从PyMongo看MongoDB Read Preference
在CAP理论与MongoDB一致性、可用性的一些思考一文中提到,MongoDB提供了一些选项,如Read Preference、Read Concern、Write Concern,对MongoDB的一致性、可用性、可靠性(durability)、性能会有较大的影响。与Read Concern、Write Concern不同的是,Read Preference基本上完全由MongoDb Driver实现,因此,本文通过PyMongo来看看Read Preference具体是如何实现的。
本文分析的PyMongo版本是PyMongo3.6,该版本兼容MongoDB3.6及以下的MongoDB。
本文地址:https://www.cnblogs.com/xybaby/p/10256812.html
Read Preference
Read preference describes how MongoDB clients route read operations to the members of a replica set.
Read Prefenrece决定了使用复制集(replica set)时,读操作路由到哪个mongod节点,如果使用Sharded Cluster,路由选择由Mongos决定,如果直接使用replica set,那么路由选择由driver决定。如下图所示:

MongoDB提供了以下Read Preference Mode:
- primary:默认模式,一切读操作都路由到replica set的primary节点
- primaryPreferred:正常情况下都是路由到primary节点,只有当primary节点不可用(failover)的时候,才路由到secondary节点。
- secondary:一切读操作都路由到replica set的secondary节点
- secondaryPreferred:正常情况下都是路由到secondary节点,只有当secondary节点不可用的时候,才路由到primary节点。
- nearest:从延时最小的节点读取数据,不管是primary还是secondary。对于分布式应用且MongoDB是多数据中心部署,nearest能保证最好的data locality。
这五种模式还受到maxStalenessSeconds和tagsets的影响。
不同的read Preference mode适合不同的应用场景,如果数据的一致性很重要,比如必须保证read-after-write一致性,那么就需要从primary读,因为secondary的数据有一定的滞后。如果能接受一定程度的stale data,那么从secondary读数据可以减轻primary的压力,且在primary failover期间也能提供服务,可用性更高。如果对延时敏感,那么适合nearest。另外,通过tagsets,还可以有更丰富的定制化读取策略,比如指定从某些datacenter读取。
PyMongo
首先给出pymongo中与read preference相关的类,方便后面的分析。
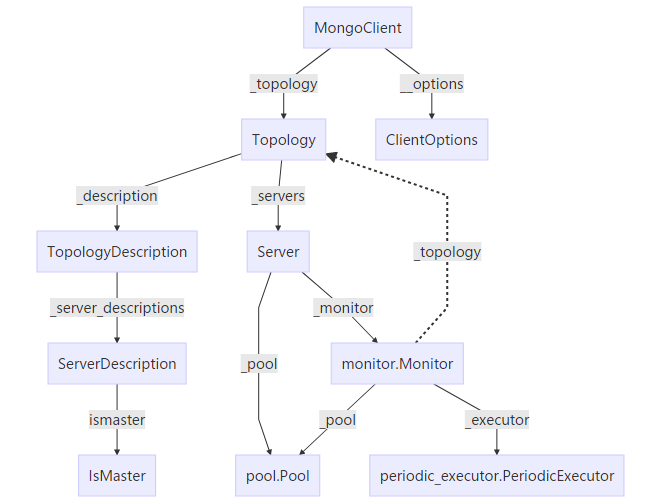
上图中实线箭头表示强引用(复合),虚线箭头表示弱引用(聚合)
connect to replica set
PyMongo的文档给出了如何连接到复制集:指定复制集的名字,以及一个或多个该复制集内的节点。如:
MongoClient('localhost', replicaset='foo')
上述操作是non-blocking,立即返回,通过后台线程去连接指定节点,PyMongo连接到节点后,会从mongod节点获取到复制集内其他节点的信息,然后再连接到复制集内的其他节点。
from time import sleep
c = MongoClient('localhost', replicaset='foo'); print(c.nodes); sleep(0.1); print(c.nodes)
frozenset([])
frozenset([(u'localhost', 27019), (u'localhost', 27017), (u'localhost', 27018)])
可以看到,刚初始化MongoClient实例时,并没有连接到任何节点(c.nodes)为空;过了一段时间,再查看,那么会发现已经连上了复制集内的三个节点。
那么问题来了,创建MongoClient后,尚未连接到复制集节点之前,能否立即操作数据库?
If you need to do any operation with a MongoClient, such as a find() or an insert_one(), the client waits to discover a suitable member before it attempts the operation.
通过后续的代码分析可以看到,会通过一个条件变量(threading.Condition)去协调。
PyMongo Monitor
上面提到,初始化MongoClient对象的时候,会通过指定的mognod节点去发现复制集内的其他节点,这个就是通过monitor.Monitor来实现的。从上面的类图可以看到,每一个server(与一个mongod节点对应)都有一个monitor。Monitor的作用在于:
- Health: detect when a member goes down or comes up, or if a different member becomes primary
- Configuration: detect when members are added or removed, and detect changes in members’ tags
- Latency: track a moving average of each member’s ping time
Monitor会启动一个后台线程 PeriodExecutor,定时(默认10s)通过socket连接Pool给对应的mongod节点发送 ismaster 消息。核心代码(略作调整)如下
def _run(self):

    self._server_description = self._check_with_retry()

    self._topology.on_change(self._server_description)

def _check_with_retry(self):

    address = self._server_description.address

    response, round_trip_time = self._check_with_socket(

                sock_info, metadata=metadata)

    self._avg_round_trip_time.add_sample(round_trip_time)  # 更新rtt

    sd = ServerDescription(

        address=address,

        ismaster=response,

        round_trip_time=self._avg_round_trip_time.get())

    return sd

def _check_with_socket(self, sock_info, metadata=None):

    """Return (IsMaster, round_trip_time).

    Can raise ConnectionFailure or OperationFailure.

    """

    cmd = SON([('ismaster', 1)])

    if metadata is not None:

        cmd['client'] = metadata

    if self._server_description.max_wire_version >= 6:

        cluster_time = self._topology.max_cluster_time()

        if cluster_time is not None:

            cmd['$clusterTime'] = cluster_time

    start = _time()

    request_id, msg, max_doc_size = message.query(

        0, 'admin.$cmd', 0, -1, cmd,

        None, DEFAULT_CODEC_OPTIONS)

    # TODO: use sock_info.command()

    sock_info.send_message(msg, max_doc_size)

    reply = sock_info.receive_message(request_id)

    return IsMaster(reply.command_response()), _time() - start
类IsMaster是对ismaster command reponse的封装,比较核心的属性包括:
- replica_set_name:从mongod节点看来,复制集的名字
- primary:从mongod节点看来,谁是Priamry
- all_hosts: 从mongod节点看来,复制集中的所有节点
- last_write_date: mongod节点最后写入数据的时间,用来判断secondary节点的staleness
- set_version:config version
- election_id:只有当mongod是primary时才会设置,表示最新的primary选举编号
当某个server的monitor获取到了在server对应的mongod上的复制集信息信息时,调用Tolopogy.on_change更新复制集的拓扑信息:
def on_change(self, server_description):

    """Process a new ServerDescription after an ismaster call completes."""

    if self._description.has_server(server_description.address):

        self._description = updated_topology_description(

            self._description, server_description)

        self._update_servers()  # 根据信息,连接到新增的节点,移除(断开)已经不存在的节点

        self._receive_cluster_time_no_lock(

            server_description.cluster_time)

        # Wake waiters in select_servers().

        self._condition.notify_all()
核心在updated_topology_description, 根据本地记录的topology信息,以及收到的server_description(来自IsMaster- ismaster command response),来调整本地的topology信息。以一种情况为例:收到一个ismaster command response,对方自称自己是primary,不管当前topology有没有primary,都会进入调用以下函数
def _update_rs_from_primary(

        sds,

        replica_set_name,

        server_description,

        max_set_version,

        max_election_id):

    """Update topology description from a primary's ismaster response.

    Pass in a dict of ServerDescriptions, current replica set name, the

    ServerDescription we are processing, and the TopologyDescription's

    max_set_version and max_election_id if any.

    Returns (new topology type, new replica_set_name, new max_set_version,

    new max_election_id).

    """

    if replica_set_name is None:

        replica_set_name = server_description.replica_set_name

    elif replica_set_name != server_description.replica_set_name:   # 不是来自同一个复制集

        # We found a primary but it doesn't have the replica_set_name

        # provided by the user.

        sds.pop(server_description.address)

        return (_check_has_primary(sds),

                replica_set_name,

                max_set_version,

                max_election_id)

    max_election_tuple = max_set_version, max_election_id

    if None not in server_description.election_tuple:

        if (None not in max_election_tuple and

                max_election_tuple > server_description.election_tuple):  # 节点是priamry,但比topology中记录的旧

            # Stale primary, set to type Unknown.

            address = server_description.address

            sds[address] = ServerDescription(address)   # 传入空dict,则server-type为UnKnown

            return (_check_has_primary(sds),

                    replica_set_name,

                    max_set_version,

                    max_election_id)

        max_election_id = server_description.election_id

    if (server_description.set_version is not None and         # 节点的config version版本更高

        (max_set_version is None or

            server_description.set_version > max_set_version)):

        max_set_version = server_description.set_version

    # We've heard from the primary. Is it the same primary as before?

    for server in sds.values():

        if (server.server_type is SERVER_TYPE.RSPrimary

                and server.address != server_description.address):

            # Reset old primary's type to Unknown.

            sds[server.address] = ServerDescription(server.address)

            # There can be only one prior primary.

            break

    # Discover new hosts from this primary's response.

    for new_address in server_description.all_hosts:

        if new_address not in sds:

            sds[new_address] = ServerDescription(new_address)

    # Remove hosts not in the response.

    for addr in set(sds) - server_description.all_hosts:

        sds.pop(addr)

    # If the host list differs from the seed list, we may not have a primary

    # after all.

    return (_check_has_primary(sds),

            replica_set_name,

            max_set_version,

            max_election_id)
注意看docstring中的Returns,都是返回新的复制集信息
那么整个函数从上往下检查
- 是不是同一个复制集
- 新节点(自认为是primary)与topology记录的primary相比,谁更新。比较(set_version, election_id)
- 比较set_servion
- 如果topology中已经有stale primary,那么将其server-type改成Unknown
- 从Primary节点的all_hosts中取出新加入复制集的节点
- 移除已经不存在于复制集中的节点
PyMongo关于复制集的状态都来自于所有节点的ismaster消息,Source of Truth在于复制集,而且这个Truth来自于majority 节点。因此,某个节点返回给driver的信息可能是过期的、错误的,driver通过有限的信息判断复制集的状态,如果判断失误,比如将写操作发到了stale primary上,那么会在复制集上再次判断,保证正确性。
PyMongo read preference
前面详细介绍了PyMongo是如何更新复制集的信息,那么这一部分来看看基于拓扑信息具体是如何根据read preference路由到某个节点上的。
我们从Collection.find出发,一路跟踪, 会调用MongoClient._send_message_with_response
    def _send_message_with_response(self, operation, read_preference=None,

                                    exhaust=False, address=None):

        topology = self._get_topology()

        if address:

            server = topology.select_server_by_address(address)

            if not server:

                raise AutoReconnect('server %s:%d no longer available'

                                    % address)

        else:

            selector = read_preference or writable_server_selector

            server = topology.select_server(selector)

        return self._reset_on_error(

            server,

            server.send_message_with_response,

            operation,

            set_slave_ok,

            self.__all_credentials,

            self._event_listeners,

            exhaust)
代码很清晰,根据指定的address或者read_preference, 选择出server,然后通过server发请求,等待回复。topology.select_server一路调用到下面这个函数
def _select_servers_loop(self, selector, timeout, address):

    """select_servers() guts. Hold the lock when calling this."""

    now = _time()

    end_time = now + timeout

    server_descriptions = self._description.apply_selector(  # _description是TopologyDescription

        selector, address)

    while not server_descriptions:

        # No suitable servers.

        if timeout == 0 or now > end_time:

            raise ServerSelectionTimeoutError(

                self._error_message(selector))

        self._ensure_opened()

        self._request_check_all()

        # Release the lock and wait for the topology description to

        # change, or for a timeout. We won't miss any changes that

        # came after our most recent apply_selector call, since we've

        # held the lock until now.

        self._condition.wait(common.MIN_HEARTBEAT_INTERVAL) # Conditional.wait

        self._description.check_compatible()

        now = _time()

        server_descriptions = self._description.apply_selector(

            selector, address)

    self._description.check_compatible()

    return server_descriptions
可以看到,不一定能一次选出来,如果选不出server,意味着此时还没有连接到足够多的mongod节点,那么等待一段时间(_condition.wait)重试。在上面Topology.on_change 可以看到,会调用_condition.notify_all唤醒。
def apply_selector(self, selector, address):

    def apply_local_threshold(selection):

        if not selection:

            return []

        settings = self._topology_settings

        # Round trip time in seconds.

        fastest = min(

            s.round_trip_time for s in selection.server_descriptions)

        threshold = settings.local_threshold_ms / 1000.0

        return [s for s in selection.server_descriptions

                if (s.round_trip_time - fastest) <= threshold]

    # 省略了无关代码...

    return apply_local_threshold(

        selector(Selection.from_topology_description(self)))
上面selector就是read_preference._ServerMode的某一个子类,以Nearest为例
class Nearest(_ServerMode):

    def __call__(self, selection):

        """Apply this read preference to Selection."""

        return member_with_tags_server_selector(

            self.tag_sets,

            max_staleness_selectors.select(

                self.max_staleness, selection))
首先要受到maxStalenessSeconds的约束,然后再用tagsets过滤一遍,这里只关注前者。
关于maxStalenessSeconds
The read preference maxStalenessSeconds option lets you specify a maximum replication lag, or “staleness”, for reads from secondaries. When a secondary’s estimated staleness exceeds maxStalenessSeconds, the client stops using it for read operations.
怎么计算的,如果节点有primary,则调用下面这个函数
def _with_primary(max_staleness, selection):

    """Apply max_staleness, in seconds, to a Selection with a known primary."""

    primary = selection.primary

    sds = []

    for s in selection.server_descriptions:

        if s.server_type == SERVER_TYPE.RSSecondary:

            # See max-staleness.rst for explanation of this formula.

            staleness = (

                (s.last_update_time - s.last_write_date) -

                (primary.last_update_time - primary.last_write_date) +

                selection.heartbeat_frequency)

            if staleness <= max_staleness:

                sds.append(s)

        else:

            sds.append(s)

    return selection.with_server_descriptions(sds)
上面的代码用到了IsMaster的last_write_date属性,正是用这个属性来判断staleness。
公式的解释可参考max-staleness.rst
个人觉得可以这么理解:假设网络延时一致,如果在同一时刻收到心跳回复,那么只用P.lastWriteDate - S.lastWriteDate就行了,但心跳时间不同,所以得算上时间差。我会写成(P.lastWriteDate - S.lastWriteDate) + (S.lastUpdateTime - P.lastUpdateTime) 。加上 心跳间隔是基于悲观假设,如果刚心跳完之后secondary就停止复制,那么在下一次心跳之前最多的stale程度就得加上 心跳间隔。
从代码可以看到Nearest找出了所有可读的节点,然后通过apply_local_threshold函数来刷选出最近的。
references
从PyMongo看MongoDB Read Preference的更多相关文章
- pymongo连接MongoDB
导语 pymongo 是目前用的相对普遍一个python用来连接MongoDB的库,是工作中各种基本需求都能满足具体api可以参考 pymongo APIpymongo github 安装 Mongo ...
- python操作三大主流数据库(8)python操作mongodb数据库②python使用pymongo操作mongodb的增删改查
python操作mongodb数据库②python使用pymongo操作mongodb的增删改查 文档http://api.mongodb.com/python/current/api/index.h ...
- Python 使用pymongo操作mongodb库
Python 使用pymongo操作mongodb库 2016-12-31 21:55 1115人阅读 评论(0) 收藏 举报 分类: - - - Python(10) 版权声明:本文为博主原创文 ...
- MongoDB学习【四】—pymongo操作mongodb数据库
一.pymongodb的安装 Python 要连接 MongoDB 需要 MongoDB 驱动,这里我们使用 PyMongo 驱动来连接. pip安装 pip 是一个通用的 Python 包管理工具, ...
- pymongo操作mongodb
此验证中只开启两个mongodb节点,可以连接任意节点,以下操作不涉及读写,不涉及连接那个节点 mongodb连接: from pymongo import MongoReplicaSetClient ...
- 使用pymongo连接mongodb时报错:pymongo.errors.OperationFailure: not authorized
连接本机或局域网部署的mongodb时可以用以下方法: from urllib import parse from pymongo import MongoClient host = '*.*.*.* ...
- pymongo 对mongoDB的操作
#文档地址 http://api.mongodb.com/python/current/api/pymongo/collection.html collection级别的操作: find_and _m ...
- Mongodb-- python中使用pymongo连接mongodb数据库
一.使用 通过pip或者pychrm下载pymongo模块 import json from pymongo import MongoClient from bson import ObjectId ...
- 从PHP客户端看MongoDB通信协议(转)
MongoDB 的 PHP 客户端有一个 MongoCursor 类,它是用于获取一次查询结果集的句柄(或者叫游标),这个简单的取数据操作,内部实现其实不是那么简单.本文就通过对 MongoCurso ...
随机推荐
- ES6躬行记(14)——函数
在前面的章节中,已陆陆续续介绍了ES6为改良函数而引入的几个新特性,本章将会继续讲解ES6对函数的其余改进,包括默认参数.元属性.块级函数和箭头函数等. 一.默认参数 在ES5时代,只能在函数体中定义 ...
- 【Angular专题】——(2)【译】Angular中的ForwardRef
原文地址:https://blog.thoughtram.io/angular/2015/09/03/forward-references-in-angular-2.html 作者:Christoph ...
- Linq实现左连接、右连接
--一本错误的记录 insert into Book values('错误时怎样练成的',111) --左连接 select s.name,b.name from student as s lef ...
- [PHP] 魔术方法__get __set __sleep __wakeup的实际使用
1.__get __set是在给不可访问属性赋值和读取时,调用 2.__sleep 是在序列化对象的时候调用 3.__wakeup是在反序列化对象的时候调用 4.可以在序列化对象的时候 , 只序列化指 ...
- MySQL中 and or 查询的优先级
这个可能是容易被忽略的问题,首选我们要清楚:MySQL中,AND的执行优先级高于OR.也就是说,在没有小括号()的限制下,总是优先执行AND语句,再执行OR语句.比如: select * from t ...
- TensorFlow资料汇总
升级mac自带的python 使用virtualenv进行python环境隔离 tf.nn.conv2d.卷积函数 max_pool 池化函数 TF.VARIABLE.TF.GET_VARIABLE. ...
- 委托(2).net 1.x中的委托
上一篇已经演示了使用委托实现一个多语言问候的程序,这一篇文章来总结一下在.net 1.x中委托的使用方法. 既然委托是一个类型(class),那么它就要经历像类一个先声明,然后new一个对象,最后调用 ...
- 基于element-tree-table树型表格点击节点请求数据展开树型表格
效果: 引用CSS.JS: Vue.element-ui.Axios treeTable: https://github.com/ProsperLee/element-tree-grid 模拟根据父i ...
- 介绍Dynamics 365 Performance Center
关注本人微信和易信公众号: 微软动态CRM专家罗勇 ,回复257或者20170517可方便获取本文,同时可以在第一间得到我发布的最新的博文信息,follow me!我的网站是 www.luoyong. ...
- arcgis api 3.x for js 入门开发系列十三地图最短路径分析(附源码下载)
前言 关于本篇功能实现用到的 api 涉及类看不懂的,请参照 esri 官网的 arcgis api 3.x for js:esri 官网 api,里面详细的介绍 arcgis api 3.x 各个类 ...