HAProxy 代理负载均衡
HAProxy
HAProxy是免费 高效 可靠的高可用及负载均衡解决方案,该软件非常适合于处理高负载
站点的七层数据请求,HAProxy的工作模式使其可以非常容易且安全地集成到我们现有的站点
架构中。使用类似的代理软件还可以对外屏蔽内部真实Web服务器,防止内部服务器遭受外部攻击
Haproxy有8种负载均衡算法(balance),分别如下:
1.balance roundrobin # 轮询,软负载均衡基本都具备这种算法
2.balance static-rr # 根据权重,建议使用
3.balance leastconn # 最少连接者先处理,建议使用
4.balance source # 根据请求源IP,建议使用
5.balance uri # 根据请求的URI
6.balance url_param,# 根据请求的URl参数'balance url_param' requires an URL parameter name
7.balance hdr(name) # 根据HTTP请求头来锁定每一次HTTP请求
8.balance rdp-cookie(name) # 根据据cookie(name)来锁定并哈希每一次TCP请求
由于负载请求分发到不同服务器,可能导致Session会话不同步的问题,若想实现会话共享或保持,可采用如下3种方式:
1.用户IP 识别
haroxy 将用户IP经过hash计算后 指定到固定的真实服务器上(类似于nginx 的IP hash 指令)
配置指令
balance source
2.Cookie 识别
haproxy 将WEB服务端发送给客户端的cookie中插入(或添加加前缀)haproxy定义的后端的服务器COOKIE ID。
配置指令例举
cookie SESSION_COOKIE insert indirect nocache
用firebug可以观察到用户的请求头的cookie里 有类似” Cookie jsessionid=0bc588656ca05ecf7588c65f9be214f5; SESSION_COOKIE=app1” SESSION_COOKIE=app1就是haproxy添加的内容
3.Session 识别
haproxy 将后端服务器产生的session和后端服务器标识存在haproxy中的一张表里。客户端请求时先查询这张表。
配置指令例举
appsession JSESSIONID len 64 timeout 5h request-learn
安装部署HAProxy
环境准备:两台机器
linux-node1.example.com 192.168.56.11
linux-node2.example.com 192.168.56.12
第一台
[root@linux-node1 ~]# cat /etc/redhat-release

CentOS Linux release 7.2. (Core)

[root@linux-node1 ~]# uname -r

3.10.-.el7.x86_64

关闭防火墙及SELIUNX

#systemctl disable firewalld

#systemctl disable NetworkManager

# cat /etc/selinux/config

SELINUX=disabled

安装依赖包epel

rpm -ivh http://mirrors.aliyun.com/epel/epel-release-latest-7.noarch.rpm

yum -y install net-tools vim lrzsz tree screen lsof tcpdump nc mtr nmap wget gcc glibc gcc-c++ make
第二台
[root@linux-node2 ~]# cat /etc/redhat-release

CentOS Linux release 7.2. (Core)

[root@linux-node2 ~]# uname -r

3.10.-.el7.x86_64

关闭防火墙及SELIUNX

#systemctl disable firewalld

#systemctl disable NetworkManager

# cat /etc/selinux/config

SELINUX=disabled

安装系统依赖包

#rpm -ivh http://mirrors.aliyun.com/epel/epel-release-latest-7.noarch.rpm
#yum -y install net-tools vim lrzsz tree screen lsof tcpdump nc mtr nmap wget gcc glibc gcc-c++ make
部署应用
在两台机器部署apache作为RS
linux-node1.example.com
[root@linux-node1 ~]# yum -y install httpd

[root@linux-node1 ~]# vim /etc/httpd/conf/httpd.conf

ServerName 192.168.56.11

Listen

[root@linux-node1 ~]# systemctl enable httpd

[root@linux-node1 ~]# systemctl start httpd

[root@linux-node1 ~]# echo "chuck-test1" > /var/www/html/index.html

[root@linux-node1 ~]# netstat -tunlp | grep httpd

tcp6              :::                 :::*                    LISTEN      /httpd

[root@linux-node1 ~]# curl http://192.168.56.11:8080

chuck-test1
linux-node2.example.com
[root@linux-node2 ~]# yum -y install httpd

[root@linux-node2 ~]# vim /etc/httpd/conf/httpd.conf

ServerName 192.168.56.12

Listen

[root@linux-node2 ~]# systemctl enable httpd

[root@linux-node2 ~]# systemctl start httpd

[root@linux-node2 ~]# echo "chuck-test2" > /var/www/html/index.html

[root@linux-node2 ~]# netstat -tunlp | grep httpd

tcp6              :::                 :::*                    LISTEN      /httpd

[root@linux-node2 ~]# curl http://192.168.56.12:8080

chuck-test2
Linux-node1上面安装HAProxy软件
[root@linux-node1 ~]# cd /usr/local/src/

[root@linux-node1 src]# wget http://www.haproxy.org/download/1.6/src/haproxy-1.6.3.tar.gz

[root@linux-node1 src]# tar zxf haproxy-1.6..tar.gz

[root@linux-node1 src]# cd haproxy-1.6.

[root@linux-node1 haproxy-1.6.]# make TARGET=linux2628 PREFIX=/usr/local/haproxy-1.6.

[root@linux-node1 haproxy-1.6.]# make install

[root@linux-node1 haproxy-1.6.]# cp /usr/local/sbin/haproxy /usr/sbin/

[root@linux-node1 haproxy-1.6.]# haproxy -v

HA-Proxy version 1.6. //

Copyright - Willy Tarreau <willy@haproxy.org>
编辑haproxy启动脚本
[root@linux-node1 haproxy-1.6.]# cd /usr/local/src/haproxy-1.6.

[root@linux-node1 haproxy-1.6.]# cp examples/haproxy.init /etc/init.d/haproxy

[root@linux-node1 haproxy-1.6.]# chmod  /etc/init.d/haproxy
针对配置文件下的路径创建目录
[root@linux-node1 ~]# useradd -r haproxy

[root@linux-node1 ~]# mkdir /etc/haproxy

[root@linux-node1 ~]# mkdir /var/lib/haproxy

[root@linux-node1 ~]# mkdir /var/run/haproxy
编辑haproxy配置文件,配置log,并启动
[root@linux-node1 ~]# cd /etc/haproxy/

[root@linux-node1 haproxy]# cat haproxy.cfg

global

#全局配置,在所有配置段中都生效

    log 127.0.0.1 local3 info

#记录日志

    chroot /var/lib/haproxy

    user haproxy

    group haproxy

    daemon

defaults

#默认配置,可以被前端和后端继承

    log global

#使用global的log设置

    mode http

#使用http模式,也可以使用tcp模式

    option httplog

#启动http请求的log

    option dontlognull

#在日志中不记录空连接(空连接:健康检查的链接)

    timeout connect

 #长连接超时时间

    timeout client

#客户端连接超时

    timeout server

#RS连接超时

frontend www_chuck-blog_com

#前端配置 + 一个配置段的名字(最好不要乱写,和项目直接相关最佳)

    mode http

    #使用http模式,也可以使用tcp模式

    bind *:

#监听80端口

    stats uri /haproxy?stats

    #状态页面dashboard

    default_backend www_chuck-blog_com_backend

#对应的backend名称

backend www_chuck-blog_com_backend

#对应的frontend的default_backend

#source cookie SERVERID

    option httpchk GET /index.html

#设置检测url的详细的页面

    balance roundrobin

#使用rr负载均衡方式

    server linux-node1 192.168.56.11: check inter  rise  fall  weight

    server linux-node2 192.168.56.12: check inter  rise  fall  weight

#RS健康检测时间间隔2秒,重试三次,失败三次不可用,权重1
打开rsyslog配置文件的注释
[root@linux-node1 haproxy]# vim /etc/rsyslog.conf

 $ModLoad imudp #打开注释

 $UDPServerRun  #打开注释

local7.* /var/log/boot.log

#在此行的下面添加如下内容

local3.* /var/log/haproxy.log

 #local3的路径
启动HAProxy
[root@linux-node1 haproxy]# systemctl restart rsyslog.service

[root@linux-node1 haproxy]# /etc/init.d/haproxy start
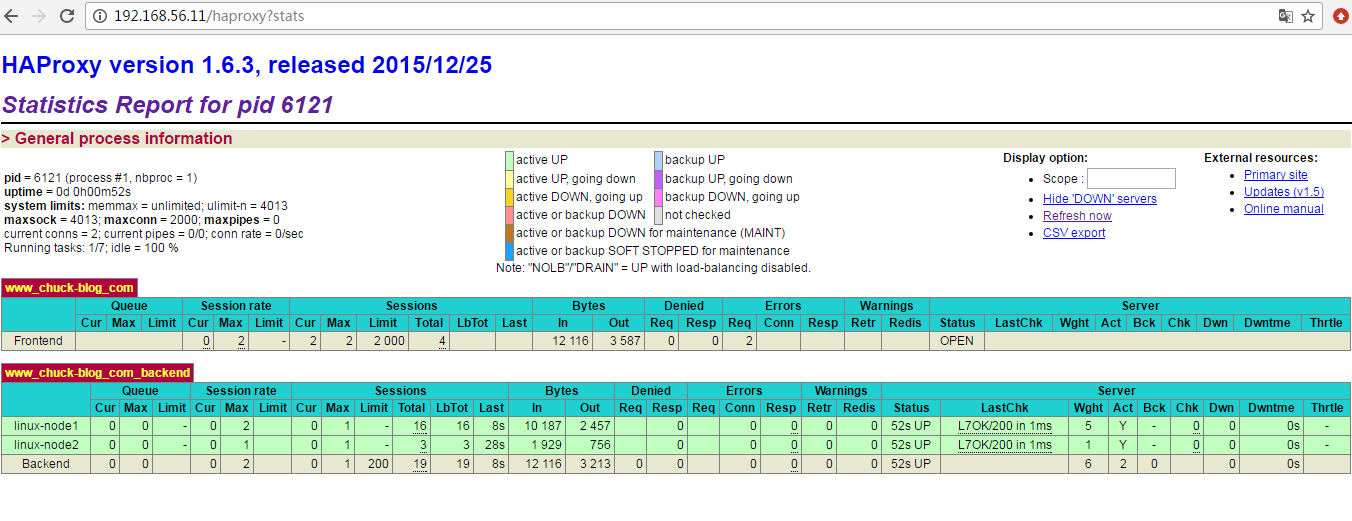
检查是否成功


查看检测状态

通过ACL设置虚拟主机
通过acl设置虚拟主机,一个前端可以对应多个后端
[root@linux-node1 haproxy]# cat haproxy.cfg

global

    log 127.0.0.1 local3 info

    chroot /var/lib/haproxy

    user haproxy

    group haproxy

    daemon

defaults

    log global

    mode http

    option httplog

    option dontlognull

    timeout connect

    timeout client

    timeout server

frontend www_chuck-blog_com

    mode http

    bind *:

    stats uri /haproxy?stats
   #默认的backend

    default_backend www_chuck-blog_com_backend

    acl is_other_chuck-blog_com hdr_end(host) other.chuck-blog.com
  #is_other_chuck-blog_com:给此acl起一个名字;hdr(host):固定格式,用来识别host,如果没有匹配到acl,即访问default的bankcend

    use_backend other_chuck-blog_com_backend if is_other_chuck-blog_com
  #use_backend:关键词,使用哪个banckend;other_chuck-blog_com_backend:指定哪个backend的名称;if is_other_chuck-blog_com:用来判断acl

backend www_chuck-blog_com_backend

    option forwardfor header X-REAL-IP

    option httpchk GET /index.html

    balance roundrobin

    server linux-node1 192.168.56.11: check inter  rise  fall  weight

backend other_chuck-blog_com_backend

    option forwardfor header X-REAL-IP

    option httpchk GET /index.html

    balance roundrobin

    server linux-node2 192.168.56.12: check inter  rise  fall  weight
重启
[root@linux-node1 ~]# systemctl reload haproxy
在本地电脑使用host解析
192.168.56.11 www.chuck-blog.com other.chuck-blog.com
通过浏览器访问不同的域名


在fortend添加acl,根据静态文件,设置不同的backend(类似于location),注释的两行和前两行的意义相同
分别是通过url正则匹配和url的后缀匹配
acl is_static_reg url_reg /*.(css|jpg|png|js|jpeg|gif)$

use_backend other_chuck-blog_com_backend if is_static_reg

#acl is_static_path path_end .gif .png .css .jpg .jpeg

#use_backend other_chuck-blog_com_backend if is_static_path

[root@linux-node2 ~]# echo "This is a static test page " >/var/www/html/abc.js
[root@linux-node1 ~]# /etc/init.d/haproxy restart
打开浏览器查看

其它ACL 可以查看百度
acl is_do_path url_reg /chuck.do

use_backend other_chuck-blog_com_backend if is_do_path

acl is_UA_path hdr_reg(User-Agent) -i andriod #基于安卓手机

use_backend other_chuck-blog_com_backend if is_UA_path
HAProxy动态维护
在配置文件添加socket
[root@linux-node1 haproxy]# head - haproxy.cfg

global

    log 127.0.0.1 local3 info

    chroot /var/lib/haproxy

    user haproxy

    group haproxy

    daemon

    stats socket /var/lib/haproxy/haproxy.sock mode 600 level admin
  #指定socket文件路径,权限,管理级别

    stats timeout 2m
  #指定超时时间
重启服务生效
[root@linux-node1 haproxy]# /etc/init.d/haproxy restart
安装socat连接haproxy.sock文件
[root@linux-node1 ~]yum install -y socat
使用help查看socat的事情
[root@linux-node1 haproxy]# echo "help" |socat stdio /var/lib/haproxy/haproxy.sock

Unknown command. Please enter one of the following commands only :

  clear counters : clear max statistics counters (add 'all' for all counters)

  clear table    : remove an entry from a table

  help           : this message

  prompt         : toggle interactive mode with prompt

  quit           : disconnect

  show backend   : list backends in the current running config

  show info      : report information about the running process #查看所有信息

  show pools     : report information about the memory pools usage  #查看所有poll

  show stat      : report counters for each proxy and server        #显示状态

  show errors    : report last request and response errors for each proxy

  show sess [id] : report the list of current sessions or dump this session

  show table [id]: report table usage stats or dump this table's contents

  show servers state [id]: dump volatile server information (for backend <id>)

  get weight     : report a server's current weight    #获得权重信息

  set weight     : change a server's weight            #设置权重

  set server     : change a server's state, weight or address      #改变一个server的转态权重或地址

  set table [id] : update or create a table entry's data

  set timeout    : change a timeout setting

  set maxconn    : change a maxconn setting

  set rate-limit : change a rate limiting value

  disable        : put a server or frontend in maintenance mode        #将一个server或者fortend置于维护模式

  enable         : re-enable a server or frontend which is in maintenance mode      #启用一个维护状态的server或者frontend

  shutdown       : kill a session or a frontend (eg:to release listening ports)

  show acl [id]  : report avalaible acls or dump an acl's contents

  get acl        : reports the patterns matching a sample for an ACL

  add acl        : add acl entry

  del acl        : delete acl entry

  clear acl <id> : clear the content of this acl

  show map [id]  : report avalaible maps or dump a map's contents

  get map        : reports the keys and values matching a sample for a map

  set map        : modify map entry

  add map        : add map entry

  del map        : delete map entry

  clear map <id> : clear the content of this map

  set ssl <stmt> : set statement for ssl
设置监控
查看info信息,内容值可以利用来监控
[root@linux-node1 haproxy]# echo "show info" |socat stdio /var/lib/haproxy/haproxy.sock

Name: HAProxy

Version: 1.6.

Release_date: //

Nbproc:

Process_num:

Pid:

Uptime: 0d 0h16m20s

Uptime_sec:

Memmax_MB:

Ulimit-n:

Maxsock:

Maxconn:

Hard_maxconn:

CurrConns:

CumConns:

CumReq:

Maxpipes:

PipesUsed:

PipesFree:

ConnRate:

ConnRateLimit:

MaxConnRate:

SessRate:

SessRateLimit:

MaxSessRate:

CompressBpsIn:

CompressBpsOut:

CompressBpsRateLim:

Tasks:

Run_queue:

Idle_pct:

node: linux-node1.example.com

description:
关闭主机
关闭linux-node2主机
[root@linux-node1 haproxy]# echo "disable server other_chuck-blog_com_backend/linux-node2" |socat stdio /var/lib/haproxy/haproxy.sock

[root@linux-node1 haproxy]#

Message from syslogd@localhost at Dec   :: ...

 haproxy[]: backend other_chuck-blog_com_backend has no server available!

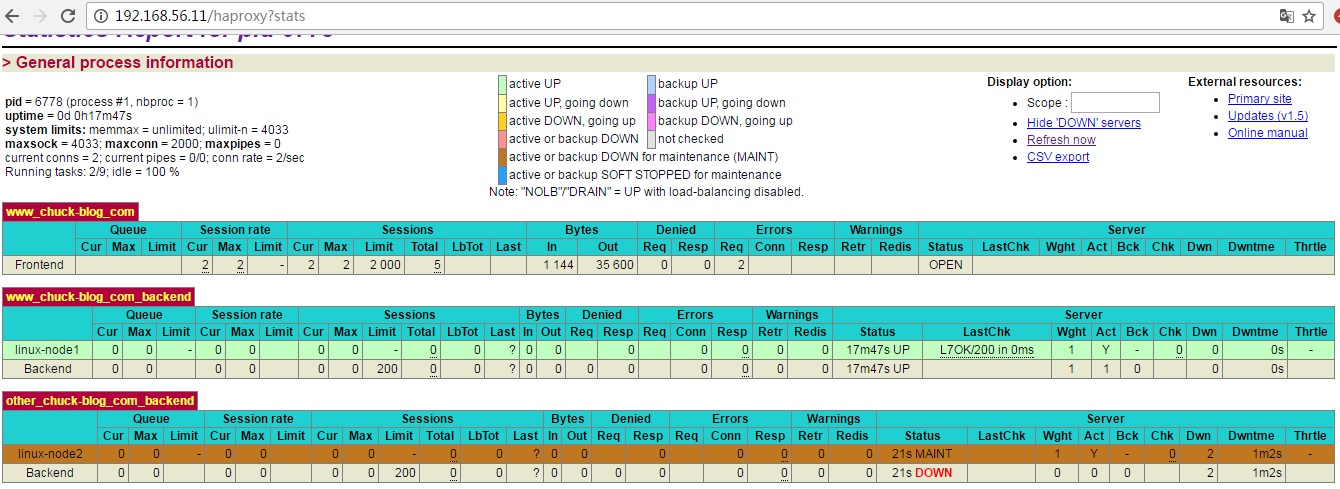
可以看到 linux -node2 进入了维护maintain状态
开启主机
打开linux-node2主机(只对现有的server生效,不能用来新增节点)
[root@linux-node1 haproxy]# echo "enable server other_chuck-blog_com_backend/linux-node2" |socat stdio /var/lib/haproxy/haproxy.sock
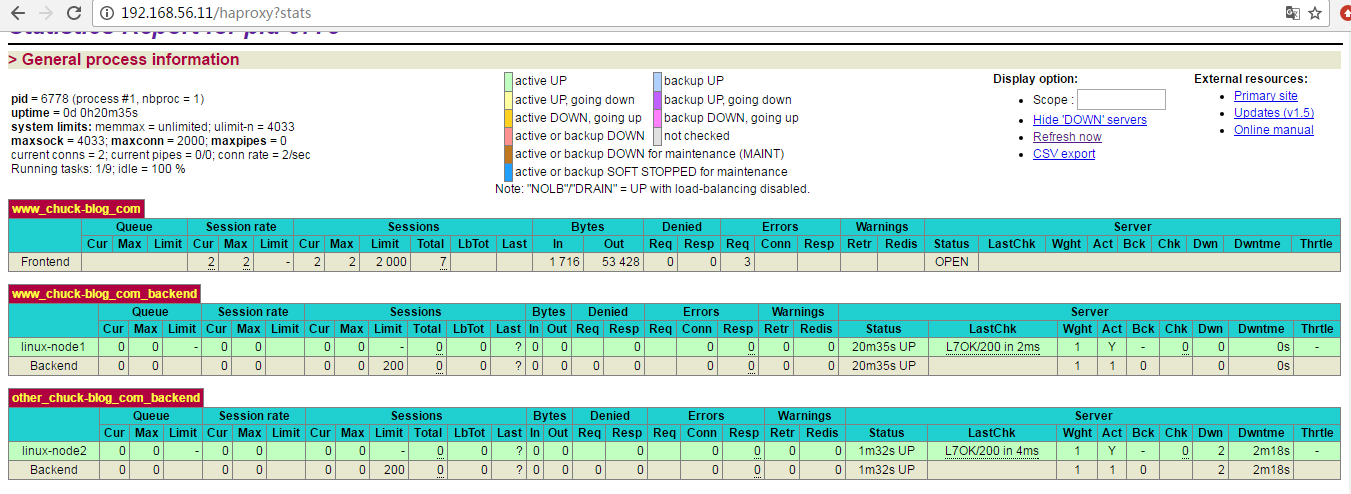
可以看到linux-node2恢复正常

生产问题
haproxy的本地端口可能用尽,解决方案
1)更改local的端口范围,调整内核参数
[root@linux-node1 haproxy]# cat /proc/sys/net/ipv4/ip_local_port_range
2)调整timewait的端口复用,设置为1
[root@linux-node1 haproxy]# cat /proc/sys/net/ipv4/tcp_tw_reuse
3)缩短tcp_wait的时间,并不建议修改
[root@linux-node1 haproxy]# cat /proc/sys/net/ipv4/tcp_fin_timeout
4)终极方案:增加为多个ip,自然端口数就够了
haproxy对比nginx
nginx
优点:
1 web服务器,应用比较广泛
2 7层负载均衡,location设置复杂的基于HTTP的负载均衡
3 性能强大,网络依赖小
4 安装配置简单
缺点
1 监控检查单一
2 负载均衡算法少
3 不能动态管理
4 没有集群upstream的状态页面
haproxy
优点
1 专门做负载均衡
2 负载均衡算法多
3 性能>=nginx
4 通过和haproxy socker通信进行动态管理
5 有比较丰富的dashboard页面
6 强大的7层代理
缺点
1 配置没有nginx简单
2 应用没有nginx广泛
提示:很多CDN会使用LVS+Haproxy来做负载均衡
HAProxy 代理负载均衡的更多相关文章
- 基于 Haproxy 构建负载均衡集群
1.HAPROXY简介 HAProxy提供高可用性.负载均衡以及基于TCP和HTTP应用的代理,支持虚拟主机,它是免费.快速并且可靠的一种负载均衡解决方案.HAProxy特别适用于那些负载特大的web ...
- 实现基于Haproxy+Keepalived负载均衡高可用架构
1.项目介绍: 上上期我们实现了keepalived主从高可用集群网站架构,随着公司业务的发展,公司负载均衡服务已经实现四层负载均衡,但业务的复杂程度提升,公司要求把mobile手机站点作为单独的服务 ...
- 05.haproxy+mysql负载均衡 整合 redis集群+ssm
本篇重点讲解haproxy+mysql负载均衡,搭建完成后与之前搭建的redis+ssm进行整合 (注:这里用到了两台mysql数据库,分别安装两台虚拟机上,已经成功实现主主复制,如果有需要,请查看我 ...
- Haproxy+Keepalived负载均衡
Haproxy介绍 HAProxy是一个特别适用于高可用性环境的TCP/HTTP开源的反向代理和负载均衡软件.在7层负载均衡方面的功能很强大(支持cookie track, header rewrit ...
- centos7使用haproxy1.7.5实现反向代理负载均衡实战
使用haproxy实现反向代理负载均衡实战环境准备:两台虚拟机 # yum install -y gcc glibc gcc-c++ make screen tree lrzsz node1源码编译安 ...
- LNMP+HAProxy+Keepalived负载均衡 - LNMP基础环境准备
环境版本说明: 服务器系统:CentOS 7.5: ``` cat /etc/redhat-release CentOS Linux release 7.5.1804 (Core) # 输出结果 `` ...
- Haproxy 构建负载均衡集群
1.HAPROXY简介 HAProxy提供高可用性.负载均衡以及基于TCP和HTTP应用的代理,支持虚拟主机,它是免费.快速并且可靠的一种负载均衡解决方案.HAProxy特别适用于那些负载特大的web ...
- Nginx,Haproxy/lvs负载均衡的优缺点分析
PS:Nginx/LVS/HAProxy是目前使用最广泛的三种负载均衡软件,本人都在多个项目中实施过,参考了一些资料,结合自己的一些使用经验,总结一下. 一般对负载均衡的使用是随着网站规模的提升根据不 ...
- 反向代理负载均衡之nginx
一.集群 1.1 什么是集群 集群是一组相互独立的.通过高速网络互联的计算机,它们构成了一个组,并以单一系统的模式加以管理.一个客户与集群相互作用时,集群像是一个独立的服务器.集群配置是用于提高可用性 ...
随机推荐
- JavaEE:XML解析
XML解析技术概述1.XML 技术主要企业应用1)存储和传输数据 2)作为框架的配置文件2.使用xml 存储和传输数据涉及到以下两点1)通过程序生成xml2)读取xml 中数据 ---- xml 解析 ...
- 一步步学习Python-django开发-添加后台管理
Pyhon-djano提供了一个很强大的后台管理功能,你很轻松的就可以拥有一个后台管理平台.你需要做啥呢?你只需要将需要管理员进行管理的表注册到管理site中即可: from django.contr ...
- 使用WPF教你一步一步实现连连看
使用WPF教你一步一步实现连连看(一) 第一步: 问题,怎样动态的建立一个10*10的grid(布局) for (int i = 0; i < 10; i++){ RowDefinition r ...
- 重复弹Toast的解决方案
虽然网上有很多了,还是记录一下吧, 解决思路:不用计算Toast的时间之类的,就是定义一个全局的成员变量Toast, 这个Toast不为null的时候才去make,否则直接setText.为了按返回键 ...
- hdu 3074 Multiply game(模板级线段树)
离机房关门还有十分钟,这点时间能干些什么?故作沉思地仰望星空,重新捋一下一天的学习进度,或者,砍掉一棵模板级线段树. 纯模板,就是把单点更新,区间求和改为单点更新,区间求积. 1A. #include ...
- <meta>标签的作用
<META> 是放于 <HEAD> 与 </HEAD>之间的标记,功用与变化等对,所以我公式化地介绍. <meta name="Descriptio ...
- linux:C语言通过ICMP协议判断局域网内部主机是否存活
ICMP协议 ICMP(Internet Control Message,网际控制报文协议)是为网关和目标主机而提供的一种差错控制机制,使它们在遇到差错时能把错误报告给报文源发方. ICMP协议是IP ...
- hdu1044
#include <cstdio> #include <cstring> #include <queue> using namespace std; const i ...
- OSI模型第四层传输层--UDP协议
1.udp协议 UDP是OSI参考模型中一种无连接的传输层协议,它主要用于不要求分组顺序到达的传输中,分组传输顺序的检查与排序由应用层完成[2] ,提供面向事务的简单不可靠信息传送服务.UDP 协议 ...
- 学习Sass(二)
前面简单介绍了sass的安装,特点和使用方法等,这里记录下sass的基本语法. 1.变量 2.运算 3.嵌套 4.代码复用 5.高级语法 6.自定义函数 一.变量 变量以$开始,像css属性那样赋值, ...
