多线程爬坑之路-Thread和Runable源码解析之基本方法的运用实例
前面的文章:多线程爬坑之路-学习多线程需要来了解哪些东西?(concurrent并发包的数据结构和线程池,Locks锁,Atomic原子类)
前面大致的了解了Thread的一些方法和属性下面对一些方法进行运用看看具体效果<下面可能还是会贴很多的源代码,其实我是拒绝的,我只想贴每个方法的代码,但是有时候看到一个方法里面有调用了方法,但是笔者有没有给出来,很蛋疼,有种爽到一半的感觉,所以我还是会把它贴出来,希望一次就能挖到底,不论有没有全懂,但至少懂了几分。>
activeCount():返回当前线程所属线程组的活动线程数
源代码如下:
  /**

      * Returns an estimate of the number of active threads in the current

      * thread's {@linkplain java.lang.ThreadGroup thread group} and its

      * subgroups. Recursively iterates over all subgroups in the current

      * thread's thread group.

      *

      * <p> The value returned is only an estimate because the number of

      * threads may change dynamically while this method traverses internal

      * data structures, and might be affected by the presence of certain

      * system threads. This method is intended primarily for debugging

      * and monitoring purposes.

      *

      * @return  an estimate of the number of active threads in the current

      *          thread's thread group and in any other thread group that

      *          has the current thread's thread group as an ancestor

      */

     public static int activeCount() {

         return currentThread().getThreadGroup().activeCount();

     }
这个静态方法先调用了一个currentThread()方法获取当前线程,然后调用了getThreadgroup()获取线程组,最后调用了activeCount()方法获取活动线程数。下面是调用的方法的具体实现,native方法调用的是VM的实现,需要下载VM的源码才能查看,这里先略过。
/**

     * Returns a reference to the currently executing thread object.

     *

     * @return  the currently executing thread.

     */

    public static native Thread currentThread();

/**

     * Returns the thread group to which this thread belongs.

     * This method returns null if this thread has died

     * (been stopped).

     *

     * @return  this thread's thread group.

     */

    public final ThreadGroup getThreadGroup() {

        return group;

    }

/**

     * Returns an estimate of the number of active threads in this thread

     * group and its subgroups. Recursively iterates over all subgroups in

     * this thread group.

     *

     * <p> The value returned is only an estimate because the number of

     * threads may change dynamically while this method traverses internal

     * data structures, and might be affected by the presence of certain

     * system threads. This method is intended primarily for debugging

     * and monitoring purposes.

     *

     * @return  an estimate of the number of active threads in this thread

     *          group and in any other thread group that has this thread

     *          group as an ancestor

     *

     * @since   JDK1.0

     */

    public int activeCount() {

        int result;

        // Snapshot sub-group data so we don't hold this lock

        // while our children are computing.

        int ngroupsSnapshot;

        ThreadGroup[] groupsSnapshot;

        synchronized (this) {

            if (destroyed) {

                return 0;

            }

            result = nthreads;

            ngroupsSnapshot = ngroups;

            if (groups != null) {

                groupsSnapshot = Arrays.copyOf(groups, ngroupsSnapshot);

            } else {

                groupsSnapshot = null;

            }

        }

        for (int i = 0 ; i < ngroupsSnapshot ; i++) {

            result += groupsSnapshot[i].activeCount();

        }

        return result;

    }
方法的使用:
 /**

  * thread method test

  * @author Ljcx

  *

  */

 public class ThreadMethord implements Runnable{

     @Override

     public void run() {

         System.out.println("");

         try {

             Thread.sleep(1000);

         } catch (InterruptedException e) {

             e.printStackTrace();

         }

     }

     public static void main(String[] args) {

         ThreadMethord    tm = new ThreadMethord();

         Thread th = new Thread(tm);

         th.start();

         System.out.println("--活动线程数--"+th.activeCount());

         ThreadMethord    tm2 = new ThreadMethord();

         Thread th2 = new Thread(tm2);

         th2.start();

         System.out.println("--活动线程数--"+th2.activeCount());

     }

 }
运行结果:
--活动线程数--2

--活动线程数--3
程序启动一共创建了三个线程:main,th,th2,主线程启动main函数,线程th启动,此时的活动线程为main,th.然后创建线程th2并启动。此时活动线程数是main,th,th2.把上面的代码稍微修改一下
 public class ThreadMethord implements Runnable{

     public void run() {

         System.out.println("");

         /*try {

             Thread.sleep(1000);

         } catch (InterruptedException e) {

             e.printStackTrace();

         }*/

     }

     public static void main(String[] args) {

         ThreadMethord    tm = new ThreadMethord();

         Thread th = new Thread(tm);

         th.start();

         System.out.println("--活动线程数--"+th.activeCount());

         ThreadMethord    tm2 = new ThreadMethord();

         Thread th2 = new Thread(tm2);

         th2.start();

         System.out.println("--活动线程数--"+th2.activeCount());

     }

 }
运行结果:
 --活动线程数--2

 --活动线程数--2
好像跟预期的结果不一样,只是因为把线程休眠去掉了,那是因为在th2启动的时候th1已经运行结束了。
基本属性的获取方法:
方法使用:
 public class ThreadMethord implements Runnable{

     public void run() {

         System.out.println("");

         System.out.println("-当前线程的引用--"+ Thread.currentThread());

         try {

             Thread.sleep(1000);

         } catch (InterruptedException e) {

             e.printStackTrace();

         }

     }

     public static void main(String[] args) {

         ThreadMethord    tm = new ThreadMethord();

         Thread th = new Thread(tm);

         th.start();

         System.out.println("--活动线程数--"+th.activeCount());

         ThreadMethord    tm2 = new ThreadMethord();

         Thread th2 = new Thread(tm2);

         th2.start();

         System.out.println("--活动线程数--"+th2.activeCount());

         Thread  [] tarray = new Thread[3];

         System.out.println("-当前线程的引用--"+ Thread.currentThread());

         Thread.enumerate(tarray);//将当前线程的所有活动线程放进数组里

         for (Thread thread : tarray) {

             System.out.println("--tarray活动线程--"+thread);

         }

         System.out.println("--th线程ID--"+th.getId());

         System.out.println("--th的线程名--"+ th.getName());

         System.out.println("--th的线程优先级--"+ th.getPriority());

         System.out.println("--th的线程组--"+ th.getThreadGroup());

         System.out.println("--th2线程ID--"+th2.getId());

         System.out.println("--th2的线程名--"+ th2.getName());

         th2.setPriority(6);//设置优先级

         System.out.println("--th2的线程优先级--"+ th2.getPriority());

         System.out.println("--th2的线程组--"+ th2.getThreadGroup());

     }

 }
运行结果:
 --活动线程数--2

 --活动线程数--3

 -当前线程的引用--Thread[main,5,main]

 --tarray活动线程--Thread[main,5,main]

 --tarray活动线程--Thread[Thread-0,5,main]

 --tarray活动线程--Thread[Thread-1,5,main]

 --th线程ID--10

 --th的线程名--Thread-0

 --th的线程优先级--5

 --th的线程组--java.lang.ThreadGroup[name=main,maxpri=10]

 --th2线程ID--11

 --th2的线程名--Thread-1

 --th2的线程优先级--6

 --th2的线程组--java.lang.ThreadGroup[name=main,maxpri=10]

 -当前线程的引用--Thread[Thread-0,5,main]

 -当前线程的引用--Thread[Thread-1,6,main]
可以看到主线程他的引用就是main,优先级是5,所属线程组是main,th和th2他们的引用分别是Thread-0,Thread-1,这是他们的线程名,因为我们在创建现成的时候没有个他初始化名称,所以默认使用Thread-加上线程组内线程创建的序号。(说多了我以为我在胡扯,来看一波源代码)
源代码:
//这个初始化方法是我们调用的,可以看到他的命名方式:“Thread-“+nextThreadNum(),这个nextThreadNum方法是一个同步的方法,加了
//sychnorized锁,返回的是一个私有的静态的int类型的属性,所以他的默认值应该是0,说到这有的小伙伴可能有疑问了,既然默认值(初始值)0,
//那么这里返回的是threadInitNumber++,那第一个线程名应该是Thread-1,问题又回到了++i和i++的问题了,不多说了。
public Thread(Runnable target) {

        init(null, target, "Thread-" + nextThreadNum(), 0);

    }

/*初始化方法的四个参数第一个线程组,第二个线程,第三个线程名,第四个是栈大小
 private void init(ThreadGroup g, Runnable target, String name,long stackSize) {
init(g, target, name, stackSize, null);
}*/
private static int threadInitNumber;

private static synchronized int nextThreadNum() {

     return threadInitNumber++;

}
getState():获取线程状态
方法使用:
 public class TestMethord2 implements Runnable{

     @Override

     public void run() {

         //获取当前线程的引用

         Thread obj = Thread.currentThread();

         System.out.println("线程:"+obj.getName()+"的状态:"+obj.getState());//RUNNABLE

         try {

             Thread.sleep(2000);

         } catch (InterruptedException e) {

             e.printStackTrace();

         }

     }

     public static void main(String[] args) {

         TestMethord2 t1 = new TestMethord2();

         TestMethord2 t2 = new TestMethord2();

         Thread th1 = new Thread(t1,"th1");

         System.out.println(th1.getState());//NEW

         th1.start();

         System.out.println(th1.getState());//RUNNABLE

         //等待线程执行到sleep

         try {

             Thread.sleep(1000);

         } catch (InterruptedException e) {

             e.printStackTrace();

         }

         System.out.println(th1.getState());//TIMES_WAITING

         //等待线程th1执行完毕

         try {

             Thread.sleep(1000);

         } catch (InterruptedException e) {

             e.printStackTrace();

         }

         System.out.println(th1.getState());//TERMINATED

     }

 }
运行结果:(跑一下代码一目了然可以看到不同的状态)
 线程th1的状态:NEW

 线程th1的状态:RUNNABLE

 RUN线程th1的状态:RUNNABLE

 线程th1的状态:TIMED_WAITING

 线程th1的状态:TERMINATED
开始创建的时候状态是:NEW。start之后线程执行,状态是RUNNABLE,此时主线程进入休眠1秒,是为了等待th1进入到休眠状态,当th1进入休眠状态2秒,主线程已经结束了休眠此时在查看th1的状态为TIMED_WAIING,我们再让主线程等待1秒,th1结束了休眠,执行完毕,再次查看th1状态为TERMINATED。
跟状态相关的方法:
yield:暂停当前线程,让其他线程先执行。
 public class TestMethord3 implements Runnable{

     @Override

     public void run() {

         System.out.println(Thread.currentThread().getName()+"runing.....");

         for (int i = 0; i <10; i++) {

             System.out.println(Thread.currentThread().getName()+":"+i);

             if(i==3){

                 Thread.yield();

             }

         }

     }

     public static void main(String[] args) {

         TestMethord3 tm1 = new TestMethord3();

         TestMethord3_2 tm2 = new TestMethord3_2();

         Thread th1 = new Thread(tm1, "th1");

         Thread th2 = new Thread(tm2, "th2");

         th1.start();

         th2.start();

     }

 }
 public class TestMethord3_2 implements Runnable{

     public void run() {

         System.out.println(Thread.currentThread().getName()+"runing.....");

         for (int i = 0; i < 10; i++) {

             System.out.println("------------------"+i);

         }

     }

 }
运行结果:这个结果每次运行都不一样。
 th2runing.....

 th1runing.....

 ------------------0

 ------------------1

 ------------------2

 ------------------3

 ------------------4

 ------------------5

 ------------------6

 th1:0

 ------------------7

 th1:1

 ------------------8

 ------------------9

 th1:2

 th1:3

 th1:4

 th1:5

 th1:6

 th1:7

 th1:8

 th1:9
按照理想上来说,我们在th1运行到输出3的时候就应该停下来让th2先执行完,th1和th2是我交叉执行应该只发生在th1输出3之前。然而结果并不是如此,多运行几次就会发现,这个yield方法并没有起到应有的作用,这是由于CPU资源充足的情况下两个都能获取到CPU,暂停当前线程的执行可能只是在CPU资源不足的情况下让出CPU资源。(个人理解),但是就算是CPU资源不充足,两个同等优先级的线程在一个暂停之后仍然有同等几率被调度选中分配到资源,所以说这个yield方法同等优先级的情况下出现不管用的几率会更大。
join:等待某线程终止
 public class TestMethord3 implements Runnable{

     public void run() {

         System.out.println(Thread.currentThread().getName()+"runing.....");

         for (int i = 0; i <10; i++) {

             System.out.println(Thread.currentThread().getName()+":"+i);

             if(i==3){

                 Thread.yield();

             }

         }

     }

     public static void main(String[] args) throws InterruptedException {

         TestMethord3 tm1 = new TestMethord3();

         TestMethord3_2 tm2 = new TestMethord3_2();

         Thread th1 = new Thread(tm1, "th1");

         Thread th2 = new Thread(tm2, "th2");

         th1.start();

         th2.start();

         th2.join();

         System.out.println("th2的状态:"+th2.getState());

     }

 }

 public class TestMethord3_2 implements Runnable{

     public void run() {

         System.out.println(Thread.currentThread().getName()+"runing.....");

         for (int i = 0; i < 10; i++) {

             System.out.println("------------------"+i);

         }

     }

 }
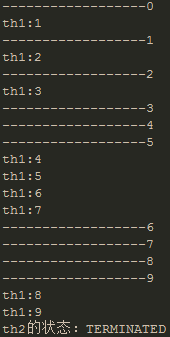
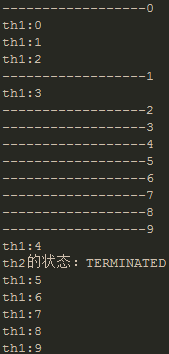
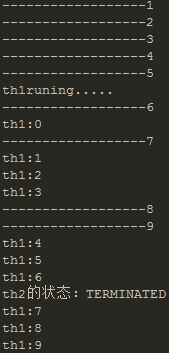
运行结果:下面是运行四次的结果显示,从结果中可以看出,无论th1,th2怎么运行,最终主线程输出的th2的状态都是TERMINATED,因为这一行输出是放在th2.join()后面的,表示的是主线程要等待th2执行完毕才能继续执行。


wait(),wait(long million),notify(),notifyAll(),这几个方法继承自Object类.
wait()和wait(long million):指的是让线程等待,与sleep的不同的是,wait方法会释放CPU,而sleep仍然占有CPU资源。
notify():指的是唤醒某个线程
notifyAll() :指的是唤醒所有的线程
这几个方法需要组合使用,在多个线程运行时涉及到的先后问题,暂时还未研究深入,先放一下。后面会补充上。
通过上面这些方法,基本上了解了线程这个类。除去基本的属性方法,其他的跟状态相关的在复杂的并发线程环境中才能体现他们的作用和价值,也才能展现出使用上的难度,这里所涉及到的不过是九牛一毛,后面继续探索。
多线程爬坑之路-Thread和Runable源码解析之基本方法的运用实例的更多相关文章
- 多线程爬坑之路-Thread和Runable源码解析
多线程:(百度百科借一波定义) 多线程(英语:multithreading),是指从软件或者硬件上实现多个线程并发执行的技术.具有多线程能力的计算机因有硬件支持而能够在同一时间执行多于一个线程,进而提 ...
- [Java多线程]-Thread和Runable源码解析之基本方法的运用实例
前面的文章:多线程爬坑之路-学习多线程需要来了解哪些东西?(concurrent并发包的数据结构和线程池,Locks锁,Atomic原子类) 多线程爬坑之路-Thread和Runable源码解析 前面 ...
- [Java多线程]-Thread和Runable源码解析
多线程:(百度百科借一波定义) 多线程(英语:multithreading),是指从软件或者硬件上实现多个线程并发执行的技术.具有多线程能力的计算机因有硬件支持而能够在同一时间执行多于一个线程,进而提 ...
- [Java多线程]-线程池的基本使用和部分源码解析(创建,执行原理)
前面的文章:多线程爬坑之路-学习多线程需要来了解哪些东西?(concurrent并发包的数据结构和线程池,Locks锁,Atomic原子类) 多线程爬坑之路-Thread和Runable源码解析 多线 ...
- 多线程爬坑之路-学习多线程需要来了解哪些东西?(concurrent并发包的数据结构和线程池,Locks锁,Atomic原子类)
前言:刚学习了一段机器学习,最近需要重构一个java项目,又赶过来看java.大多是线程代码,没办法,那时候总觉得多线程是个很难的部分很少用到,所以一直没下决定去啃,那些年留下的坑,总是得自己跳进去填 ...
- 多线程爬坑之路-ThreadLocal源码及原理的深入分析
ThreadLocal<T>类:以空间换时间提供一种多线程更快捷访问变量的方式.这种方式不存在竞争,所以也不存在并发的安全性问题. This class provides thread-l ...
- 多线程爬坑之路-J.U.C.atomic包下的AtomicInteger,AtomicLong等类的源码解析
Atomic原子类:为基本类型的封装类Boolean,Integer,Long,对象引用等提供原子操作. 一.Atomic包下的所有类如下表: 类摘要 AtomicBoolean 可以用原子方式更新的 ...
- Thread、ThreadLocal源码解析
今天来看一下Thread和ThreadLocal类的源码. 一.Thread (1)首先看一下线程的构造方法,之后会说每种参数的用法,而所有的构造函数都会指向init方法 //空构造创建一个线程 Th ...
- 多线程爬坑之路--并发,并行,synchonrized同步的用法
一.多线程的并发与并行: 并发:多个线程同时都处在运行中的状态.线程之间相互干扰,存在竞争,(CPU,缓冲区),每个线程轮流使用CPU,当一个线程占有CPU时,其他线程处于挂起状态,各线程断续推进. ...
随机推荐
- Oracle分析函数入门
一.Oracle分析函数入门 分析函数是什么?分析函数是Oracle专门用于解决复杂报表统计需求的功能强大的函数,它可以在数据中进行分组然后计算基于组的某种统计值,并且每一组的每一行都可以返回一个统计 ...
- SQL Server2014 SP2新增的数据库克隆功能
SQL Server2014 SP2新增的数据库克隆功能 创建测试库 --创建测试数据库 create database testtest use testtest go --创建表 )) --插入数 ...
- json与JavaScript对象互换
1,json字符串转化为JavaScript对象: 方法:JSON.parse(string) eg:var account = '{"name":"jaytan&quo ...
- 【翻译】MongoDB指南/CRUD操作(二)
[原文地址]https://docs.mongodb.com/manual/ MongoDB CRUD操作(二) 主要内容: 更新文档,删除文档,批量写操作,SQL与MongoDB映射图,读隔离(读关 ...
- .Net 大型分布式基础服务架构横向演变概述
一. 业务背景 构建具备高可用,高扩展性,高性能,能承载高并发,大流量的分布式电子商务平台,支持用户,订单,采购,物流,配送,财务等多个项目的协作,便于后续运营报表,分析,便于运维及监控. 二. 基础 ...
- iptables
一.在服务器上打开 22.80.9011端口: iptables -A INPUT -p tcp --dport 9011 -j ACCEPT iptables -A OUTPUT -p tcp -- ...
- TYPESDK手游聚合SDK服务端设计思路与架构之二:服务端设计
在前一篇文中,我们对一个聚合SDK服务端所需要实现的功能作了简单的分析.通过两个主要场景的功能流程图,我们可以看到,作为多款游戏要适配多个渠道的统一请求转发中心,TYPESDK服务端主要需要实现的功能 ...
- iOS系列教程 目录 (持续更新...)
前言: 听说搞iOS的都是高富帅,身边妹子无数.咱也来玩玩.哈哈. 本篇所有内容使用的是XCode工具.Swift语言进行开发. 我现在也是学习阶段,每一篇内容都是经过自己实际编写完一遍之后,发现 ...
- 在Ubuntu下安装ovs-dpdk
在Ubuntu下安装ovs-dpdk 参考资料:https://software.intel.com/zh-cn/articles/using-open-vswitch-with-dpdk-on-ub ...
- 二叉树的递归实现(java)
这里演示的二叉树为3层. 递归实现,先构造出一个root节点,先判断左子节点是否为空,为空则构造左子节点,否则进入下一步判断右子节点是否为空,为空则构造右子节点. 利用层数控制迭代次数. 依次递归第二 ...
