学习ASP.NET Core, 怎能不了解请求处理管道[3]: 自定义一个服务器感受一下管道是如何监听、接收和响应请求的
我们在《服务器在管道中的“龙头”地位》中对ASP.NET Core默认提供的具有跨平台能力的KestrelServer进行了介绍,为了让读者朋友们对管道中的服务器具有更加深刻的认识,接下来我们采用实例演示的形式创建一个自定义的服务器。这个自定义的服务器直接利用HttpListener来完成针对请求的监听、接收和响应,我们将其命名为HttpListenerServer。在正式介绍HttpListenerServer的设计和实现之前,我们先来显示一下如何将它应用到 一个具体的Web应用中。我们依然采用最简单的Hello World应用来演示针对HttpListenerServer的应用,所以我们在Startup类的Configure方法中编写如下的程序直接响应一个“Hello World”字符串。[本文已经同步到《ASP.NET Core框架揭秘》之中]
1: public class Startup
2: {
3: public void Configure(IApplicationBuilder app)
4: {
5: app.Run(async context => await context.Response.WriteAsync("Hello World!"));
6: }
7: }
在作为程序入口的Main方法中,我们直接创建一个WebHostBuilder对象并调用扩展方法UseHttpListener完成针对自定义HttpListenerServer的注册。我们接下来调用UseStartup方法注册上面定义的这个启动类型,然后调用Build方法创建一个WebHost对象,最后调用Run方法运行这个作为宿主的WebHost。
1: public class Program
2: {
3: public static void Main()
4: {
5: new WebHostBuilder()
6: .UseHttpListener()
7: .UseStartup<Startup>()
8: .Build()
9: .Run();
10: }
11: }
12:
13: public static class WebHostBuilderExtensions
14: {
15: public static IWebHostBuilder UseHttpListener(this IWebHostBuilder builder)
16: {
17: builder.ConfigureServices(services => services.AddSingleton<IServer, HttpListenerServer>());
18: return builder;
19: }
20: }
我们自定义的扩展方法UseHttpListener的逻辑很简单,它只是调用WebHostBuilder的ConfigureServices方法将我们自定义的HttpListenerServer类型以单例模式注册到指定的ServiceCollection上而已。我们直接运行这个程序并利用浏览器访问默认的监听地址(http://localhost:5000),服务端响应的“Hello World”字符串会按照如下图所示的形式显示在浏览器上。

接下来我们来介绍一下HttpListenerServer的大体涉及。除了HttpListenerServer这个实现了IServer的自定义Server类型之外,我们只定义了一个名为HttpListenerServerFeature的特性类型,图7所示的UML基本上体现了HttpListenerServer的总体设计。
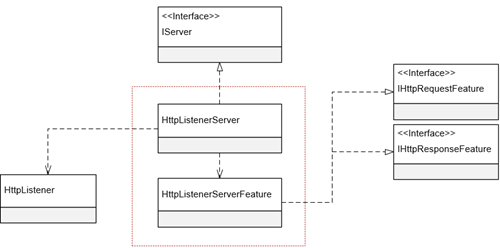
如果我们利用HttpListener来监听请求,它会为接收到的每次请求创建一个属于自己的上下文,具体来说这是一个类型为HttpListenerContext对象。我们可以利用这个HttpListenerContext对象获取所有与请求相关的信息,针对请求的任何响应也都是利用它完成的。上面这个HttpListenerServerFeature实际上就是对这个作为原始上下文的HttpListenerContext对象的封装,或者说它是管道使用的DefaultHttpContext与这个原始上下文之间沟通的中介。
如下所示的代码片段展示了HttpListenerServerFeature类型的完整定义。简单起见,我们并没有实现上面提到过的所有特性接口,而只是选择性地实现了IHttpRequestFeature和IHttpResponseFeature这两个最为核心的特性接口。它的构造函数除了具有一个类型为HttpListenerContext的参数之外,还具有一个字符串的参数pathBase用来指定请求URL的基地址(对应IHttpRequestFeature的PathBase属性),我们利用它来计算请求URL的相对地址(对应IHttpRequestFeature的Path属性)。IHttpRequestFeature和IHttpResponseFeature中定义的属性都可以直接利用HttpListenerContext对应的成员来实现,这方面并没有什么特别之处。
1: public class HttpListenerServerFeature : IHttpRequestFeature, IHttpResponseFeature
2: {
3: private readonly HttpListenerContext httpListenerContext;
4: private string queryString;
5: private IHeaderDictionary requestHeaders;
6: private IHeaderDictionary responseHeaders;
7: private string protocol;
8: private readonly string pathBase;
9:
10: public HttpListenerServerFeature(HttpListenerContext httpListenerContext, string pathBase)
11: {
12: this.httpListenerContext = httpListenerContext;
13: this.pathBase = pathBase;
14: }
15:
16: #region IHttpRequestFeature
17:
18: Stream IHttpRequestFeature.Body
19: {
20: get { return httpListenerContext.Request.InputStream; }
21: set { throw new NotImplementedException(); }
22: }
23:
24: IHeaderDictionary IHttpRequestFeature.Headers
25: {
26: get { return requestHeaders ?? (requestHeaders = GetHttpHeaders(httpListenerContext.Request.Headers)); }
27: set { throw new NotImplementedException(); }
28: }
29:
30: string IHttpRequestFeature.Method
31: {
32: get { return httpListenerContext.Request.HttpMethod; }
33: set { throw new NotImplementedException(); }
34: }
35:
36: string IHttpRequestFeature.Path
37: {
38: get { return httpListenerContext.Request.RawUrl.Substring(pathBase.Length);}
39: set { throw new NotImplementedException(); }
40: }
41:
42: string IHttpRequestFeature.PathBase
43: {
44: get { return pathBase; }
45: set { throw new NotImplementedException(); }
46: }
47:
48: string IHttpRequestFeature.Protocol
49: {
50: get{ return protocol ?? (protocol = this.GetProtocol());}
51: set { throw new NotImplementedException(); }
52: }
53:
54: string IHttpRequestFeature.QueryString
55: {
56: Get { return queryString ?? (queryString = this.ResolveQueryString());}
57: set { throw new NotImplementedException(); }
58: }
59:
60: string IHttpRequestFeature.Scheme
61: {
62: get { return httpListenerContext.Request.IsWebSocketRequest ? "https" : "http"; }
63: set { throw new NotImplementedException(); }
64: }
65: #endregion
66:
67: #region IHttpResponseFeature
68: Stream IHttpResponseFeature.Body
69: {
70: get { return httpListenerContext.Response.OutputStream; }
71: set { throw new NotImplementedException(); }
72: }
73:
74: string IHttpResponseFeature.ReasonPhrase
75: {
76: get { return httpListenerContext.Response.StatusDescription; }
77: set { httpListenerContext.Response.StatusDescription = value; }
78: }
79:
80: bool IHttpResponseFeature.HasStarted
81: {
82: get { return httpListenerContext.Response.SendChunked; }
83: }
84:
85: IHeaderDictionary IHttpResponseFeature.Headers
86: {
87: get { return responseHeaders ?? (responseHeaders = GetHttpHeaders(httpListenerContext.Response.Headers)); }
88: set { throw new NotImplementedException(); }
89: }
90: int IHttpResponseFeature.StatusCode
91: {
92: get { return httpListenerContext.Response.StatusCode; }
93: set { httpListenerContext.Response.StatusCode = value; }
94: }
95:
96: void IHttpResponseFeature.OnCompleted(Func<object, Task> callback, object state)
97: {
98: throw new NotImplementedException();
99: }
100:
101: void IHttpResponseFeature.OnStarting(Func<object, Task> callback, object state)
102: {
103: throw new NotImplementedException();
104: }
105: #endregion
106:
107: private string ResolveQueryString()
108: {
109: string queryString = "";
110: var collection = httpListenerContext.Request.QueryString;
111: for (int i = 0; i < collection.Count; i++)
112: {
113: queryString += $"{collection.GetKey(i)}={collection.Get(i)}&";
114: }
115: return queryString.TrimEnd('&');
116: }
117:
118: private IHeaderDictionary GetHttpHeaders(NameValueCollection headers)
119: {
120: HeaderDictionary dictionary = new HeaderDictionary();
121: foreach (string name in headers.Keys)
122: {
123: dictionary[name] = new StringValues(headers.GetValues(name));
124: }
125: return dictionary;
126: }
127:
128: private string GetProtocol()
129: {
130: HttpListenerRequest request = httpListenerContext.Request;
131: Version version = request.ProtocolVersion;
132: return string.Format("{0}/{1}.{2}", request.IsWebSocketRequest ? "HTTPS" : "HTTP", version.Major, version.Minor);
133: }
134: }
接下来我们来看看HttpListenerServer的定义。如下面的代码片段所示,用来监听请求的HttpListener在构造函数中被创建,与此同时,我们会创建一个用于获取监听地址的ServerAddressesFeature对象并将其添加到属于自己的特性列表中。当HttpListenerServer随着Start方法的调用而被启动后,它将这个ServerAddressesFeature对象提取出来,然后利用它得到所有的地址并添加到HttpListener的Prefixes属性表示的监听地址列表中。接下来,HttpListener的Start方法被调用,并在一个无限循环中开启请求的监听与接收。
1: public class HttpListenerServer : IServer
2: {
3: private readonly HttpListener listener;
4:
5: public IFeatureCollection Features { get; } = new FeatureCollection();
6:
7: public HttpListenerServer()
8: {
9: listener = new HttpListener();
10: this.Features.Set<IServerAddressesFeature>(new ServerAddressesFeature());
11: }
12:
13: public void Dispose()
14: {
15: listener.Stop();
16: }
17:
18: public void Start<TContext>(IHttpApplication<TContext> application)
19: {
20: foreach (string address in this.Features.Get<IServerAddressesFeature>().Addresses)
21: {
22: listener.Prefixes.Add(address.TrimEnd('/') + "/");
23: }
24:
25: listener.Start();
26: while (true)
27: {
28: HttpListenerContext httpListenerContext = listener.GetContext();
29:
30: string listenUrl = this.Features.Get<IServerAddressesFeature>().Addresses
31: .First(address => httpListenerContext.Request.Url.IsBaseOf(new Uri(address)));
32: string pathBase = new Uri(listenUrl).LocalPath.TrimEnd('/') ;
33: HttpListenerServerFeature feature = new HttpListenerServerFeature(httpListenerContext, pathBase);
34:
35: FeatureCollection features = new FeatureCollection();
36: features.Set<IHttpRequestFeature>(feature);
37: features.Set<IHttpResponseFeature>(feature);
38: TContext context = application.CreateContext(features);
39:
40: application.ProcessRequestAsync(context).ContinueWith(task =>
41: {
42: httpListenerContext.Response.Close();
43: application.DisposeContext(context, task.Exception);
44: });
45: }
46: }
47: }
HttpListener的GetContext方法以同步的方式监听请求,并利用接收到的请求创建返回的HttpListenerContext对象。我们利用它解析出当前请求的基地址,并进一步创建出描述当前原始上下文的HttpListenerServerFeature。接下来我们将这个对象分别采用特性接口IHttpRequestFeature和IHttpResponseFeature添加到创建的FeatureCollection对象中。然后我们将这个FeatureCollection作为参数调用HttpApplication的CreateContext创建出上下文对象,并将其作为参数调用HttpApplication的ProcessContext方法让注册的中间件来逐个地对请求进行处理。
学习ASP.NET Core, 怎能不了解请求处理管道[3]: 自定义一个服务器感受一下管道是如何监听、接收和响应请求的的更多相关文章
- ASP.NET Core 6框架揭秘实例演示[28]:自定义一个服务器
作为ASP.NET Core请求处理管道的"龙头"的服务器负责监听和接收请求并最终完成对请求的响应.它将原始的请求上下文描述为相应的特性(Feature),并以此将HttpCont ...
- 学习ASP.NET Core, 怎能不了解请求处理管道[6]: 管道是如何随着WebHost的开启被构建出来的?
注册的服务器和中间件共同构成了ASP.NET Core用于处理请求的管道, 这样一个管道是在我们启动作为应用宿主的WebHost时构建出来的.要深刻了解这个管道是如何被构建出来的,我们就必须对WebH ...
- 学习ASP.NET Core,怎能不了解请求处理管道[1]: 中间件究竟是个什么东西?
ASP.NET Core管道虽然在结构组成上显得非常简单,但是在具体实现上却涉及到太多的对象,所以我们在 "通过重建Hosting系统理解HTTP请求在ASP.NET Core管道中的处理流 ...
- 学习ASP.NET Core, 怎能不了解请求处理管道[5]: 中间件注册可以除了可以使用Startup之外,还可以选择StartupFilter
中间件的注册除了可以借助Startup对象(DelegateStartup或者ConventionBasedStartup)来完成之外,也可以利用另一个叫做StartupFilter的对象来实现.所谓 ...
- 学习ASP.NET Core, 怎能不了解请求处理管道[4]: 应用的入口——Startup
一个ASP.NET Core应用被启动之后就具有了针对请求的处理能力,而这个能力是由管道赋予的,所以应用的启动同时意味着管道的成功构建.由于管道是由注册的服务器和若干中间件构成的,所以应用启动过程中一 ...
- 学习ASP.NET Core,怎能不了解请求处理管道[2]: 服务器在管道中的“龙头”地位
ASP.NET Core管道由注册的服务器和一系列中间件构成.我们在上一篇中深入剖析了中间件,现在我们来了解一下服务器.服务器是ASP .NET Core管道的第一个节点,它负责完整请求的监听和接收, ...
- 学习ASP.NET Core,你必须了解无处不在的“依赖注入”
ASP.NET Core的核心是通过一个Server和若干注册的Middleware构成的管道,不论是管道自身的构建,还是Server和Middleware自身的实现,以及构建在这个管道的应用,都需要 ...
- 学习ASP.NET Core Razor 编程系列二——添加一个实体
在Razor页面应用程序中添加一个实体 在本篇文章中,学习添加用于管理数据库中的书籍的实体类.通过实体框架(EF Core)使用这些类来处理数据库.EF Core是一个对象关系映射(ORM)框架,它简 ...
- 学习ASP.NET Core Razor 编程系列四——Asp.Net Core Razor列表模板页面
学习ASP.NET Core Razor 编程系列目录 学习ASP.NET Core Razor 编程系列一 学习ASP.NET Core Razor 编程系列二——添加一个实体 学习ASP.NET ...
随机推荐
- iframe用法
<iframe src="http://caiyanli.top/" height="500" width="500" frameb ...
- Ubuntu 14.04中Elasticsearch集群配置
Ubuntu 14.04中Elasticsearch集群配置 前言:本文可用于elasticsearch集群搭建参考.细分为elasticsearch.yml配置和系统配置 达到的目的:各台机器配置成 ...
- Security Policy:行级安全(Row-Level Security)
行级安全RLS(Row-Level Security)是在数据行级别上控制用户的访问,控制用户只能访问数据库表的特定数据行.断言是逻辑表达式,在SQL Server 2016中,RLS是基于安全断言( ...
- SQLServer执行命令出现“目录无效的提示”
异常处理汇总-数据库系列 http://www.cnblogs.com/dunitian/p/4522990.html 一般都是清理垃圾清理过头了,把不该删的目录删了 网上说法: 问题描述: 1.s ...
- Centos 下 mysql root 密码重置
重置mysql密码的方法有很多,官网也提供了很方便的快捷操作办法,可参考资料 resetting permissions .本文重置密码的具体步骤如下: 一.停止MySQL(如果处于运行状态) #se ...
- 学习ASP.NET Core,怎能不了解请求处理管道[1]: 中间件究竟是个什么东西?
ASP.NET Core管道虽然在结构组成上显得非常简单,但是在具体实现上却涉及到太多的对象,所以我们在 "通过重建Hosting系统理解HTTP请求在ASP.NET Core管道中的处理流 ...
- 如何利用ETW(Event Tracing for Windows)记录日志
ETW是Event Tracing for Windows的简称,它是Windows提供的原生的事件跟踪日志系统.由于采用内核(Kernel)层面的缓冲和日志记录机制,所以ETW提供了一种非常高效的事 ...
- UVA, 10336 Rank the Languages
难点在于:递归函数和输出: #include <iostream> #include <vector> #include <algorithm> #include ...
- 关于DDD的学习资料汇总
DDD(Domain-Driven Design)领域驱动设计,第一次看到DDD是在学习ABP时,在其中的介绍中看到的.what,DDD是个什么鬼,我不是小白,是大白,没听过.于是乎,度娘查查查,找到 ...
- 新技术≠颠覆:CIO 要有战略耐心
新技术≠颠覆:CIO 要有战略耐心 大数据,云时代,互联网思维, 物联网--最近一两年,这些字眼一次次地出现在各种大大小小的CIO会议上和他们的私下交流圈子里,作为对新技术最敏感的人群,一方面他们迫切 ...