liberty | 在IDEA整合Springboot与IBM liberty

在IDEA整合Springboot与IBM liberty
简介
Liberty 是一款全新的轻量级应用服务器,它将用户的良好开发体验作为最主要的出发点。其主要特点和内容包括:
高模块化——该功能允许用户根据自己应用程序的需求启用或者禁用相关的 feature(所谓 feature,在这里指的是运行应用程序所需要的各种资源的支持。比如,应用程序用到了 JSP,我们就需要启动 JSP 这个 feature,如果不在需要此 feature,就可以将其禁用。通过这种模块化的控制,我们可以按需启动不同的 feature,包括 JSP, Servlet, JPA 等等,这种控制是实现轻量级应用服务器的基础)。
轻量级—— Liberty 采用了多种技术进行瘦身和优化(主要是 OSGi 的应用),与传统的 WAS 相比,极大的减少了运行时的内存消耗。
高动态性——由于采用了 OSGi 的架构,程序员在开发的时候,可以动态修改配置文件,应用程序以及服务器的运行时信息,这些修改都是实时生效的,不需要重启服务器。
快速——由于采用了高模块化的设计,Liberty 应用服务器会“按需启动”,自身消耗的系统资源很少,对执行任务的反应时间也非常短,例如,一般来说 Liberty 的启动时间小于 5 秒。
配置简单——在整个开发过程中,用户只需要和一个配置文件(server.xml)打交道,而且配置的使用也非常灵活。
尽管 Liberty 与传统 WAS 相比只是一个“小块头”,但是在 Web 和 OSGi 应用程序的开发上,Liberty 与传统 WAS 完全保持一致,在 Liberty 上开发的程序,可以直接移植到传统 WAS 上,不需要做任何的改变。相比传统 WAS 的庞大,Liberty 在为用户提供良好的开发体验上遥遥领先。
在本文中,我将描述如何使用Spring Boot和IDEA开发工具创建一个简单的“Hello World”应用程序。
IBM Liberty Vs Tomcat
简单来说,IBM Liberty就是 IBM WebSphere Application Server 的简化版,Liberty是从WebSphere 8.5.5引入的,与传统的WAS不同,Liberty侧重于云应用与微服务的支持,用户可以配置细粒度级别的应用程序所需的组件,所以服务器启动速度非常快,占用空间也很小,跟tomcat一样轻量级,一般都是用于企业级应用比较多,尤其是金融类、或者大型商业应用等,提供很多商业级的扩展组件。
两者区别可以通过以下两篇文章了解:
https://webspherecompetition.files.wordpress.com/2012/11/liberty-vs-tomcat.pdf
https://www.ibm.com/developerworks/community/files/form/anonymous/api/library/ac092234-1cdc-406a-9317-39ee651ffbf6/document/ed0b79c7-09f1-4023-b7ec-31efa730c97f/media/tomcat-liberty.pdf
开始之前
你需要先到以下网址下载最新版的WebSphere Liberty runtime:
https://developer.ibm.com/wasdev/downloads/download-latest-stable-websphere-liberty-runtime/
创建Springboot Rest应用
利用Spring Initializr创建一个Sprignboot项目
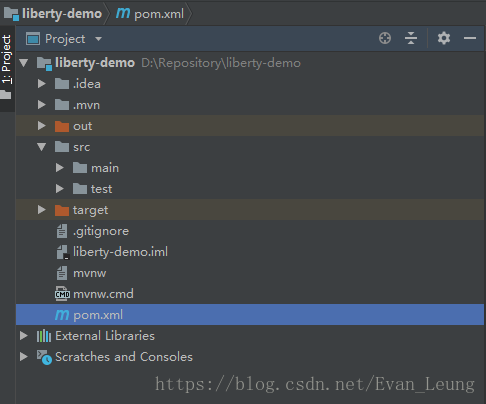
选择File->Project->Spring Initizlizr创建项目命名为liberty-demo,依赖包选择Web,然后一直点击Next完成即可,项目结构如下:

配置Pom.xml文件,添加servlet容器依赖:
     <dependency>

            <groupId>javax.servlet</groupId>

            <artifactId>javax.servlet-api</artifactId>

            <version>3.1.0</version>

            <scope>provided</scope>

        </dependency>
如果使用旧版本的应用服务器,还需要添加如下依赖:
<dependency>

    <groupId>javax</groupId>

    <artifactId>javaee-api</artifactId>

    <version>7.0</version>

    <scope>provided</scope>

</dependency>
跟配置外置tomcat一样,我们需要过滤到Springboot里的tomcat模块
    <dependency>

            <groupId>org.springframework.boot</groupId>

            <artifactId>spring-boot-starter-web</artifactId>

            <exclusions>

                <exclusion>

                    <groupId>org.springframework.boot</groupId>

                    <artifactId>spring-boot-starter-tomcat</artifactId>

                </exclusion>

            </exclusions>

        </dependency>
我项目完整的Pom.xml文件如下:
<?xml version="1.0" encoding="UTF-8"?>

<project xmlns="http://maven.apache.org/POM/4.0.0" xmlns:xsi="http://www.w3.org/2001/XMLSchema-instance"

         xsi:schemaLocation="http://maven.apache.org/POM/4.0.0 http://maven.apache.org/xsd/maven-4.0.0.xsd">

    <modelVersion>4.0.0</modelVersion>

    <groupId>com.eshare.liberty</groupId>

    <artifactId>demo</artifactId>

    <version>0.0.1-SNAPSHOT</version>

    <packaging>jar</packaging>

    <name>demo</name>

    <description>Demo project for Spring Boot</description>

    <parent>

        <groupId>org.springframework.boot</groupId>

        <artifactId>spring-boot-starter-parent</artifactId>

        <version>2.0.6.RELEASE</version>

        <relativePath/> <!-- lookup parent from repository -->

    </parent>

    <properties>

        <project.build.sourceEncoding>UTF-8</project.build.sourceEncoding>

        <project.reporting.outputEncoding>UTF-8</project.reporting.outputEncoding>

        <java.version>1.8</java.version>

    </properties>

    <dependencies>

        <dependency>

            <groupId>org.springframework.boot</groupId>

            <artifactId>spring-boot-starter-thymeleaf</artifactId>

        </dependency>

        <dependency>

            <groupId>org.springframework.boot</groupId>

            <artifactId>spring-boot-starter-web</artifactId>

            <exclusions>

                <exclusion>

                    <groupId>org.springframework.boot</groupId>

                    <artifactId>spring-boot-starter-tomcat</artifactId>

                </exclusion>

            </exclusions>

        </dependency>

        <dependency>

            <groupId>org.projectlombok</groupId>

            <artifactId>lombok</artifactId>

            <optional>true</optional>

        </dependency>

        <dependency>

            <groupId>org.springframework.boot</groupId>

            <artifactId>spring-boot-starter-test</artifactId>

            <scope>test</scope>

        </dependency>

        <dependency>

            <groupId>javax.servlet</groupId>

            <artifactId>javax.servlet-api</artifactId>

            <version>3.1.0</version>

            <scope>provided</scope>

        </dependency>

    </dependencies>

    <build>

        <plugins>

            <plugin>

                <groupId>org.springframework.boot</groupId>

                <artifactId>spring-boot-maven-plugin</artifactId>

            </plugin>

        </plugins>

    </build>

</project>
我们要使用传统的WAR发布Sringboot项目方式,需要调整程序入口代码,继承SpringBootServletInitializer类,重写configure方法去告诉容器我们的程序启动入口
@SpringBootApplication

public class DemoApplication extends SpringBootServletInitializer {

    public static void main(String[] args) {

        SpringApplication.run(DemoApplication.class, args);

    }

    @Override

    protected SpringApplicationBuilder configure(SpringApplicationBuilder application) {

        return application.sources(DemoApplication.class);

    }

}
接下来我们实现一个简单的Rest程序,用于测试容器是否启动正常
/**

 * Created by liangyh on 2018/10/20.

 * Email:10856214@163.com

 */

@RestController

public class IndexController{

        @RequestMapping("/sayHello/{name}")

        public String sayHello(@PathVariable String name) {

            return "hello," + name;

        }

}
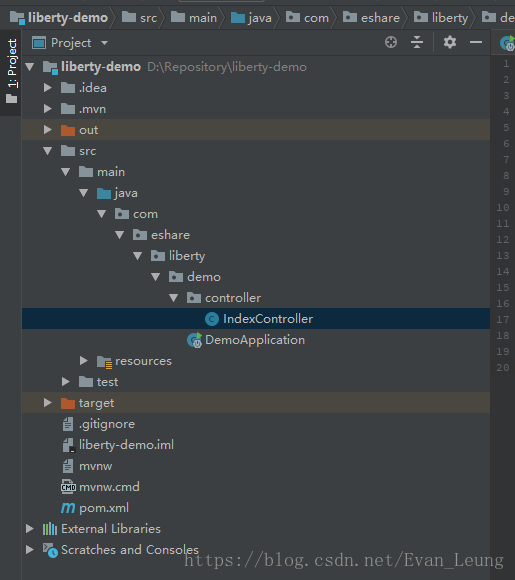
记住,Springboot的启动类必须置于其他类的同级或者外层,否则会出现扫描不到类的情况,完成项目结构如下:

配置Liberty应用服务器
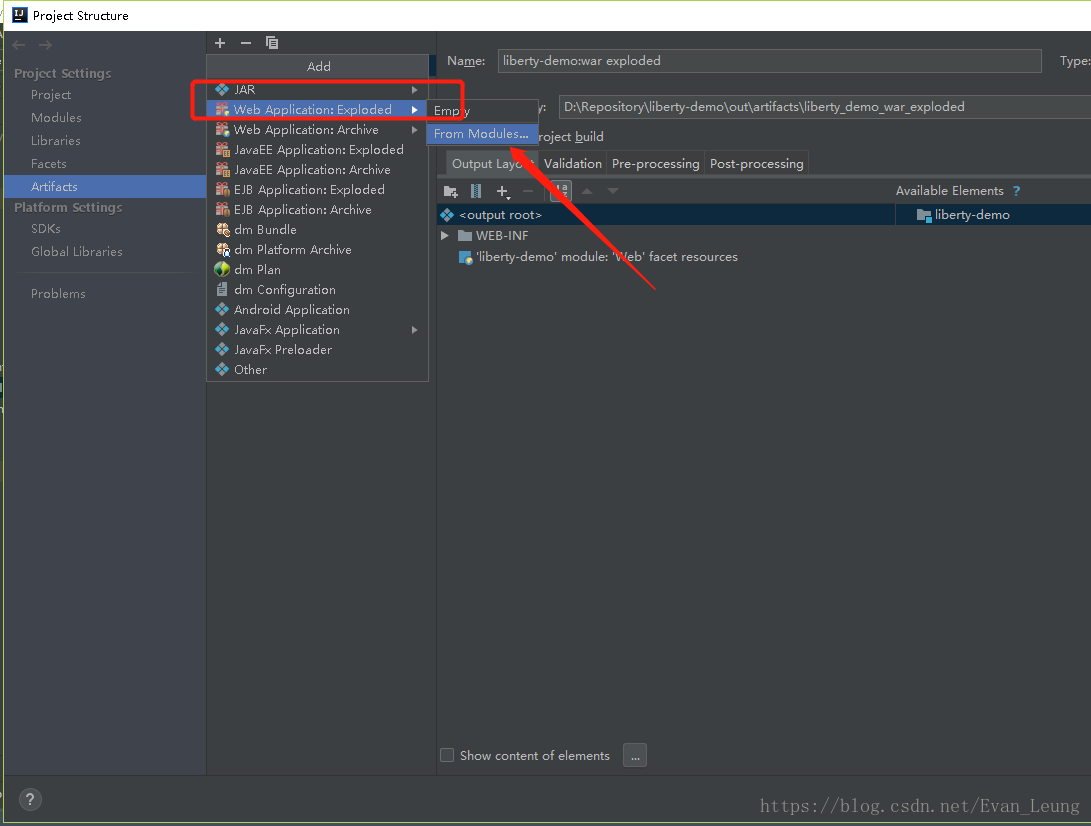
设置我们的模块包的打包方式
点击Peroject Structure->Artifacts,如下图所示选择打包方式:

选择完成后,点击Apply完成
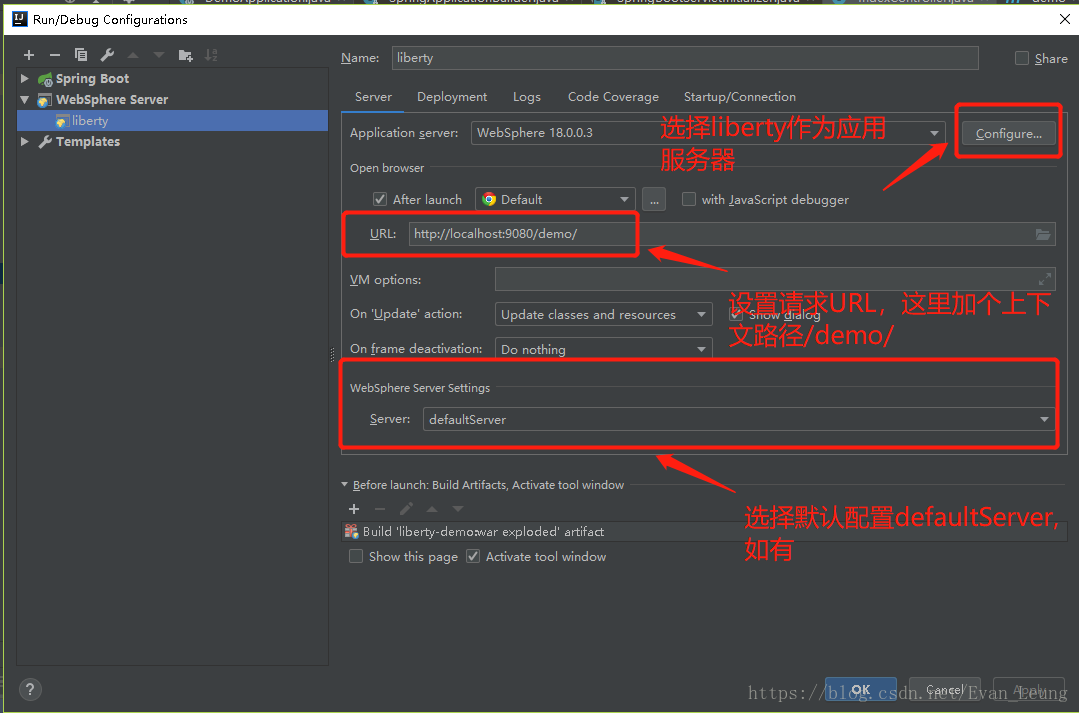
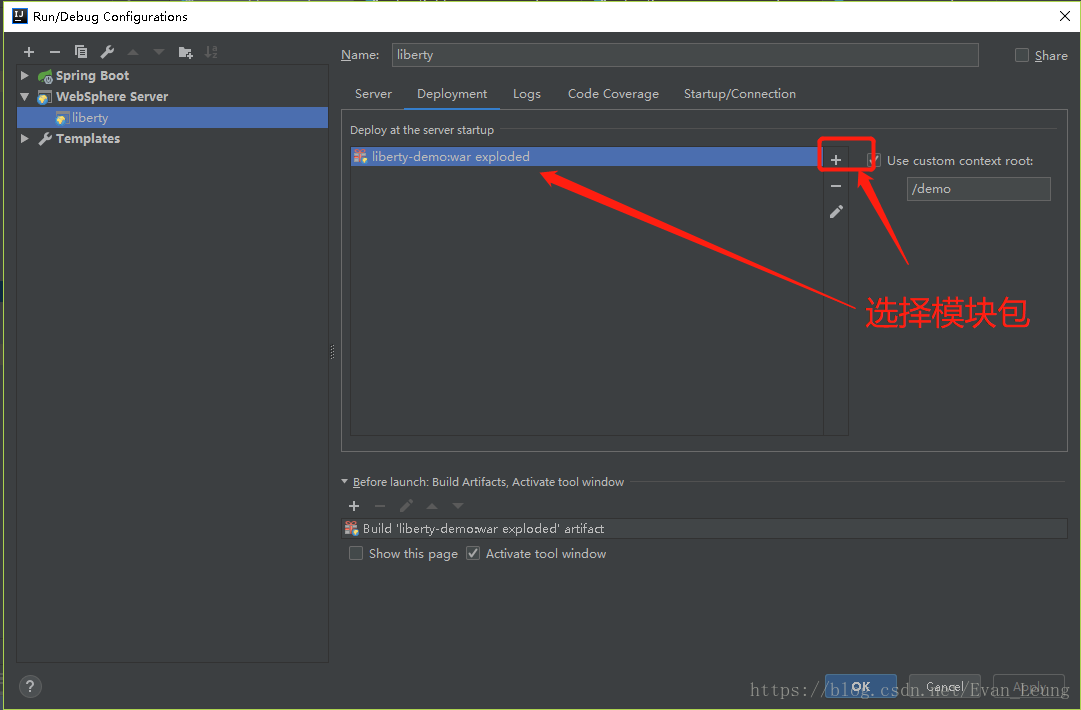
选择启动应用服务器
如下图所示,选择liberty作为我们的项目服务器,然后填入相应配置,必须配置请求上下文(如/demo/):


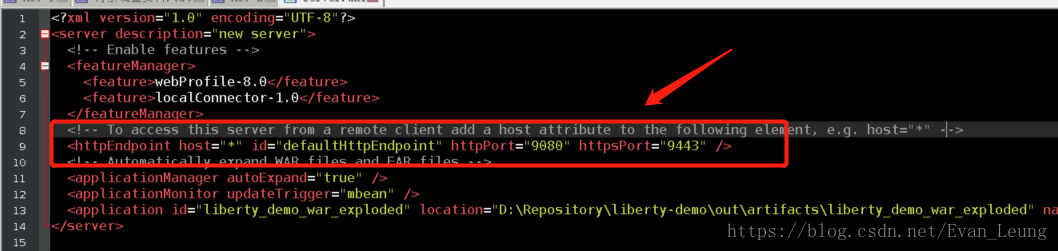
设置Liberty服务器配置
在wlp\usr\servers\defaultServer路径下,找到Liberty启动服务器配置server.xml,添加host="*",指定拦截任何请求,否则应用服务器不会拦截你的请求:

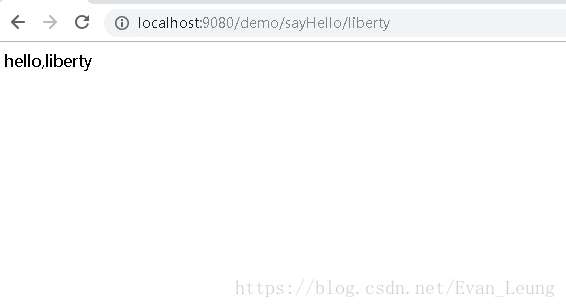
启动服务器验证
在IDEA启动服务器,浏览器输入http://localhost:9080/demo/sayHello/haha,可以看到如下结果:

liberty | 在IDEA整合Springboot与IBM liberty的更多相关文章
- 用Springboot干掉IBM的WAS-为公司省点钱
1 那一夜,你伤害了我 今夜的雨下得凉快,小南睡得正香,突然收到远洋运维小周的电话:Hello, Are you OK? WAS有issue,快起来help me! 只见小南登陆WAS机,查看了机器日 ...
- 整合springboot(app后台框架搭建四)
springboot可以说是为了适用SOA服务出现,一方面,极大的简便了配置,加速了开发速度:第二方面,也是一个嵌入式的web服务,通过jar包运行就是一个web服务: 还有提供了很多metric,i ...
- 整合 springboot 和 swagger出问题
整合 springboot 和 swagger ,出现报错, org.springframework.beans.factory.UnsatisfiedDependencyException: Err ...
- 【SpringBoot】搜索框架ElasticSearch介绍和整合SpringBoot
========================12章 搜索框架ElasticSearch介绍和整合SpringBoot ============================= 加入小D课堂技术交 ...
- netty-socketio整合springboot消息推送
netty-socketio整合springboot消息推送 1.netty-socketio消息推送 1)在项目中常常涉及到消息推送的情况,消息推送要求的实时性,使用传统的方式已经不能满足需求了: ...
- 教你 Shiro 整合 SpringBoot,避开各种坑
教你 Shiro 整合 SpringBoot,避开各种坑-----https://www.cnblogs.com/HowieYuan/p/9259638.html
- 基于 SpringBoot2.0+优雅整合 SpringBoot+Mybatis
SpringBoot 整合 Mybatis 有两种常用的方式,一种就是我们常见的 xml 的方式 ,还有一种是全注解的方式.我觉得这两者没有谁比谁好,在 SQL 语句不太长的情况下,我觉得全注解的方式 ...
- 消息中间件——RabbitMQ(十)RabbitMQ整合SpringBoot实战!(全)
前言 1. SpringBoot整合配置详解 publisher-confirms,实现一个监听器用于监听Broker端给我们返回的确认请求:RabbitTemplate.ConfirmCallbac ...
- Activiti7整合SpringBoot(十二)
1 SpringBoot 整合 Activiti7 的配置 为了能够实现 SpringBoot 与 Activiti7 整合开发,首先我们要引入相关的依赖支持.所以,我们在工程的 pom.xml 文件 ...
随机推荐
- mysql主从之binlog日志
mysql的binlog说明 主从复制依赖于二进制日志文件,简称为binlog binlog里面有存放了偏移信息 mysql主库binlog信息查看命令 [root@master ~]# mysql ...
- 【题解】PKUWC2018简要题解
[题解]PKUWC2018简要题解 Minimax 定义结点x的权值为: 1.若x没有子结点,那么它的权值会在输入里给出,保证这类点中每个结点的权值互不相同. 2.若x有子结点,那么它的权值有p的概率 ...
- ThreadLocal源码阅读
package java.lang; import java.lang.ref.WeakReference; import java.util.Objects; import java.util.co ...
- java实现单向循环链表
链表图解 带头结点的链表: 不带头结点的链表: 区别 带头结点的链表容易代码实现 不带头结点的容易实现循环链表和双向链表 代码的实现 (增减 删除) 节点实现: public class node { ...
- 1081 检查密码 (15分)C语言
本题要求你帮助某网站的用户注册模块写一个密码合法性检查的小功能.该网站要求用户设置的密码必须由不少于6个字符组成,并且只能有英文字母.数字和小数点 .,还必须既有字母也有数字. 输入格式: 输入第一行 ...
- 1049 数列的片段和 (20 分)C语言
给定一个正数数列,我们可以从中截取任意的连续的几个数,称为片段.例如,给定数列 { 0.1, 0.2, 0.3, 0.4 },我们有 (0.1) (0.1, 0.2) (0.1, 0.2, 0.3) ...
- notepad++中cmd运行中文乱码?
notepad++中有中文内容时,cmd运行时中文显示乱码,如何处理? 设置-->首选项-->新建-->选择ANSI编码(注意现在的文件不会被转换,要重新把代码拷入修建的文件中才可以 ...
- schedule of 2016-09-19~2016-09-25(Monday~Sunday)——1st semester of 2nd Grade
2016/9/19 Monday 1.make ppt for today's group meeting 2.recite 100 words 3.review <图解机器学习>ch1~ ...
- Java操作Jxl实现数据交互。三部曲——《第一篇》
Java操作Jxl实现.xsl及.xsls两种数据表格进行批量导入数据到SQL server数据库. 本文实现背景Web项目:前台用的框架是Easyui+Bootstrap结合使用,需要引入相应的Js ...
- Java 用集合实现简单的斗地主发牌
创建数组.集合,存放数据 public class FightAgainstLandlords { /** * poker集合,存储54张牌 */ private ArrayList<Strin ...