Android 自定义数字加减器
该自定义View主要是实现一款效果不错的数字加减器的功能的,但是也可以自定义选择器的外观颜色等。
1、自定义View的布局(add_sub_view.xml)
 <?xml version="1.0" encoding="utf-8"?>

 <LinearLayout xmlns:android="http://schemas.android.com/apk/res/android"

               android:layout_width="match_parent"

               android:layout_height="match_parent"

               android:background="@android:color/white"

               android:orientation="horizontal">

     <Button

         android:id="@+id/bt01"

         android:layout_width="32dp"

         android:layout_height="32dp"

         android:scaleType="fitCenter"

         android:textSize="18sp"/>

     <TextView

         android:id="@+id/et01"

         android:layout_width="32dp"

         android:layout_height="32dp"

         android:enabled="false"

         android:layout_gravity="center"

         android:gravity="center"

         android:textColor="#000000"

         android:textSize="16sp">

     </TextView>

     <Button

         android:id="@+id/bt02"

         android:layout_width="32dp"

         android:layout_height="32dp"

         android:scaleType="fitCenter"

         android:textSize="18sp"/>

 </LinearLayout>
2、定义该View的一些属性(attrs.xml)
 <?xml version="1.0" encoding="utf-8"?>

 <resources>

     <declare-styleable name="AddAndSubView">

         <attr name="textColor" format="color"/>

         <attr name="initValue" format="integer"/>

         <attr name="maxValue" format="integer"/>

         <attr name="minValue" format="integer"/>

         <attr name="textSize" format="dimension"/>

         <attr name="textFrameBackground" format="reference|color"/>

         <attr name="addBackground" format="reference|color"/>

         <attr name="subBackground" format="reference|color"/>

         <attr name="textFrameWidth" format="dimension"/>

         <attr name="addWidth" format="dimension"/>

         <attr name="subWidth" format="dimension"/>

         <attr name="addText" format="string"/>

         <attr name="subText" format="string"/>

     </declare-styleable>

 </resources>
3、定义该View的Java类(AddAndSubView.java)
 package com.ileevey.addsub;

 import android.content.Context;

 import android.content.res.Resources;

 import android.content.res.TypedArray;

 import android.graphics.drawable.ColorDrawable;

 import android.graphics.drawable.Drawable;

 import android.util.AttributeSet;

 import android.view.LayoutInflater;

 import android.view.View;

 import android.widget.Button;

 import android.widget.LinearLayout;

 import android.widget.TextView;

 public class AddAndSubView extends LinearLayout{

     /** 显示文本 */

     private TextView mTextView;

     /** 增加按钮 */

     private Button btAdd;

     /** 减少按钮 */

     private Button btReduce;

     /** 显示文本的长宽 */

     private int textFrameWidth;

     /** 显示文本及button中文字的颜色 */

     private int textColor;

     /** 初始值 */

     private int initValue;

     /** 最大值 */

     private int maxValue;

     /** 最小值 */

     private int minValue;

     /** 显示文本及button中文字的大小 */

     private int textSize;

     /** 显示文本的背景 */

     private Drawable textFrameBackground;

     /** 增加按钮的背景 */

     private Drawable addBackground;

     /** 减少按钮的背景 */

     private Drawable subBackground;

     /** 增加按钮的大小 */

     private int addWidth;

     /** 减少按钮的大小 */

     private int subWidth;

     /** 增加按钮中的文本 */

     private String addText;

     /** 减少按钮中的文本 */

     private String subText;

     public AddAndSubView(Context context, AttributeSet attrs) {

         super(context, attrs);

         initWidget(context);

         TypedArray a = context.obtainStyledAttributes(attrs, R.styleable.AddAndSubView);

         textColor = a.getColor(R.styleable.AddAndSubView_textColor, getResources().getColor(android.R.color.black));

         textSize = a.getDimensionPixelSize(R.styleable.AddAndSubView_textSize, 16);

         textFrameBackground =  a.getDrawable(R.styleable.AddAndSubView_textFrameBackground);

         textFrameWidth = a.getDimensionPixelSize(R.styleable.AddAndSubView_textFrameWidth, 48);

         addBackground = a.getDrawable(R.styleable.AddAndSubView_addBackground);

         subBackground = a.getDrawable(R.styleable.AddAndSubView_subBackground);

         initValue = a.getInt(R.styleable.AddAndSubView_initValue, 0);

         maxValue = a.getInt(R.styleable.AddAndSubView_maxValue, 1000000000);

         minValue = a.getInt(R.styleable.AddAndSubView_minValue, -1000000000);

         addWidth = a.getDimensionPixelSize(R.styleable.AddAndSubView_addWidth, 48);

         subWidth = a.getDimensionPixelSize(R.styleable.AddAndSubView_subWidth, 48);

         addText = a.getString(R.styleable.AddAndSubView_addText);

         subText = a.getString(R.styleable.AddAndSubView_subText);

         setAddBackground(addBackground);

         setAddText(addText);

         setAddWidth(addWidth);

         setInitValue(initValue);

         setMaxValue(maxValue);

         setMinValue(minValue);

         setSubBackground(subBackground);

         setSubText(subText);

         setSubWidth(subWidth);

         setTextColor(textColor);

         setTextFrameBackground(textFrameBackground);

         setTextFrameWidth(textFrameWidth);

         setTextSize(textSize);

         a.recycle();

     }

     protected void onFinishInflate() {

         super.onFinishInflate();

         addListener();

     }

     public void initWidget(Context context){

         LayoutInflater.from(context).inflate(R.layout.add_sub_view, this);

         mTextView = (TextView)findViewById(R.id.et01);

         btAdd = (Button)findViewById(R.id.bt01);

         btReduce = (Button)findViewById(R.id.bt02);

     }

     public void addListener(){

         btAdd.setOnClickListener(new OnClickListener() {

             public void onClick(View v) {

                 int num = Integer.valueOf(mTextView.getText().toString());

                 num++;

                 if (num >= maxValue+1)

                     return;

                 mTextView.setText(Integer.toString(num));

             }

         });

         btReduce.setOnClickListener(new OnClickListener() {

             @Override

             public void onClick(View v) {

                 int num = Integer.valueOf(mTextView.getText().toString());

                 num--;

                 if (num <= minValue-1)

                     return;

                 mTextView.setText(Integer.toString(num));

             }

         });

     }

     public int getTextFrameWidth() {

         return textFrameWidth;

     }

     public void setTextFrameWidth(int textFrameWidth) {

         this.textFrameWidth = textFrameWidth;

         mTextView.setWidth(textFrameWidth);

         mTextView.setHeight(textFrameWidth);

     }

     public int getTextColor() {

         return textColor;

     }

     public void setTextColor(int textColor) {

         this.textColor = textColor;

         mTextView.setTextColor(textColor);

         btAdd.setTextColor(textColor);

         btReduce.setTextColor(textColor);

     }

     public int getInitValue() {

         return initValue;

     }

     public void setInitValue(int initValue) {

         this.initValue = initValue;

         mTextView.setText(String.valueOf(initValue));

     }

     public int getMaxValue() {

         return maxValue;

     }

     public void setMaxValue(int maxValue) {

         this.maxValue = maxValue;

     }

     public int getMinValue() {

         return minValue;

     }

     public void setMinValue(int minValue) {

         this.minValue = minValue;

     }

     public int getTextSize() {

         return textSize;

     }

     public void setTextSize(int textSize) {

         this.textSize = textSize;

         mTextView.setTextSize(textSize);

     }

     public Drawable getTextFrameBackground() {

         return textFrameBackground;

     }

     public void setTextFrameBackground(Drawable textFrameBackground) {

         this.textFrameBackground = textFrameBackground;

         mTextView.setBackgroundDrawable(textFrameBackground);

     }

     public Drawable getAddBackground() {

         return addBackground;

     }

     public void setAddBackground(Drawable addBackground) {

         this.addBackground = addBackground;

         Resources res = getResources();

         int color = res.getColor(android.R.color.darker_gray);

         Drawable drawable = new ColorDrawable(color);

         btAdd.setBackgroundDrawable(addBackground==null?drawable:addBackground);

     }

     public Drawable getSubBackground() {

         return subBackground;

     }

     public void setSubBackground(Drawable subBackground) {

         this.subBackground = subBackground;

         Resources res = getResources();

         int color = res.getColor(android.R.color.darker_gray);

         Drawable drawable = new ColorDrawable(color);

         btReduce.setBackgroundDrawable(subBackground==null?drawable:subBackground);

     }

     public int getAddWidth() {

         return addWidth;

     }

     public void setAddWidth(int addWidth) {

         this.addWidth = addWidth;

         btAdd.setWidth(addWidth);

         btAdd.setHeight(addWidth);

     }

     public int getSubWidth() {

         return subWidth;

     }

     public void setSubWidth(int subWidth) {

         this.subWidth = subWidth;

         btReduce.setWidth(subWidth);

         btReduce.setHeight(subWidth);

     }

     public String getAddText() {

         return addText;

     }

     public void setAddText(String addText) {

         this.addText = addText;

         btAdd.setText(addText);

     }

     public String getSubText() {

         return subText;

     }

     public void setSubText(String subText) {

         this.subText = subText;

         btReduce.setText(subText);

     }

 }
4、在显示视图中添加该自定义View
 <?xml version="1.0" encoding="utf-8"?>

 <LinearLayout xmlns:android="http://schemas.android.com/apk/res/android"

               xmlns:asv="http://schemas.android.com/apk/res-auto"

               android:layout_width="match_parent"

               android:layout_height="match_parent"

               android:background="@android:color/white"

               android:orientation="vertical">

     <TextView

         android:layout_width="wrap_content"

         android:layout_height="wrap_content"

         android:layout_margin="16dp"

         android:text="数字通过按键可以加减: "

         android:textSize="20sp">

     </TextView>

     <com.ileevey.addsub.AddAndSubView

         android:id="@+id/meter"

         android:layout_width="wrap_content"

         android:layout_height="wrap_content"

         android:layout_gravity="center"

         asv:addBackground="@drawable/selector_add"

         asv:initValue="0"

         asv:maxValue="10"

         asv:minValue="-10"

         asv:subBackground="@drawable/selector_sub"/>

 </LinearLayout>
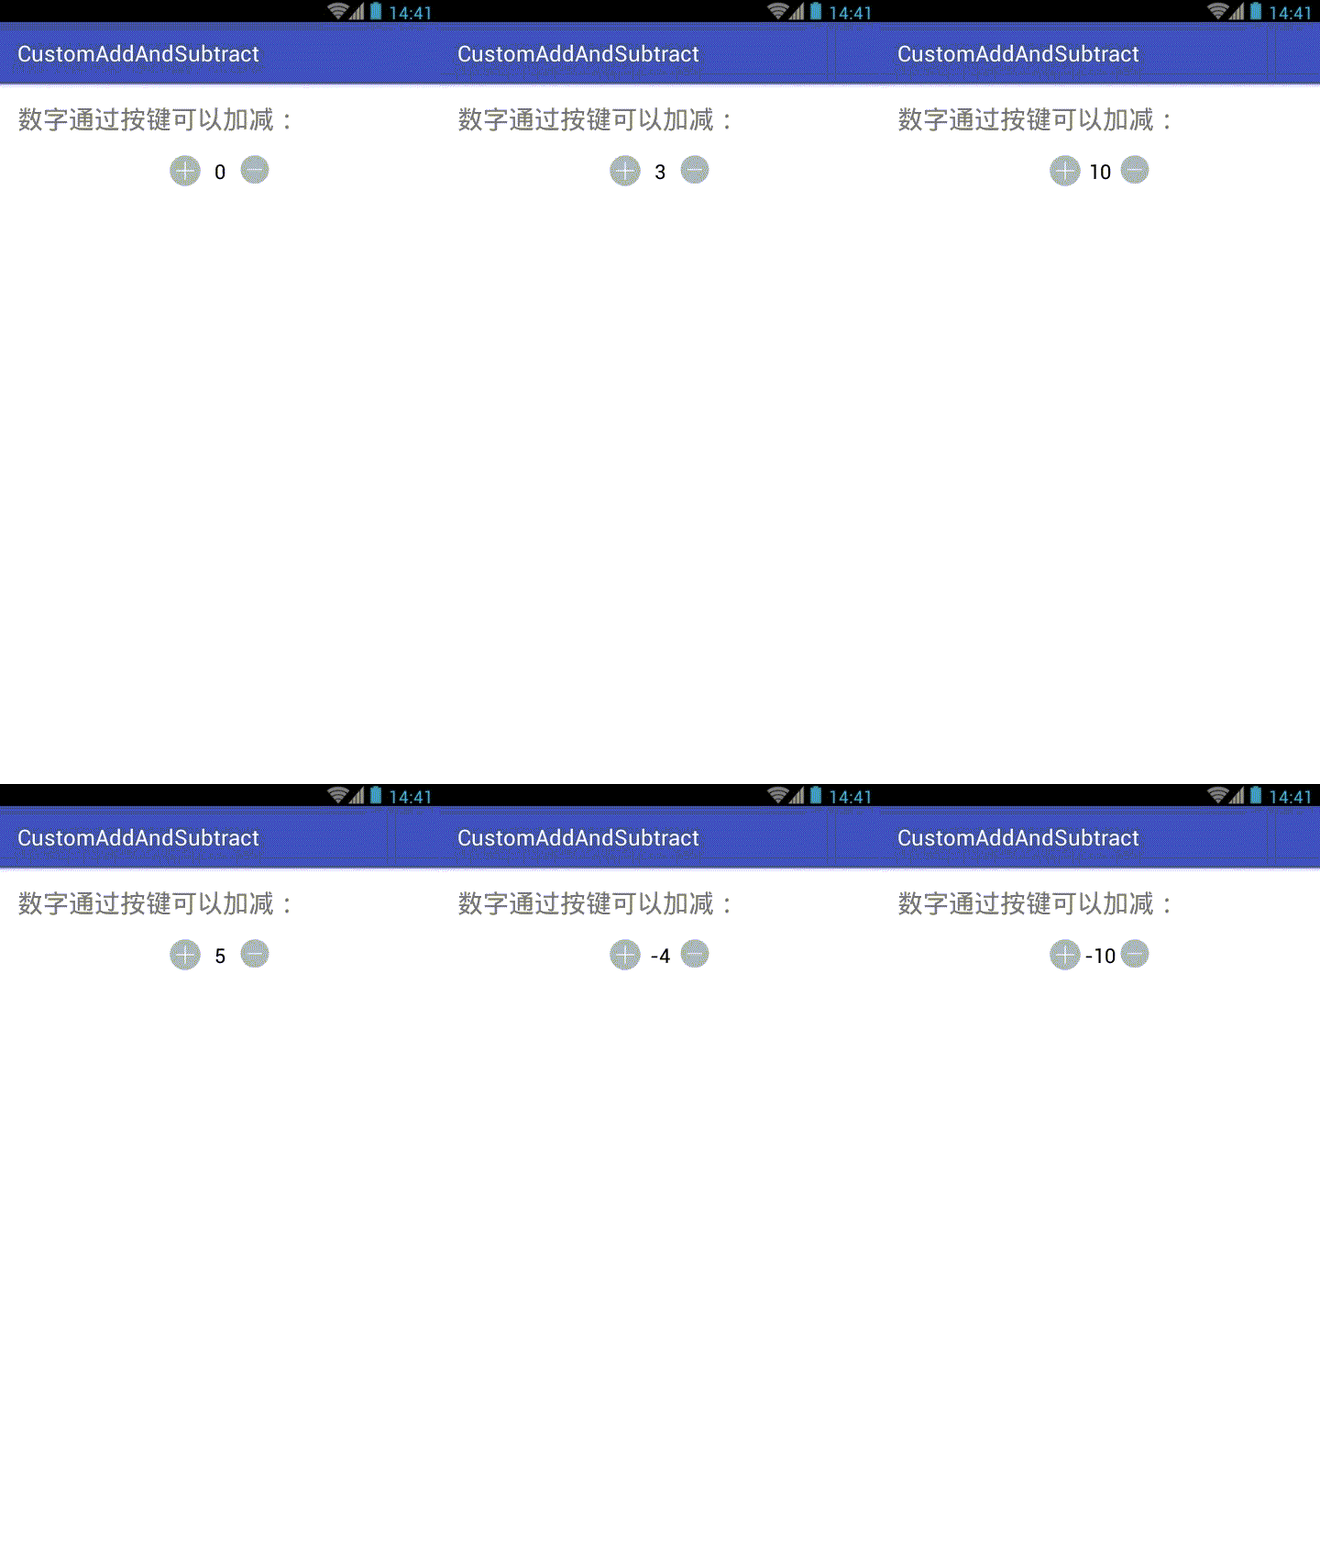
效果如下图:

Android 自定义数字加减器的更多相关文章
- 我的Android进阶之旅------>Android自定义View实现带数字的进度条(NumberProgressBar)
今天在Github上面看到一个来自于 daimajia所写的关于Android自定义View实现带数字的进度条(NumberProgressBar)的精彩案例,在这里分享给大家一起来学习学习!同时感谢 ...
- Android自定义View4——统计图View
1.介绍 周末在逛慕课网的时候,看到了一张学习计划报告图,详细记录了自己一周的学习情况,天天都是0节课啊!正好在学习Android自定义View,于是就想着自己去写了一个,这里先给出一张慕课网的图,和 ...
- (转)[原] Android 自定义View 密码框 例子
遵从准则 暴露您view中所有影响可见外观的属性或者行为. 通过XML添加和设置样式 通过元素的属性来控制其外观和行为,支持和重要事件交流的事件监听器 详细步骤见:Android 自定义View步骤 ...
- Android 自定义View合集
自定义控件学习 https://github.com/GcsSloop/AndroidNote/tree/master/CustomView 小良自定义控件合集 https://github.com/ ...
- [原] Android 自定义View 密码框 例子
遵从准则 暴露您view中所有影响可见外观的属性或者行为. 通过XML添加和设置样式 通过元素的属性来控制其外观和行为,支持和重要事件交流的事件监听器 详细步骤见:Android 自定义View步骤 ...
- Android自定义View
转载请标明出处:http://blog.csdn.net/lmj623565791/article/details/24252901 很多的Android入门程序猿来说对于Android自定义View ...
- 带你体验Android自定义圆形刻度罗盘 仪表盘 实现指针动态改变
带你体验Android自定义圆形刻度罗盘 仪表盘 实现指针动态改变 转 https://blog.csdn.net/qq_30993595/article/details/78915115 近期有 ...
- android 自定义动画
android自定义动画注意是继承Animation,重写里面的initialize和applyTransformation,在initialize方法做一些初始化的工作,在applyTransfor ...
- Android自定义View 画弧形,文字,并增加动画效果
一个简单的Android自定义View的demo,画弧形,文字,开启一个多线程更新ui界面,在子线程更新ui是不允许的,但是View提供了方法,让我们来了解下吧. 1.封装一个抽象的View类 B ...
随机推荐
- 【面试题】整理一下2018年java技术要领
整理一下2018年java技术要领 基础篇 基本功 面向对象的特征 final, finally, finalize 的区别 int 和 Integer 有什么区别 重载和重写的区别 抽象类和接口有什 ...
- RecyclerView混合布局
本来想把公司的UI图放上来,考虑到版权等未知因素,就拿网上的图来说了: 类似的这种布局,有的一行只有一张图片,有的一行有两个元素,有个一行有三个元素..就是混合的布局方式 参考文献: https:// ...
- 性能测试篇:LoadRunner11 压力测试实例笔记
最近在学习用loadrunner做web性能测试,简单记录一下一个自学实例流程. 1.录制测试脚本 (1).打开LR11,点击create/edit Script来打开VUgen (2).点击新建 ( ...
- DOS中的CD命令详解
CD命令是改变子目录的命令.格式:CD [路径] . 值得明确的是:CD命令只能进入当前盘符中的文件夹,改变操作的根目录(改变操作盘符),则不需用cd.例如你当前是在c:盘下,要到d:盘,只需键入d: ...
- Spring的消息 Java Message Service (JMS)
Spring有两种方法提供对EJB的支持: Spring能让你在Spring的配置文件里,把EJB作为Bean来声明.这样,把EJB引用置入到其他Bean的属性里就成为可能了,好像EJB就是另一个P ...
- 【多重背包】CDOJ1691 这是一道比CCCC简单题经典的中档题
#include<cstdio> #include<algorithm> using namespace std; int n,V,w[110],c[110],a[110],f ...
- 【强连通分量缩点】【拓扑排序】【dp预处理】CDOJ1640 花自飘零水自流,一种相思,两处闲愁。
题意: 在n个点m条边的有向图上,从1出发的回路最多经过多少个不同的点 可以在一条边上逆行一次 题解: 在同一个强连通分量中,显然可以经过当中的每一个点 因此先将强连通分量缩点,点权为强连通分量的点数 ...
- 20162304 实验二《Java面向对象程序设计》实验报告
20162304 实验二<Java面向对象程序设计>实验报告 实验内容 初步掌握单元测试和TDD 理解并掌握面向对象三要素:封装.继承.多态 初步掌握UML建模 熟悉S.O.L.I.D原则 ...
- [HNOI/AHOI2017]影魔
[HNOI/AHOI2017]影魔 题目大意: 有一排\(n(n\le2\times10^5)\)个数\(k_{1\sim n}\).对于点对\((i,j)\),若不存在\(k_s(i<s< ...
- 【spring boot】使用注解@ConfigurationProperties读取配置文件时候 报错 org.springframework.beans.factory.UnsatisfiedDependencyException: Error creating bean with name 'rocketmqAutoConfiguration': Unsatisfied dependenc
如题,配置文件如下: #注册中心配置 eureka: instance: instanceId: ${spring.application.name}:${random.int} hostname: ...
