Android-读取操作系统通话记录并/拨打电话/发送短信/复制号码到拨号盘
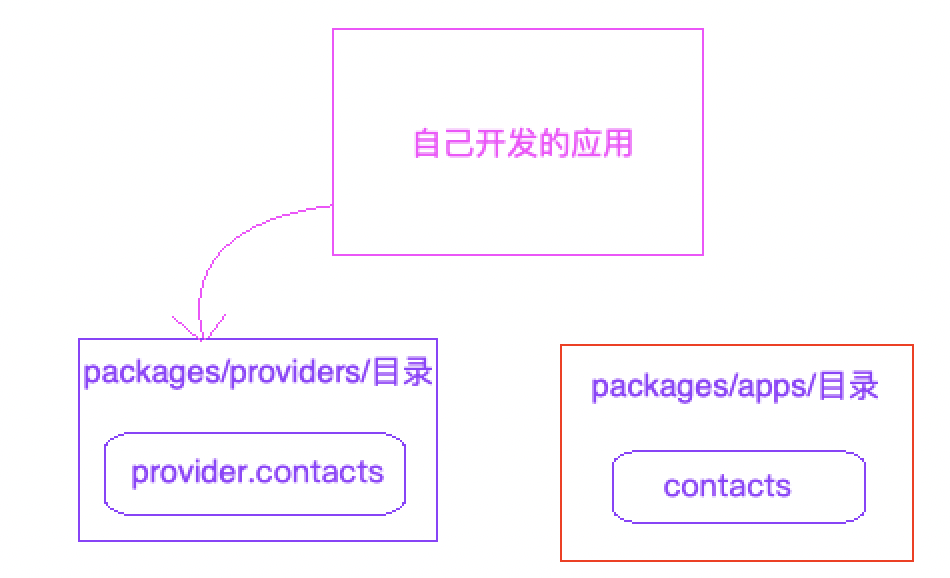
apps目录的contacts应用(有读取通话记录功能),是访问provider目录的provider.contacts应用(有暴露通话记录),所以要阅读Android操作系统源码-->packages/providers/ContactsProvider通话记录的(内容提供者)
阅读 com.android.providers.contacts 数据库与表
Android操作系统的文件系统目录/data/data/com.android.contacts,是访问/data/data/com.android.providers.contacts(内容提供者应用)
所以需要阅读/data/data/com.android.providers.contacts(内容提供者应用)的数据库:

首选要有一条通话记录

打开 contacts2.db
打开后:表非常多,视图非常多,等等,但只需关心,calls(通话记录表)

阅读 com.android.providers.contacts AndroidManifest.xml
android:name="CallLogProvider" 通话记录的内容提供者
android:authorities="call_log" 授权唯一标识
android:exported="true" 允许对外输出
android:readPermission="android.permission.READ_CALL_LOG" 访问者必须要配置的权限
android:writePermission="android.permission.WRITE_CALL_LOG" 访问者必须要配置的权限
    <provider android:name="CallLogProvider"

            android:authorities="call_log"

            android:syncable="false" android:multiprocess="false"

            android:exported="true"

            android:readPermission="android.permission.READ_CALL_LOG"

            android:writePermission="android.permission.WRITE_CALL_LOG">

        </provider>
阅读 com.android.providers.contacts CallLogProvider.java
首先要找到的就是Uri,所以搜索UriMatcher的matcher.addURI
有规律,通常情况下,matcher.addURI(授权, path, code),第二个参数 path 和数据库表名对应的 calls
private static final UriMatcher sURIMatcher = new UriMatcher(UriMatcher.NO_MATCH);

    static {

        sURIMatcher.addURI(CallLog.AUTHORITY, "calls", CALLS);

        sURIMatcher.addURI(CallLog.AUTHORITY, "calls/#", CALLS_ID);

        sURIMatcher.addURI(CallLog.AUTHORITY, "calls/filter/*", CALLS_FILTER);

}
C应用 AndroidManifest.xml 权限的配置:
  <!--

        访问操作系统短信通话记录提供者应用,需要加入的权限

        android:readPermission="android.permission.READ_CALL_LOG"

        android:writePermission="android.permission.WRITE_CALL_LOG"

    -->

    <uses-permission android:name="android.permission.READ_CALL_LOG" />

    <uses-permission android:name="android.permission.WRITE_CALL_LOG" />
  <!-- C应用配置拨打电话的权限 拨打电话的权限 -->

    <uses-permission android:name="android.permission.CALL_PHONE" />
C应用 读取操作系统通话记录并/拨打电话/发送短信/复制号码到拨号盘 Java代码:
package liudeli.cp.client;

import android.app.Activity;

import android.app.AlertDialog;

import android.content.DialogInterface;

import android.content.Intent;

import android.database.Cursor;

import android.net.Uri;

import android.os.Bundle;

import android.provider.CallLog;

import android.util.Log;

import android.view.View;

import android.widget.AdapterView;

import android.widget.ListView;

import android.widget.SimpleCursorAdapter;

public class CallLogActivity extends Activity {

    /**

     * 找寻到了Android操作系统的通话记录内容提供者的授权和Uri

     * android:authorities="call_log"

     * sURIMatcher.addURI(CallLog.AUTHORITY, "calls", CALLS);

     */

    private final String AUTHORITY = "call_log";

    private Uri callLogUri = Uri.parse("content://" + AUTHORITY + "/calls");

    /**

     * 系统也提供了常量的方式来获取Uir,为了学习,还是直接看源码复制出来的比较理解些

     */

    /*private final String AUTHORITY = CallLog.AUTHORITY;

    private Uri callLogUri =  Uri.parse(CallLog.CONTENT_URI + "/calls");*/

    @Override

    protected void onCreate(Bundle savedInstanceState) {

        super.onCreate(savedInstanceState);

        setContentView(R.layout.activity_call_log);

        ListView listView = findViewById(R.id.listview);

        String[] porjecting = new String[]{"_id" ,"number", "date", "type"};

        final Cursor cursor = getContentResolver().query(callLogUri,

                 porjecting,

                null, // 不要查询条件

                null, // 不要查询条件值

                null); // 不排序

        while (cursor.moveToNext()) {

            Log.d("cccc", "" + cursor.getString(0) + "  "+ cursor.getString(1) + " " + cursor.getString(2) + "   "+ cursor.getString(3));

        }

        final SimpleCursorAdapter cursorAdapter = new SimpleCursorAdapter(this, // 上下文

                          R.layout.layou_calllog_item, // Item显示的布局

                          cursor, // 游标数据

                          porjecting, // 数据从哪里来(从Cursor中获取对应的字段)

                          new int[]{R.id.tv_id, R.id.tv_number, R.id.tv_date, R.id.tv_type} // 数据到哪里去,到Item布局里面的控件显示

        );

        listView.setAdapter(cursorAdapter);

        // 千万不能关闭 cursor.close();,否则数据展示不出来

        listView.setOnItemLongClickListener(new AdapterView.OnItemLongClickListener() {

            @Override

            public boolean onItemLongClick(AdapterView<?> parent, View view, int position, long id) {

                // 获取Item的值 (转换规则,传入什么类型,就转换成什么类型)

                final Cursor itemCursor = (Cursor) cursorAdapter.getItem(position);

                /**

                 * 把Cursor移动到指定的行数,然后在取值 itemCursor.getString(0~9)

                 */

                itemCursor.moveToPosition(position);

                new AlertDialog.Builder(CallLogActivity.this)

                        .setTitle("请选择")

                        /*.setMessage("请选择,下面列表的功能")*/ //列表对话框不能设置这个,否则显示不出来

                        .setItems(new String[]{"拨打电话", "复制号码到拨号盘", "复制号码到短信编辑界面"}, new DialogInterface.OnClickListener() {

                            @Override

                            public void onClick(DialogInterface dialog, int which) {

                                // 把Cursor移动到指定的行数,然后在取值 itemCursor.getString(0~9)

                                String number = itemCursor.getString(itemCursor.getColumnIndex("number"));

                                /**

                                 * 下面这三个功能,都需要隐式意图的方式去激活系统暴露的组件

                                 * 匹配规则:只要匹配一组,就可以来

                                 */

                                switch (which) {

                                    case 0: // 拨打电话

                                        Intent intentCall =  new Intent();

                                        intentCall.setAction(Intent.ACTION_CALL);

                                        intentCall.setData(Uri.parse("tel:" + number));

                                        startActivity(intentCall);

                                        break;

                                    case 1: // 复制号码到拨号盘

                                        Intent intentCopyCall = new Intent();

                                        intentCopyCall.setAction(Intent.ACTION_DIAL);

                                        intentCopyCall.setData(Uri.parse("tel:" + number));

                                        startActivity(intentCopyCall);

                                        break;

                                    case 2: // 复制号码到短信编辑界面

                                        Intent intentSmsEdit = new Intent();

                                        intentSmsEdit.setAction(Intent.ACTION_VIEW);

                                        intentSmsEdit.setData(Uri.parse("sms:" + number));

                                        startActivity(intentSmsEdit);

                                        break;

                                    default:

                                        break;

                                }

                            }

                        })

                        .show();

                return false;

            }

        });

    }

}
C应用显示的Layout:
<?xml version="1.0" encoding="utf-8"?>

<RelativeLayout xmlns:android="http://schemas.android.com/apk/res/android"

    android:layout_width="match_parent"

    android:layout_height="match_parent">

    <ListView

        android:id="@+id/listview"

        android:layout_width="match_parent"

        android:layout_height="match_parent" />

</RelativeLayout>
C应用显示的Layout --> ListVIew-->Item布局:
<?xml version="1.0" encoding="utf-8"?>

<LinearLayout xmlns:android="http://schemas.android.com/apk/res/android"

    android:orientation="horizontal"

    android:layout_width="match_parent"

    android:layout_height="wrap_content"

    android:layout_marginBottom="8dp">

    <!-- 默认比重为0 我先填充 -->

    <LinearLayout

        android:layout_width="wrap_content"

        android:layout_height="wrap_content"

        android:orientation="vertical">

        <TextView

            android:layout_width="wrap_content"

            android:layout_height="wrap_content"

            android:textSize="20sp"

            android:text="id"

            android:textColor="@android:color/black"

            />

        <TextView

            android:layout_width="wrap_content"

            android:layout_height="wrap_content"

            android:textSize="20sp"

            android:text="number"

            android:textColor="@android:color/black"

            />

        <TextView

            android:layout_width="wrap_content"

            android:layout_height="wrap_content"

            android:textSize="20sp"

            android:text="date"

            android:textColor="@android:color/black"

            android:layout_marginTop="5dp"

            />

        <TextView

            android:layout_width="wrap_content"

            android:layout_height="wrap_content"

            android:textSize="20sp"

            android:text="type"

            android:textColor="@android:color/black"

            android:layout_marginTop="5dp"

            />

    </LinearLayout>

    <!-- 哥们,你已经填充完来吧,剩下的空间我全部使用 -->

    <LinearLayout

        android:layout_width="0dp"

        android:layout_height="wrap_content"

        android:orientation="vertical"

        android:layout_weight="1"

        android:layout_marginLeft="20dp"

        >

        <TextView

            android:id="@+id/tv_id"

            android:layout_width="wrap_content"

            android:layout_height="wrap_content"

            android:textSize="20sp"

            android:text="id"

            android:textColor="@android:color/black"

            />

        <TextView

            android:id="@+id/tv_number"

            android:layout_width="wrap_content"

            android:layout_height="wrap_content"

            android:textSize="20sp"

            android:text="number"

            android:textColor="@android:color/black"

            />

        <TextView

            android:id="@+id/tv_date"

            android:layout_width="wrap_content"

            android:layout_height="wrap_content"

            android:textSize="20sp"

            android:text="date"

            android:textColor="@android:color/black"

            android:layout_marginTop="5dp"

            />

        <TextView

            android:id="@+id/tv_type"

            android:layout_width="wrap_content"

            android:layout_height="wrap_content"

            android:textSize="20sp"

            android:text="type"

            android:textColor="@android:color/black"

            android:layout_marginTop="5dp"

            />

    </LinearLayout>

</LinearLayout>
C应用效果图:

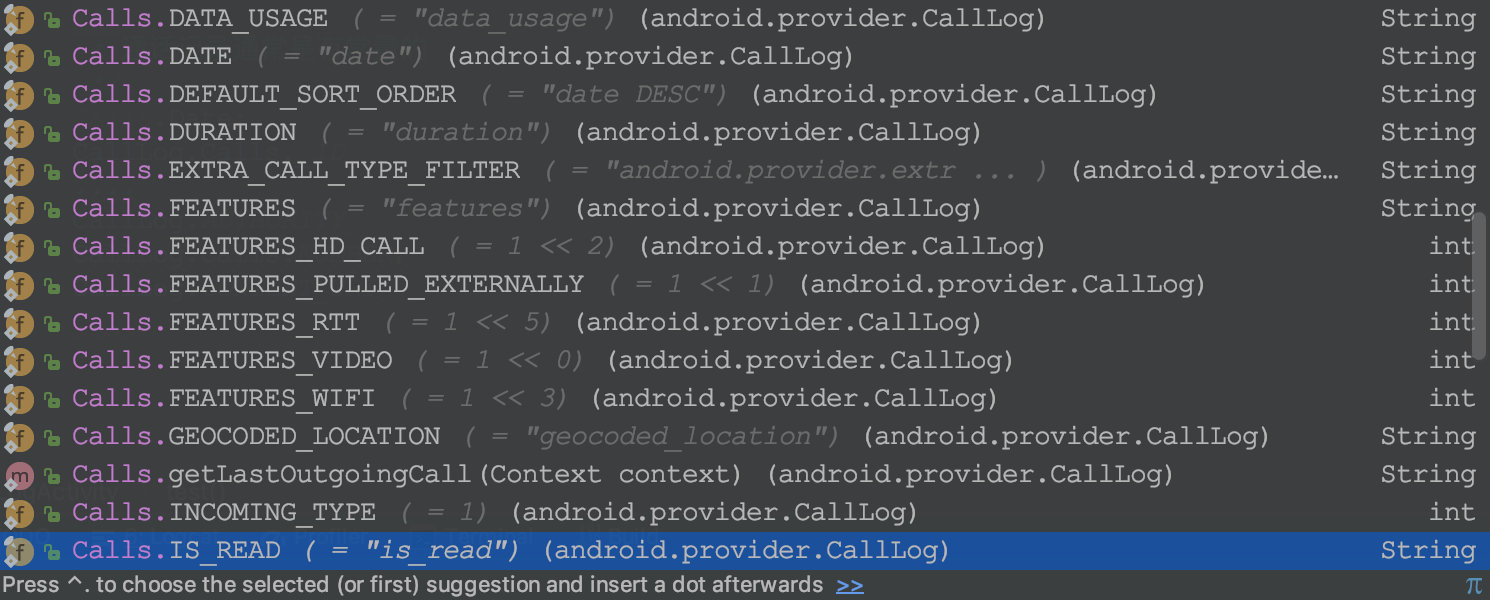
真实开发中,必须要用常量,才靠谱,万一字段变来怎么办,是吧
    /**

         * 通话记录通常是有常量的

         */

        Calls.Date;

        CallLog.Calls._ID

        ....

        CallLog.AUTHORITY

        CallLog.Calls.NUMBER;

        CallLog.CONTENT_URI

        ....
Android-读取操作系统通话记录并/拨打电话/发送短信/复制号码到拨号盘的更多相关文章
- android 入门 002 (拨打电话,发送短信)
一.拨打电话 1.首先做好界面,代码如下: layout =>activity_main.xml 中 <LinearLayout xmlns:android="http://sc ...
- iOS_拨打电话/发送短信
GitHub address : https://github.com/mancongiOS/makeACallAndSendMessage.git 功能一: 拨打电话 1.可以有提示框.提示该电话号 ...
- 调用 url_launcher 模块打开外部浏 览器 打开外部应用 拨打电话 发送短信
1.Flutter url_launcher 模块 Flutter url_launcher 模块可以让我们实现打开外部浏览器.打开外部应用.发送短信.拨打电话等功能. https://p ...
- Arduino+sim800C家居安防火灾报警 拨打电话 发送短信例程程序
家居安防报警器,参考程序. 火灾报警 涉及用sim800c发短信,拨打电话通知. 接线: Sim800c 3.3V -> Arduino 3.3V Sim800c GND -> Ardui ...
- IOS中调用系统拨打电话发送短信
一.调用打电话界面 [[UIApplication sharedApplication] openURL:[NSURL URLWithString:[NSString stringWithFormat ...
- html5 安卓拨打电话 发短信
方法一: <input name=”phone_no” format=”*m” value=”13″/> <do type=”option” label=”呼出号”> < ...
- java攻城师之路(Android篇)--搭建开发环境、拨打电话、发送短信、布局例子
一.搭建开发环境 1.所需资源 JDK6以上 Eclipse3.6以上 SDK17, 2.3.3 ADT17 2.安装注意事项 不要使用中文路径 如果模拟器默认路径包含中文, 可以设置android_ ...
- Android 打开URL中的网页和拨打电话、发送短信功能
拨打电话需要的权限 <uses-permission android:name="android.permission.CALL_PHONE"/> 为了省事界面都写一起 ...
- Android中使用Intent的Action和Data属性实现点击按钮跳转到拨打电话和发送短信
场景 点击拨打电话按钮,跳转到拨打电话页面 点击发送短信按钮,跳转到发送短信页面 注: 博客: https://blog.csdn.net/badao_liumang_qizhi 关注公众号 霸道的程 ...
随机推荐
- 聚合模型---K-Means
聚类模型:K-Means 聚类(clustering)属于无监督学习(unsupervised learning) 无类别标记 在线 demo:http://syskall.com/kmeans.js ...
- 「小程序JAVA实战」小程序模板在外部页面引用(20)
转自:https://idig8.com/2018/08/09/xiaochengxu-chuji-20/ 不知道老铁还有印象吗?当时讲模板的时候,是在当前的页面进行模板的应用,如何外部的方式引用模板 ...
- JSTL之C标签的用法
转自:https://my.oschina.net/zimingforever/blog/78980 最近开始整理以前的onenote,居然有200多篇,大致翻了下,很多内容都是在大学的时候学习的时候 ...
- Mysql 5.6 源码编译安装
简介: 多余的话不说,就是源码安装 Mysql 5.6 ,机器内存 512 MB ,系统 CentOS 6.6 ,安装方式 minimal ! 1.安装底层支持包 shell > yum -y ...
- C# Attribute的用法
{ { Attribute[] atts = Attribute.GetCustomAttribut ...
- Linux实战教学笔记55:开源虚拟化KVM(三)管理虚拟网络
六,管理虚拟网络 [x] Linux网桥基本概念 [x] qemu-kvm支持的网络 [x] 向虚拟机添加虚拟网络连接 [x] 基于NAT的虚拟网络 [x] 基于网桥的虚拟网络 [x] 用户自定义的隔 ...
- CMDB-客户端
配置文件的设置 大体思路: 1,通过开始文件将用户配置信息的文件放置到环境变量中. 2,在lib文件中的config文件中,从环境变量中获取到用户的配置,通过importlib模块导入用户配置文件,通 ...
- 80. Remove Duplicates from Sorted Array II (Array)
Follow up for "Remove Duplicates": What if duplicates are allowed at most twice? For examp ...
- Opencv Match Template(轮廓匹配)
#include <iostream>#include <opencv2/opencv.hpp> using namespace std;using namespace cv; ...
- spring与mybatis五种整合方法
1.采用数据映射器(MapperFactoryBean)的方式 不用写mybatis映射文件,采用注解方式提供相应的sql语句和输入参数. (1)Spring配置文件: <!-- 引入jdbc ...