折腾deeplin系统
1.双系统失败记录
多系统启动问题
先安装完deepin,发现再安装windows怎么都起不起来,哪怕他们已经安装在不同的盘
(体现再Windows7通过ghost位于另外一个盘,但就是没有启动项)
为了装双系统,损失惨重,sda2盘不幸被格式化,千万不要幻想pe工具可以把系统写到磁盘的中间区域,
它一定是从磁盘的起始区域开始写,所以通过压缩卷弄出来的空间装系统一定不靠谱,会导致数据覆盖的!!!
window7 sda2
deepin sdb
不得不佩服deepin,无论bios如何设置,deepin系统总是能启动起来,哪怕开机启动项里已经完全排除了sdb盘。
deepin这样做真的好吗,安装的时候求着我要一个EFI格式分区(sdb1),可装完就翻脸不认人了,直接把我的bios
启动顺序给无视了(被欺骗的感觉),使用efibootmgr可以发现,它完全自己搞了一套启动顺序
sain@Linux:~/Desktop$ efibootmgr

BootCurrent: 0000

Timeout: 1 seconds

BootOrder: 0000,0001,0002,0005,0006

Boot0000* deepin

Boot0001* Hard Drive

Boot0002  UEFI OS

Boot0005  UEFI OS

Boot0006  USB
/etc/grub.d/40_custom (用于生成/boot/grub/grub.cfg中的自定义引导项)
sain@Linux:/etc/grub.d$ ls

00_header  05_debian_theme  10_linux  20_linux_xen  30_os-prober  30_uefi-firmware  40_custom  41_custom  README

READEM
All executable files in this directory are processed in shell expansion order.
00_*: Reserved for 00_header.
10_*: Native boot entries.
20_*: Third party apps (e.g. memtest86+).
The number namespace in-between is configurable by system installer and/or
administrator. For example, you can add an entry to boot another OS as
01_otheros, 11_otheros, etc, depending on the position you want it to occupy in
the menu; and then adjust the default setting via /etc/default/grub.
文件/etc/default/grub也并无想要的东西
# Written by com.deepin.daemon.Grub2

GRUB_BACKGROUND="/boot/grub/themes/deepin/background.png"

GRUB_CMDLINE_LINUX=""

GRUB_CMDLINE_LINUX_DEFAULT="splash quiet"

GRUB_DEFAULT="0"

GRUB_DISTRIBUTOR="`/usr/bin/lsb_release -d -s 2>/dev/null || echo Deepin`"

GRUB_GFXMODE="1920x1080"

GRUB_THEME="/boot/grub/themes/deepin/theme.txt"

GRUB_TIMEOUT="5"
修改
/etc/grub.d/40_custom
#!/bin/sh

exec tail -n + $

# This file provides an easy way to add custom menu entries.  Simply type the

# menu entries you want to add after this comment.  Be careful not to change

# the 'exec tail' line above.

menuentry 'Windows 7 (loader) (on /dev/sda2)' --class windows {

    insmod part_msdos

    insmod ntfs

    set root='hd0,msdos2'

    chainloader +

}
重新生成 /boot/grub/grub.cfg
sudo grub-mkconfig -o /boot/grub/grub.cfg
打开设置那里,可以发现菜单多了选项
其实这样也只不过是菜单上多了个win7选项,肯定还是无法启动的

反复修改,都无法启动,提示找不到磁盘或者invalid EFI file path
UUID的获取sudo blkid
menuentry 'Windows 7 (loader) (on /dev/sda2)' --class windows {

    insmod part_msdos

    insmod ntfs

    set root='(hd0,msdos1)'

    search --no-floppy --fs-uuid --set=root 000598F0000980AD

    chainloader +

}

error: invalid EFI file path
安装过win7系统所在磁盘EFI目录文件如下:
sain@Linux:/media/sain/000598F0000980AD/EFI/Microsoft/Boot$ ls

BCD  BCD.LOG  BCD.LOG1    BCD.LOG2  bootmgfw.efi    bootmgr.efi  BOOTSTAT.DAT  en-US  Fonts  memtest.efi  zh-CN
正确的配置
exec tail -n + $

# This file provides an easy way to add custom menu entries.  Simply type the

# menu entries you want to add after this comment.  Be careful not to change

# the 'exec tail' line above.

menuentry 'Windows 7 (loader) (on /dev/sda2)' --class windows {

    insmod part_msdos

    insmod ntfs

    set root='(hd0,msdos1)'

    search --no-floppy --fs-uuid --set=root 000598F0000980AD

    chainloader /EFI/Microsoft/Boot/bootmgfw.efi

}
安装原版windows 系统

BIOS-->MBR-->DPT-->PBR--> Bootmgr-->bcd-->Winload.exe-->内核加载 -->整个windows7系统
https://baike.baidu.com/item/bootmgr/7141238?fr=aladdin
2.失败原因分析
感觉原理没问题了,可最终还是失败了,尽量不要尝试先装deepin,再装windows,纠结了好几天,也没搞出来原因
后来再重装时才突然为什么重启就不行
    set root='(hd0,msdos1)'

    search --no-floppy --fs-uuid --set=root 000598F0000980AD

    chainloader /EFI/Microsoft/Boot/bootmgfw.efi
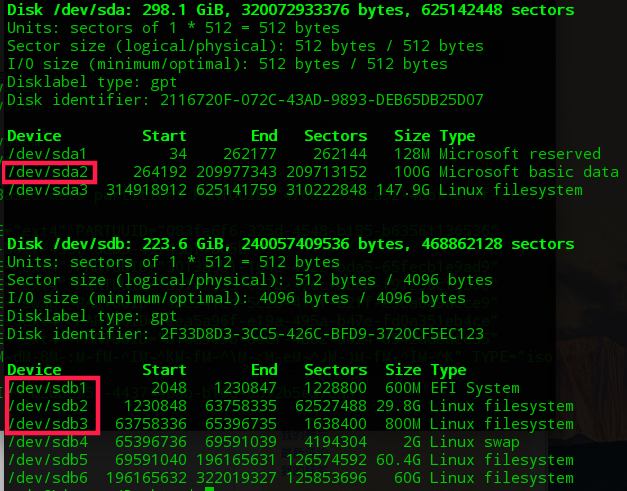
因为我当时磁盘的划分不是mbr而是gpt引导, 整个硬盘多出来一个100多兆的分区存放索引信息,gpt支持2T以上的银盘,mbr不支持的,这就导致gpt实际上多出了一个磁盘分区,如下图
这对用deepin引导是致命的

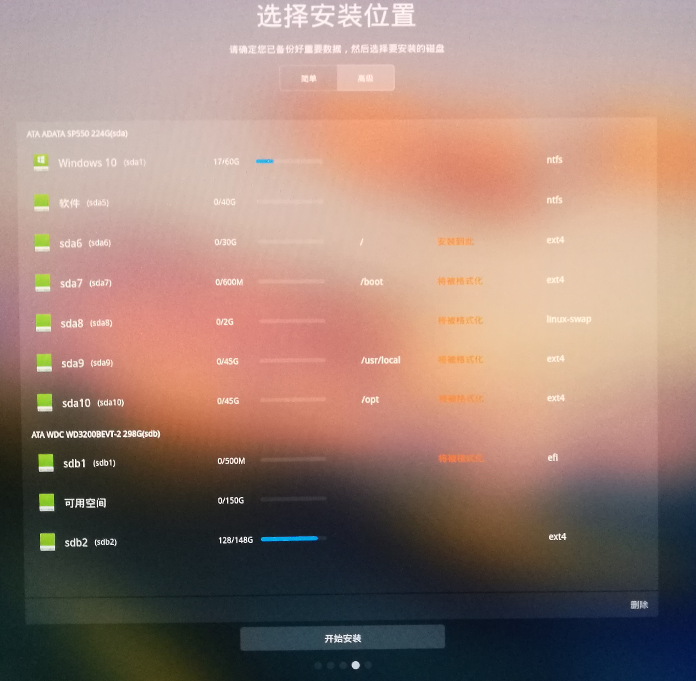
3.双系统正确的装法
先装win10,再装deepin,很简单就好了
ssd 分出一部分 装win10,为了方便deepin引导,分区坚决使用mbr
ssd 分出一部分 装deepin , 其中home分区挂载hdd上
为保证系统的独立性,deepin必须的EFi分区放在hdd上,这样两个系统的引导信息就在不同的盘上,而且系统主体都在ssd上,保证了系统的启动速度
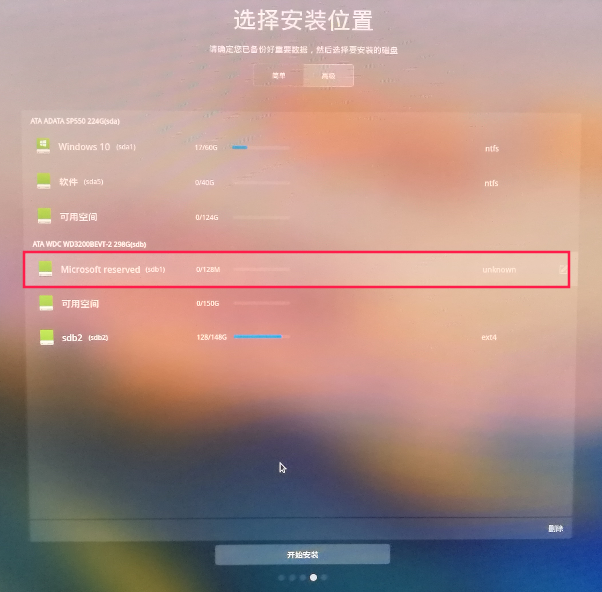
附张图:
SSD 240G
HHD 320G
menuentry 'Windows 10 (loader) (on /dev/sda1)' --class windows {

    insmod part_msdos

    insmod ntfs

    set root='(hd0,msdos1)'

    search --no-floppy --fs-uuid --set=root 000BA64600056356

    chainloader +

}
装完双系统默认已经生成了一个,不过会卡屏一下才启动,自己写的更好一些
### BEGIN /etc/grub.d/30_os-prober ###

menuentry 'Windows 10 (on /dev/sda1)' --class windows --class os $menuentry_id_option 'osprober-chain-000BA64600056356' {

    insmod part_msdos

    insmod ntfs

    set root='hd0,msdos1'

    if [ x$feature_platform_search_hint = xy ]; then

      search --no-floppy --fs-uuid --set=root --hint-bios=hd0,msdos1 --hint-efi=hd0,msdos1 --hint-baremetal=ahci0,msdos1  000BA64600056356

    else

      search --no-floppy --fs-uuid --set=root 000BA64600056356

    fi

    parttool ${root} hidden-

    drivemap -s (hd0) ${root}

    chainloader +

}

### END /etc/grub.d/30_os-prober ###

### BEGIN /etc/grub.d/30_uefi-firmware ###

### END /etc/grub.d/30_uefi-firmware ###

### BEGIN /etc/grub.d/40_custom ###

# This file provides an easy way to add custom menu entries.  Simply type the

# menu entries you want to add after this comment.  Be careful not to change

# the 'exec tail' line above.

menuentry 'Windows 10 (loader) (on /dev/sda1)' --class windows {

    insmod part_msdos

    insmod ntfs

    set root='(hd0,msdos1)'

    search --no-floppy --fs-uuid --set=root 000BA64600056356

    chainloader +

}

### END /etc/grub.d/40_custom ###
折腾deeplin系统的更多相关文章
- 玩转 Linux 系统的方法论
Linus 说“Just for fun”,而我要说“Just for 折腾”.想知道我是怎样折腾 Linux 的,请看下面这个截图: 从这个截图可以看出,我为了“折腾” Linux 系统,在我的电脑 ...
- Linux江湖01:玩转Linux系统的方法论 (转载)
http://www.blogjava.net/youxia/archive/2015/01/08/linux001.html 2014年上半年,我是在写RCP系列.然后,由于要准备研究生毕业论文和答 ...
- 重装Win10系统的非常简单的操作教程
这是回到学校的第二天,准备搞一份实习证明,然而宿舍宽带停了,于是我来到了社团办公室,打开了其中一台电脑. 各位师弟师妹...你们也太厉害,把电脑折腾成这样...电脑装了各种各样的工具, Adobe P ...
- 新买苹果电脑,mac系统中小白应该了解哪些东西?
本文旨在分享新买了mac电脑,应该做哪些设置,帮助苹果电脑小白轻松上手使用mac电脑,当然,新电脑肯定是需要安装各种软件,这里,小编推荐一下可以看看小编写的mac软件装机必备Mac 装机必备软件推荐, ...
- TOP100summit:【分享实录-美团点评】 业务快速升级发展背后的系统架构演进
本篇文章内容来自2016年TOP100summit美团●大众点评高级技术专家,酒店后台研发组eHome团队负责人许关飞的案例分享.编辑:Cynthia 许关飞:美团●大众点评高级技术专家,酒店后台研发 ...
- Linux 江湖系列阶段性总结
引言 我使用 Linux 已经有很多年了,最开始接触 Linux 的时候是从 RedHat 9(没有 Enterprise),中途换过 N 个不同的发行版.多年前,我在 BlogJava 上面分享 J ...
- 虚拟机体验之 VirtualBox 篇 —— 性能强大的经典架构
前两篇体验了 QEMU 和经过 KVM 加速的 QEMU,并体验了第三方虚拟机管理工具 virt-manager,让我们见识了开源社区的强大和开源虚拟机软件的高质量和高性能.这一篇,我来剖析一下 Vi ...
- 安装 Linux 时碰到的硬盘分区的陷阱及应对
硬盘分区的陷阱及应对 之所以想到写这篇,是因为本人在折腾 Linux 系统的过程中,有多次掉入硬盘分区的陷阱的经历.最近几天,再一次掉入坑中,折腾了两天才从坑中爬出来.经过多方查询资料,终于弄明白了硬 ...
- centos 安装gcc时,出错:Found 10 pre-existing rpmdb problem(s), 'yum check' output follows:
别人折腾的系统. 刚开始,准备安装下tornado,报错,需要安装 gcc 和 python-devel gcc安装报错,如标题所示: 谷歌了一把: http://stackoverflow.com/ ...
随机推荐
- 第23章、OnFocuChangeListener焦点事件(从零开始学Android)
在Android App应用中,OnFocuChangeListener焦点事件是必不可少的,我们在上一章的基础上来学习一下如何实现. 基本知识点:OnFocuChangeListener事件 一 ...
- MySQL主从不一致情形与解决方法
参考:https://blog.csdn.net/hardworking0323/article/details/81046408 https://blog.csdn.net/lijingkuan/a ...
- [转]sql:除非另外还指定了 TOP 或 FOR XML,否则,ORDER BY 子句在视图、内联函数、派生表、子查询
执行sql语句: select * from ( select * from tab where ID>20 order by userID desc ) as a order by date ...
- Linux下编译、使用静态库和动态库 自己测过的
每个程序实质上都会链接到一个或者多个的库.比如使用C函数的程序会链接到C运行时库,GUI程序会链接到窗口库等等.无论哪种情况,你都会要决定是链接到静态库(static libary)还是动态库(dyn ...
- keepalived virtual_router_id 44
在同一局或网内如果有多个keepalived 的话 virtuall_router_id 44 (不能相同,但同一对,是一定相同)
- Typeface-为自定义字体提供字体内存缓存
Android 上自定义字体的代码一般如下: TextView textview = (TextView) findViewById(R.id.your_referenced_textview); / ...
- libxml2实例
// libxmlTest.cpp : 定义控制台应用程序的入口点. // #include "stdafx.h" #include <stdio.h> #includ ...
- background-origin:规定 background-position 属性相对于什么位置来定位
background-origin:border-box;此时设置background-size:contain; 根据容器的边框定位 例如:容器的盒模型如下:设置了padding:20px;bord ...
- 混合模式程序集是针对“v2.0.50727”版的运行时生成的
混合模式程序集是针对“v2.0.50727”版的运行时生成的,在没有配置其他信息的情况下,无法在 4.0 运行时中加载该程序集. 由于“system.data.sqlite.dll”不完整造成的. 在 ...
- cocos2d-x聊天气泡
用cocos2d-x做聊天气泡在网上搜索了一下提示用CCScale9Sprite,这个类可以不缩放边角只 缩放中心,正好符合气泡的要求. 说一下思路,头像都是用cocosbuilder做的ccb,在代 ...