Android 生成和Pull解析xml
一、单个对象生成xml
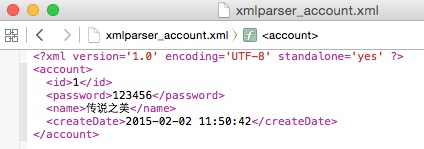
生成以下xml,该怎么生成呢?
<?xml version='1.0' encoding='UTF-8' standalone='yes' ?>

<account>

  <id>1</id>

  <password>123456</password>

  <name>传说之美</name>

  <createDate>2015-02-02 11:50:42</createDate>

</account>
先定义一个account类,属性有id、name、password、createDate。
public class Account {

    private String id;

    private String password;

    private String name;

    private String createDate;

    public Account() {

        super();

    }

    public Account(String id, String password, String name, String createDate) {

        super();

        this.id = id;

        this.password = password;

        this.name = name;

        this.createDate = createDate;

    }

    public String getId() {

        return id;

    }

    public void setId(String id) {

        this.id = id;

    }

    public String getPassword() {

        return password;

    }

    public void setPassword(String password) {

        this.password = password;

    }

    public String getName() {

        return name;

    }

    public void setName(String name) {

        this.name = name;

    }

    public String getCreateDate() {

        return createDate;

    }

    public void setCreateDate(String createDate) {

        this.createDate = createDate;

    }

    @Override

    public String toString() {

        return "Account [id=" + id + ", password=" + password + ", name=" + name + ", createDate=" + createDate + "]\n\n";

    }

}
定义好这个类,就可以利用XmlSerializer用于写xml数据了。写个方法,把生成的xml保存在xmlparser_account.xml文件。
	/**

	 * 单个对象生成xml

	 * @param account

	 */

	private static void XmlFileCreator(Account account) {

		File newxmlfile = new File(Environment.getExternalStorageDirectory() + "/xmlparser_account.xml");

		try {

			if (!newxmlfile.exists())

				newxmlfile.createNewFile();

		} catch (IOException e) {

			Log.e("IOException", "exception in createNewFile() method");

		}

		FileOutputStream fileos = null;

		try {

			fileos = new FileOutputStream(newxmlfile);

		} catch (FileNotFoundException e) {

			Log.e("FileNotFoundException", "can't create FileOutputStream");

		}

		// XmlSerializer用于写xml数据

		XmlSerializer serializer = Xml.newSerializer();

		try {

			// XmlSerializer 用 UTF-8 编码

			serializer.setOutput(fileos, "UTF-8");

			serializer.startDocument(null, Boolean.valueOf(true));

			serializer.setFeature("http://xmlpull.org/v1/doc/features.html#indent-output", true);

			serializer.startTag(null, "account");

			// xml-tree,由startTag开始,endTag结束

			serializer.startTag(null, "id");

			serializer.text(account.getId());

			serializer.endTag(null, "id");

			serializer.startTag(null, "password");

			serializer.text(account.getPassword());

			serializer.endTag(null, "password");

			serializer.startTag(null, "name");

			serializer.text(account.getName());

			serializer.endTag(null, "name");

			serializer.startTag(null, "createDate");

			serializer.text(account.getCreateDate());

			serializer.endTag(null, "createDate");

			serializer.endTag(null, "account");

			serializer.endDocument();

			// 写xml数据到FileOutputStream

			serializer.flush();

			// 关闭fileos,释放资源

			fileos.close();

		} catch (Exception e) {

			Log.e("Exception", "error occurred while creating xml file");

		}

	}
生成account对象,单个对象生成xml
		SimpleDateFormat sdf = new SimpleDateFormat("yyyy-MM-dd hh:mm:ss");

		Account account = new Account("1", "123456", "传说之美", sdf.format(new Date()));

		XmlFileCreator(account);
查看保存的文件
二、解析单个对象组成的xml为单个对象
把生成的xmlparser_account.xml文件放在res/xml/下,将这个xml解析为Account对象。这里用XmlResourceParser,XmlResourceParser继承了xmlpullparse的类。
Pull解析和sax解析类似,都采用事件驱动进行解析的,当pull解析器,开始解析后,调用它的next()方法,获取下一个解析事件(包括4个解析事件:开始文档,结束文档,开始标签,结束标签),这里单单说一下Pull解析。
	/**

	 * 解析单个对象组成的xml和xml组

	 * @return

	 */

	private List<Account> getListData() {

		List<Account> accountList = new ArrayList<Account>();

		XmlResourceParser xrp = getResources().getXml(R.xml.xmlparser_account);

		try {

			// 直到文档的结尾处

			Account account = null;

			while (xrp.getEventType() != XmlResourceParser.END_DOCUMENT) {

				String tagName = xrp.getName();

				if (xrp.getEventType() == XmlResourceParser.START_DOCUMENT){

				}

				// 如果遇到了开始标签

				if (xrp.getEventType() == XmlResourceParser.START_TAG) {

					Log.i("", tagName);

					if(tagName.equals("account")){

						account = new Account();

					} else if (account != null) {

						if (tagName.equals("id")) {

							String id = xrp.nextText();// 通过属性名来获取属性值

							account.setId(id);

						} else if (tagName.equals("password")) {

							String password = xrp.nextText();// 通过属性索引来获取属性值

							account.setPassword(password);

						} else if (tagName.equals("name")) {

							String name = xrp.nextText();

							account.setName(name);

						} else if (tagName.equals("createDate")) {

							String createDate = xrp.nextText();

							account.setCreateDate(createDate);

						}

					}

				}

				if (xrp.getEventType() == XmlResourceParser.END_TAG) {

					if (tagName.equals("account") && account !=null) {

						accountList.add(account);

						account = null;

					}

				}

				xrp.next();// 获取解析下一个事件

			}

		} catch (XmlPullParserException e) {

			e.printStackTrace();

		} catch (IOException e) {

			e.printStackTrace();

		}

		return accountList;

	}
直接打印结果看看
Log.i("", getListData().toString());
log如下

三、单个对象组成的xml组
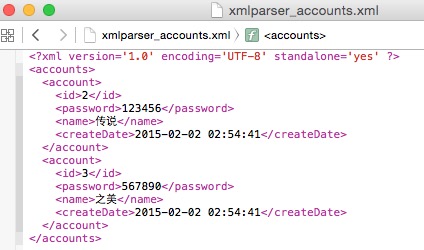
类似这样
<?xml version='1.0' encoding='UTF-8' standalone='yes' ?>

<accounts>

  <account>

    <id>2</id>

    <password>123456</password>

    <name>传说</name>

    <createDate>2015-02-02 02:54:41</createDate>

  </account>

  <account>

    <id>3</id>

    <password>567890</password>

    <name>之美</name>

    <createDate>2015-02-02 02:54:41</createDate>

  </account>

</accounts>
生成单个对象组 组成的xml组跟单个对象xml基本差不多,写成了一个方法,把生成的xml保存在xmlparser_accounts.xml文件。
	/**

	 * 生成单个对象的xml数组

	 *

	 * @param data

	 */

	private static void XmlFileCreator(List<Account> data) {

		File newxmlfile = new File(Environment.getExternalStorageDirectory() + "/xmlparser_accounts.xml");

		try {

			if (!newxmlfile.exists())

				newxmlfile.createNewFile();

		} catch (IOException e) {

			Log.e("IOException", "exception in createNewFile() method");

		}

		FileOutputStream fileos = null;

		try {

			fileos = new FileOutputStream(newxmlfile);

		} catch (FileNotFoundException e) {

			Log.e("FileNotFoundException", "can't create FileOutputStream");

		}

		XmlSerializer serializer = Xml.newSerializer();

		try {

			serializer.setOutput(fileos, "UTF-8");

			serializer.startDocument(null, Boolean.valueOf(true));

			serializer.setFeature("http://xmlpull.org/v1/doc/features.html#indent-output", true);

			serializer.startTag(null, "accounts");

			for (Account account : data) {

				serializer.startTag(null, "account");

				serializer.startTag(null, "id");

				serializer.text(account.getId());

				serializer.endTag(null, "id");

				serializer.startTag(null, "password");

				serializer.text(account.getPassword());

				serializer.endTag(null, "password");

				serializer.startTag(null, "name");

				serializer.text(account.getName());

				serializer.endTag(null, "name");

				serializer.startTag(null, "createDate");

				serializer.text(account.getCreateDate());

				serializer.endTag(null, "createDate");

				serializer.endTag(null, "account");

			}

			serializer.endTag(null, "accounts");

			serializer.endDocument();

			serializer.flush();

			fileos.close();

		} catch (Exception e) {

			Log.e("Exception", "error occurred while creating xml file");

		}

	}
简单地用几行代码生成
		Account account1 = new Account("2", "123456", "传说", sdf.format(new Date()));

		Account account2 = new Account("3", "567890", "之美", sdf.format(new Date()));

		List<Account> accountList = new ArrayList<Account>();

		accountList.add(account1);

		accountList.add(account2);

		XmlFileCreator(accountList);
生成的文件如下
四、解析单个对象组成的xml组
跟 二、解析单个对象组成的xml为单个对象 一样 ,请查看二
五、生成具有attribute的单个对象组成的xml组
类似如下,account里面还包含一个attribute值如何生成,其实很简单,在 三、单个对象组成的xml组 基础上修改一点就可以了
<?xml version='1.0' encoding='UTF-8' standalone='yes' ?>

<accounts>

  <account id="2">

    <password>123456</password>

    <name>传说</name>

    <createDate>2015-02-02 04:50:45</createDate>

  </account>

  <account id="3">

    <password>567890</password>

    <name>之美</name>

    <createDate>2015-02-02 04:50:45</createDate>

  </account>

</accounts>
修改地方为
			for (Account account : data) {

				serializer.startTag(null, "account");

				serializer.attribute(null, "id", account.getId());

//				serializer.startTag(null, "id");

//				serializer.text(account.getId());

//				serializer.endTag(null, "id");

				serializer.startTag(null, "password");

				serializer.text(account.getPassword());

				serializer.endTag(null, "password");

				serializer.startTag(null, "name");

				serializer.text(account.getName());

				serializer.endTag(null, "name");

				serializer.startTag(null, "createDate");

				serializer.text(account.getCreateDate());

				serializer.endTag(null, "createDate");

				serializer.endTag(null, "account");

			}
六、解析具有attribute的单个对象组成的xml组
解析同理,跟四、解析单个对象组成的xml组 差不多,修改id部分解析即可
				// 如果遇到了开始标签

				if (xrp.getEventType() == XmlResourceParser.START_TAG) {

					Log.i("", tagName);

					if(tagName.equals("account")){

						account = new Account();

						String id = xrp.getAttributeValue(null, "id");

						account.setId(id);

					} else if (account != null) {

						if (tagName.equals("id")) {

//							String id = xrp.nextText();

//							account.setId(id);

						} else if (tagName.equals("password")) {

							String password = xrp.nextText();

							account.setPassword(password);

						} else if (tagName.equals("name")) {

							String name = xrp.nextText();

							account.setName(name);

						} else if (tagName.equals("createDate")) {

							String createDate = xrp.nextText();

							account.setCreateDate(createDate);

						}

					}

				}
本文原创链接:http://www.cnblogs.com/liqw/p/4267461.html
下载地址:http://download.csdn.net/detail/lqw770737185/8417583
Android 生成和Pull解析xml的更多相关文章
- android 生成、pull解析xml文件
<RelativeLayout xmlns:android="http://schemas.android.com/apk/res/android" xmlns:tools= ...
- [android] 采用pull解析xml文件
/***********2016年5月6日 更新**********************/ 知乎:Android 中有哪几种解析 xml 的类,官方推荐哪种 ? 以及它们的原理和区别? 刘吉财: ...
- Android SAX、DOM、Pull解析xml文件剖析与案例讲解
XML介绍 XML(Extensible Markup Language) 即可扩展标记语言,与HTML一样,都是SGML(Standard Generalized Markup Language,标 ...
- Android之Pull解析XML
一.Pull解析方法介绍 除了可以使用SAX和DOM解析XML文件,也可以使用Android内置的Pull解析器解析XML文件.Pull解析器的运行方式与SAX解析器相似.它也是事件触发的.Pull解 ...
- Android——PULL解析XML
简介 Android中常常使用XML文件保存用户的APP设置信息.因此需要对XML文件的相关操作进行了解.本文将以<学生信息管理系统>为案例背景进行介绍相关的XML解析的介绍,以及其他相关 ...
- Android系列--DOM、SAX、Pull解析XML
您可以通过点击 右下角 的按钮 来对文章内容作出评价, 也可以通过左下方的 关注按钮 来关注我的博客的最新动态. 如果文章内容对您有帮助, 不要忘记点击右下角的 推荐按钮 来支持一下哦 如果您对文章内 ...
- 使用XML序列化器生成XML文件和利用pull解析XML文件
首先,指定XML格式,我指定的XML格式如下: <?xml version='1.0' encoding='utf-8' standalone='yes' ?> <message&g ...
- Android中用PULL解析XML
解析XML的方式有DOM,SAX,PULL,那为什么要在Android中使用PULL解析呢?首先来说一下PULL解析的优点,然后再说一下其他两种解析方式的缺点,答案就清晰可见啦. DOM不适合文档较大 ...
- Android -- 创建XML文件对象及其序列化, pull解析XML文件
1. 创建XML文件对象及其序列化 示例代码:(模拟以xml格式备份短信到SD卡) SmsInfo.java, bean对象 /** * 短信的业务bean * @author Administrat ...
随机推荐
- Gulp, 比Grunt更好用的前端构建工具
Gulp, 比Grunt更好用的前端构建工具 本文主要从两个方面介绍Gulp:一,Gulp相对于Grunt的优势: 二,Gulp的安装和使用流程 Gulp相对于Grunt的优势 gulp.js 的作者 ...
- ASP.NET中利用DataList实现图片无缝滚动
这个问题之前也困扰我,后来解决了,拿出来分享下,以后用也方便,代码很容易看懂,不多说什么了 <div id="demo" style="overflow: hidd ...
- 我的grub.cfg配置文件
路径:/boot/grub/grub.cfg 配置文件如下: # # DO NOT EDIT THIS FILE # # It is automatically generated by grub-m ...
- 北工大耿丹学院16级计科院3班C语言课程助教学期总结
很荣幸得到邹老师,周老师,以及北工大耿丹学院各位老师的认可,担任计科院3班C语言课程助教,班主任为李光杰老师,很感谢李老师一学期的帮助,使得我更好的担任助教一职.我班学生31名,很愉快的与同学们度过一 ...
- 【js】将table的每个td的内容自动赋值给其title属性
<!DOCTYPE html PUBLIC "-//W3C//DTD XHTML 1.0 Transitional//EN" "http://www.w3.org/ ...
- Metasploit是一款开源的安全漏洞检测工具,
Metasploit是一款开源的安全漏洞检测工具,可以帮助安全和IT专业人士识别安全性问题,验证漏洞的缓解措施,并管理专家驱动的安全性进行评估,适合于需要核实漏洞的安全专家,同时也适合于强大进攻能力的 ...
- Linux下PS1、PS2、PS3、PS4使用详解
参考印象笔记:
- 深入了解PooledConnectionFactory CachingConnectionFactory Sin
深入理解PooledConnectionFactory CachingConnectionFactory SingleConnectionFactory PooledConnectionFactory ...
- Spring源码学习(二)AOP
----ProxyFactoryBean这个类,这是AOP使用的入口---- AOP有些特有的概念,如:advisor.advice和pointcut等等,使用或配置起来有点绕,让人感觉有些距离感,其 ...
- 追溯ASP.NET发展史
2000年全新平台的ASP.NET 1.0正式发布,发展速度异常惊人,2003年升级为1.1版本.ASP.NET 1.1发布之后,更加激发了Web应用程序开发人员对ASP.NET的兴趣,并且对网络技术 ...