spring boot 打包war后 部署到外部 tomcat 的具体正确操作【包括修改端口 与 去除请求路径的工程名】
1.前言
工程做好了,总不能放在idea运行吧?不然怎么把项目放到云服务器呢?【这一篇随笔不讲解发布的云服务器的操作,在其他随笔有详细记载。】
解决的方案是把springboot 工程 打包成war文件 ,然后部署到外部tomcat服务器的webapps文件夹里面,
然后修改配置文件service.xml 用于修改访问端口与去除请求路径的工程名。
【一般用一个tomcat可以设置多个节点,也就是说一个tomcat服务器可以同时开启多个工程,地址一样,用端口来区分,
但是
Tomcat 默认配置的最大请求数是 150,也就是说同时支持 150 个并发,当然了,也可以将其改大。

当某个应用拥有 250 个以上并发的时候,应考虑应用服务器的集群。

具体能承载多少并发,需要看硬件的配置,CPU 越多性能越高,分配给 JVM 的内存越多性能也就越高,但也会加重 GC 的负担。

操作系统对于进程中的线程数有一定的限制:

Windows 每个进程中的线程数不允许超过 2000

Linux 每个进程中的线程数不允许超过 1000

另外,在 Java 中每开启一个线程需要耗用 1MB 的 JVM 内存空间用于作为线程栈之用。

Tomcat的最大并发数是可以配置的,实际运用中,最大并发数与硬件性能和CPU数量都有很大关系的。
所以一般一个工程最少使用一个tomcat ,如果并发量超级大,会使用tomcat集群,即多个tomcat运行同一个工程。
这里只用一个tomcat演示
】
2.操作
(1)打包war
修改pom文件
添加打包方式

添加依赖包

设置war包名称 ,如果不写 ,会默认 为 【工程名】-【版本号】.war

我这里使用了依赖包管理标签,依赖包与我不一样没关系【这个工程是我以前学习spring cloud时候建立的,所以不要纠结其他依赖包为什么不同,没影响的】
pom源码
<?xml version="1.0" encoding="UTF-8"?>
<project xmlns="http://maven.apache.org/POM/4.0.0" xmlns:xsi="http://www.w3.org/2001/XMLSchema-instance"
xsi:schemaLocation="http://maven.apache.org/POM/4.0.0 https://maven.apache.org/xsd/maven-4.0.0.xsd">
<modelVersion>4.0.0</modelVersion>
<!-- <parent>-->
<!-- <groupId>cen.cloud</groupId>-->
<!-- <artifactId>cen-mycloud</artifactId>-->
<!-- <version>0.0.1-SNAPSHOT</version>-->
<!-- <relativePath/> <!– lookup parent from repository –>-->
<!-- </parent>-->
<groupId>com.example</groupId>
<artifactId>provider-8001</artifactId>
<version>0.0.1-SNAPSHOT</version>
<name>provider-8001</name>
<description>Demo project for Spring Boot</description> <!-- //打包方式-->
<packaging>war</packaging> <dependencyManagement>
<!--进行项目依赖版本通过一管理-->
<dependencies>
<!-- 方法二 : spring boot 的版本控制 ,与<parent>标签作用等同-->
<dependency>
<groupId>org.springframework.boot</groupId>
<artifactId>spring-boot-starter-parent</artifactId>
<version>2.1.6.RELEASE</version>
<type>pom</type>
<scope>import</scope>
</dependency>
<!-- spring cloud 的版本控制 -->
<dependency>
<groupId>org.springframework.cloud</groupId>
<artifactId>spring-cloud-dependencies</artifactId>
<version>Greenwich.SR2</version>
<type>pom</type>
<scope>import</scope>
</dependency>
</dependencies>
</dependencyManagement> <properties>
<java.version>1.8</java.version>
</properties> <dependencies>
<!-- spring boot web 组件-->
<dependency>
<groupId>org.springframework.boot</groupId>
<artifactId>spring-boot-starter-web</artifactId>
</dependency> <!-- 测试组件-->
<dependency>
<groupId>org.springframework.boot</groupId>
<artifactId>spring-boot-starter-test</artifactId>
<scope>test</scope>
<exclusions>
<exclusion>
<groupId>org.junit.vintage</groupId>
<artifactId>junit-vintage-engine</artifactId>
</exclusion>
</exclusions>
</dependency> <!--eureka 注册中心依赖包 -->
<dependency>
<groupId>org.springframework.cloud</groupId>
<artifactId>spring-cloud-starter-netflix-eureka-server</artifactId>
</dependency> <!-- 修改后立即生效,热部署 -->
<!-- 热修改后端-->
<dependency>
<groupId>org.springframework</groupId>
<artifactId>springloaded</artifactId>
<version>1.2.4.RELEASE</version>
</dependency>
<!-- 热修改前端-->
<dependency>
<groupId>org.springframework.boot</groupId>
<artifactId>spring-boot-devtools</artifactId>
<!-- <optional>true</optional>-->
</dependency> <!-- 打war包时加入此项, 告诉spring-boot tomcat相关jar包用外部的,不要打进去 -->
<dependency>
<groupId>org.springframework.boot</groupId>
<artifactId>spring-boot-starter-tomcat</artifactId>
<scope>provided</scope>
</dependency> </dependencies> <build>
<!-- 打包出的war包名字-->
<finalName>provider-8001</finalName>
<plugins>
<plugin>
<groupId>org.springframework.boot</groupId>
<artifactId>spring-boot-maven-plugin</artifactId>
</plugin> </plugins>
</build> </project>
(2)修改启动类,tomcat无法使用spring boot的启动类,需要继承
SpringBootServletInitializer
后重写父类方法
启动类源码
package com.example.provider8001;

import org.springframework.boot.SpringApplication;

import org.springframework.boot.autoconfigure.SpringBootApplication;

import org.springframework.boot.builder.SpringApplicationBuilder;

import org.springframework.boot.web.servlet.support.SpringBootServletInitializer;

import org.springframework.cloud.netflix.eureka.EnableEurekaClient;

//@SpringBootApplication

////开启发现服务

//@EnableEurekaClient

//public class Provider8001Application {

//

//    public static void main(String[] args) {

//        SpringApplication.run(Provider8001Application.class, args);

//    }

//

//}

/**

 * spring boot 打包成war 用于外部tomcat运行才使用下面的启动方式

 */

@SpringBootApplication

//开启发现服务

@EnableEurekaClient

//启动类继承SpringBootServletInitializer实现configure ,用于配合war打包在外部tomcat使用

public class Provider8001Application extends SpringBootServletInitializer {

    public static void main(String[] args) {

        SpringApplication.run(Provider8001Application.class, args);

    }

    //配合war打包

    @Override

    protected SpringApplicationBuilder configure(SpringApplicationBuilder builder) {

        return builder.sources(Provider8001Application.class);

    }

}
(3)idea软件打包成war 很简单的
菜单栏,找到 Build -Build Artifacts

点击会弹出 选择栏,根据数字顺序操作即可
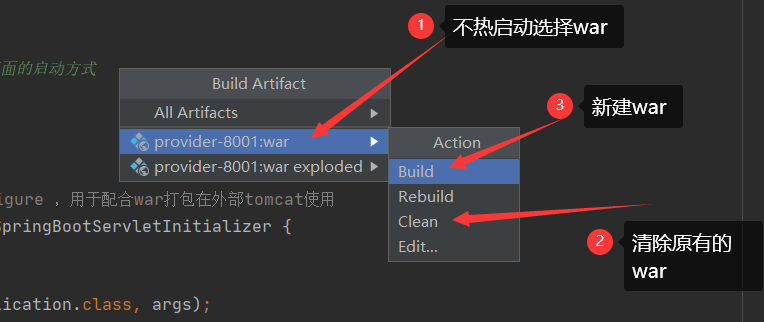
打包的过程可能会遇到一些黄色的感叹号警告,这是因为jdk版本的不一致或版本太老的关系,不影响war使用,但是对强迫症很不友好

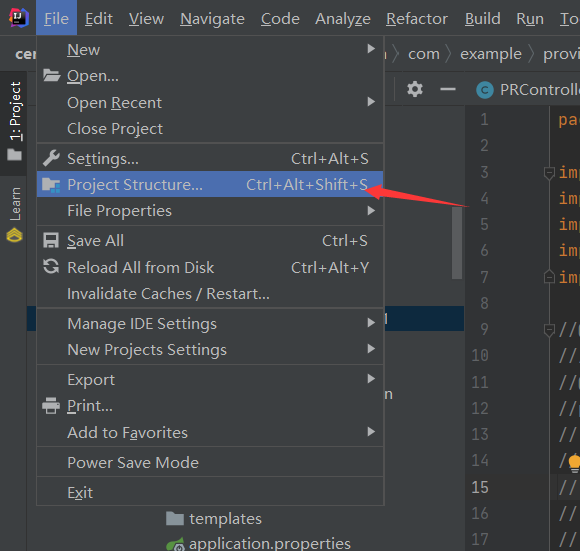
可以去除
【我使用jdk1.8 ,因此设置都需要选中数字1.8或8】
下面是去除的方法
如图,打开project structure
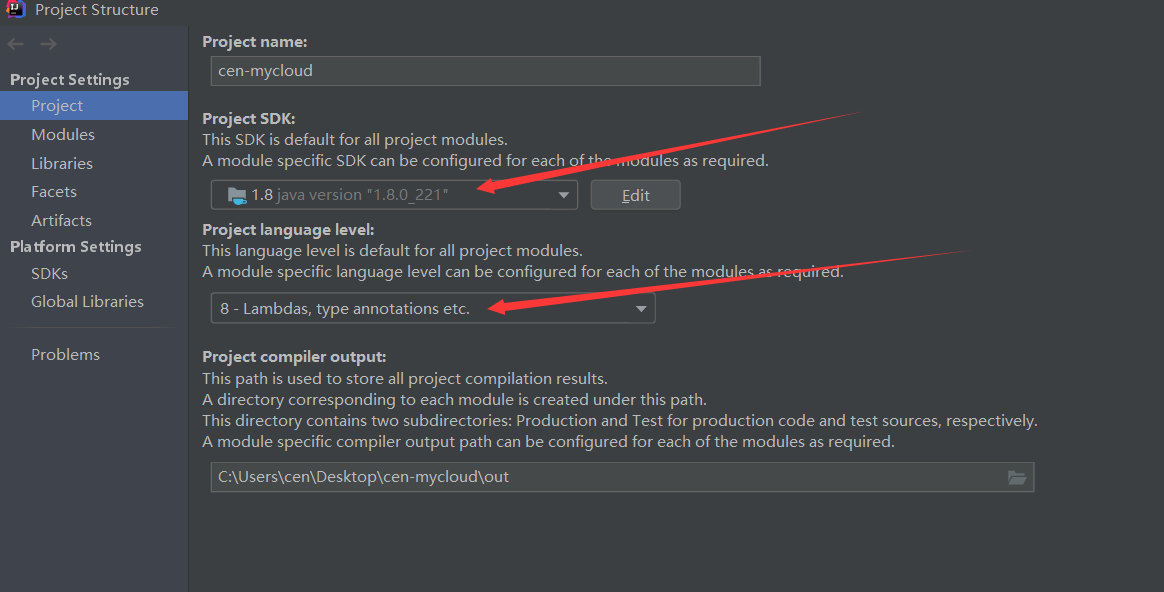
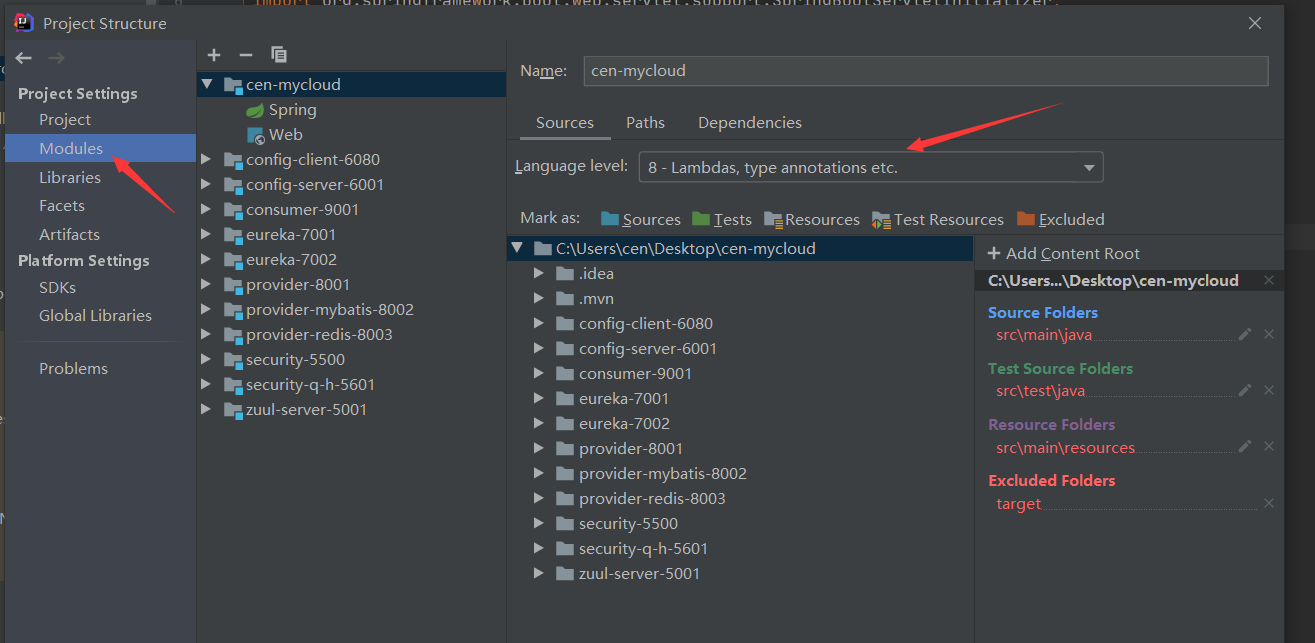
然后打开setting
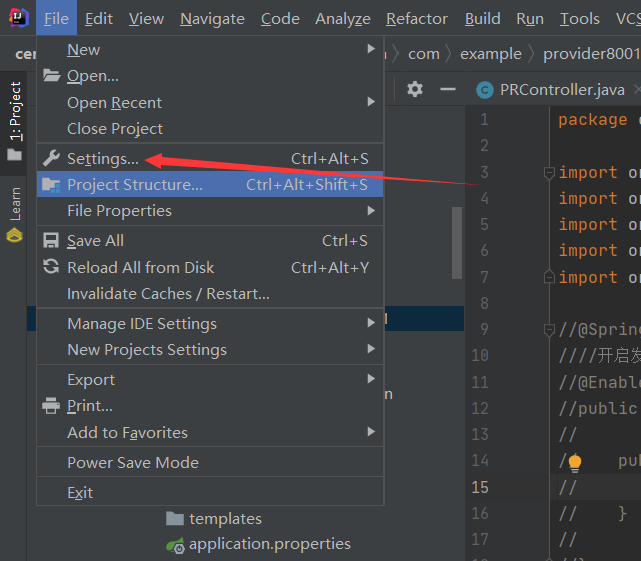

然后再试一下,好了没有警告了

(4)好了war打包好了,那么在哪里呢?
默认再target包里面
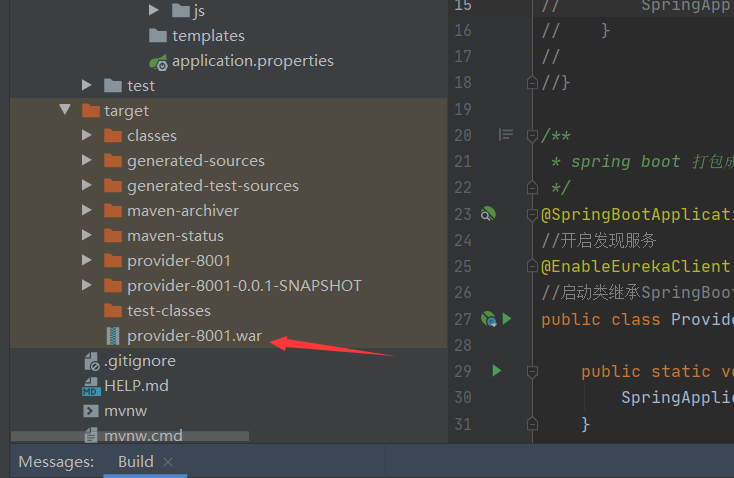
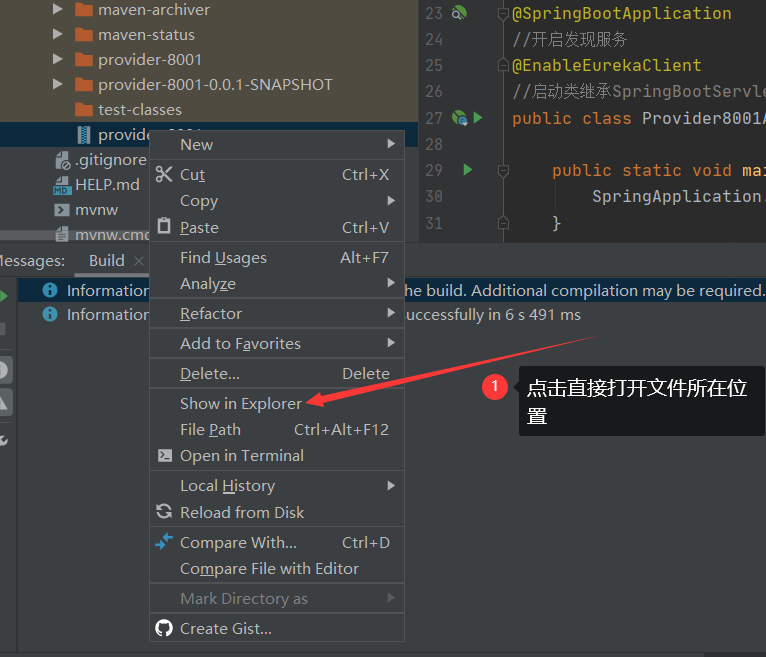
可以直接复制出来,也可以进入工程文件夹查找
(5)需要提前准备一个tomcat 【我是用版本9.0.12】
找到tomcat的标签 <Context >只有在
webapps文件夹 将war包直接粘贴进入即可
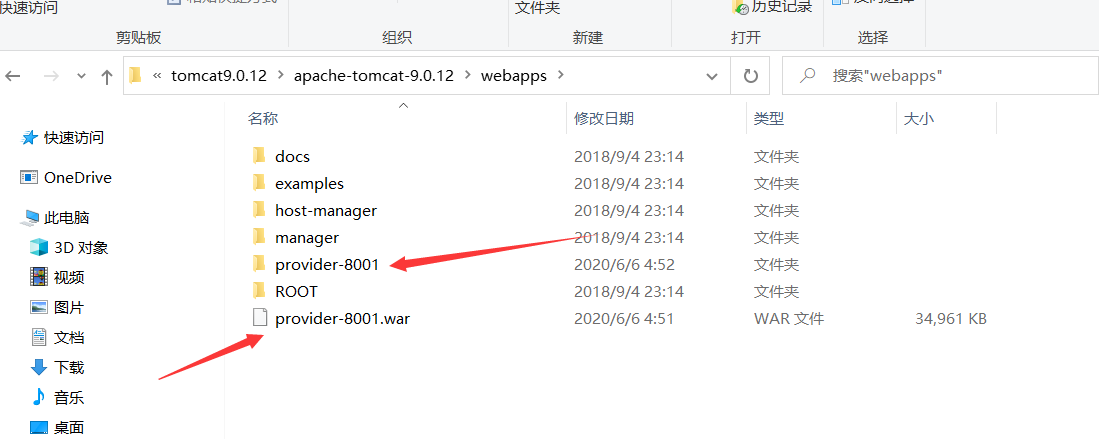
是不是很疑惑,那个与war包一样名字的文件夹是什么回事 ,其实文件夹是在tomcat启动的时候自动创建的然后自动将war解压到里面
(6)配置信息
找到server.xml文件 打开

每一个<server >标签都是一个节点 ,一个节点可以设置一个工程

,但是如果设置多个节点 ,该标签可以设置改成<Service name="Catalina"> ,这样就可以不用单独留一个端口来关闭该节点 ,给本地省接口
不加关闭端口,一个节点还需要3个端口号 ,没必要浪费
具体多节点配置可参考这篇博文 : https://blog.csdn.net/yin__ren/article/details/93198351
配置访问工程端口号
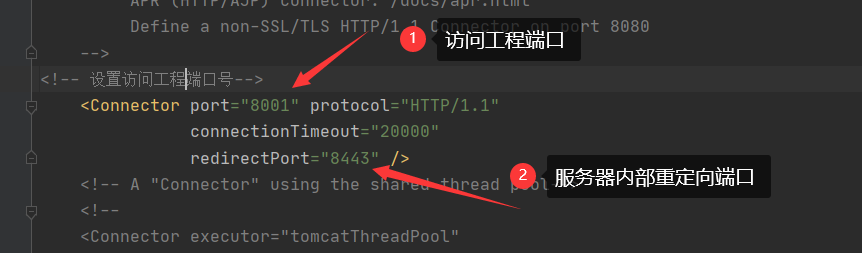
一般只有改port 即可 ,重定向端口根据需要可以改动,但是一个阶段得重定向接口需要统一

【注意,端口多了得注意管理,不能端口冲突,如果一台主机装了多个tomcat,那么不同的tomcat端口也不可以重复,因为是共用一个本地ip地址,因此端口号数据是共享的】
配置 访问路径去除工程名
在<Host>标签内部添加新标签 <Context>

注意了 ,重点来了
配置<Host>标签 信息
name 是域名或者ip地址 【默认本地localhost ,如果设置域名还需要配置解析才能生效,我懒得写,以后再说吧】,
appBase 是应用路径 ,如果配置了新标签 <Context> 必须去除 appBase 参数,否则会在tomcat启动时启动两次,
会导致报错org.springframework.jmx.export.UnableToRegisterMBeanException: Unable to register MBean

server.xml源码
<?xml version="1.0" encoding="UTF-8"?>
<!--
Licensed to the Apache Software Foundation (ASF) under one or more
contributor license agreements. See the NOTICE file distributed with
this work for additional information regarding copyright ownership.
The ASF licenses this file to You under the Apache License, Version 2.0
(the "License"); you may not use this file except in compliance with
the License. You may obtain a copy of the License at http://www.apache.org/licenses/LICENSE-2.0 Unless required by applicable law or agreed to in writing, software
distributed under the License is distributed on an "AS IS" BASIS,
WITHOUT WARRANTIES OR CONDITIONS OF ANY KIND, either express or implied.
See the License for the specific language governing permissions and
limitations under the License.
-->
<!-- Note: A "Server" is not itself a "Container", so you may not
define subcomponents such as "Valves" at this level.
Documentation at /docs/config/server.html
-->
<Server port="8005" shutdown="SHUTDOWN">
<Listener className="org.apache.catalina.startup.VersionLoggerListener" />
<!-- Security listener. Documentation at /docs/config/listeners.html
<Listener className="org.apache.catalina.security.SecurityListener" />
-->
<!--APR library loader. Documentation at /docs/apr.html -->
<Listener className="org.apache.catalina.core.AprLifecycleListener" SSLEngine="on" />
<!-- Prevent memory leaks due to use of particular java/javax APIs-->
<Listener className="org.apache.catalina.core.JreMemoryLeakPreventionListener" />
<Listener className="org.apache.catalina.mbeans.GlobalResourcesLifecycleListener" />
<Listener className="org.apache.catalina.core.ThreadLocalLeakPreventionListener" /> <!-- Global JNDI resources
Documentation at /docs/jndi-resources-howto.html
-->
<GlobalNamingResources>
<!-- Editable user database that can also be used by
UserDatabaseRealm to authenticate users
-->
<Resource name="UserDatabase" auth="Container"
type="org.apache.catalina.UserDatabase"
description="User database that can be updated and saved"
factory="org.apache.catalina.users.MemoryUserDatabaseFactory"
pathname="conf/tomcat-users.xml" />
</GlobalNamingResources> <!-- A "Service" is a collection of one or more "Connectors" that share
a single "Container" Note: A "Service" is not itself a "Container",
so you may not define subcomponents such as "Valves" at this level.
Documentation at /docs/config/service.html
-->
<Service name="Catalina"> <!--The connectors can use a shared executor, you can define one or more named thread pools-->
<!--
<Executor name="tomcatThreadPool" namePrefix="catalina-exec-"
maxThreads="150" minSpareThreads="4"/>
--> <!-- A "Connector" represents an endpoint by which requests are received
and responses are returned. Documentation at :
Java HTTP Connector: /docs/config/http.html
Java AJP Connector: /docs/config/ajp.html
APR (HTTP/AJP) Connector: /docs/apr.html
Define a non-SSL/TLS HTTP/1.1 Connector on port 8080
-->
<!-- 设置访问工程端口号-->
<Connector port="8001" protocol="HTTP/1.1"
connectionTimeout="20000"
redirectPort="8443" />
<!-- A "Connector" using the shared thread pool-->
<!--
<Connector executor="tomcatThreadPool"
port="8080" protocol="HTTP/1.1"
connectionTimeout="20000"
redirectPort="8443" />
-->
<!-- Define a SSL/TLS HTTP/1.1 Connector on port 8443
This connector uses the NIO implementation. The default
SSLImplementation will depend on the presence of the APR/native
library and the useOpenSSL attribute of the
AprLifecycleListener.
Either JSSE or OpenSSL style configuration may be used regardless of
the SSLImplementation selected. JSSE style configuration is used below.
-->
<!--
<Connector port="8443" protocol="org.apache.coyote.http11.Http11NioProtocol"
maxThreads="150" SSLEnabled="true">
<SSLHostConfig>
<Certificate certificateKeystoreFile="conf/localhost-rsa.jks"
type="RSA" />
</SSLHostConfig>
</Connector>
-->
<!-- Define a SSL/TLS HTTP/1.1 Connector on port 8443 with HTTP/2
This connector uses the APR/native implementation which always uses
OpenSSL for TLS.
Either JSSE or OpenSSL style configuration may be used. OpenSSL style
configuration is used below.
-->
<!--
<Connector port="8443" protocol="org.apache.coyote.http11.Http11AprProtocol"
maxThreads="150" SSLEnabled="true" >
<UpgradeProtocol className="org.apache.coyote.http2.Http2Protocol" />
<SSLHostConfig>
<Certificate certificateKeyFile="conf/localhost-rsa-key.pem"
certificateFile="conf/localhost-rsa-cert.pem"
certificateChainFile="conf/localhost-rsa-chain.pem"
type="RSA" />
</SSLHostConfig>
</Connector>
--> <!-- Define an AJP 1.3 Connector on port 8009 -->
<Connector port="8009" protocol="AJP/1.3" redirectPort="8443" /> <!-- An Engine represents the entry point (within Catalina) that processes
every request. The Engine implementation for Tomcat stand alone
analyzes the HTTP headers included with the request, and passes them
on to the appropriate Host (virtual host).
Documentation at /docs/config/engine.html --> <!-- You should set jvmRoute to support load-balancing via AJP ie :
<Engine name="Catalina" defaultHost="localhost" jvmRoute="jvm1">
-->
<Engine name="Catalina" defaultHost="localhost"> <!--For clustering, please take a look at documentation at:
/docs/cluster-howto.html (simple how to)
/docs/config/cluster.html (reference documentation) -->
<!--
<Cluster className="org.apache.catalina.ha.tcp.SimpleTcpCluster"/>
--> <!-- Use the LockOutRealm to prevent attempts to guess user passwords
via a brute-force attack -->
<Realm className="org.apache.catalina.realm.LockOutRealm">
<!-- This Realm uses the UserDatabase configured in the global JNDI
resources under the key "UserDatabase". Any edits
that are performed against this UserDatabase are immediately
available for use by the Realm. -->
<Realm className="org.apache.catalina.realm.UserDatabaseRealm"
resourceName="UserDatabase"/>
</Realm> <!-- 修改域名-->
<!-- <Host name="localhost" appBase="webapps"-->
<!-- unpackWARs="true" autoDeploy="true">-->
<!-- 如果设置了将访问路径去除了项目名,则必须删除参数appBase的数据 ,否则会导致同一个工程加载两次,
然后报错org.springframework.jmx.export.UnableToRegisterMBeanException: Unable to register MBean-->
<Host name="localhost" appBase=""
unpackWARs="true" autoDeploy="true"> <!-- path="" 是访问路径 , docBase是war包解压后的文件夹在tomcat里的相对位置 ,reloadable是当配置文件有修改时重启节点-->
<Context path="" docBase="webapps/provider-8001" reloadable="true" /> <!-- SingleSignOn valve, share authentication between web applications
Documentation at: /docs/config/valve.html -->
<!--
<Valve className="org.apache.catalina.authenticator.SingleSignOn" />
--> <!-- Access log processes all example.
Documentation at: /docs/config/valve.html
Note: The pattern used is equivalent to using pattern="common" -->
<Valve className="org.apache.catalina.valves.AccessLogValve" directory="logs"
prefix="localhost_access_log" suffix=".txt"
pattern="%h %l %u %t "%r" %s %b" /> </Host>
</Engine>
</Service>
</Server>
保存文件
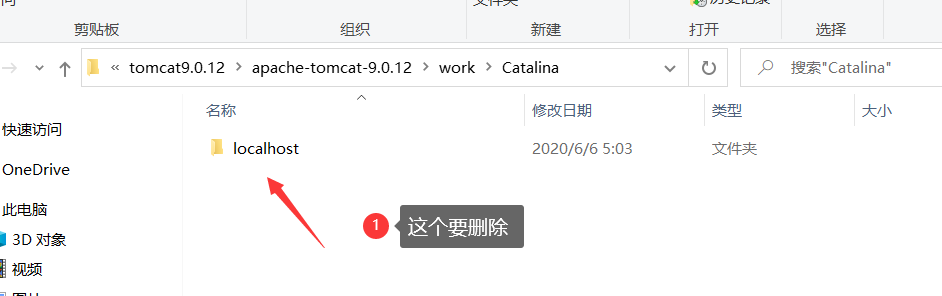
(7)进入work/Catalina目录查看内部是否有内容,有得则删除,没有则忽略这一步
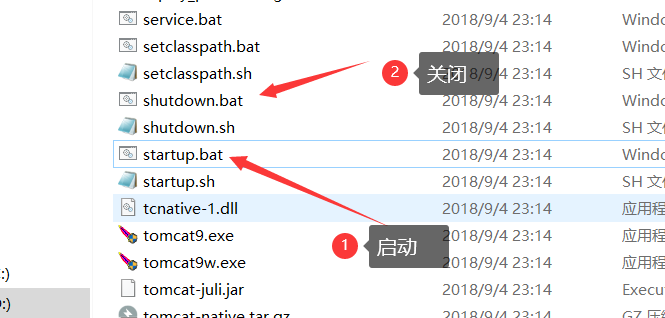
(8)进入bin目录 ,找到 startup.bat 双击运行即可
(9)出现 start Server startup in 15866 ms 即表示工程启动成功

3.测试
(1)访问网址 http://localhost:8001/getname?name=爱你哟
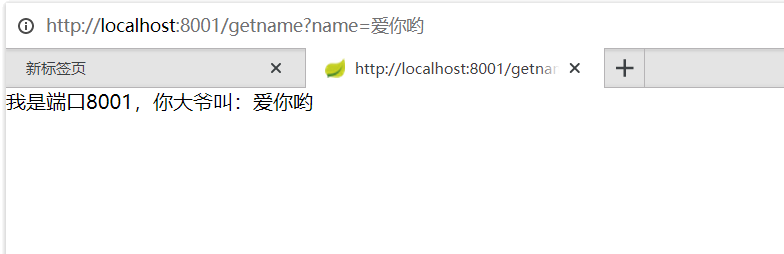
成功访问controller层接口
(2)我做了个 zuul【5001】 ->消费者【9001】 - >上面tomcat配置的工程【8001】 三成调用 【分布式 微服务框架 spring security 】的测试
具体实现这里不展示
访问网址 http://localhost:5001/mzuul/consumer-9001/doname?name=岑惜&token=nuu
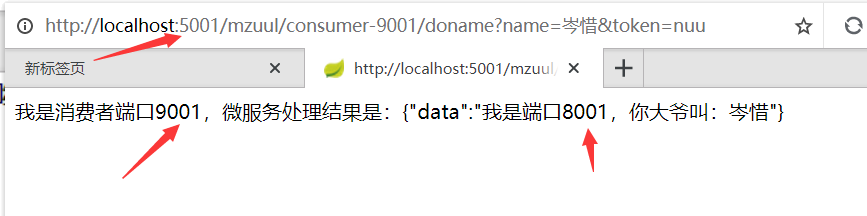
完美完成,撒花!!!
------------------------------------
参考博文原址 :
https://blog.csdn.net/yin__ren/article/details/93198351
https://www.cnblogs.com/zhaosq/p/10870762.html
https://www.cnblogs.com/tudou-22/p/9330875.html
spring boot 打包war后 部署到外部 tomcat 的具体正确操作【包括修改端口 与 去除请求路径的工程名】的更多相关文章
- Spring Boot打包war jar 部署tomcat
概述 1.Spring Boot聚合工程打包war部署Tomcat 2.Spring Boot打包Jar,通过Java -jar直接运行. 3.提供完整pom.xml测试项目 至github 4.项目 ...
- Spring Boot 以 war 方式部署
Spring Boot 默认自带了一个嵌入式的 Tomcat 服务器,可以以jar方式运行,更为常见的情况是需要将 Spring Boot 应用打包成一个 war 包,部署到 Tomcat.Jerry ...
- springboot-把web项目打成war包部署到外部tomcat
将打包方式修改为war <packaging>war</packaging> 移除tomcat依赖或者将tomcat依赖scope改为provide 移除tomcat依赖 &l ...
- Spring boot打包war包
1.设置打包的类型(war/jar) 在pom.xml里设置 <packaging>war</packaging> 2.移除嵌入式tomcat插件 //在pom.xml里找到s ...
- spring boot 打war包部署,打jar包
官方文档:http://docs.spring.io/spring-boot/docs/current/reference/htmlsingle/#howto-create-a-deployable- ...
- spring boot 打包jar后访问classes文件夹的文件提示地址不存在
报错内容:class path resource [client.p12] cannot be resolved to absolute file path because it does not r ...
- spring boot 打包war
@SpringBootApplication public class AesApplication extends SpringBootServletInitializer { public sta ...
- spring boot 使用war包部署
- spring boot打包文件后,报错\No such file or directory
现象: 一段代码: ClassLoader loader = XXXUtil.class.getClassLoader(); String jsFileName = loader.getResourc ...
随机推荐
- 【C/C++】散列/算法笔记4.2
先说一下我自己的理解. 我先给你N组数据,这个N组里可能有重复的! 然后我们先统计好了N组里面的独立的每个对应的出现了几次(相当于map,然后每项属性有出现了多少次的),用的是数组下标对应 现在我们给 ...
- 莫烦python教程学习笔记——总结篇
一.机器学习算法分类: 监督学习:提供数据和数据分类标签.--分类.回归 非监督学习:只提供数据,不提供标签. 半监督学习 强化学习:尝试各种手段,自己去适应环境和规则.总结经验利用反馈,不断提高算法 ...
- 『学了就忘』Linux系统管理 — 82、Linux中进程的查看(ps命令)
目录 1.ps命令介绍 2.ps aux命令示例 3.ps -le命令示例 4.pstree命令 1.ps命令介绍 ps命令是用来静态显示系统中进程的命令. 不过这个命令有些特殊,它部分命令的选项前不 ...
- [BUUCTF]PWN——mrctf2020_shellcode
mrctf2020_shellcode 附件 步骤: 例行检查,64位程序,开启了relro和pie,没有nx,肯定是用shellcode最方便了 本地试运行一下,看看大概的情况 64位ida载入,根 ...
- 录入任务信息(Project)
<Project2016 企业项目管理实践>张会斌 董方好 编著 日历设置好了,就该录入任务了.当然在录入任务之前还要对任务进行一下面分解,就是一个项目,要分几个大步完成,每个大步又分几个 ...
- 如何完成符合ISO 26262要求的基于模型设计(MBD)的测试
背景介绍 随着汽车行业的迅速发展,汽车的复杂程度不断增加,越来越多的汽车电子控制系统具有与安全相关的功能,因此对ECU的安全要求也越来越高.复杂的软件功能,将会带来大量的软件风险问题,如何保证软件的安 ...
- mysql使用自定义序列实现row_number功能
看了一些文章,终于知道该怎么在 mysql 里面实现 row_number() 排序 话不多说,show you the code: 第一步:建表: create table grades( `nam ...
- JAVA比较两个版本号的大小
/** * 比较版本号的大小 (两个版本号格式应尽量相同) * * @param v1 版本号1 * @param v2 版本号2 * @return 正数:v1大 负数:v2大 0:相等 */ pu ...
- 【LeetCode】555. Split Concatenated Strings 解题报告(C++)
作者: 负雪明烛 id: fuxuemingzhu 个人博客:http://fuxuemingzhu.cn/ 目录 题目描述 题目大意 解题方法 遍历 日期 题目地址:https://leetcode ...
- 【LeetCode】953. Verifying an Alien Dictionary 解题报告(Python)
作者: 负雪明烛 id: fuxuemingzhu 个人博客: http://fuxuemingzhu.cn/ 目录 题目描述 题目大意 解题方法 日期 题目地址:https://leetcode.c ...