源码解析.Net中Middleware的实现
前言
本篇继续之前的思路,不注重用法,如果还不知道有哪些用法的小伙伴,可以点击这里,微软文档说的很详细,在阅读本篇文章前,还是希望你对中间件有大致的了解,这样你读起来可能更加能够意会到意思。废话不多说,咱们进入正题(ps:读者要注意关注源码的注释哦)。
Middleware类之间的关系
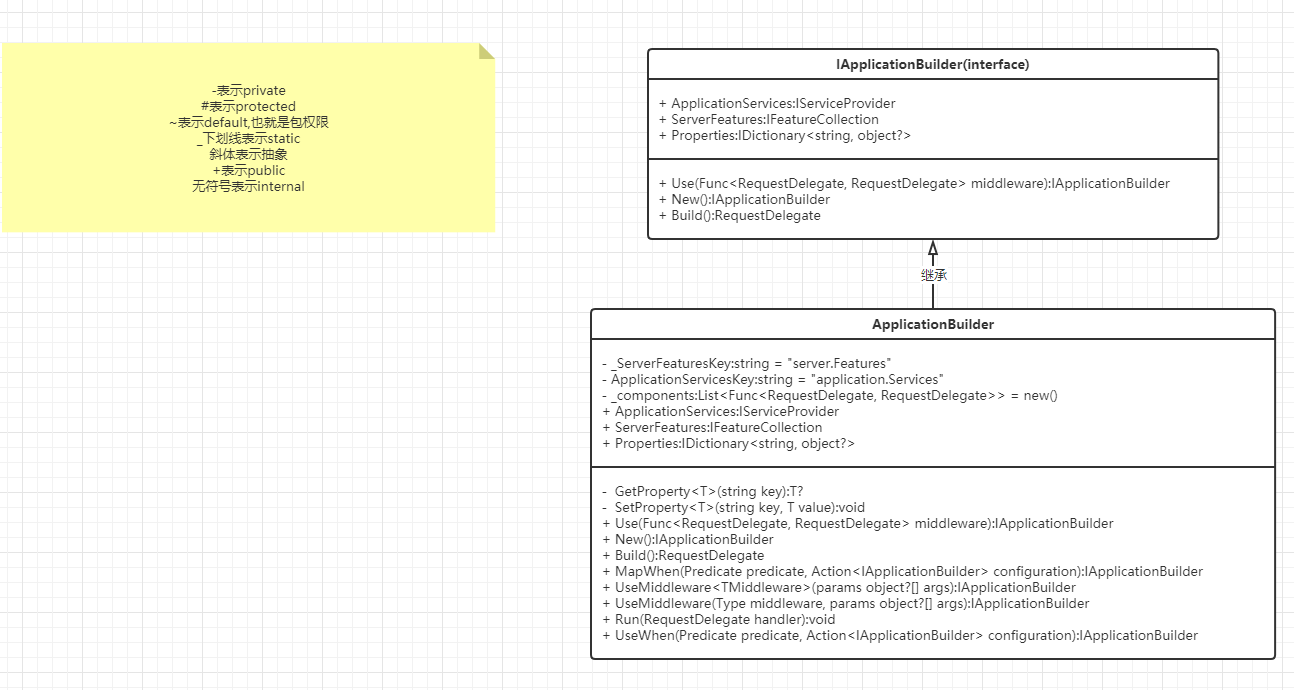
下图也是只列出重要的类和方法,其主要就是就ApplicationBuilder类,如下图:
源码解析
1.在使用中间件时,需要在StartUp类的Config方法中来完成(.Net自带的中间件,官方有明确过使用的顺序,可以看文档),例如Use,Map,Run等方法,它们都通过IApplicationBuilder内置函数调用,所以我们先看ApplicationBuilder类的主体构造,代码如下图:
//这个是所有中间件的委托

public delegate Task RequestDelegate(HttpContext context);

public class ApplicationBuilder : IApplicationBuilder

{

    //服务特性集合key

    private const string ServerFeaturesKey = "server.Features";

    //注入的服务集合key

    private const string ApplicationServicesKey = "application.Services";

    //添加的中间件集合

    private readonly List<Func<RequestDelegate, RequestDelegate>> _components = new();

    public ApplicationBuilder(IServiceProvider serviceProvider)

    {

        Properties = new Dictionary<string, object?>(StringComparer.Ordinal);

        ApplicationServices = serviceProvider;

    }

    public ApplicationBuilder(IServiceProvider serviceProvider, object server)

        : this(serviceProvider)

    {

        SetProperty(ServerFeaturesKey, server);

    }

    private ApplicationBuilder(ApplicationBuilder builder)

    {

        Properties = new CopyOnWriteDictionary<string, object?>(builder.Properties, StringComparer.Ordinal);

    }

    public IServiceProvider ApplicationServices

    {

        get

        {

            return GetProperty<IServiceProvider>(ApplicationServicesKey)!;

        }

        set

        {

            SetProperty<IServiceProvider>(ApplicationServicesKey, value);

        }

    }

    public IFeatureCollection ServerFeatures

    {

        get

        {

            return GetProperty<IFeatureCollection>(ServerFeaturesKey)!;

        }

    }

    //缓存结果,方便读取

    public IDictionary<string, object?> Properties { get; }

    private T? GetProperty<T>(string key)

    {

        return Properties.TryGetValue(key, out var value) ? (T?)value : default(T);

    }

    private void SetProperty<T>(string key, T value)

    {

        Properties[key] = value;

    }

    //添加委托调用,将中间件添加到集合中

    public IApplicationBuilder Use(Func<RequestDelegate, RequestDelegate> middleware)

    {

        _components.Add(middleware);

        return this;

    }

    //创建新的AppBuilder

    public IApplicationBuilder New()

    {

        return new ApplicationBuilder(this);

    }

    //执行Build,构造委托链

    public RequestDelegate Build()

    {

        RequestDelegate app = context =>

        {

            var endpoint = context.GetEndpoint();

            var endpointRequestDelegate = endpoint?.RequestDelegate;

            if (endpointRequestDelegate != null)

            {

                var message =

                    $"The request reached the end of the pipeline without executing the endpoint: '{endpoint!.DisplayName}'. " +

                    $"Please register the EndpointMiddleware using '{nameof(IApplicationBuilder)}.UseEndpoints(...)' if using " +

                    $"routing.";

                throw new InvalidOperationException(message);

            }

            context.Response.StatusCode = StatusCodes.Status404NotFound;

            return Task.CompletedTask;

        };

        //后添加的在末端,先添加的先执行

        for (var c = _components.Count - 1; c >= 0; c--)

        {

            app = _components[c](app);

        }

        return app;

    }

}
根据上述代码可以看出,向集合中添加项只能调用Use方法,然后在Build方法时将委托全部构造成链,请求参数是HttpContext,也就是说,每次请求时,直接调用这个链路头部的委托就可以把所有方法走一遍。
- 接下来,看一下那些自定义的中间件是怎么加入到管道,并且在.net中是怎么处理的,源码如下:
public static class UseMiddlewareExtensions

{

    internal const string InvokeMethodName = "Invoke";

    internal const string InvokeAsyncMethodName = "InvokeAsync";

    public static IApplicationBuilder UseMiddleware<[DynamicallyAccessedMembers(MiddlewareAccessibility)]TMiddleware>(this IApplicationBuilder app, params object?[] args)

    {

        return app.UseMiddleware(typeof(TMiddleware), args);

    }

    public static IApplicationBuilder UseMiddleware(this IApplicationBuilder app, [DynamicallyAccessedMembers(MiddlewareAccessibility)] Type middleware, params object?[] args)

    {

        //判断如果是以依赖注入的形式加入的中间件,需要继承IMiddleware,则不允许有参数

        if (typeof(IMiddleware).IsAssignableFrom(middleware))

        {

            if (args.Length > 0)

            {

                throw new NotSupportedException(Resources.FormatException_UseMiddlewareExplicitArgumentsNotSupported(typeof(IMiddleware)));

            }

            return UseMiddlewareInterface(app, middleware);

        }

        var applicationServices = app.ApplicationServices;

        return app.Use(next =>

        {

            //检查是否有Invoke或者InvokeAsync方法

            var methods = middleware.GetMethods(BindingFlags.Instance | BindingFlags.Public);

            var invokeMethods = methods.Where(m =>

                string.Equals(m.Name, InvokeMethodName, StringComparison.Ordinal)

                || string.Equals(m.Name, InvokeAsyncMethodName, StringComparison.Ordinal)

                ).ToArray();

            //且不能超过一个

            if (invokeMethods.Length > 1)

            {

                throw new InvalidOperationException(Resources.FormatException_UseMiddleMutlipleInvokes(InvokeMethodName, InvokeAsyncMethodName));

            }

            //也不能等于零个

            if (invokeMethods.Length == 0)

            {

                throw new InvalidOperationException(Resources.FormatException_UseMiddlewareNoInvokeMethod(InvokeMethodName, InvokeAsyncMethodName, middleware));

            }

            var methodInfo = invokeMethods[0];

            //返回类型必须是Task

            if (!typeof(Task).IsAssignableFrom(methodInfo.ReturnType))

            {

                throw new InvalidOperationException(Resources.FormatException_UseMiddlewareNonTaskReturnType(InvokeMethodName, InvokeAsyncMethodName, nameof(Task)));

            }

            //获取Invoke方法参数

            var parameters = methodInfo.GetParameters();

            if (parameters.Length == 0 || parameters[0].ParameterType != typeof(HttpContext))

            {

                throw new InvalidOperationException(Resources.FormatException_UseMiddlewareNoParameters(InvokeMethodName, InvokeAsyncMethodName, nameof(HttpContext)));

            }

            //第一个参数是RequestDelegate

            var ctorArgs = new object[args.Length + 1];

            ctorArgs[0] = next;

            Array.Copy(args, 0, ctorArgs, 1, args.Length);

            //根据构造函数参数创建实例

            var instance = ActivatorUtilities.CreateInstance(app.ApplicationServices, middleware, ctorArgs);

            if (parameters.Length == 1)

            {

                //如果是只有一个参数,直接根据实例Invoke方法,创建RequestDelegate委托

                return (RequestDelegate)methodInfo.CreateDelegate(typeof(RequestDelegate), instance);

            }

            //说明Invoke有容器注入的其他服务,则这个方法就是获取那些服务

            var factory = Compile<object>(methodInfo, parameters);

            return context =>

            {

                //默认是请求的Scope容器,如果是null,则返回根容器

                var serviceProvider = context.RequestServices ?? applicationServices;

                if (serviceProvider == null)

                {

                    throw new InvalidOperationException(Resources.FormatException_UseMiddlewareIServiceProviderNotAvailable(nameof(IServiceProvider)));

                }

                //执行Invoke方法

                return factory(instance, context, serviceProvider);

            };

        });

    }

    private static IApplicationBuilder UseMiddlewareInterface(IApplicationBuilder app, [DynamicallyAccessedMembers(DynamicallyAccessedMemberTypes.PublicConstructors)] Type middlewareType)

    {

        //调用Use方法,将委托添加到ApplicationBuilder的内存集合里

        return app.Use(next =>

        {

            return async context =>

            {

                //获取中间件工厂类,从Scope容器中获取注入的中间件

                var middlewareFactory = (IMiddlewareFactory?)context.RequestServices.GetService(typeof(IMiddlewareFactory));

                if (middlewareFactory == null)

                {

                    throw new InvalidOperationException(Resources.FormatException_UseMiddlewareNoMiddlewareFactory(typeof(IMiddlewareFactory)));

                }

                //获取中间件注入的对象实例

                var middleware = middlewareFactory.Create(middlewareType);

                if (middleware == null)

                {

                    throw new InvalidOperationException(Resources.FormatException_UseMiddlewareUnableToCreateMiddleware(middlewareFactory.GetType(), middlewareType));

                }

                try

                {

                    //调用InvokeAsync方法

                    await middleware.InvokeAsync(context, next);

                }

                finally

                {

                    //实际上没做处理,和容器的生命周期一致

                    middlewareFactory.Release(middleware);

                }

            };

        });

    }

}
根据上面的代码可以看出,根据不同方式注入的中间件,.Net做了不同的处理,并且对自定义的中间件做类型检查,但是最后必须调用app.Use方法,将委托加入到ApplicationBuilder的内存集合里面,到Build阶段处理。
- 上面介绍了自定义中间件的处理方式,接下里我们依次介绍下Use,Map和Run方法的处理,源码如下:
public static class UseExtensions

{

    public static IApplicationBuilder Use(this IApplicationBuilder app, Func<HttpContext, Func<Task>, Task> middleware)

    {

        //调用Use方法,添加到内存集合里

        return app.Use(next =>

        {

            return context =>

            {

                //next就是下一个处理,也就是RequestDelegate

                Func<Task> simpleNext = () => next(context);

                return middleware(context, simpleNext);

            };

        });

    }

}

public static class MapExtensions

{

    public static IApplicationBuilder Map(this IApplicationBuilder app, PathString pathMatch, Action<IApplicationBuilder> configuration)

    {

        return Map(app, pathMatch, preserveMatchedPathSegment: false, configuration);

    }

    public static IApplicationBuilder Map(this IApplicationBuilder app, PathString pathMatch, bool preserveMatchedPathSegment, Action<IApplicationBuilder> configuration)

    {

        if (app == null)

        {

            throw new ArgumentNullException(nameof(app));

        }

        if (configuration == null)

        {

            throw new ArgumentNullException(nameof(configuration));

        }

        //不能是/结尾,这个!.用法我也是学习到了

        if (pathMatch.HasValue && pathMatch.Value!.EndsWith("/", StringComparison.Ordinal))

        {

            throw new ArgumentException("The path must not end with a '/'", nameof(pathMatch));

        }

        //构建新的ApplicationBuilder对象,里面不包含之前添加的中间件

        var branchBuilder = app.New();

        //新分支里面的中间件

        configuration(branchBuilder);

        //执行Build方法构建分支管道

        var branch = branchBuilder.Build();

        var options = new MapOptions

        {

            Branch = branch,

            PathMatch = pathMatch,

            PreserveMatchedPathSegment = preserveMatchedPathSegment

        };

        //内部其实是检查是否匹配,匹配的话执行Branch,不匹配继续执行next

        return app.Use(next => new MapMiddleware(next, options).Invoke);

    }

}

public static class RunExtensions

{

    public static void Run(this IApplicationBuilder app, RequestDelegate handler)

    {

        if (app == null)

        {

            throw new ArgumentNullException(nameof(app));

        }

        if (handler == null)

        {

            throw new ArgumentNullException(nameof(handler));

        }

        //只执行Handle,不做其他处理,也就是管道终端,给短路了

        app.Use(_ => handler);

    }

}
上面的代码分别介绍了Use,Map,Run的方法实现,它们还是在需要将中间件加入到内存集合里面,但是对于不同的方法,它们达到的效果也不一样。
- 总结上面的代码可以看出,它执行完Build方法,把委托链构造出来之后,然后在每次请求的时候只需要将构造完成的HttpContext当作请求参数传入之后,即可依次执行中间件的内容,那么应用程序是如何构建ApplicationBuilder对象实例,又是在哪里调用Build方法的呢?我们继续往下看。
我们知道在使用.Net通用模板的创建项目的时候,在Program里面有一句代码,如下:
Host.CreateDefaultBuilder(args)

//这个方法主要是构建web主机,如Kestrel,集成IIS等操作

.ConfigureWebHostDefaults(webBuilder =>

{

    webBuilder.UseStartup<Startup>();

});
追溯其源码的位置时,实际上它是作为了IHostedService服务来运行的,如果有不清楚IHostedService的小伙伴可以点击这里,先看下官方文档的解释和用法,看完之后你就明白了。我们再来看源码:
public static IHostBuilder ConfigureWebHost(this IHostBuilder builder, Action<IWebHostBuilder> configure, Action<WebHostBuilderOptions> configureWebHostBuilder)

{

    if (configure is null)

    {

        throw new ArgumentNullException(nameof(configure));

    }

    if (configureWebHostBuilder is null)

    {

        throw new ArgumentNullException(nameof(configureWebHostBuilder));

    }

    if (builder is ISupportsConfigureWebHost supportsConfigureWebHost)

    {

        return supportsConfigureWebHost.ConfigureWebHost(configure, configureWebHostBuilder);

    }

    var webHostBuilderOptions = new WebHostBuilderOptions();

    //下面两行执行的代码,是关于构建Host主机的,以后新的文章来说

    configureWebHostBuilder(webHostBuilderOptions);

    var webhostBuilder = new GenericWebHostBuilder(builder, webHostBuilderOptions);

    //执行自定的方法,例如模板方法里面的UseStartUp

    configure(webhostBuilder);

    //主要看这里,将其添加到HostedService

    builder.ConfigureServices((context, services) => services.AddHostedService<GenericWebHostService>());

    return builder;

}

internal sealed partial class GenericWebHostService : IHostedService

{

  public async Task StartAsync(CancellationToken cancellationToken)

  {

      HostingEventSource.Log.HostStart();

      var serverAddressesFeature = Server.Features.Get<IServerAddressesFeature>();

      var addresses = serverAddressesFeature?.Addresses;

      //配置服务地址

      if (addresses != null && !addresses.IsReadOnly && addresses.Count == 0)

      {

          var urls = Configuration[WebHostDefaults.ServerUrlsKey];

          if (!string.IsNullOrEmpty(urls))

          {

              serverAddressesFeature!.PreferHostingUrls = WebHostUtilities.ParseBool(Configuration, WebHostDefaults.PreferHostingUrlsKey);

              foreach (var value in urls.Split(';', StringSplitOptions.RemoveEmptyEntries))

              {

                  addresses.Add(value);

              }

          }

      }

      //定义最终返回的委托变量

      RequestDelegate? application = null;

      try

      {

          //默认StartUp类里面的Config

          var configure = Options.ConfigureApplication;

          if (configure == null)

          {

              throw new InvalidOperationException($"No application configured. Please specify an application via IWebHostBuilder.UseStartup, IWebHostBuilder.Configure, or specifying the startup assembly via {nameof(WebHostDefaults.StartupAssemblyKey)} in the web host configuration.");

          }

          //构建ApplicationBuilder

          var builder = ApplicationBuilderFactory.CreateBuilder(Server.Features);

          //如果存在IStartupFilter,那么把要执行的中间件放到前面

          foreach (var filter in StartupFilters.Reverse())

          {

              configure = filter.Configure(configure);

          }

          configure(builder);

          //执行Build,开始构建委托链

          application = builder.Build();

      }

      catch (Exception ex)

      {

          Logger.ApplicationError(ex);

          if (!Options.WebHostOptions.CaptureStartupErrors)

          {

              throw;

          }

          var showDetailedErrors = HostingEnvironment.IsDevelopment() || Options.WebHostOptions.DetailedErrors;

          application = ErrorPageBuilder.BuildErrorPageApplication(HostingEnvironment.ContentRootFileProvider, Logger, showDetailedErrors, ex);

      }

      var httpApplication = new HostingApplication(application, Logger, DiagnosticListener, ActivitySource, Propagator, HttpContextFactory);

      //启动服务

      await Server.StartAsync(httpApplication, cancellationToken);

  }

}
从上面可以看出,最终是作为IHostedService来运行的,而StartAsync方法,则是在Host.Build().Run()中的Run方法里面统一执行所有注册过IHostedService服务的集合,也就是在Run阶段才开始构建管道(读者可以自行看下源码,以后的文章我也会讲到)。
总结
通过解读源码可以看出中间件有以下特点:
- 目前自定义的中间件要么需要继承IMiddleware(不能传递参数),要么需要构造指定规则的类。
- Use不会使管道短路(除非调用方不调用next),Map和Run会使管道短路,更多的是,Run不会再往下传递,也就是终止,而Map可能会往下传递。
- 委托链的构造是在Run方法中执行的,并且作为IHostedService托管服务执行的。
上述文章中所展示的源码并不是全部的源码,笔者只是挑出其重点部分展示。由于文采能力有限,如果有没说明白的或者没有描述清楚的,又或者有错误的地方,还请评论指正。
源码解析.Net中Middleware的实现的更多相关文章
- Spark 源码解析 : DAGScheduler中的DAG划分与提交
一.Spark 运行架构 Spark 运行架构如下图: 各个RDD之间存在着依赖关系,这些依赖关系形成有向无环图DAG,DAGScheduler对这些依赖关系形成的DAG,进行Stage划分,划分的规 ...
- 源码解析.Net中IConfiguration配置的实现
前言 关于IConfituration的使用,我觉得大部分人都已经比较熟悉了,如果不熟悉的可以看这里.因为本篇不准备讲IConfiguration都是怎么使用的,但是在源码部分的解读,网上资源相对少一 ...
- 源码解析.Net中DependencyInjection的实现
前言 笔者的这篇文章和上篇文章思路一样,不注重依赖注入的使用方法,更加注重源码的实现,我尽量的表达清楚内容,让读者能够真正的学到东西.如果有不太清楚依赖注入是什么或怎么在.Net项目中使用的话,请点击 ...
- 源码解析.Net中Host主机的构建过程
前言 本篇文章着重讲一下在.Net中Host主机的构建过程,依旧延续之前文章的思路,着重讲解其源码,如果有不知道有哪些用法的同学可以点击这里,废话不多说,咱们直接进入正题 Host构建过程 下图是我自 ...
- 源码解析C#中PriorityQueue(优先级队列)的实现
前言 前段时间看到有大佬对.net 6.0新出的PriorityQueue(优先级队列)数据结构做了解析,但是没有源码分析,所以本着探究源码的心态,看了看并分享出来.它不像普通队列先进先出(FIFO) ...
- multiprocessing 源码解析 更新中......
一.参考链接 1.源码包下载·链接: https://pypi.org/search/?q=multiprocessing+ 2.源码包 链接:https://pan.baidu.com/s/1j ...
- 源码解析Android中View的measure量算过程
Android中的Veiw从内存中到呈现在UI界面上需要依次经历三个阶段:量算 -> 布局 -> 绘图,关于View的量算.布局.绘图的总体机制可参见博文< Android中View ...
- spring boot 源码解析52-actuate中MVCEndPoint解析
今天有个别项目的jolokia的endpoint不能访问,调试源码发现:endpoint.enabled的开关导致的. 关于Endpoint, <Springboot Endpoint之二:En ...
- Spring源码解析-Advice中的Adapter模式
在spring中与通知相关的类有: 以Advice结尾的通知接口 MethodBeforeAdvice AfterReturningAdvice ThrowsAdvice 以Inter ...
随机推荐
- npm 安装、卸载模块
npm安装模块 [npm install xxx]利用 npm 安装xxx模块到当前命令行所在目录:[npm install -g xxx]利用npm安装全局模块xxx:本地安装时将模块写入packa ...
- python内置函数--- hasattr、setattr、getattr
1.描述 hasattr() 函数用于判断对象是否包含对应的属性. 语法 hasattr 语法: hasattr(object, name) 2.描述 setattr() 函数对应函数 getattr ...
- lwIP(Light Weight IP)协议
信号量 信号量结构体:struct sys_semt struct _sys_sem { void *sem; }; err_t sys_sem_new(sys_sem_t *sem, u8_t c ...
- 构建前端第7篇之---elementUI设置主题,进而改变全局button底色
张艳涛写于2020-1-20 What:是elementUI主题? 是内置的格式,elementUI默认只有一个主题,如果想整体替换按钮的颜色等问题,那么就可以用主题 设置步骤 在路径src/styl ...
- 【阅读笔记】Java核心技术卷一 #4.Chapter6
6 接口.lambda 表达式与内部类 6.1 接口 6.1.1 接口概念 接口绝不能含有实例域:但在接口中可以定义常量,被自动设为 public static final 接口中的所有方法自动地属于 ...
- 机器学习 - k-means聚类
k-means简介 k-means是无监督学习下的一种聚类算法,简单说就是不需要数据标签,仅靠特征值就可以将数据分为指定的几类.k-means算法的核心就是通过计算每个数据点与k个质心(或重心)之间的 ...
- .NET Core/.NET5/.NET6 开源项目汇总13:模板引擎
系列目录 [已更新最新开发文章,点击查看详细] 开源项目是众多组织与个人分享的组件或项目,作者付出的心血我们是无法体会的,所以首先大家要心存感激.尊重.请严格遵守每个项目的开源协议后再使用.尊 ...
- Golang语言系列-18-Gin框架博客项目
代码托管在码云: https://gitee.com/lichengguo/my-blog-golang
- 【笔记】二分类算法解决多分类问题之OvO与OvR
OvO与OvR 前文书道,逻辑回归只能解决二分类问题,不过,可以对其进行改进,使其同样可以用于多分类问题,其改造方式可以对多种算法(几乎全部二分类算法)进行改造,其有两种,简写为OvO与OvR OvR ...
- Python 可变数据类型与不可变数据类型
浅拷贝和深拷贝 Python数据都是存放到内存中的,Python的数据又分为可变和不可以变 可变数据(修改了值后,不会改变内存地址,修改的值还是指向相同的内存地址) 字典 # 列表是可变 x = [1 ...