Springboot源码分析之jar探秘
摘要:
- 利用IDEA等工具打包会出现springboot-0.0.1-SNAPSHOT.jar,springboot-0.0.1-SNAPSHOT.jar.original,前面说过它们之间的关系了,接下来我们就一探究竟,它们之间到底有什么联系。
文件对比:
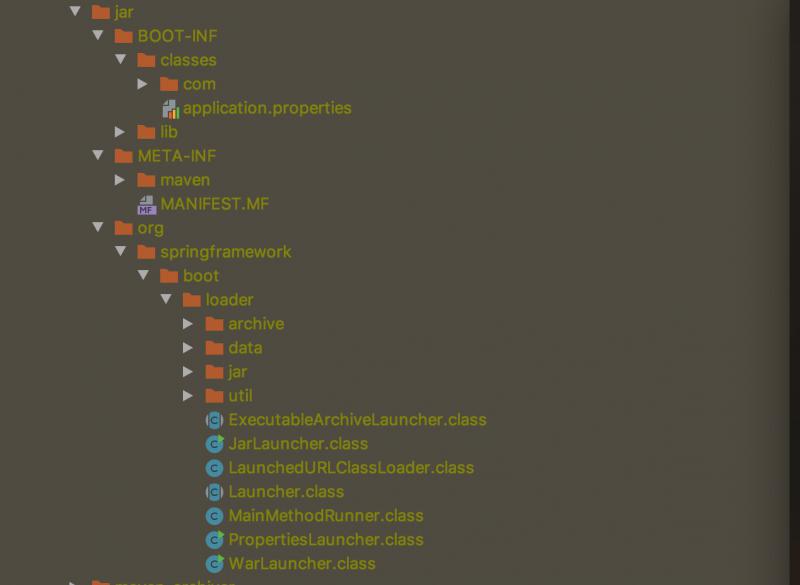
进入target目录,unzip springboot-0.0.1-SNAPSHOT.jar -d jar命令将springboot-0.0.1-SNAPSHOT.jar解压到jar目录
进入target目录,unzip springboot-0.0.1-SNAPSHOT.jar.original -d original命令将springboot-0.0.1-SNAPSHOT.jar.original解压到original目录

前面文章分析过springboot-0.0.1-SNAPSHOT.jar.original不能执行,将它进行repackage后生成springboot-0.0.1-SNAPSHOT.jar就成了我们的可执行fat jar,对比上面文件会发现可执行 fat jar和original jar目录不一样,最关键的地方是多了org.springframework.boot.loader这个包,这个就是我们平时java -jar springboot-0.0.1-SNAPSHOT.jar命令启动的奥妙所在。MANIFEST.MF文件里面的内容包含了很多关键的信息
Manifest-Version: 1.0

Start-Class: com.github.dqqzj.springboot.SpringbootApplication

Spring-Boot-Classes: BOOT-INF/classes/

Spring-Boot-Lib: BOOT-INF/lib/

Build-Jdk-Spec: 1.8

Spring-Boot-Version: 2.1.6.RELEASE

Created-By: Maven Archiver 3.4.0

Main-Class: org.springframework.boot.loader.JarLauncher
相信不用多说大家都能明白Main-Class: org.springframework.boot.loader.JarLauncher是我们 java -jar命令启动的入口,后续会进行分析,Start-Class: com.github.dqqzj.springboot.SpringbootApplication才是我们程序的入口主函数。
Springboot jar启动源码分析
public class JarLauncher extends ExecutableArchiveLauncher {

    static final String BOOT_INF_CLASSES = "BOOT-INF/classes/";

    static final String BOOT_INF_LIB = "BOOT-INF/lib/";

    public JarLauncher() {

    }

    protected JarLauncher(Archive archive) {

        super(archive);

    }

   /**

    * 判断是否归档文件还是文件系统的目录 可以猜想基于文件系统一样是可以启动的

    */

    protected boolean isNestedArchive(Entry entry) {

        return entry.isDirectory() ? entry.getName().equals("BOOT-INF/classes/") : entry.getName().startsWith("BOOT-INF/lib/");

    }

    public static void main(String[] args) throws Exception {

    /**

     * 进入父类初始化构造器ExecutableArchiveLauncher

     * launch方法交给Launcher执行

     */

        (new JarLauncher()).launch(args);

    }

}

public abstract class ExecutableArchiveLauncher extends Launcher {

    private final Archive archive;

    public ExecutableArchiveLauncher() {

        try {

    /**

     * 使用父类Launcher加载资源,包括BOOT-INF的classes和lib下面的所有归档文件

     */

            this.archive = this.createArchive();

        } catch (Exception var2) {

            throw new IllegalStateException(var2);

        }

    }

    protected ExecutableArchiveLauncher(Archive archive) {

        this.archive = archive;

    }

    protected final Archive getArchive() {

        return this.archive;

    }

    /**

     * 从归档文件中获取我们的应用程序主函数

     */

    protected String getMainClass() throws Exception {

        Manifest manifest = this.archive.getManifest();

        String mainClass = null;

        if (manifest != null) {

            mainClass = manifest.getMainAttributes().getValue("Start-Class");

        }

        if (mainClass == null) {

            throw new IllegalStateException("No 'Start-Class' manifest entry specified in " + this);

        } else {

            return mainClass;

        }

    }

    protected List<Archive> getClassPathArchives() throws Exception {

        List<Archive> archives = new ArrayList(this.archive.getNestedArchives(this::isNestedArchive));

        this.postProcessClassPathArchives(archives);

        return archives;

    }

    protected abstract boolean isNestedArchive(Entry entry);

    protected void postProcessClassPathArchives(List<Archive> archives) throws Exception {

    }

}

public abstract class Launcher {

    public Launcher() {

    }

    protected void launch(String[] args) throws Exception {

      /**

       *注册协议处理器,由于Springboot是 jar in jar 所以要重写jar协议才能读取归档文件

       */

        JarFile.registerUrlProtocolHandler();

        ClassLoader classLoader = this.createClassLoader(this.getClassPathArchives());

      /**

       * this.getMainClass()交给子类ExecutableArchiveLauncher实现

       */

        this.launch(args, this.getMainClass(), classLoader);

    }

    protected ClassLoader createClassLoader(List<Archive> archives) throws Exception {

        List<URL> urls = new ArrayList(archives.size());

        Iterator var3 = archives.iterator();

        while(var3.hasNext()) {

            Archive archive = (Archive)var3.next();

            urls.add(archive.getUrl());

        }

        return this.createClassLoader((URL[])urls.toArray(new URL[0]));

    }

    /**

     * 该类加载器是fat jar的关键的一处,因为传统的类加载器无法读取jar in jar模型,所以springboot进行了自己实现

     */

    protected ClassLoader createClassLoader(URL[] urls) throws Exception {

        return new LaunchedURLClassLoader(urls, this.getClass().getClassLoader());

    }

    protected void launch(String[] args, String mainClass, ClassLoader classLoader) throws Exception {

        Thread.currentThread().setContextClassLoader(classLoader);

        this.createMainMethodRunner(mainClass, args, classLoader).run();

    }

    /**

     * 创建应用程序主函数运行器

     */

    protected MainMethodRunner createMainMethodRunner(String mainClass, String[] args, ClassLoader classLoader) {

        return new MainMethodRunner(mainClass, args);

    }

    protected abstract String getMainClass() throws Exception;

    protected abstract List<Archive> getClassPathArchives() throws Exception;

   /**

		  * 得到我们的启动jar的归档文件

			*/

    protected final Archive createArchive() throws Exception {

        ProtectionDomain protectionDomain = this.getClass().getProtectionDomain();

        CodeSource codeSource = protectionDomain.getCodeSource();

        URI location = codeSource != null ? codeSource.getLocation().toURI() : null;

        String path = location != null ? location.getSchemeSpecificPart() : null;

        if (path == null) {

            throw new IllegalStateException("Unable to determine code source archive");

        } else {

            File root = new File(path);

            if (!root.exists()) {

                throw new IllegalStateException("Unable to determine code source archive from " + root);

            } else {

                return (Archive)(root.isDirectory() ? new ExplodedArchive(root) : new JarFileArchive(root));

            }

        }

    }

}

public class MainMethodRunner {

    private final String mainClassName;

    private final String[] args;

    public MainMethodRunner(String mainClass, String[] args) {

        this.mainClassName = mainClass;

        this.args = args != null ? (String[])args.clone() : null;

    }

    /**

     * 最终执行的方法,可以发现是利用的反射调用的我们应用程序的主函数

     */

    public void run() throws Exception {

        Class<?> mainClass = Thread.currentThread().getContextClassLoader().loadClass(this.mainClassName);

        Method mainMethod = mainClass.getDeclaredMethod("main", String[].class);

        mainMethod.invoke((Object)null, this.args);

    }

}
小结:
内容太多了,未涉及归档文件,协议处理器,打包war同样的可以用命令启动等,感兴趣的读者请亲自去调试一番,添加依赖
        <dependency>

            <groupId>org.springframework.boot</groupId>

            <artifactId>spring-boot-loader</artifactId>

        </dependency>
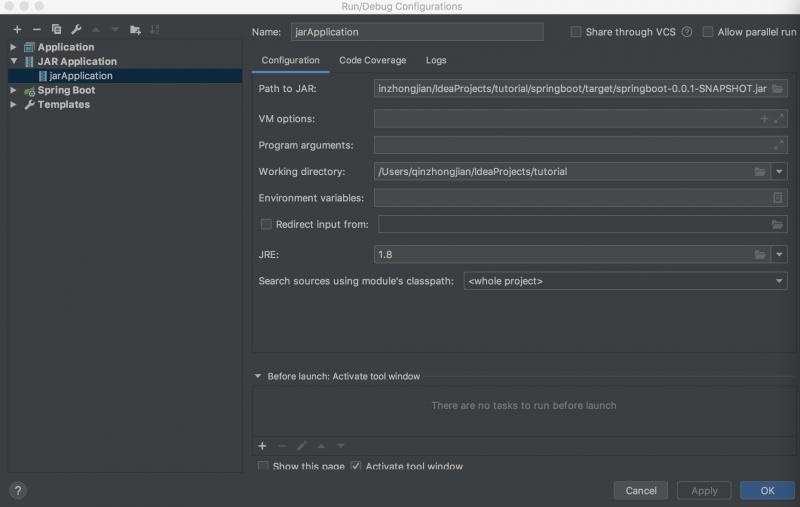
IDEA进行启动类的配置
Springboot源码分析之jar探秘的更多相关文章
- Springboot源码分析之项目结构
Springboot源码分析之项目结构 摘要: 无论是从IDEA还是其他的SDS开发工具亦或是https://start.spring.io/ 进行解压,我们都会得到同样的一个pom.xml文件 4. ...
- SpringBoot源码分析之SpringBoot的启动过程
SpringBoot源码分析之SpringBoot的启动过程 发表于 2017-04-30 | 分类于 springboot | 0 Comments | 阅读次数 SpringB ...
- 从SpringBoot源码分析 配置文件的加载原理和优先级
本文从SpringBoot源码分析 配置文件的加载原理和配置文件的优先级 跟入源码之前,先提一个问题: SpringBoot 既可以加载指定目录下的配置文件获取配置项,也可以通过启动参数( ...
- SpringBoot源码分析(二)启动原理
Springboot的jar启动方式,是通过IOC容器启动 带动了Web容器的启动 而Springboot的war启动方式,是通过Web容器(如Tomcat)的启动 带动了IOC容器相关的启动 一.不 ...
- springboot源码分析-SpringApplication
SpringApplication SpringApplication类提供了一种方便的方法来引导从main()方法启动的Spring应用程序 SpringBoot 包扫描注解源码分析 @Spring ...
- Springboot源码分析之代理三板斧
摘要: 在Spring的版本变迁过程中,注解发生了很多的变化,然而代理的设计也发生了微妙的变化,从Spring1.x的ProxyFactoryBean的硬编码岛Spring2.x的Aspectj注解, ...
- Springboot源码分析之事务拦截和管理
摘要: 在springboot的自动装配事务里面,InfrastructureAdvisorAutoProxyCreator ,TransactionInterceptor,PlatformTrans ...
- Springboot源码分析之Spring循环依赖揭秘
摘要: 若你是一个有经验的程序员,那你在开发中必然碰到过这种现象:事务不生效.或许刚说到这,有的小伙伴就会大惊失色了.Spring不是解决了循环依赖问题吗,它是怎么又会发生循环依赖的呢?,接下来就让我 ...
- 从SpringBoot源码分析 主程序配置类加载过程
1.@Import(AutoConfigurationPackages.Registrar.class) 初始SpringBoot 我们知道在SpringBoot 启动类上有一个@SpringBoot ...
随机推荐
- python之pip install
安装方式1 wget http://python-distribute.org/distribute_setup.py sudo python distribute_setup.py wget h ...
- EPPLUS 实现excel报表数据及公式填充
年后工作第一天,根据客户要求修善EPPLUS报表. Epplus: Epplus是一个使用Open Office XML(Xlsx)文件格式,能读写Excel 2007/2010文件的开源组件 好处很 ...
- CUDA编程学习笔记2
第二章 cuda代码写在.cu/.cuh里面 cuda 7.0 / 9.0开始,NVCC就支持c++11 / 14里面绝大部分的语言特性了. Dim3 __host__ __device__ dim3 ...
- C语言入门2-程序设计的灵魂—算法及Raptor的应用
一. 什么是算法(5个特性) 算法就是 解决问题的方法和步骤. 算法为解决一个具体问题而采取的确定的 有限的 执行步骤 ,仅指 计算机 能执行的算法. 算法是程序设计的灵魂和核心 ...
- Linux C 网络编程——多线程的聊天室实现(服务器端)
服务器端的主要功能: 实现多用户群体聊天功能(此程序最多设定为10人,可进行更改),每个人所发送的消息其他用户均可以收到.用户可以随意的加入或退出(推出以字符串"bye"实现),服 ...
- 《VR入门系列教程》之6---VR硬件介绍及DK1
第二章 VR硬件介绍 本章主要介绍当前比较流行的消费版VR设备,包括VR头显以及应用运行的PC和手机平台. 即使是在这工业高速发展的时代,一些大厂(比如Facebook的Oculus ...
- python课堂整理3---字符串魔法
字符串魔法 1.首字母大写功能 test = "alex" v = test.capitalize() print(v) 2.所有变小写(casefold更厉害,可以将很多未知的其 ...
- ironic+nova详解
ironic+nova详解 说明: Openstack 的安装步骤省略,按照社区的文档即可搭建出一套相对稳定的使用环境.本文档基于Newton版本. 假设现在已经有一套可用的Newton环境, 以下的 ...
- Mysql处理中文乱码的问题
一开始在创建完毕数据库和数据表之后,插入中文发现在mysql命令行和在sqlyog终端上看都是乱码,查看了一些文章,写的内容都一样,无非是如下几个步骤: 1:修改数据库字符集为utf8 2:修改数据表 ...
- PythonDay03
## 第三章 ### 今日内容 1.整型 2.布尔值 3.字符串 索引 切片 步长 字符串的方法 4.for循环 ### 1.整型 - python3:全部是整形- python2:整形,长 ...