Android(java)学习笔记180:多媒体之图形的变化处理
1. 图形的缩放
(1)布局文件activity_main.xml如下:
 <LinearLayout xmlns:android="http://schemas.android.com/apk/res/android"

     xmlns:tools="http://schemas.android.com/tools"

     android:layout_width="match_parent"

     android:layout_height="match_parent"

     android:orientation="vertical"

     android:gravity="center_horizontal"

     tools:context="com.himi.bitmapdemo.MainActivity" >

     <ImageView

         android:layout_width="wrap_content"

         android:layout_height="wrap_content"

         android:id="@+id/iv_src" />

     <ImageView

         android:layout_marginTop="10dip"

         android:layout_width="wrap_content"

         android:layout_height="wrap_content"

         android:id="@+id/iv_copyed" />

 </LinearLayout>
(2)MainActivity.java,如下:
 package com.himi.bitmapdemo;

 import android.app.Activity;

 import android.graphics.Bitmap;

 import android.graphics.Bitmap.Config;

 import android.graphics.BitmapFactory;

 import android.graphics.Canvas;

 import android.graphics.Color;

 import android.graphics.Matrix;

 import android.graphics.Paint;

 import android.os.Bundle;

 import android.widget.ImageView;

 public class MainActivity extends Activity {

     private ImageView iv_src;

     private ImageView iv_copyed;

     @Override

     protected void onCreate(Bundle savedInstanceState) {

         super.onCreate(savedInstanceState);

         setContentView(R.layout.activity_main);

         iv_src = (ImageView) findViewById(R.id.iv_src);

         iv_copyed = (ImageView) findViewById(R.id.iv_copyed);

         // 设置原图

         Bitmap bitmapSrc = BitmapFactory.decodeResource(getResources(),

                 R.drawable.img01);

         iv_src.setImageBitmap(bitmapSrc);

         // 对原图进行 缩放,创建一个原图的拷贝(副本),不能直接对原图变化

         // 获取原图的纸张类型

         Config config = bitmapSrc.getConfig();

         // 创建的副本,里面的内容是空白的,画布

         Bitmap alertBitmap = Bitmap.createBitmap(bitmapSrc.getWidth(),

                 bitmapSrc.getHeight(), config);

         // 以alertBitmap大小为模板创建一个画板

         Canvas canvas = new Canvas(alertBitmap);

         // 创建画笔

         Paint paint = new Paint();

         // 画笔的默认颜色

         paint.setColor(Color.BLACK);

         // 第一参数是临摹的图片

         canvas.drawBitmap(bitmapSrc, new Matrix(), paint);

         iv_copyed.setImageBitmap(alertBitmap);

     }

 }
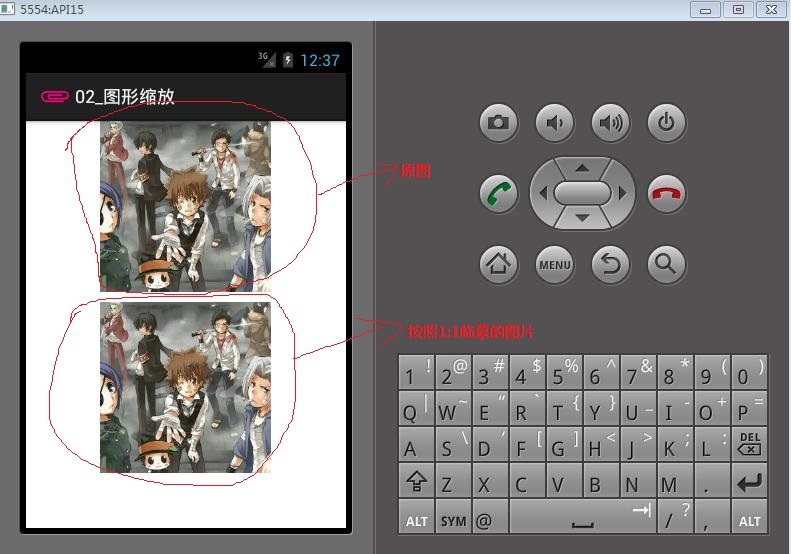
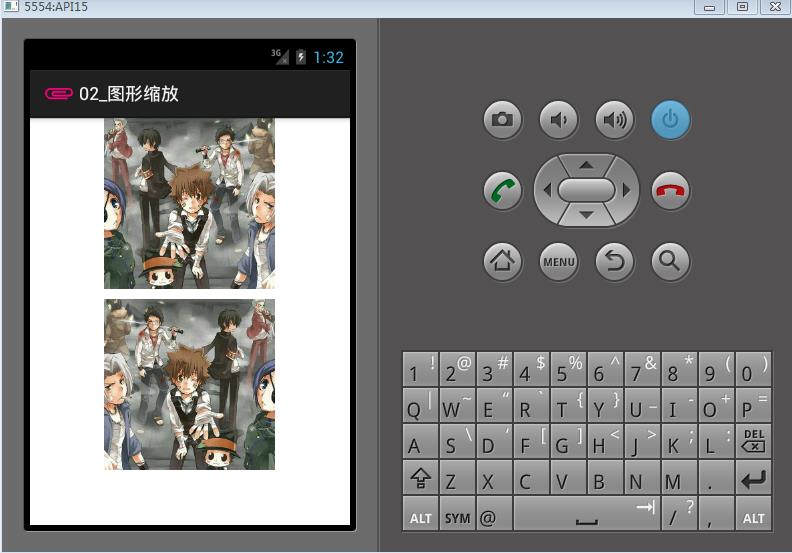
new Matrix默认是1:1缩放比例,上面代码获取的是1:1的图片,效果如下:
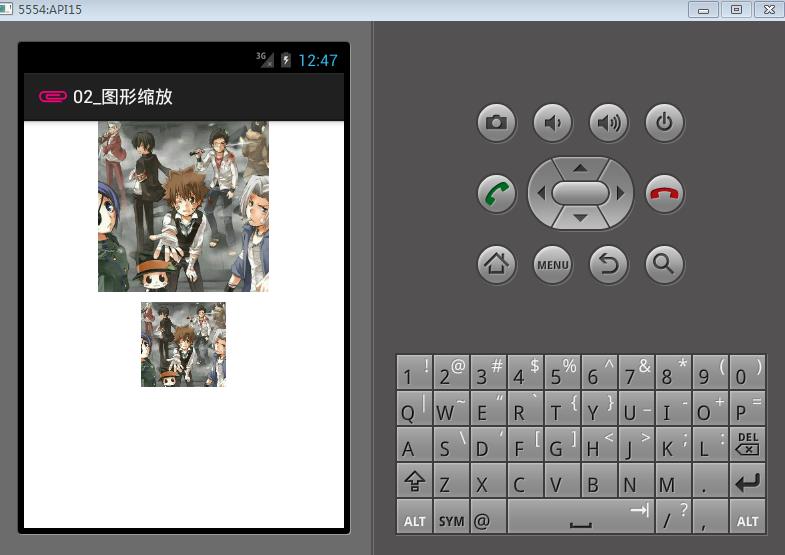
如果我们想缩小图片大小为原来2倍,就可以直接这样修改代码,如下:
MainActivity.java,如下:
 package com.himi.bitmapdemo;

 import android.app.Activity;

 import android.graphics.Bitmap;

 import android.graphics.Bitmap.Config;

 import android.graphics.BitmapFactory;

 import android.graphics.Canvas;

 import android.graphics.Color;

 import android.graphics.Matrix;

 import android.graphics.Paint;

 import android.os.Bundle;

 import android.widget.ImageView;

 public class MainActivity extends Activity {

     private ImageView iv_src;

     private ImageView iv_copyed;

     @Override

     protected void onCreate(Bundle savedInstanceState) {

         super.onCreate(savedInstanceState);

         setContentView(R.layout.activity_main);

         iv_src = (ImageView) findViewById(R.id.iv_src);

         iv_copyed = (ImageView) findViewById(R.id.iv_copyed);

         // 设置原图

         Bitmap bitmapSrc = BitmapFactory.decodeResource(getResources(),

                 R.drawable.img01);

         iv_src.setImageBitmap(bitmapSrc);

         // 对原图进行 缩放,创建一个原图的拷贝(副本),不能直接对原图变化

         // 获取原图的纸张类型

         Config config = bitmapSrc.getConfig();

         // 创建的副本,里面的内容是空白的,画布

         Bitmap alertBitmap = Bitmap.createBitmap(bitmapSrc.getWidth()*2,

                 bitmapSrc.getHeight()*2, config);

         // 以alertBitmap大小为模板创建一个画板

         Canvas canvas = new Canvas(alertBitmap);

         // 创建画笔

         Paint paint = new Paint();

         // 画笔的默认颜色

         paint.setColor(Color.BLACK);

         // 第一参数是临摹的图片

         Matrix matrix = new Matrix();

         matrix.setScale(2.0f, 2.0f);

         canvas.drawBitmap(bitmapSrc, matrix , paint);

         iv_copyed.setImageBitmap(alertBitmap);

     }

 }
运行效果如下:

如果我们想缩小图片大小为原来一半,就可以直接这样修改代码,如下:
MainActivity.java,如下:
 package com.himi.bitmapdemo;

 import android.app.Activity;

 import android.graphics.Bitmap;

 import android.graphics.Bitmap.Config;

 import android.graphics.BitmapFactory;

 import android.graphics.Canvas;

 import android.graphics.Color;

 import android.graphics.Matrix;

 import android.graphics.Paint;

 import android.os.Bundle;

 import android.widget.ImageView;

 public class MainActivity extends Activity {

     private ImageView iv_src;

     private ImageView iv_copyed;

     @Override

     protected void onCreate(Bundle savedInstanceState) {

         super.onCreate(savedInstanceState);

         setContentView(R.layout.activity_main);

         iv_src = (ImageView) findViewById(R.id.iv_src);

         iv_copyed = (ImageView) findViewById(R.id.iv_copyed);

         // 设置原图

         Bitmap bitmapSrc = BitmapFactory.decodeResource(getResources(),

                 R.drawable.img01);

         iv_src.setImageBitmap(bitmapSrc);

         // 对原图进行 缩放,创建一个原图的拷贝(副本),不能直接对原图变化

         // 获取原图的纸张类型

         Config config = bitmapSrc.getConfig();

         // 创建的副本,里面的内容是空白的,画布

         Bitmap alertBitmap = Bitmap.createBitmap(bitmapSrc.getWidth()/2,

                 bitmapSrc.getHeight()/2, config);

         // 以alertBitmap大小为模板创建一个画板

         Canvas canvas = new Canvas(alertBitmap);

         // 创建画笔

         Paint paint = new Paint();

         // 画笔的默认颜色

         paint.setColor(Color.BLACK);

         // 第一参数是临摹的图片

         Matrix matrix = new Matrix();

         matrix.setScale(0.5f, 0.5f);

         canvas.drawBitmap(bitmapSrc, matrix , paint);

         iv_copyed.setImageBitmap(alertBitmap);

     }

 }
运行的效果如下:
2. 图形的旋转
承接上面的代码,修改MainActivity.java,如下:
 package com.himi.bitmapdemo;

 import android.app.Activity;

 import android.graphics.Bitmap;

 import android.graphics.Bitmap.Config;

 import android.graphics.BitmapFactory;

 import android.graphics.Canvas;

 import android.graphics.Color;

 import android.graphics.Matrix;

 import android.graphics.Paint;

 import android.os.Bundle;

 import android.widget.ImageView;

 public class MainActivity extends Activity {

     private ImageView iv_src;

     private ImageView iv_copyed;

     @Override

     protected void onCreate(Bundle savedInstanceState) {

         super.onCreate(savedInstanceState);

         setContentView(R.layout.activity_main);

         iv_src = (ImageView) findViewById(R.id.iv_src);

         iv_copyed = (ImageView) findViewById(R.id.iv_copyed);

         // 设置原图

         Bitmap bitmapSrc = BitmapFactory.decodeResource(getResources(),

                 R.drawable.img01);

         iv_src.setImageBitmap(bitmapSrc);

         // 对原图进行 缩放,创建一个原图的拷贝(副本),不能直接对原图变化

         // 获取原图的纸张类型

         Config config = bitmapSrc.getConfig();

         // 创建的副本,里面的内容是空白的,画布

         Bitmap alertBitmap = Bitmap.createBitmap(bitmapSrc.getWidth(),

                 bitmapSrc.getHeight(), config);

         // 以alertBitmap大小为模板创建一个画板

         Canvas canvas = new Canvas(alertBitmap);

         // 创建画笔

         Paint paint = new Paint();

         // 画笔的默认颜色

         paint.setColor(Color.BLACK);

         // 第一参数是临摹的图片

         Matrix matrix = new Matrix();

         //默认以画布左上角为旋转原点,旋转30°

         //matrix.setRotate(30);

         //以画布中心点为旋转原点,旋转30°

         matrix.setRotate(, bitmapSrc.getWidth()/2, bitmapSrc.getHeight()/2);

         canvas.drawBitmap(bitmapSrc, matrix , paint);

         iv_copyed.setImageBitmap(alertBitmap);

     }

 }
效果如下:
3. 图形的平移
MainActivity代码如下:
 package com.himi.bitmapdemo;

 import android.app.Activity;

 import android.graphics.Bitmap;

 import android.graphics.Bitmap.Config;

 import android.graphics.BitmapFactory;

 import android.graphics.Canvas;

 import android.graphics.Color;

 import android.graphics.Matrix;

 import android.graphics.Paint;

 import android.os.Bundle;

 import android.widget.ImageView;

 public class MainActivity extends Activity {

     private ImageView iv_src;

     private ImageView iv_copyed;

     @Override

     protected void onCreate(Bundle savedInstanceState) {

         super.onCreate(savedInstanceState);

         setContentView(R.layout.activity_main);

         iv_src = (ImageView) findViewById(R.id.iv_src);

         iv_copyed = (ImageView) findViewById(R.id.iv_copyed);

         // 设置原图

         Bitmap bitmapSrc = BitmapFactory.decodeResource(getResources(),

                 R.drawable.img01);

         iv_src.setImageBitmap(bitmapSrc);

         // 对原图进行 缩放,创建一个原图的拷贝(副本),不能直接对原图变化

         // 获取原图的纸张类型

         Config config = bitmapSrc.getConfig();

         // 创建的副本,里面的内容是空白的,画布

         Bitmap alertBitmap = Bitmap.createBitmap(bitmapSrc.getWidth(),

                 bitmapSrc.getHeight(), config);

         // 以alertBitmap大小为模板创建一个画板

         Canvas canvas = new Canvas(alertBitmap);

         // 创建画笔

         Paint paint = new Paint();

         // 画笔的默认颜色

         paint.setColor(Color.BLACK);

         // 第一参数是临摹的图片

         Matrix matrix = new Matrix();

         matrix.setTranslate(0, 50);

         canvas.drawBitmap(bitmapSrc, matrix , paint);

         iv_copyed.setImageBitmap(alertBitmap);

     }

 }
运行效果如下:图形竖直方向向下平移了50像素点(手机坐标系是水平向右为正,竖直向下为正)

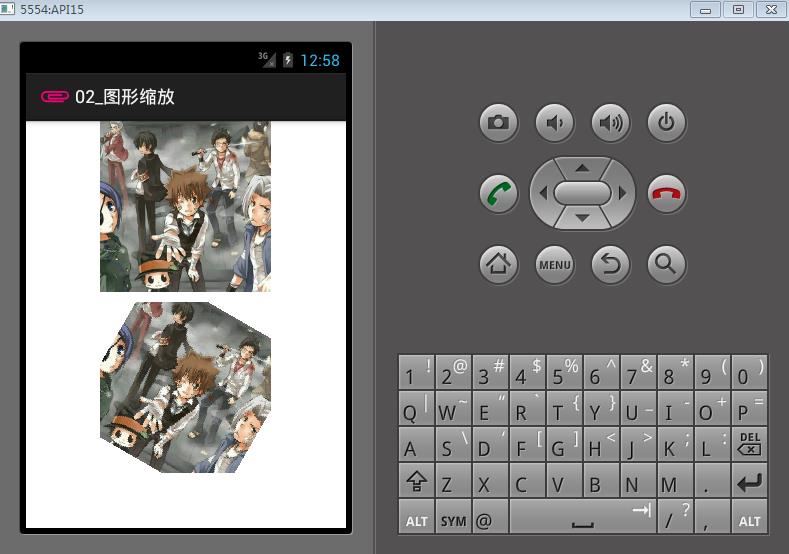
4. 图形的倒影效果:
分析:在画布上,先把图片的向下翻转,但是这样会跳出画布(不能显示),在让图形整体向上移动,移动距离为图形的高度。
MainActivity.java,如下:
 package com.himi.bitmapdemo;

 import android.app.Activity;

 import android.graphics.Bitmap;

 import android.graphics.Bitmap.Config;

 import android.graphics.BitmapFactory;

 import android.graphics.Canvas;

 import android.graphics.Color;

 import android.graphics.Matrix;

 import android.graphics.Paint;

 import android.os.Bundle;

 import android.widget.ImageView;

 public class MainActivity extends Activity {

     private ImageView iv_src;

     private ImageView iv_copyed;

     @Override

     protected void onCreate(Bundle savedInstanceState) {

         super.onCreate(savedInstanceState);

         setContentView(R.layout.activity_main);

         iv_src = (ImageView) findViewById(R.id.iv_src);

         iv_copyed = (ImageView) findViewById(R.id.iv_copyed);

         // 设置原图

         Bitmap bitmapSrc = BitmapFactory.decodeResource(getResources(),

                 R.drawable.img01);

         iv_src.setImageBitmap(bitmapSrc);

         // 对原图进行 缩放,创建一个原图的拷贝(副本),不能直接对原图变化

         // 获取原图的纸张类型

         Config config = bitmapSrc.getConfig();

         // 创建的副本,里面的内容是空白的,画布

         Bitmap alertBitmap = Bitmap.createBitmap(bitmapSrc.getWidth(),

                 bitmapSrc.getHeight(), config);

         // 以alertBitmap大小为模板创建一个画板

         Canvas canvas = new Canvas(alertBitmap);

         // 创建画笔

         Paint paint = new Paint();

         // 画笔的默认颜色

         paint.setColor(Color.BLACK);

         // 第一参数是临摹的图片

         Matrix matrix = new Matrix();

         matrix.setScale(1,-1); //图形向下翻转

         //post是在上一次变化的基础上进行新的变化,set设置一个新的变化,会把原来的设置给覆盖

         matrix.postTranslate(0, bitmapSrc.getHeight());//图形整体向上移动

         canvas.drawBitmap(bitmapSrc, matrix , paint);

         iv_copyed.setImageBitmap(alertBitmap);

     }

 }
运行效果如下:
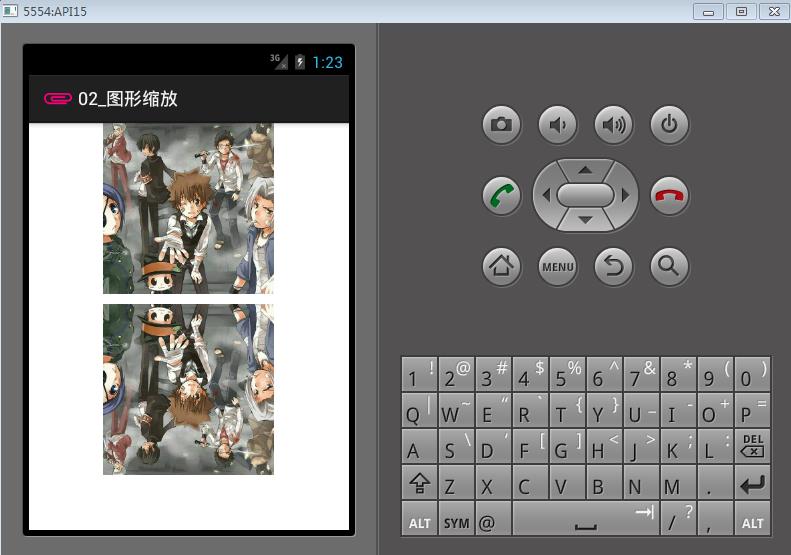
5. 图形镜面效果:
分析:在画布上,先把图片的向左翻转,但是这样会跳出画布(不能显示),在让图形整体向右移动,移动距离为图形的宽度。
MainActivity.java,如下:
 package com.himi.bitmapdemo;

 import android.app.Activity;

 import android.graphics.Bitmap;

 import android.graphics.Bitmap.Config;

 import android.graphics.BitmapFactory;

 import android.graphics.Canvas;

 import android.graphics.Color;

 import android.graphics.Matrix;

 import android.graphics.Paint;

 import android.os.Bundle;

 import android.widget.ImageView;

 public class MainActivity extends Activity {

     private ImageView iv_src;

     private ImageView iv_copyed;

     @Override

     protected void onCreate(Bundle savedInstanceState) {

         super.onCreate(savedInstanceState);

         setContentView(R.layout.activity_main);

         iv_src = (ImageView) findViewById(R.id.iv_src);

         iv_copyed = (ImageView) findViewById(R.id.iv_copyed);

         // 设置原图

         Bitmap bitmapSrc = BitmapFactory.decodeResource(getResources(),

                 R.drawable.img01);

         iv_src.setImageBitmap(bitmapSrc);

         // 对原图进行 缩放,创建一个原图的拷贝(副本),不能直接对原图变化

         // 获取原图的纸张类型

         Config config = bitmapSrc.getConfig();

         // 创建的副本,里面的内容是空白的,画布

         Bitmap alertBitmap = Bitmap.createBitmap(bitmapSrc.getWidth(),

                 bitmapSrc.getHeight(), config);

         // 以alertBitmap大小为模板创建一个画板

         Canvas canvas = new Canvas(alertBitmap);

         // 创建画笔

         Paint paint = new Paint();

         // 画笔的默认颜色

         paint.setColor(Color.BLACK);

         // 第一参数是临摹的图片

         Matrix matrix = new Matrix();

         matrix.setScale(-1,1);

         //post是在上一次变化的基础上进行新的变化,set设置一个新的变化,会把原来的设置给覆盖

         matrix.postTranslate(bitmapSrc.getWidth(), 0);

         canvas.drawBitmap(bitmapSrc, matrix , paint);

         iv_copyed.setImageBitmap(alertBitmap);

     }

 }
运行效果如下:
6. 图形透明度变化效果:
MainActivity.java,如下:
 package com.himi.bitmapdemo;

 import android.app.Activity;

 import android.graphics.Bitmap;

 import android.graphics.Bitmap.Config;

 import android.graphics.BitmapFactory;

 import android.graphics.Canvas;

 import android.graphics.Color;

 import android.graphics.Matrix;

 import android.graphics.Paint;

 import android.os.Bundle;

 import android.widget.ImageView;

 public class MainActivity extends Activity {

     private ImageView iv_src;

     private ImageView iv_copyed;

     @Override

     protected void onCreate(Bundle savedInstanceState) {

         super.onCreate(savedInstanceState);

         setContentView(R.layout.activity_main);

         iv_src = (ImageView) findViewById(R.id.iv_src);

         iv_copyed = (ImageView) findViewById(R.id.iv_copyed);

         // 设置原图

         Bitmap bitmapSrc = BitmapFactory.decodeResource(getResources(),

                 R.drawable.img01);

         iv_src.setImageBitmap(bitmapSrc);

         // 对原图进行 缩放,创建一个原图的拷贝(副本),不能直接对原图变化

         // 获取原图的纸张类型

         Config config = bitmapSrc.getConfig();

         // 创建的副本,里面的内容是空白的,画布

         Bitmap alertBitmap = Bitmap.createBitmap(bitmapSrc.getWidth(),

                 bitmapSrc.getHeight(), config);

         // 以alertBitmap大小为模板创建一个画板

         Canvas canvas = new Canvas(alertBitmap);

         // 创建画笔

         Paint paint = new Paint();

         //设置画笔的透明度

         paint.setAlpha(80);

         // 画笔的默认颜色

         //paint.setColor(Color.BLACK); //这里必须注释掉这个设置画布默认颜色

         // 第一参数是临摹的图片

         Matrix matrix = new Matrix();

         canvas.drawBitmap(bitmapSrc, matrix , paint);

         iv_copyed.setImageBitmap(alertBitmap);

     }

 }
运行效果如下:

Android(java)学习笔记180:多媒体之图形的变化处理的更多相关文章
- java学习笔记(二)图形用户接口
这个学期主要放在ACM比赛上去了,比赛结束了.不知不觉就15周了,这周就要java考试了,复习一下java吧.java的学习的目的还是让我们学以致用,让我们可以运用java开发一下小项目.而不是单单应 ...
- Android 数字签名学习笔记
Android 数字签名学习笔记 在Android系统中,所有安装到系统的应用程序都必有一个数字证书,此数字证书用于标识应用程序的作者和在应用程序之间建立信任关系,如果一个permission的pro ...
- Java学习笔记4
Java学习笔记4 1. JDK.JRE和JVM分别是什么,区别是什么? 答: ①.JDK 是整个Java的核心,包括了Java运行环境.Java工具和Java基础类库. ②.JRE(Java Run ...
- 0028 Java学习笔记-面向对象-Lambda表达式
匿名内部类与Lambda表达式示例 下面代码来源于:0027 Java学习笔记-面向对象-(非静态.静态.局部.匿名)内部类 package testpack; public class Test1{ ...
- 《Java学习笔记(第8版)》学习指导
<Java学习笔记(第8版)>学习指导 目录 图书简况 学习指导 第一章 Java平台概论 第二章 从JDK到IDE 第三章 基础语法 第四章 认识对象 第五章 对象封装 第六章 继承与多 ...
- Android动画学习笔记-Android Animation
Android动画学习笔记-Android Animation 3.0以前,android支持两种动画模式,tween animation,frame animation,在android3.0中 ...
- Java学习笔记:语言基础
Java学习笔记:语言基础 2014-1-31 最近开始学习Java,目的倒不在于想深入的掌握Java开发,而是想了解Java的基本语法,可以阅读Java源代码,从而拓展一些知识面.同时为学习An ...
- 【Java学习笔记之二十六】深入理解Java匿名内部类
在[Java学习笔记之二十五]初步认知Java内部类中对匿名内部类做了一个简单的介绍,但是内部类还存在很多其他细节问题,所以就衍生出这篇博客.在这篇博客中你可以了解到匿名内部类的使用.匿名内部类要注意 ...
- java学习笔记16--I/O流和文件
本文地址:http://www.cnblogs.com/archimedes/p/java-study-note16.html,转载请注明源地址. IO(Input Output)流 IO流用来处理 ...
- java学习笔记7--抽象类与抽象方法
接着前面的学习: java学习笔记6--类的继承.Object类 java学习笔记5--类的方法 java学习笔记4--类与对象的基本概念(2) java学习笔记3--类与对象的基本概念(1) jav ...
随机推荐
- Code-NFine:下来框和复选框
ylbtech-Code-NFine:下来框和复选框 1.返回顶部 1. 1.1 html $("#F_OrganizeId").bindSelect({ url: "/ ...
- bzoj2839
容斥原理+组合数学 看见这种恰有k个的题一般都是容斥原理,因为恰有的限制比较强,一般需要复杂度较高的方法枚举,而容斥就是转化为至少有k个,然后通过容斥原理解决 我们先选出k个元素作为交集,有C(n,k ...
- Bootstrap Notify
https://github.com/mouse0270/bootstrap-notify $.notify('Hello World', { offset: { x: 50, y: 100 } }) ...
- vim带你装逼带你飞(一)
前言:逃离windows有很长时间了,特别是当今android盛行的时代,我们没有理由不选择ubuntu作为编译开发android之首选.其实操作系统只是我们使用的一个工具, windows也好lin ...
- hdu 1521 排列组合【指数型生成函数】
根据套路列出式子:\( \prod_{i=1}^{n}\sum_{j=0}^{c[i]}\frac{x^j}{j!} \),然后暴力展开即可 #include<iostream> #inc ...
- bzoj 4044: [Cerc2014] Virus synthesis【回文自动机+dp】
建回文自动机,注意到一个回文串是可以通过一个长度小于等于这个串长度的一半的回文串添上一些字符然后复制得到的,也就是在自动机上向fa走,相当于treedp 每次都走显然会T,记录一个up,指向祖先中最下 ...
- git自动化部署+rsync文件同步
1.进入线上git裸仓库 2.编辑post-receive #!/bin/sh unset GIT_DIR cd /var/www/ git pull http://web:xxxxxxx@120.3 ...
- 数位dp真·浅谈 By cellur925
预警:由于是从$Vergil$学长那里和$Mathison$大神那里学来的,所以清一色记忆化搜索!qwq 巨佬的数位dp讲解(未来的咕咕日报头条): https://www.luogu.org/blo ...
- Luogu P2278 [HNOI2003]操作系统【优先队列/重载运算符/模拟】 By cellur925
题目传送门 本来是照着二叉堆的题去做的...没想到捡了个模拟...不过模拟我都不会...我好弱啊... 其实核心代码并不长,比辰哥的标程短到不知哪里去...但是思路需要清晰. 读题的时候我明白,当有优 ...
- only-child选择器
:only-child选择器用于匹配属于某一个父元素的唯一子元素的元素,也就是说,如果某个父元素仅有一个子元素,则使用 :only-chlid选择器 ,可以选择这个子元素