Qt应用Redis实现消息队列
类似BS模式,客户端发送任务请求给服务端,服务端将处理结果返回给客户端。 redis负责消息的存储和转发。
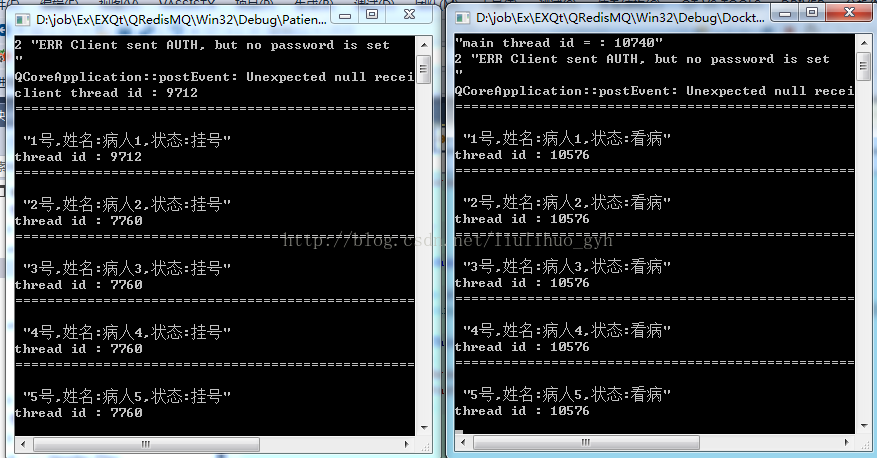
仿真病人挂号看病,Patient进程进行挂号,Doctor进程进行看病 ,程序代码如下:
////////////////////////////////////////////Patient////////////////////////////////////////////
Patient.h:
- #include <QObject>
- class QRedis;
- class Patient : public QObject
- {
- Q_OBJECT
- public:
- Patient(QObject *parent = nullptr);
- ~Patient();
- public slots:
- void pushTask(); //push任务
- private:
- void popResult(); //pop结果
- QRedis * m_redis;
- };
Patient.cpp
- #include "patient.h"
- #include "qredis.h"
- #include <QTimer>
- #include <QEventLoop>
- #include <QThread>
- static const QString KEYTASK = "MARKTASK";
- static const QString KEYRESULT = "MARKRESULT";
- Patient::Patient(QObject *parent)
- : QObject(parent)
- {
- //初始化通道
- m_redis = new QRedis(this);
- m_redis->connectHost("127.0.0.1", 6379);
- m_redis->auth("1234");
- qDebug() << "client thread id :" << int(QThread::currentThreadId());
- //轮询任务
- QTimer * timer = new QTimer(this);
- connect(timer, &QTimer::timeout, this, &Patient::popResult);
- timer->start(20);
- m_redis->del(KEYRESULT);
- m_redis->del(KEYTASK);
- pushTask();
- }
- Patient::~Patient()
- {
- }
- void Patient::pushTask()
- {
- static int i = 0;
- QString task = QStringLiteral("%1号,姓名:%2,状态:%3").arg(++i).arg(QStringLiteral("病人%1").arg(i)).arg(QStringLiteral("挂号"));
- qDebug() <<"========================================================\n\n"<< task;
- qDebug() << "thread id :" << int(QThread::currentThreadId());
- qint64 ret = m_redis->rpush(KEYTASK, task);
- }
- void Patient::popResult()
- {
- QString state;
- QString taskData = m_redis->lpop(KEYRESULT);
- if (taskData.compare("nil", Qt::CaseInsensitive) == 0 || taskData.isEmpty())
- {
- return;
- }
- QEventLoop loop;
- QTimer::singleShot(5000, &loop, &QEventLoop::quit);
- loop.exec();
- pushTask();
- }
main.cpp
- #include <QtCore/QCoreApplication>
- #include <QDebug>
- #include <QThread>
- #include "patient.h"
- int main(int argc, char *argv[])
- {
- QCoreApplication a(argc, argv);
- qDebug() << QString("main thread id = : %1").arg(int(QThread::currentThreadId()));
- QThread patientThread;
- Patient patient;
- patient.moveToThread(&patientThread);
- patientThread.start();
- return a.exec();
- }
/////////////////////////////////////////////////Docktor/////////////////////////////////////////////////
Docktor.h
- #pragma once
- #include <QObject>
- class QRedis;
- class Docktor : public QObject
- {
- Q_OBJECT
- public:
- Docktor(QObject *parent = nullptr);
- ~Docktor();
- public slots:
- void popTask(); //pop任务
- private:
- void pushResult(const QString &task); //push结果
- QRedis * m_redis;
- };
Docktor.cpp
- #include "docktor.h"
- #include "qredis.h"
- #include <QTimer>
- #include <QEventLoop>
- #include <QThread>
- static const QString KEYTASK = "MARKTASK";
- static const QString KEYRESULT = "MARKRESULT";
- Docktor::Docktor(QObject *parent)
- : QObject(parent)
- {
- //初始化通道
- m_redis = new QRedis(this);
- m_redis->connectHost("127.0.0.1", 6379);
- m_redis->auth("1234");
- QTimer * timer = new QTimer(this);
- connect(timer, &QTimer::timeout, this, &Docktor::popTask);
- timer->start(20);
- }
- Docktor::~Docktor()
- {
- }
- void Docktor::popTask()
- {
- //获取任务
- QString taskData = m_redis->lpop(KEYTASK);
- if (taskData.compare("nil", Qt::CaseInsensitive) == 0 || taskData.isEmpty())
- {
- //qDebug() << QString("wait..............................");
- return;
- }
- //处理任务
- pushResult(taskData);
- }
- void Docktor::pushResult(const QString &task)
- {
- QStringList taskDatas = task.split(",");
- QString state = taskDatas.at(2);
- taskDatas.removeLast();
- taskDatas.append(QStringLiteral("状态:看病"));
- //push处理结果
- qDebug() <<"========================================================\n\n" << taskDatas.join(",");
- qDebug() << "thread id :" << int(QThread::currentThreadId());
- qint64 ret = m_redis->rpush(KEYRESULT, taskDatas.join(","));
- }
main.cpp
- #include <QtCore/QCoreApplication>
- #include <QDebug>
- #include <QThread>
- #include "docktor.h"
- int main(int argc, char *argv[])
- {
- QCoreApplication a(argc, argv);
- qDebug() << QString("main thread id = : %1").arg(int(QThread::currentThreadId()));
- QThread docktorThread;
- Docktor docktor;
- docktor.moveToThread(&docktorThread);
- docktorThread.start();
- return a.exec();
- }
/////////////////截图/////////////
Qt应用Redis实现消息队列的更多相关文章
- Redis 做消息队列
一般来说,消息队列有两种场景,一种是发布者订阅者模式,一种是生产者消费者模式.利用redis这两种场景的消息队列都能够实现.定义: 生产者消费者模式:生产者生产消息放到队列里,多个消费者同时监听队列, ...
- Redis作为消息队列服务场景应用案例
NoSQL初探之人人都爱Redis:(3)使用Redis作为消息队列服务场景应用案例 一.消息队列场景简介 “消息”是在两台计算机间传送的数据单位.消息可以非常简单,例如只包含文本字符串:也可以更 ...
- redis resque消息队列
Resque 目前正在学习使用resque .resque-scheduler来发布异步任务和定时任务,为了方便以后查阅,所以记录一下. resque和resque-scheduler其优点在于功能比 ...
- 【springboot】【redis】springboot+redis实现发布订阅功能,实现redis的消息队列的功能
springboot+redis实现发布订阅功能,实现redis的消息队列的功能 参考:https://www.cnblogs.com/cx987514451/p/9529611.html 思考一个问 ...
- 【Redis】php+redis实现消息队列
在项目中使用消息队列一般是有如下几个原因: 把瞬间服务器的请求处理换成异步处理,缓解服务器的压力 实现数据顺序排列获取 redis实现消息队列步骤如下: 1).redis函数rpush,lpop 2) ...
- Lumen开发:结合Redis实现消息队列(1)
1.简介 Lumen队列服务为各种不同的后台队列提供了统一的API.队列允许你推迟耗时任务(例如发送邮件)的执行,从而大幅提高web请求速度. 1.1 配置 .env文件的QUEUE_DRIVER选项 ...
- Redis除了做缓存--Redis做消息队列/Redis做分布式锁/Redis做接口限流
1.用Redis实现消息队列 用命令lpush入队,rpop出队 Long size = jedis.lpush("QueueName", message);//返回存放的数据条数 ...
- sping+redis实现消息队列的乱码问题
使用spring支持redis实现消息队列,参考官方样例:https://spring.io/guides/gs/messaging-redis/ 实现后在运行过程中发现消费者在接收消息时会出现乱码的 ...
- 程序员过关斩将--redis做消息队列,香吗?
Redis消息队列 在程序员这个圈子打拼了太多年,见过太多的程序员使用redis,其中一部分喜欢把redis做缓存(cache)使用,其中最典型的当属存储用户session,除此之外,把redis作为 ...
随机推荐
- 【php设计模式】策略模式
策略模式是针对一组算法,将每一种算法都封装到具有共同接口的独立的类中,从而是它们可以相互替换.策略模式的最大特点是使得算法可以在不影响客户端的情况下发生变化,从而改变不同的功能. <?php i ...
- linux基础3-磁盘和文件系统相关
一 dumpe2fs : 在Linux使用过程中,我们如果要了解文件系统的配置情况,可以使用dumpe2fs查看ext2/ext3/ext4格式的文件系统信息. 命令格式: dumpe2fs [选项] ...
- asp.net 设计音乐网站
第一步 收集资料 http://www.logoko.com.cn/ --设计logo网站 设计音乐文档 https://wenku.baidu.com/view/3d957617f18583 ...
- 关于单例模式getInstance()的使用
/** * 对象的实例化方法,也是比较多的,最常用的方法是直接使用new,而这是最普通的,如果要考虑到其它的需要,如单实例模式,层次间调用等等. * 直接使用new就不可以实现好的设计好,这时候需要 ...
- iframe通信相关:父操作子,子操作父,兄弟通信
这里写window和document是认为代表了BOM和DOM(个人理解不一定对) 拿到了window就能操作全局变量和函数 拿到了document就能获取dom,操作节点 父操作子 window:选 ...
- HTML5——3 HTML5拖放
<!doctype html> <html lang="en"> <head> <meta charset="UTF-8&quo ...
- Force git to overwrite local files on pull 使用pull强制覆盖本地文件 转载自:http://snowdream.blog.51cto.com/3027865/1102441
How do I force an overwrite of local files on a git pull? I think this is the right way: $ git fetch ...
- [译] 优化 WEBPACK 以更快地构建 REACT
原文地址:OPTIMIZING WEBPACK FOR FASTER REACT BUILDS 原文作者:Jonathan Rowny 译文出自:掘金翻译计划 本文永久链接:https://githu ...
- GET与POST方法和用curl命令执行
1.超文本传输协议 超文本传输协议(HTTP)的设计目的是保证客户机与服务器之间的通信,web 浏览器可能是客户端,而计算机上的网络应用程序也可能作为服务器端. HTTP的工作方式是客户机与服务器之间 ...
- 在maven项目中如何引入另外一个项目(转)
原文链接:https://blog.csdn.net/jianfpeng241241/article/details/52654352 1 在Myeclipse中准备两个maven demo. , ...