iOS CGContextRef/UIBezierPath(绘图)
绘图的底层实现方法
注意:在drawRect方法中系统会默认创建一个上下文(C语言类型)在其他方法中不会有这样一个上下文(可以自己测试)
@implementation DrawView
//注意,在drawRect方法中系统会默认创建一个上下文(C语言类型)
//在其他方法中不会有这样一个上下文(可以自己测试)
//下面这个方法中的rect参数会传入当前view的frame
- (void)drawRect:(CGRect)rect{
//获取上下文
CGContextRef ctx = UIGraphicsGetCurrentContext();
//或者绘图路径对象(可以了理解为画笔)
UIBezierPath *bezierPath = [UIBezierPath bezierPath];
//绘图
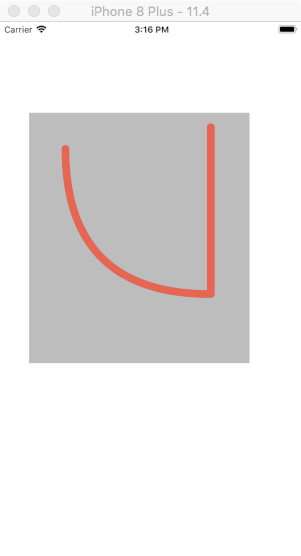
[bezierPath moveToPoint:CGPointMake(50, 50)];
//通过控制点(ControlPoint来改变直线的弧度)
[bezierPath addQuadCurveToPoint:CGPointMake(250, 250) controlPoint:CGPointMake(50, 250)];
[bezierPath addLineToPoint:CGPointMake(250, 20)];
/**********设置上下文的状态***********/
CGContextSetLineWidth(ctx, 10);
CGContextSetLineJoin(ctx, kCGLineJoinRound);
CGContextSetLineCap(ctx, kCGLineCapRound);
//改变路径颜色
[[UIColor redColor] setStroke];
/***********************************/
//把路径添加到上下文
CGContextAddPath(ctx, bezierPath.CGPath);
//渲染上下文(layer)
CGContextStrokePath(ctx);
}
@end
效果图:
绘制图片(简易)
- (void)drawRect:(CGRect)rect{

    UIBezierPath *path = [UIBezierPath bezierPathWithRect:CGRectMake(50, 50, 150, 150)];

    [[UIColor redColor] setStroke];

    [path setLineWidth:10];

    [[UIColor yellowColor] setFill];

    //fill和stroke必须在绘图的最后一步进行

    [path stroke];

    [path fill];

}
效果图:

绘图三
- (void)drawRect:(CGRect)rect{

    //绘制扇形

    CGPoint center = CGPointMake(rect.size.width*0.5, rect.size.height*0.5);

    /*arcCenter:扇形圆心

     *radius:半径

     *clockWise:YES(逆时针),NO(顺时针)

     */

    //注意不能位self.center作为扇形的圆形:self.center是以screen的左上角位坐标原点进行绘图

    UIBezierPath *path = [UIBezierPath bezierPathWithArcCenter:center radius:100 startAngle:0 endAngle:M_PI_2 clockwise:YES];

    [path addLineToPoint:center];

    [path closePath];

    [path setLineWidth:10];

    [[UIColor redColor] setStroke];

    [[UIColor yellowColor] setFill];

    [path stroke];

    [path fill];

    //fill方法中,有进行路径的自动关闭,使用了fill有时候可以不使用closePath

}
效果图:

绘图三
注意
[self setNeedsDisplay];可以重制绘图内容,刷新UI
//ViewController Slider方法

- (IBAction)progressValue:(UISlider *)sender {

    NSString *progress = [NSString stringWithFormat:@"%.2f%%",sender.value *100];

    self.progressLabel.text = progress;

    self.drawView.progressValue = sender.value;

    [self.drawView drawRect:self.drawView.frame];

}

//drawView中的方法

- (void)setProgressValue:(CGFloat)progressValue{

    _progressValue = progressValue;

    [self setNeedsDisplay];

}

- (void)drawRect:(CGRect)rect{

    CGPoint center = CGPointMake(rect.size.width*0.5, rect.size.height*0.5);

    CGFloat angle = self.progressValue*M_PI*2;

    CGFloat endAngle = angle - M_PI_2;

    UIBezierPath *path = [UIBezierPath bezierPathWithArcCenter:center radius:rect.size.width*0.5 startAngle:-M_PI_2 endAngle:endAngle clockwise:YES];

    [path setLineWidth:10];

    [[UIColor redColor] setStroke];

    [path stroke];

}
效果图:

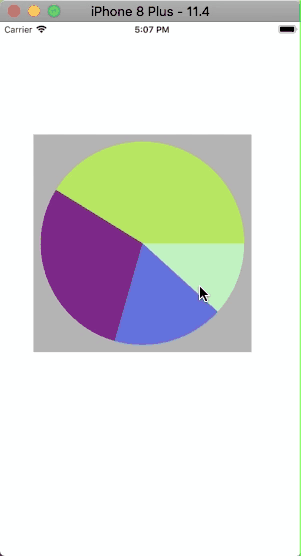
绘图四 饼图
@implementation DrawView

- (void)drawRect:(CGRect)rect {

    //模拟获取数据

    NSArray *numberArr = @[@20,@30,@50,@70];

    CGFloat total = 0;

    CGPoint center = CGPointMake(rect.size.width*0.5, rect.size.width*0.5);

    CGFloat radius = rect.size.width*0.5-10;

    for(NSNumber *number in numberArr){

        total += number.doubleValue;

    }

    CGFloat startAngel = 0;

    for(NSNumber *number in numberArr){

        CGFloat numberValue = number.doubleValue / total *M_PI *2;

        [self drawRadiusWith:center WithRadius:radius withStartAngle:startAngel wihtNumber:(CGFloat)numberValue];

        startAngel += numberValue;

    }

}

- (void)drawRadiusWith:(CGPoint)center WithRadius:(CGFloat)radius withStartAngle:(CGFloat)startAngle wihtNumber:(CGFloat)number{

    CGFloat endAngle = startAngle + number;

    UIBezierPath *path = [UIBezierPath bezierPathWithArcCenter:center radius:radius startAngle:startAngle endAngle:endAngle clockwise:YES];

    [path setLineWidth:5];

     [path addLineToPoint:center];

    [[self randomColor] setFill];

    [path fill];

}

//设置随机颜色

- (UIColor *)randomColor{

    CGFloat red = arc4random_uniform(256) / 255.0;

    CGFloat blue = arc4random_uniform(256) / 255.0;

    CGFloat yellow = arc4random_uniform(256) / 255.0;

    return [UIColor colorWithRed:red green:blue blue:yellow alpha:1.0];

}

- (void)touchesBegan:(NSSet<UITouch *> *)touches withEvent:(UIEvent *)event{

    [self setNeedsDisplay];

}

@end
效果图:
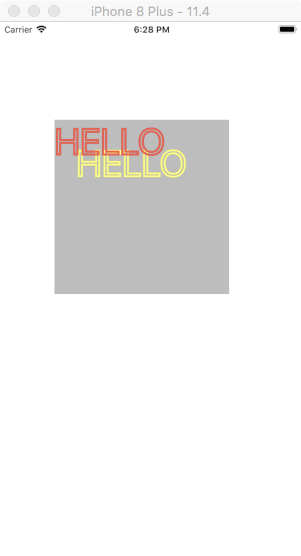
绘文字
- (void)drawRect:(CGRect)rect {

    NSString *str = @"HELLO";

    NSMutableDictionary *mutableDict = [NSMutableDictionary dictionary];

    mutableDict[NSFontAttributeName] = [UIFont systemFontOfSize:50];

    mutableDict[NSForegroundColorAttributeName]  = [UIColor blueColor];

    mutableDict[NSStrokeColorAttributeName] = [UIColor redColor];

    mutableDict[NSStrokeWidthAttributeName]  = @5;

    NSShadow *shadow = [[NSShadow alloc] init];

    shadow.shadowOffset = CGSizeMake(30, 30);

    shadow.shadowColor = [UIColor yellowColor];

    mutableDict[NSShadowAttributeName] = shadow;

    //drawInRect 会匹配内容,绘图适配

    [str drawInRect:rect withAttributes:mutableDict];

}
效果图:
绘图/UIImage/裁剪
- (void)drawRect:(CGRect)rect {

    UIImage *image = [UIImage imageNamed:@"folder"];

    //这是裁剪区域一定要在绘图前进行设置

    UIRectClip(CGRectMake(50, 50, 50, 50));

    [image drawAsPatternInRect:rect];

}
效果图:

不再DrawRect中开启位图上下文
注意关闭上下文
- (void)viewDidLoad {

    [super viewDidLoad];

    UIImage *image = [UIImage imageNamed:@"folder"];

    //1.开启一个跟图片原始大小的上下文

    //第二个参数opaque:不透明度

    UIGraphicsBeginImageContextWithOptions(image.size, NO, 0);

    //2.把图片绘制到上下文中

    [image drawAtPoint:CGPointZero];

    //3.把文字绘制到上下文当中

    NSString *str = @"HELLO";

    [str drawAtPoint:CGPointMake(10, 20) withAttributes:nil];

    //4.把上下文中的所有内容绘制成一张图片

    UIImage *newImage = UIGraphicsGetImageFromCurrentImageContext();

    //5.手动关闭上下文

    UIGraphicsEndImageContext();

    self.imageView.image = newImage;

}

@end
效果图类似于微博中的水印
iOS CGContextRef/UIBezierPath(绘图)的更多相关文章
- iOS 之UIBezierPath
代码地址如下:http://www.demodashi.com/demo/11602.html 在之前的文章中,由于用到过UIBezierPath这个类,所以这里就对这个类进行简单的记录一下,方便自己 ...
- (转)IOS开发之——绘图(CGContext)
周刊 更多 登录 IOS开发之——绘图(CGContext) 时间 2014-04-21 09:17:43 CSDN博客 原文 http://blog.csdn.net/zhenyu521131 ...
- iOS:quartz2D绘图
Quartz-2D:绘图 一.介绍: •Quartz 2D是一个二维图形绘制引擎,支持iOS环境和Mac OS X环境 •Quartz 2D API可以实现许多功能,如基于路径的绘图.透明度.阴影 ...
- iOS - 用 UIBezierPath 实现果冻效果
最近在网上看到一个很酷的下拉刷新效果(http://iostuts.io/2015/10/17/elastic-bounce-using-uibezierpath-and-pan-gesture/). ...
- iOS 使用UIBezierPath类实现随手画画板
在上一篇文章中我介绍了 UIBezierPath类 介绍 ,下面这篇文章介绍一下如何通过这个类实现一个简单的随手画画板的简单程序demo,功能包括:划线(可以调整线条粗细,颜色),撤销笔画,回撤笔画, ...
- [iOS Animation]-CALayer 绘图效率
绘图 不必要的效率考虑往往是性能问题的万恶之源. ——William Allan Wulf 在第12章『速度的曲率』我们学习如何用Instruments来诊断Core Animation性能问题.在构 ...
- IOS中的绘图Quartz2D
drawRect 方法的使用 常见图形的绘制:线条.多边形.圆 绘图状态的设置:文字颜色.线宽等 图形上下文状态的保存与恢复 图形上下文栈 Quartz 2D是一个二维绘图引擎,同时支持IOS和MAC ...
- IOS开发之——绘图(CGContext)
0 CGContextRef context = UIGraphicsGetCurrentContext(); 设置上下文 1 CGContextMoveToPoint 开始画线 2 CGContex ...
- iOS CGContextRef画图时的常用方法
UIView的drawRect方法 CoreGraphics绘图 综述:描述系统会调用UIView的drawRect方法,所以coreGraphics的所有实现代码放在该函数内,setNeedsDis ...
随机推荐
- xml文档操作
/** * */package com.gootrip.util; import java.io.ByteArrayOutputStream;import java.io.File;import ja ...
- 通过直方图进行PCA准备
import graphviz import mglearn from mpl_toolkits.mplot3d import Axes3D from sklearn.datasets import ...
- [转]Xmind 8 pro 软件破解版
链接地址:https://blog.csdn.net/qq_16093323/article/details/80967867 作者博客:http://www.carrotchou.blog/
- LeetCode:按序打印【1114】
LeetCode:按序打印[1114] 题目描述 我们提供了一个类: 1 2 3 4 5 public class Foo { public void one() { print("on ...
- jvm(3)---常用监控工具指令
1.jps 查看jvm中运行的进程(获取对应pid) 参数:默认-V(大写) -v: 列出jvm启动参数. ---------------------------------- 2.jstack pi ...
- Linux下Mongodb安装和启动配置 转载
原文地址:https://www.cnblogs.com/Jimmy104/p/6181899.html 以下文章为转载,感谢网友,原文链接 http://blog.csdn.net/yuwenrul ...
- 【C/C++开发】C语言实现函数可变参数
函数原型: int printf(const char *format[,argument]...) 返 回 值: 成功则返回实际输出的字符数,失败返回-1. 函数说明: ...
- 高级UI-沉浸式设计
关于沉浸式设计,在国内指的是Toolbar和系统状态栏相统一,而谷歌官方给出的沉浸式则是指整个界面为UI所用,而这里所说的沉浸式则是指的前者,涉及4.4和5.0及以上,4.4以下的Android做不出 ...
- 安装本地 jar 文件
Maven 提供了 maven-install-plugin 可将 jar 文件安装至本地 repository.安装命令如下: mvn install:install-file -Dfile= -D ...
- Struts笔记5
文件下载 1.写action类 package com.gyf.web.action; import java.io.File; import java.io.FileInputStream; imp ...