Linux服务器安装配置Nginx服务器
Nginx("engine x")是一款是由俄罗斯的程序设计师Igor Sysoev所开发高性能的 Web和 反向代理 服务器,也是一个 IMAP/POP3/SMTP 代理服务器。
在高连接并发的情况下,Nginx是Apache服务器不错的替代品。
Nginx 安装
一、安装编译工具及库文件
yum -y install make zlib zlib-devel gcc-c++ libtool openssl openssl-devel
二、首先要安装 PCRE
PCRE 作用是让 Nginx 支持 Rewrite 功能。
1、下载 PCRE 安装包,下载地址: http://downloads.sourceforge.net/project/pcre/pcre/8.35/pcre-8.35.tar.gz
[root@bogon src]# wget http://downloads.sourceforge.net/project/pcre/pcre/8.35/pcre-8.35.tar.gz

2、解压安装包:
[root@bogon src]# tar zxvf pcre-8.35.tar.gz
3、进入安装包目录
[root@bogon src]# cd pcre-8.35
4、编译安装
[root@bogon pcre-8.35]# ./configure

[root@bogon pcre-8.35]# make && make install
5、查看pcre版本
[root@bogon pcre-8.35]# pcre-config --version

三、安装 Nginx
1、下载 Nginx,下载地址:http://nginx.org/download/nginx-1.6.2.tar.gz
[root@bogon src]# wget http://nginx.org/download/nginx-1.6.2.tar.gz

2、解压安装包
[root@bogon src]# tar zxvf nginx-1.6.2.tar.gz
3、进入安装包目录
[root@bogon src]# cd nginx-1.6.2
4、编译安装
[root@bogon nginx-1.6.2]# ./configure --prefix=/usr/local/webserver/nginx --with-http_stub_status_module --with-http_ssl_module --with-pcre=/usr/local/src/pcre-8.35

[root@bogon nginx-1.6.2]# make

[root@bogon nginx-1.6.2]# make install
5、查看nginx版本
[root@bogon nginx-1.6.2]# /usr/local/webserver/nginx/sbin/nginx -v

到此,nginx安装完成。
四、Nginx 配置
创建 Nginx 运行使用的用户 www:
[root@bogon conf]# /usr/sbin/groupadd www

[root@bogon conf]# /usr/sbin/useradd -g www www
配置nginx.conf ,将/usr/local/webserver/nginx/conf/nginx.conf替换为以下内容

[root@bogon conf]#  cat /usr/local/webserver/nginx/conf/nginx.conf

user www www;

worker_processes 2; #设置值和CPU核心数一致

error_log /usr/local/webserver/nginx/logs/nginx_error.log crit; #日志位置和日志级别

pid /usr/local/webserver/nginx/nginx.pid;

#Specifies the value for maximum file descriptors that can be opened by this process.

worker_rlimit_nofile 65535;

events

{

  use epoll;

  worker_connections 65535;

}

http

{

  include mime.types;

  default_type application/octet-stream;

  log_format main  '$remote_addr - $remote_user [$time_local] "$request" '

               '$status $body_bytes_sent "$http_referer" '

               '"$http_user_agent" $http_x_forwarded_for';

#charset gb2312;

  server_names_hash_bucket_size 128;

  client_header_buffer_size 32k;

  large_client_header_buffers 4 32k;

  client_max_body_size 8m;

  sendfile on;

  tcp_nopush on;

  keepalive_timeout 60;

  tcp_nodelay on;

  fastcgi_connect_timeout 300;

  fastcgi_send_timeout 300;

  fastcgi_read_timeout 300;

  fastcgi_buffer_size 64k;

  fastcgi_buffers 4 64k;

  fastcgi_busy_buffers_size 128k;

  fastcgi_temp_file_write_size 128k;

  gzip on;

  gzip_min_length 1k;

  gzip_buffers 4 16k;

  gzip_http_version 1.0;

  gzip_comp_level 2;

  gzip_types text/plain application/x-javascript text/css application/xml;

  gzip_vary on;

  #limit_zone crawler $binary_remote_addr 10m;

 #下面是server虚拟主机的配置

 server

  {

    listen 80;#监听端口

    server_name localhost;#域名

    index index.html index.htm index.php;

    root /usr/local/webserver/nginx/html;#站点目录

      location ~ .*\.(php|php5)?$

    {

      #fastcgi_pass unix:/tmp/php-cgi.sock;

      fastcgi_pass 127.0.0.1:9000;

      fastcgi_index index.php;

      include fastcgi.conf;

    }

    location ~ .*\.(gif|jpg|jpeg|png|bmp|swf|ico)$

    {

      expires 30d;

  # access_log off;

    }

    location ~ .*\.(js|css)?$

    {

      expires 15d;

   # access_log off;

    }

    access_log off;

  }

}
检查配置文件ngnix.conf的正确性命令:
[root@bogon conf]# /usr/local/webserver/nginx/sbin/nginx -t
五、启动 Nginx
Nginx 启动命令如下:
[root@bogon conf]# /usr/local/webserver/nginx/sbin/nginx

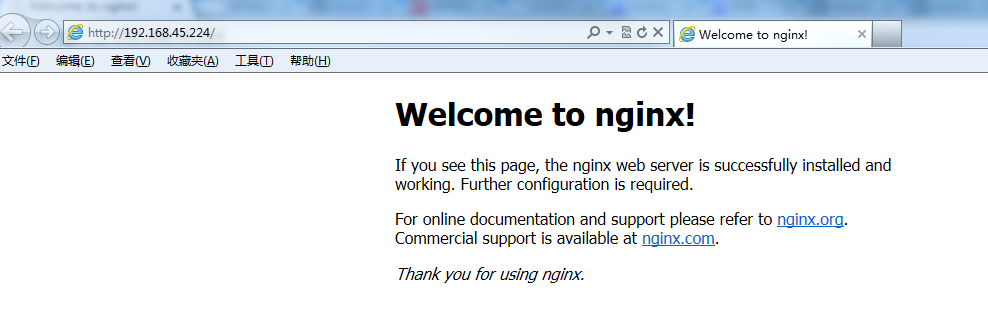
六、访问站点
从浏览器访问我们配置的站点ip:
七、Nginx 其他命令
以下包含了 Nginx 常用的几个命令:
/usr/local/webserver/nginx/sbin/nginx -s reload            # 重新载入配置文件

/usr/local/webserver/nginx/sbin/nginx -s reopen            # 重启 Nginx

/usr/local/webserver/nginx/sbin/nginx -s stop              # 停止 Nginx
八、正向代理:
server端:
应用在nginx的server段,不要server_name,需要添加一个resolver。
server {

    # 配置DNS解析IP地址,比如 Google Public DNS,以及超时时间(5秒)

    resolver 8.8.8.8;    # 必需

    resolver_timeout 5s;

    # 监听端口

    listen 8080;

    access_log  /home/reistlin/logs/proxy.access.log;

    error_log   /home/reistlin/logs/proxy.error.log;

    location / {

        # 配置正向代理参数

        proxy_pass $scheme://$host$request_uri;

        # 解决如果URL中带"."后Nginx 503错误

        proxy_set_header Host $http_host;

        # 配置缓存大小

        proxy_buffers 256 4k;

        # 关闭磁盘缓存读写减少I/O

        proxy_max_temp_file_size 0;

         # 代理连接超时时间

        proxy_connect_timeout 30;

        # 配置代理服务器HTTP状态缓存时间

        proxy_cache_valid 200 302 10m;

        proxy_cache_valid 301 1h;

        proxy_cache_valid any 1m;

    }

}
client端:
一次代理,直接在shell执行:
#export http_proxy=http://192.168.1.9:8080
永久使用:
#vim .bashrc
export http_proxy=http://192.168.1.9:8080
#source .bashrc
转自---https://www.cnblogs.com/AlanLee/p/9044644.html
Linux服务器安装配置Nginx服务器的更多相关文章
- Linux安装配置Nginx服务器
如有需要可以加我Q群[308742428]大家一起讨论技术,有偿服务. 后面会不定时为大家更新文章,敬请期待. 喜欢的朋友可以关注下. 前言 今天搭建nginx服务器,来访问静态资源文件. Nginx ...
- Linux下配置Tomcat服务器
Linux下配置Tomcat服务器和Windows下其实差不多,可以去官网下载安装包释放或者在线下载,只是当时下载的windows.zip文件,现在下载.tar.gz格式的即可,下面使用命令行的方式安 ...
- Linux下配置Samba服务器全过程
Linux下配置Samba服务器全过程 user级别的samba的配置 http://www.linuxidc.com/Linux/2014-11/109234.htm http://www.linu ...
- Linux上配置Nginx+PHP5(FastCGI)
原为地址:http://www.laruence.com/2009/07/28/1030.html Nginx是俄罗斯人编写的十分轻量级的HTTP服务器,以事件驱动的方式编写,所以有非常好的性能,同时 ...
- 负载均衡---在window与linux下配置nginx
最近有些时间,开始接触负载均衡方面的东西,从硬件F5再到Citrix Netscalar.不过因为硬件的配置虽然不复杂,但昂贵的价格也让一般用户望而却步(十几万到几十万),所以只能转向nginx,sq ...
- Linux下配置nginx,负载IIS的页面
最近研究了下Linux下的nginx结果贴一下: 反向代理概念: 一般访问流程:a=>b,a访问b服务器, 加n来做反向代理流程:a=>n=>b 负载均衡概率:a访问B站点,B站点有 ...
- 【转】玩玩负载均衡---在window与linux下配置nginx
最近有些时间,开始接触负载均衡方面的东西,从硬件F5再到Citrix Netscalar.不过因为硬件的配置虽然不复杂,但昂贵的价格也让一般用户望而却步(十几万到几十万),所以只能转向nginx,sq ...
- [运维] 如何在 Linux 上安装 Nginx 服务器(一)
原因 因为小程序对素材的大小是由要求的, 所以为了简化小程序上的内存要求, 在Linux上安装nginx来作为静态资源服务器, 这篇为第一篇, 主要介绍怎么在Linux上安装nginx, 下一篇将会介 ...
- 玩玩负载均衡---在window与linux下配置nginx
最近有些时间,开始接触负载均衡方面的东西,从硬件F5再到Citrix Netscalar.不过因为硬件的配置虽然不复杂,但昂贵的价格也让一般用户望而却步(十几万到几十万),所以只能转向nginx, ...
随机推荐
- js对象及元素复制拷贝
1.数组及对象拷贝: 浅拷贝var b=$.extend(false,{},a);//对象浅拷贝 var a={aa:111,bb:{bb1:22}}; var b=$.extend(false,{} ...
- Shell 编程 (变量和条件测试)
变量: 1 . 变量声明 直接使用变量 + 赋值 #!/bin/bash NAME='HELLO WORD' echo $NAME 使用 declare 关键字声明 declare(选项)(参数) + ...
- Django 模板格式化日期
在模板中格式化日期: {{ post.date|date:”Y-m-d H:i:s” }}
- js页面停留时间
//在线阅读时间 function onlineRead(minutes){ var o= new Object(); o.courseId=courseId; o.userId=userId; o. ...
- WDA-5-VIEW视图切换
这一部分介绍同一窗口下不同视图之间的链接跳转. 前提:完成上一步骤MAIN视图ALV显示. 1.效果展示 点击ALV物料下划线链接,页面跳转到物料明细页面. 2.实现过程 基于上一步骤在MAIN页面显 ...
- vue 监听state 任意值变化、监听mutations actions
// store.watch((state) => state.count + 1, (newCount) => { // console.log(' 监听') // }) // stor ...
- U3D MemoryProfiler
MemoryProfiler Unity 5.3a4 has a new very lowlevel memory profiler API. It can tell you which object ...
- U3D开发中关于脚本方面的限制-有关IOS反射和JIT的支持问题
U3D文档中说明了,反射在IOS是支持的,除了system.reflection.emit空间内的,其它都支持.JIT是不支持的. 本质上来说即是:只要不在运行时动态生成代码的行为都支持,reflec ...
- maven中scope标签详解
前言 最近在做itoo的pom优化工作,发现对于maven依赖管理中的scope标签还是有不明白的地方,所以今天就来总结一下这方面的知识,scope在maven的依赖管理中主要负责项目的部署 mave ...
- JULIA BOORSTIN — Interview a Broadcaster!
JULIA BOORSTIN — Interview a Broadcaster! Share Tweet Share Tagged With: Interview a Broadcaster Stu ...