MVC文件上传07-使用客户端jQuery-File-Upload插件和服务端Backload组件裁剪上传图片
本篇通过在配置文件中设置,对上传图片修剪后保存到指定文件夹。
相关兄弟篇:
MVC文件上传01-使用jquery异步上传并客户端验证类型和大小
MVC文件上传02-使用HttpPostedFileBase上传多个文件
MVC文件上传03-使用Request.Files上传多个文件
MVC文件上传04-使用客户端jQuery-File-Upload插件和服务端Backload组件实现多文件异步上传
MVC文件上传05-使用客户端jQuery-File-Upload插件和服务端Backload组件自定义上传文件夹
MVC文件上传06-使用客户端jQuery-File-Upload插件和服务端Backload组件自定义控制器上传多个文件
□ 思路
1、自定义控制器继承Backload的默认控制器BackloadController
2、自定义一个jQuery File Upload初始化js文件,使用自定义控制器的方法
3、在视图页面调用自定义jQuery File Upload初始化js文件
□ 安装Backload组件和jQuery File Upload插件
→在"程序包管理器控制台"输入:Install-Package Backload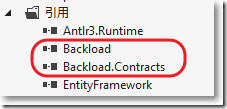
→在"程序包管理器控制台"输入: Install-Package JQuery_File_Upload_Plugin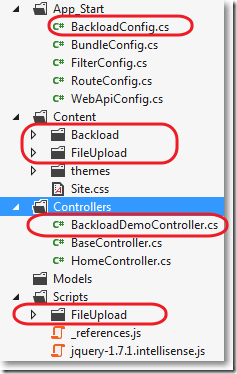
□ 自定义BaseController继承BackloadController
1: using System.Web.Mvc;
2:
3: namespace MvcApplication7.Controllers
4: {
5: public class BaseController : BackloadController
6: {
7: //public ActionResult Index()
8: //{
9: // return View();
10: //}
11:
12: public async Task<ActionResult> FileHandler()
13: {
14: ActionResult result = await base.HandleRequestAsync();
15: return result;
16: }
17: }
18: }
.csharpcode, .csharpcode pre
{
font-size: small;
color: black;
font-family: consolas, "Courier New", courier, monospace;
background-color: #ffffff;
/*white-space: pre;*/
}
.csharpcode pre { margin: 0em; }
.csharpcode .rem { color: #008000; }
.csharpcode .kwrd { color: #0000ff; }
.csharpcode .str { color: #006080; }
.csharpcode .op { color: #0000c0; }
.csharpcode .preproc { color: #cc6633; }
.csharpcode .asp { background-color: #ffff00; }
.csharpcode .html { color: #800000; }
.csharpcode .attr { color: #ff0000; }
.csharpcode .alt
{
background-color: #f4f4f4;
width: 100%;
margin: 0em;
}
.csharpcode .lnum { color: #606060; }
□ 自定义HomeController继承BaseController
1: using System.Web.Mvc;
2: namespace MvcApplication7.Controllers
3: {
4: public class HomeController : BaseController
5: {
6: public ActionResult Index()
7: {
8: return View();
9: }
10: }
11: }
.csharpcode, .csharpcode pre
{
font-size: small;
color: black;
font-family: consolas, "Courier New", courier, monospace;
background-color: #ffffff;
/*white-space: pre;*/
}
.csharpcode pre { margin: 0em; }
.csharpcode .rem { color: #008000; }
.csharpcode .kwrd { color: #0000ff; }
.csharpcode .str { color: #006080; }
.csharpcode .op { color: #0000c0; }
.csharpcode .preproc { color: #cc6633; }
.csharpcode .asp { background-color: #ffff00; }
.csharpcode .html { color: #800000; }
.csharpcode .attr { color: #ff0000; }
.csharpcode .alt
{
background-color: #f4f4f4;
width: 100%;
margin: 0em;
}
.csharpcode .lnum { color: #606060; }
□ 自定义用于初始化jQuery File Upload的js文件main.js
其中,还限制了上传文件的格式。
1: $(function () {
2: 'use strict';
3:
4: var url = '/Base/FileHandler';
5: // Initialize the jQuery File Upload widget:
6: $('#fileupload').fileupload({
7: // Uncomment the following to send cross-domain cookies:
8: //xhrFields: {withCredentials: true},
9: url: url,
10: acceptFileTypes: /(jpg)|(jpeg)|(png)|(gif)$/i // Allowed file types
11: });
12:
13: // Enable iframe cross-domain access via redirect option:
14: $('#fileupload').fileupload(
15: 'option',
16: 'redirect',
17: window.location.href.replace(
18: /\/[^\/]*$/,
19: '/cors/result.html?%s'
20: )
21: );
22:
23: // Load existing files by an initial ajax request to the server after page loads up
24: // This is done by a simple jQuery ajax call, not by the FIle Upload plugin.,
25: // but the results are passed to the plugin with the help of the context parameter:
26: // context: $('#fileupload')[0] and the $(this)... call in the done handler.
27: // With ajax.context you can pass a JQuery object to the event handler and use "this".
28: $('#fileupload').addClass('fileupload-processing');
29: $.ajax({
30: // Uncomment the following to send cross-domain cookies:
31: //xhrFields: {withCredentials: true},
32: url: url,
33: dataType: 'json',
34: context: $('#fileupload')[0]
35: }).always(function () {
36: $(this).removeClass('fileupload-processing');
37: }).done(function (result) {
38: $(this).fileupload('option', 'done')
39: .call(this, null, { result: result });
40: });
41: });
42:
43: $("document").ready(function () {
44: $('#fileupload')
45: .bind('fileuploaddestroy', function (e, data) {
46: // Event handler example. Do something if you need after file has been deleted on the server.
47: // (Refer to the client side documentatio).
48: });
49:
50: });
51:
.csharpcode, .csharpcode pre
{
font-size: small;
color: black;
font-family: consolas, "Courier New", courier, monospace;
background-color: #ffffff;
/*white-space: pre;*/
}
.csharpcode pre { margin: 0em; }
.csharpcode .rem { color: #008000; }
.csharpcode .kwrd { color: #0000ff; }
.csharpcode .str { color: #006080; }
.csharpcode .op { color: #0000c0; }
.csharpcode .preproc { color: #cc6633; }
.csharpcode .asp { background-color: #ffff00; }
.csharpcode .html { color: #800000; }
.csharpcode .attr { color: #ff0000; }
.csharpcode .alt
{
background-color: #f4f4f4;
width: 100%;
margin: 0em;
}
.csharpcode .lnum { color: #606060; }
□ _Layout.cshtml布局视图
1: <!DOCTYPE html>
2: <html>
3: <head>
4: <meta charset="utf-8" />
5: <meta name="viewport" content="width=device-width" />
6: <title>@ViewBag.Title</title>
7: @Styles.Render("~/Content/css")
8: @Styles.Render("~/Content/themes/base/css")
9: @Styles.Render("~/bundles/fileupload/bootstrap/BasicPlusUI/css")
10: @Scripts.Render("~/bundles/modernizr")
11: </head>
12: <body>
13: @RenderBody()
14:
15: @Scripts.Render("~/bundles/jquery")
16: @Scripts.Render("~/bundles/jqueryui")
17: @Scripts.Render("~/bundles/fileupload/bootstrap/BasicPlusUI/js")
18: @RenderSection("scripts", required: false)
19: </body>
20: </html>
21:
.csharpcode, .csharpcode pre
{
font-size: small;
color: black;
font-family: consolas, "Courier New", courier, monospace;
background-color: #ffffff;
/*white-space: pre;*/
}
.csharpcode pre { margin: 0em; }
.csharpcode .rem { color: #008000; }
.csharpcode .kwrd { color: #0000ff; }
.csharpcode .str { color: #006080; }
.csharpcode .op { color: #0000c0; }
.csharpcode .preproc { color: #cc6633; }
.csharpcode .asp { background-color: #ffff00; }
.csharpcode .html { color: #800000; }
.csharpcode .attr { color: #ff0000; }
.csharpcode .alt
{
background-color: #f4f4f4;
width: 100%;
margin: 0em;
}
.csharpcode .lnum { color: #606060; }
□ Home/Index.cshtml视图
展开@{
ViewBag.Title = "Index";
Layout = "~/Views/Shared/_Layout.cshtml";
}
<style type="text/css">
.table-striped {
width: 65%;
}
</style>
<div>
<!-- The file upload form used as target for the file upload widget -->
<form id="fileupload" action="/Backload/UploadHandler" method="POST" enctype="multipart/form-data">
<!-- Redirect browsers with JavaScript disabled to the origin page -->
<noscript><input type="hidden" name="redirect" value="/"></noscript>
<!-- The fileupload-buttonbar contains buttons to add/delete files and start/cancel the upload -->
<div class="row fileupload-buttonbar">
<div class="span7">
<!-- The fileinput-button span is used to style the file input field as button -->
<span class="btn btn-success fileinput-button">
<i class="icon-plus icon-white"></i>
<span>添加文件...</span>
<input type="file" name="files[]" multiple>
</span>
<button type="submit" class="btn btn-primary start">
<i class="icon-upload icon-white"></i>
<span>开始上传</span>
</button>
<button type="reset" class="btn btn-warning cancel">
<i class="icon-ban-circle icon-white"></i>
<span>取消上传</span>
</button>
<button type="button" class="btn btn-danger delete">
<i class="icon-trash icon-white"></i>
<span>删除</span>
</button>
<input type="checkbox" class="toggle">
<!-- The loading indicator is shown during file processing -->
<span class="fileupload-loading"></span>
</div>
<!-- The global progress information -->
<div class="span5 fileupload-progress fade">
<!-- The global progress bar -->
<div class="progress progress-success progress-striped active" role="progressbar" aria-valuemin="0" aria-valuemax="100">
<div class="bar" style="width:0%;"></div>
</div>
<!-- The extended global progress information -->
<div class="progress-extended"> </div>
</div>
</div>
<!-- The table listing the files available for upload/download -->
<table role="presentation" class="table table-striped"><tbody class="files" data-toggle="modal-gallery" data-target="#modal-gallery"></tbody></table>
</form>
<!-- The template to display files available for upload -->
<script id="template-upload" type="text/x-tmpl">
{% for (var i=0, file; file=o.files[i]; i++) { %}
<tr class="template-upload fade">
<td>
<span class="preview"></span>
</td>
<td>
<p class="name">{%=file.name%}</p>
{% if (file.error) { %}
<div><span class="label label-important">Error</span> {%=file.error%}</div>
{% } %}
</td>
<td>
<p class="size">{%=o.formatFileSize(file.size)%}</p>
{% if (!o.files.error) { %}
<div class="progress progress-success progress-striped active" role="progressbar" aria-valuemin="0" aria-valuemax="100" aria-valuenow="0"><div class="bar" style="width:0%;"></div></div>
{% } %}
</td>
<td>
{% if (!o.files.error && !i && !o.options.autoUpload) { %}
<button class="btn btn-primary start">
<i class="icon-upload icon-white"></i>
<span>Start</span>
</button>
{% } %}
{% if (!i) { %}
<button class="btn btn-warning cancel">
<i class="icon-ban-circle icon-white"></i>
<span>Cancel</span>
</button>
{% } %}
</td>
</tr>
{% } %}
</script>
<!-- The template to display files available for download -->
<script id="template-download" type="text/x-tmpl">
{% for (var i=0, file; file=o.files[i]; i++) { %}
<tr class="template-download fade">
<td>
<span class="preview">
{% if (file.thumbnail_url) { %}
<a href="{%=file.url%}" title="{%=file.name%}" data-gallery="gallery" download="{%=file.name%}"><img src="{%=file.thumbnail_url%}"></a>
{% } %}
</span>
</td>
<td>
<p class="name">
<a href="{%=file.url%}" title="{%=file.name%}" data-gallery="{%=file.thumbnail_url&&'gallery'%}" download="{%=file.name%}">{%=file.name%}</a>
</p>
{% if (file.error) { %}
<div><span class="label label-important">Error</span> {%=file.error%}</div>
{% } %}
</td>
<td>
<span class="size">{%=o.formatFileSize(file.size)%}</span>
</td>
<td>
<button class="btn btn-danger delete" data-type="{%=file.delete_type%}" data-url="{%=file.delete_url%}"{% if (file.delete_with_credentials) { %} data-xhr-fields='{"withCredentials":true}'{% } %}>
<i class="icon-trash icon-white"></i>
<span>Delete</span>
</button>
<input type="checkbox" name="delete" value="1" class="toggle">
</td>
</tr>
{% } %}
</script>
</div>
@section scripts
{
@* <script src="~/Scripts/FileUpload/backload.demo.js"></script>*@
<script src="~/Scripts/main.js"></script>
}
□ web.config
1: <configuration>
2: <configSections>
3: ...
4: <section name="backload" type="Backload.Configuration.BackloadSection, Backload, Version=1.9.3.1, Culture=neutral, PublicKeyToken=02eaf42ab375d363" requirePermission="false" /></configSections>
5: <configSections>
6: <backload configSource="Web.backload.config" />
7: </configuration>
.csharpcode, .csharpcode pre
{
font-size: small;
color: black;
font-family: consolas, "Courier New", courier, monospace;
background-color: #ffffff;
/*white-space: pre;*/
}
.csharpcode pre { margin: 0em; }
.csharpcode .rem { color: #008000; }
.csharpcode .kwrd { color: #0000ff; }
.csharpcode .str { color: #006080; }
.csharpcode .op { color: #0000c0; }
.csharpcode .preproc { color: #cc6633; }
.csharpcode .asp { background-color: #ffff00; }
.csharpcode .html { color: #800000; }
.csharpcode .attr { color: #ff0000; }
.csharpcode .alt
{
background-color: #f4f4f4;
width: 100%;
margin: 0em;
}
.csharpcode .lnum { color: #606060; }
□ 所有Backload的配置放在Web.backload.config中
1: <?xml version="1.0"?>
2:
3: <backload xsi:noNamespaceSchemaLocation="Web.Backload.xsd" xmlns:xsi="http://www.w3.org/2001/XMLSchema-instance" xmlns:name="urn:backload-schema" thumbsUrlPattern="{Backload}">
4:
5: <images width="200" height="200" dpi="96" resizeMode="ratio" />
6: <thumbnails path="" width="60" height="60" canvasColor="#00000000" resizeMode="place" imageType="image/png" />
7: <fileSystem filesRoot="~/Upload" />
8: <cacheManager lastModified="true" etag="true"/>
9: </backload>
.csharpcode, .csharpcode pre
{
font-size: small;
color: black;
font-family: consolas, "Courier New", courier, monospace;
background-color: #ffffff;
/*white-space: pre;*/
}
.csharpcode pre { margin: 0em; }
.csharpcode .rem { color: #008000; }
.csharpcode .kwrd { color: #0000ff; }
.csharpcode .str { color: #006080; }
.csharpcode .op { color: #0000c0; }
.csharpcode .preproc { color: #cc6633; }
.csharpcode .asp { background-color: #ffff00; }
.csharpcode .html { color: #800000; }
.csharpcode .attr { color: #ff0000; }
.csharpcode .alt
{
background-color: #f4f4f4;
width: 100%;
margin: 0em;
}
.csharpcode .lnum { color: #606060; }
● width和height实际上设置的是画布Canvas的大小。
● 没有resizeMode属性:保持上传图片的大小不变
● resizeMode="ration": 当图片的宽度大于画布的宽度,图片的宽度修剪为画布的宽度,图片的高度等比例缩放,画布背景不显示
● resizeMode="fit": 当图片的宽度大于画布的宽度,图片的宽度修剪为画布的宽度,图片的高度等比例缩放,画布背景显示
● resizeMode="place": 当图片的宽度小于画布的宽度,图片的宽度修剪为画布的宽度,图片的高度等比例缩放,画布背景显示
● resizeMode="crop": 图片的宽度或高度充满画布的宽度或高度,空白的画布区域裁剪掉。
□ 结果
上传界面: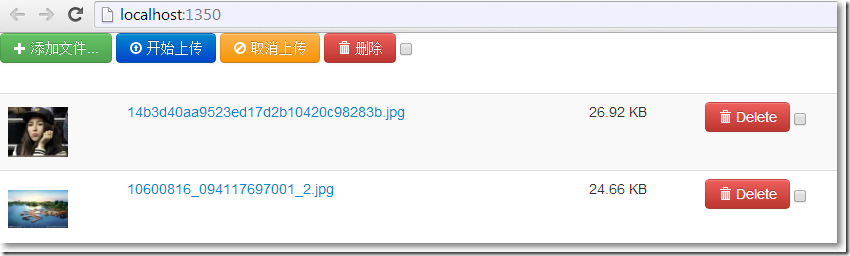
由于设置了path="",所以没有了缩略图:
由于设置了resizeMode="ratio",上传图片宽度不变,高度按比例缩小:
□ 设置文件夹带缩略图文件夹path="_thumb"
1: <backload xsi:noNamespaceSchemaLocation="Web.Backload.xsd" xmlns:xsi="http://www.w3.org/2001/XMLSchema-instance" xmlns:name="urn:backload-schema" thumbsUrlPattern="{Backload}">
2:
3: <images width="200" height="200" dpi="96" resizeMode="ratio" />
4: <thumbnails path="_thumb" width="60" height="60" canvasColor="#00000000" resizeMode="place" imageType="image/png" />
5: <fileSystem filesRoot="~/Upload" />
6: <cacheManager lastModified="true" etag="true"/>
7: </backload>
.csharpcode, .csharpcode pre
{
font-size: small;
color: black;
font-family: consolas, "Courier New", courier, monospace;
background-color: #ffffff;
/*white-space: pre;*/
}
.csharpcode pre { margin: 0em; }
.csharpcode .rem { color: #008000; }
.csharpcode .kwrd { color: #0000ff; }
.csharpcode .str { color: #006080; }
.csharpcode .op { color: #0000c0; }
.csharpcode .preproc { color: #cc6633; }
.csharpcode .asp { background-color: #ffff00; }
.csharpcode .html { color: #800000; }
.csharpcode .attr { color: #ff0000; }
.csharpcode .alt
{
background-color: #f4f4f4;
width: 100%;
margin: 0em;
}
.csharpcode .lnum { color: #606060; }
增加一个图片: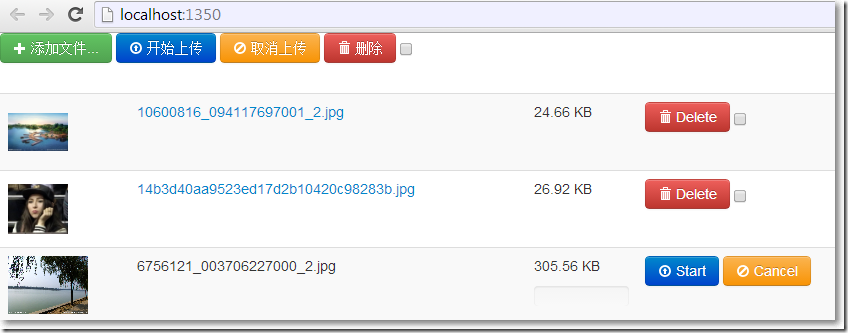
由于设置了path="_thumb",所以有了缩略图文件夹: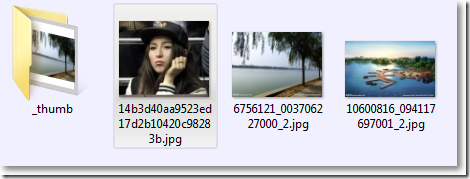
由于缩略图设置了resizeMode="place",图片宽度等于画布宽度,高度等比例缩放,显示背景: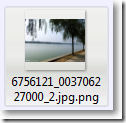
由于在main.js中设置了acceptFileTypes: /(jpg)|(jpeg)|(png)|(gif)$/i,pdf格式不允许: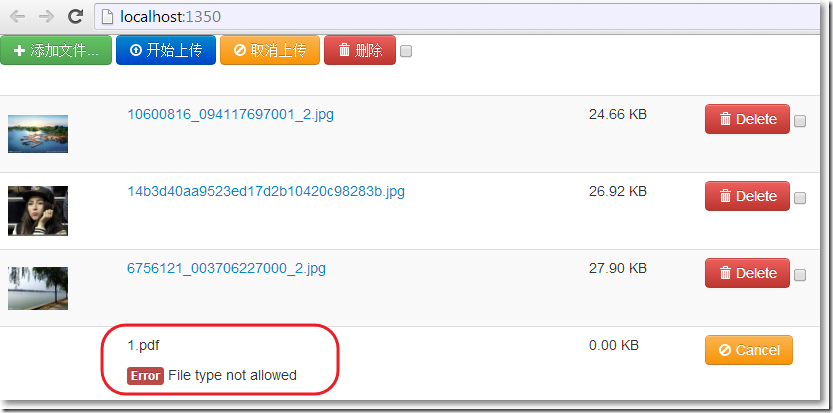
参考资料:
※ http://backload.org/ Backload官网
※ https://github.com/blackcity/Backload#examples Backload例子
※ http://nuget.org/packages/Backload/ nuget上的Backload
※ http://blueimp.github.io/jQuery-File-Upload/ jQuery File Upload官网
※ https://github.com/blueimp/jQuery-File-Upload/wiki github上的jQuery File Upload介绍
※ https://github.com/blueimp/jQuery-File-Upload github上的jQuery File Upload源码
※ https://www.nuget.org/packages/JQueryFileUpload_Demo_with_Backload/ 下载jQuery File Upload结合Backload的MVC案例
MVC文件上传07-使用客户端jQuery-File-Upload插件和服务端Backload组件裁剪上传图片的更多相关文章
- MVC文件上传09-使用客户端jQuery-File-Upload插件和服务端Backload组件让每个用户有专属文件夹,并在其中创建分类子文件夹
为用户创建专属上传文件夹后,如果想在其中再创建分类子文件夹,该怎么做?可以在提交文件的视图中再添加一个隐藏域,并设置 name="uploadContext". 相关兄弟篇: MV ...
- MVC文件上传08-使用客户端jQuery-File-Upload插件和服务端Backload组件让每个用户有专属文件夹
当需要为每个用户建立一个专属上传文件夹的时候,可以在提交文件的视图中添加一个隐藏域,并设置name="objectContext". 相关兄弟篇: MVC文件上传01-使用jque ...
- MVC文件上传06-使用客户端jQuery-File-Upload插件和服务端Backload组件自定义控制器上传多个文件
当需要在控制器中处理除了文件的其他表单字段,执行控制器独有的业务逻辑......等等,这时候我们可以自定义控制器. MVC文件上传相关兄弟篇: MVC文件上传01-使用jquery异步上传并客户端验证 ...
- MVC文件上传05-使用客户端jQuery-File-Upload插件和服务端Backload组件自定义上传文件夹
在零配置情况下,文件的上传文件夹是根目录下的Files文件夹,如何自定义文件的上传文件夹呢? MVC文件上传相关兄弟篇: MVC文件上传01-使用jquery异步上传并客户端验证类型和大小 MVC文 ...
- MVC文件上传04-使用客户端jQuery-File-Upload插件和服务端Backload组件实现多文件异步上传
本篇使用客户端jQuery-File-Upload插件和服务端Badkload组件实现多文件异步上传.MVC文件上传相关兄弟篇: MVC文件上传01-使用jquery异步上传并客户端验证类型和大小 ...
- MVC文件上传-使用jQuery.FileUpload和Backload组件实现文件上传
本篇使用客户端jQuery-File-Upload插件和服务端Badkload组件实现多文件异步上传.MVC文件上传相关兄弟篇: 处理文件上传的服务端组件Backload 用于处理文件上传的服务端组件 ...
- MVC文件上传03-使用Request.Files上传多个文件
本篇体验在控制器方法中使用controllerContext.HttpContext.Request.Files上传多个文件.兄弟篇为: MVC文件上传01-使用jquery异步上传并客户端验证类型和 ...
- MVC文件上传02-使用HttpPostedFileBase上传多个文件
本篇体验上传多个文件.兄弟篇为: MVC文件上传01-使用jquery异步上传并客户端验证类型和大小 MVC最基本上传文件方式中的一个遗漏点 □ 前台视图部分 1: <% u ...
- Strut2 和Spring MVC 文件上传对比
在Java领域中,有两个常用的文件上传项目:一个是Apache组织Jakarta的Common-FileUpload组件 (http://commons.apache.org/proper/commo ...
随机推荐
- Buffer对象的总结
1.首先记录下php关于字符串长度的统计 <?php echo '<br>'; echo '<br>'; 2.Buffer对象为16进制的两位数,即FF 0-225: v ...
- 20169211《Linux内核原理与分析》课程总结
第一周作业:linux入门学习:熟悉操作linux的基础命令 第二周作业:实验反汇编一个简答的C程序,学习汇编代码的工作过程 第三周作业:学习linux内核的启动过程 第四周作业:学习linux内核进 ...
- linux 下nginx安装
一.一键安装四个依赖 yum -y install gcc zlib zlib-devel pcre-devel openssl openssl-devel 二.创建一个安装目录,并下载nginx安装 ...
- 深入理解SQL的四种连接,左外连接,右外连接,内连接,全连接
1.内联接(典型的联接运算,使用像 = 或 <> 之类的比较运算符).包括相等联接和自然联接. 内联接使用比较运算符根据每个表共有的列的值匹配两个表中的行.例如,检索 stude ...
- JAVAEE——宜立方商城10:使用freemarker实现网页静态化、ActiveMq同步生成静态网页、Sso单点登录系统分析
1. 学习计划 1.使用freemarker实现网页静态化 2.ActiveMq同步生成静态网页 2. 网页静态化 可以使用Freemarker实现网页静态化. 2.1. 什么是freemarker ...
- 如何快速分析出现性能问题的Linux服务器
Brendan Gregg曾经分享过当遇到一个系统性能问题时,如何利用登录的前60秒对系统的性能情况做一个快速浏览和分析,主要包括如下10个工具,这是一个非常有用且有效的工具列表.本文将详细介绍这些命 ...
- python 与 mongodb的交互--更新操作
这里只要讨论python与mongod交互的时候insert的问题: from pymongo import * def insert_func(): try: client_obj= MongoCl ...
- [ 转载 ] Java中常用的设计模式
Java中常用的设计模式 1.单例模式 单例模式有以下特点: 1.单例类只能有一个实例. 2.单例类必须自己创建自己的唯一实例. 3.单例类必须给所有其他对象提供这一实例. 单例模式确保某个类只有一个 ...
- CF1042C Array Product 分类讨论+贪心
考虑有无负数(负数的个数为奇视作“有”,否则为“无”)和有无零 无负数无零,全部合并即可 无负数有零,那么把零合并起来,删掉零 有负数无零,把最大的负数找出来,删掉,合并剩余的数 有负数有零,把零和最 ...
- BZOJ.2916.[POI1997]Monochromatic Triangles(三元环)
题目链接 \(Description\) n个点的完全图,其中有m条边用红边相连,其余边为蓝色.求其中三边同色的三角形个数. \(Solution\) 直接求同色 除了n^3 不会.. 三角形总数是C ...