【第五章】 springboot + mybatis
springboot集成了springJDBC与JPA,但是没有集成mybatis,所以想要使用mybatis就要自己去集成。集成方式相当简单。
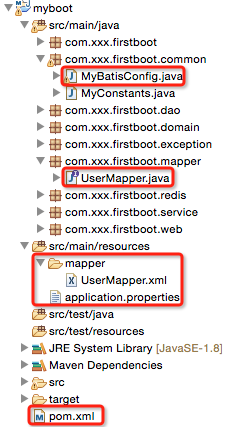
1、项目结构
2、pom.xml
        <!-- 与数据库操作相关的依赖 -->
        <dependency>
            <groupId>org.springframework.boot</groupId>
            <artifactId>spring-boot-starter-jdbc</artifactId>
        </dependency>

        <!-- 使用数据源 -->
        <dependency>
            <groupId>com.alibaba</groupId>
            <artifactId>druid</artifactId>
            <version>1.0.14</version>
        </dependency>

        <!-- mysql -->
        <dependency>
            <groupId>mysql</groupId>
            <artifactId>mysql-connector-java</artifactId>
            <scope>runtime</scope>
        </dependency>

        <!-- mybatis -->
        <dependency>
            <groupId>org.mybatis</groupId>
            <artifactId>mybatis</artifactId>
            <version>3.2.8</version>
        </dependency>
        <dependency>
            <groupId>org.mybatis</groupId>
            <artifactId>mybatis-spring</artifactId>
            <version>1.2.2</version>
         </dependency>
说明:
spring-boot-starter-jdbc:引入与数据库操作相关的依赖,例如daoSupport等
- druid:阿里巴巴的数据源
- mysql-connector-java:mysql连接jar,scope为runtime
- mybatis + mybatis-spring:mybatis相关jar
3、application.properties
jdbc.driverClassName = com.mysql.jdbc.Driver
jdbc.url = jdbc:mysql://xxx:3306/mytestdb?zeroDateTimeBehavior=convertToNull&useUnicode=true&characterEncoding=utf-8
jdbc.username = root
jdbc.password = vvvxxx

mybatis.typeAliasesPackage=com.xxx.firstboot.domain
mybatis.mapperLocations=classpath:mapper/*.xml
说明:
- mybatis.typeAliasesPackage:指定domain类的基包,即指定其在*Mapper.xml文件中可以使用简名来代替全类名(看后边的UserMapper.xml介绍)
mybatis.mapperLocations:指定*Mapper.xml的位置
4、com.xxx.firstboot.common.MyBatisConfig
作用:mybatis与springboot集成的入口
package com.xxx.firstboot.common;

import java.util.Properties;

import javax.sql.DataSource;

import org.apache.ibatis.session.SqlSessionFactory;
import org.mybatis.spring.SqlSessionFactoryBean;
import org.mybatis.spring.annotation.MapperScan;
import org.springframework.beans.factory.annotation.Autowired;
import org.springframework.context.annotation.Bean;
import org.springframework.context.annotation.Configuration;
import org.springframework.core.env.Environment;
import org.springframework.core.io.support.PathMatchingResourcePatternResolver;

import com.alibaba.druid.pool.DruidDataSourceFactory;

/**
 * springboot集成mybatis的基本入口
 * 1)创建数据源
 * 2)创建SqlSessionFactory
 */
@Configuration    //该注解类似于spring配置文件
@MapperScan(basePackages="com.xxx.firstboot.mapper")
public class MyBatisConfig {

    @Autowired
    private Environment env;

    /**
     * 创建数据源
     * @Primary 该注解表示在同一个接口有多个实现类可以注入的时候,默认选择哪一个,而不是让@autowire注解报错
     */
    @Bean
    //@Primary
    public DataSource getDataSource() throws Exception{
        Properties props = new Properties();
        props.put("driverClassName", env.getProperty("jdbc.driverClassName"));
        props.put("url", env.getProperty("jdbc.url"));
        props.put("username", env.getProperty("jdbc.username"));
        props.put("password", env.getProperty("jdbc.password"));
        return DruidDataSourceFactory.createDataSource(props);
    }

    /**
     * 根据数据源创建SqlSessionFactory
     */
    @Bean
    public SqlSessionFactory sqlSessionFactory(DataSource ds) throws Exception{
        SqlSessionFactoryBean fb = new SqlSessionFactoryBean();
        fb.setDataSource(ds);//指定数据源(这个必须有,否则报错)
        //下边两句仅仅用于*.xml文件,如果整个持久层操作不需要使用到xml文件的话(只用注解就可以搞定),则不加
        fb.setTypeAliasesPackage(env.getProperty("mybatis.typeAliasesPackage"));//指定基包
        fb.setMapperLocations(new PathMatchingResourcePatternResolver().getResources(env.getProperty("mybatis.mapperLocations")));//指定xml文件位置

        return fb.getObject();
    }

}
说明:
- 类上边添加两个
- @Configuration注解(该注解类似于spring的配置文件)
- @MapperScan注解,指定扫描的mapper接口所在的包
- 在该类中,注入了Environment实例,使用该实例可以去读取类路径下application.properties文件中的内容,读取文件内容的三种方式,见第二章 第二个spring-boot程序
- 在该类中,使用druid数据源定义了数据源Bean,spring-boot默认使用的是tomcat-jdbc数据源,这是springboot官方推荐的数据源(性能和并发性都很好)
- 根据数据源生成SqlSessionFactory
- 值得注意的是,数据源是必须指定的,否则springboot启动不了
- typeAliasesPackage和mapperLocations不是必须的,如果整个项目不需要用到*Mapper.xml来写SQL的话(即只用注解就可以搞定),那么不需要配
- @Primary注解:指定在同一个接口有多个实现类可以注入的时候,默认选择哪一个,而不是让@Autowire注解报错(一般用于多数据源的情况下)
这样之后,在项目中再使用springboot就和在ssm中(配置完成后)使用一样了。
5、com.xxx.firstboot.mapper.UserMapper
package com.xxx.firstboot.mapper;

import org.apache.ibatis.annotations.Insert;
import org.apache.ibatis.annotations.Param;

import com.xxx.firstboot.domain.User;

public interface UserMapper {

    @Insert("INSERT INTO tb_user(username, password) VALUES(#{username},#{password})")
    public int insertUser(@Param("username") String username, @Param("password")  String password);

    /**
     * 插入用户,并将主键设置到user中
     * 注意:返回的是数据库影响条数,即1
     */
    public int insertUserWithBackId(User user);
}
说明:该接口中有两个方法,
- 一个普通插入:直接用注解搞定
- 一个插入返回主键:需要使用xml来搞定
<?xml version="1.0" encoding="UTF-8" ?>
<!DOCTYPE mapper PUBLIC "-//mybatis.org//DTD Mapper 3.0//EN" "http://mybatis.org/dtd/mybatis-3-mapper.dtd">

<!-- 指定工作空间,要与接口名相同,源代码没有去看,猜测应该是通过"这里的namespace.下边方法的id"来定位方法的 -->
<mapper namespace="com.xxx.firstboot.mapper.UserMapper">

    <!-- 若不需要自动返回主键,将useGeneratedKeys="true" keyProperty="id"去掉即可(当然如果不需要自动返回主键,直接用注解即可) -->
    <insert id="insertUserWithBackId" parameterType="User" useGeneratedKeys="true" keyProperty="id" >
       <![CDATA[
       INSERT INTO tb_user
       (
           username,
           password
       )
       VALUES
       (
           #{username, jdbcType=VARCHAR},
           #{password, jdbcType=VARCHAR}
       )
       ]]>
   </insert>

</mapper>
6、com.xxx.firstboot.dao.UserDao
package com.xxx.firstboot.dao;

import org.springframework.beans.factory.annotation.Autowired;
import org.springframework.stereotype.Repository;

import com.xxx.firstboot.domain.User;
import com.xxx.firstboot.mapper.UserMapper;

@Repository
public class UserDao {

    @Autowired
    private UserMapper userMapper;

    public int insertUser(String username, String password){
        return userMapper.insertUser(username, password);
    }

    public int insertUserWithBackId(User user){
        return userMapper.insertUserWithBackId(user);
    }

}
7、com.xxx.firstboot.service.UserService
package com.xxx.firstboot.service;

import org.springframework.beans.factory.annotation.Autowired;
import org.springframework.stereotype.Service;

import com.xxx.firstboot.dao.UserDao;
import com.xxx.firstboot.domain.User;

@Service
public class UserService {

    @Autowired
    private UserDao userDao;

    public boolean addUser(String username, String password){
        return userDao.insertUser(username, password)==1?true:false;
    }

    public User addUserWithBackId(String username, String password){
        User user = new User();
        user.setUsername(username);
        user.setPassword(password);
        userDao.insertUserWithBackId(user);//该方法后,主键已经设置到user中了
        return user;
    }

}
8、com.xxx.firstboot.controller.UserController
package com.xxx.firstboot.web;

import org.springframework.beans.factory.annotation.Autowired;
import org.springframework.web.bind.annotation.RequestMapping;
import org.springframework.web.bind.annotation.RequestMethod;
import org.springframework.web.bind.annotation.RequestParam;
import org.springframework.web.bind.annotation.RestController;

import com.xxx.firstboot.domain.User;
import com.xxx.firstboot.service.UserService;

import io.swagger.annotations.Api;
import io.swagger.annotations.ApiImplicitParam;
import io.swagger.annotations.ApiImplicitParams;
import io.swagger.annotations.ApiOperation;
import io.swagger.annotations.ApiResponse;
import io.swagger.annotations.ApiResponses;

@RestController
@RequestMapping("/user")
@Api("userController相关api")
public class UserController {

    @Autowired
    private UserService userService;

    @ApiOperation("添加用户")
    @ApiImplicitParams({
        @ApiImplicitParam(paramType="query",name="username",dataType="String",required=true,value="用户的姓名",defaultValue="zhaojigang"),
        @ApiImplicitParam(paramType="query",name="password",dataType="String",required=true,value="用户的密码",defaultValue="wangna")
    })
    @ApiResponses({
        @ApiResponse(code=400,message="请求参数没填好"),
        @ApiResponse(code=404,message="请求路径没有或页面跳转路径不对")
    })
    @RequestMapping(value="/addUser",method=RequestMethod.POST)
    public boolean addUser(@RequestParam("username") String username,
                           @RequestParam("password") String password) {
        return userService.addUser(username,password);
    }

    @ApiOperation("添加用户且返回已经设置了主键的user实例")
    @ApiImplicitParams({
        @ApiImplicitParam(paramType="query",name="username",dataType="String",required=true,value="用户的姓名",defaultValue="zhaojigang"),
        @ApiImplicitParam(paramType="query",name="password",dataType="String",required=true,value="用户的密码",defaultValue="wangna")
    })
    @ApiResponses({
        @ApiResponse(code=400,message="请求参数没填好"),
        @ApiResponse(code=404,message="请求路径没有或页面跳转路径不对")
    })
    @RequestMapping(value="/addUserWithBackId",method=RequestMethod.POST)
    public User addUserWithBackId(@RequestParam("username") String username,
                                     @RequestParam("password") String password) {
        return userService.addUserWithBackId(username, password);
    }
}
测试:
进入项目的pom.xml文件所在目录,执行"mvn spring-boot:run"(这是最推荐的spring-boot的运行方式),另外一种在主类上右击-->"run as"-->"java application"不常用
参考自:
http://www.111cn.net/jsp/Java/93604.htm :springboot+mybatis+多数据源
http://blog.csdn.net/xiaoyu411502/article/details/48164311:springboot+mybatis+读写分离(其实读写分离就是两个数据源对两个库进行操作)
【第五章】 springboot + mybatis的更多相关文章
- 第五章 springboot + mybatis(转载)
本编博客转发自:http://www.cnblogs.com/java-zhao/p/5350021.html springboot集成了springJDBC与JPA,但是没有集成mybatis,所以 ...
- 第五章 springboot + mybatis
springboot集成了springJDBC与JPA,但是没有集成mybatis,所以想要使用mybatis就要自己去集成.集成方式相当简单. 1.项目结构 2.pom.xml <!-- 与数 ...
- 第九章 springboot + mybatis + 多数据源 (AOP实现)
在第八章 springboot + mybatis + 多数据源代码的基础上,做两点修改 1.ShopDao package com.xxx.firstboot.dao; import org.spr ...
- 第二十五章 springboot + hystrixdashboard
注意: hystrix基本使用:第十九章 springboot + hystrix(1) hystrix计数原理:附6 hystrix metrics and monitor 一.hystrixdas ...
- SpringBoot | 第三十五章:Mybatis的集成和使用
前言 最近收到公众号留言说,单纯的Mybatis的集成和使用.前面在第九章:Mybatis-plus的集成和使用介绍了基于mybatis-plus的集成和使用.后者也只是对mybatis进行了功能增强 ...
- javaweb各种框架组合案例(五):springboot+mybatis+generator
一.介绍 1.springboot是spring项目的总结+整合 当我们搭smm,ssh,ssjdbc等组合框架时,各种配置不胜其烦,不仅是配置问题,在添加各种依赖时也是让人头疼,关键有些jar包之间 ...
- 第九章 springboot + mybatis + 多数据源 (AOP实现)(转载)
本编博客转发自:http://www.cnblogs.com/java-zhao/p/5415896.html 1.ShopDao package com.xxx.firstboot.dao; imp ...
- 第十五章 springboot + pojo默认值设置
我们有时需要给POJO设置默认值 pojo设置(推荐) 1.User package com.xxx.firstboot.domain; import lombok.Getter; import lo ...
- SpringBoot Mybatis整合(注解版),SpringBoot集成Mybatis(注解版)
SpringBoot Mybatis整合(注解版),SpringBoot集成Mybatis(注解版) ================================ ©Copyright 蕃薯耀 2 ...
- springboot + mybatis + 多数据源
此文已由作者赵计刚薪授权网易云社区发布. 欢迎访问网易云社区,了解更多网易技术产品运营经验 在实际开发中,我们一个项目可能会用到多个数据库,通常一个数据库对应一个数据源. 代码结构: 简要原理: 1) ...
随机推荐
- Bug笔记:Google Map第一次缩放位置偏移
这是个让人蛋疼的bug,认真查看Google maps API文档的童鞋们一定不会碰到. 我的同事为项目写了个针对map这块的jQuery plugin,然后在项目测试中发现,刚加载完页面时,直接点击 ...
- vue使用resource传参数
<!DOCTYPE html> <html lang="en"> <head> <meta charset="UTF-8&quo ...
- [vue]js模块导入导出export default
webstrom调试未授权问题解决 分es6语法和node语法 参考 参考 - export default s1 1.仅能出现1次default 2.导入时候可以随便命名 3,导出时候不必写{} - ...
- LeetCode--44 通配符匹配
题目就是说两个字符串,一个含有通配符,去匹配另一个字符串:输出两个字符串是否一致. 注意:’?’表示匹配任意一个字符,’*’表示匹配任意字符0或者多次 首先,我们想到暴力破解.如果从头到尾的破解,到第 ...
- 非常不错的一个JS分页效果代码
这里分享一个不错的js分页代码. 代码中cpage是页面计数,应为全局变量,可以随处调用它: totalpage是总页数. 与asp分页代码很类似,也是先取得记录总数,然后实现分页,基本的分页思路与原 ...
- Ajax棵
ajax 1.什么是ajax?(异步请求,局部刷新) ajax是一个改善用户体验的技术,实质上是利用浏览器端ajax对象()向服务器发送异步(ajax对象在向服务器发送请求的时候,用户可以继续其他操作 ...
- #C++初学记录(算法3)
C - 不要62 杭州人称那些傻乎乎粘嗒嗒的人为62(音:laoer). 杭州交通管理局经常会扩充一些的士车牌照,新近出来一个好消息,以后上牌照,不再含有不吉利的数字了,这样一来,就可以消除个别的士司 ...
- FAFU 1136 最长递增子序列
http://acm.fafu.edu.cn/problem.php?id=1136 根据dp建边,建边的时候记得判断如果原本数的大小就ok了 好久没在自家OJ上刷了 #include <ios ...
- POJ 1836
刚开始二分写错了 wa了很久 这个二分 的好好想想 #include <iostream> #include<cstdio> #include<string.h> ...
- MyBatis学习笔记(三)——优化MyBatis配置文件中的配置
转自孤傲苍狼的博客:http://www.cnblogs.com/xdp-gacl/p/4264301.html 一.连接数据库的配置单独放在一个properties文件中 之前,我们是直接将数据库的 ...