MVC实战之排球计分软件(深入了解面向对象编程)
在此篇博客之前,我已经写了一个实战系列的博客,虽然不太成熟但是相对比较实用,在这篇博客我将继续使用mvc编程此软件。
此篇博客会在一定的时间内完成,此次完成的软件的一个需求是提供给运动员的使用。我将在这一个月之内完成此篇博客的编写,
以及软件功能的实现。
在开始软件的编程之前,我们先再一次了解一下面向对象的语言以及面向对象的编程:
面向对象的编程:
面向对象编程(Object Oriented Programming,OOP,面向对象程序设计)是一种计算机编程架构。OOP 的一条基本原则是计算
机程序是由单个能够起到子程序作用的单元或对象组合而成。OOP 达到了软件工程的三个主要目标:重用性、灵活性和扩展性。为
了实现整体运算,每个对象都能够接收信息、处理数据和向其它对象发送信息。
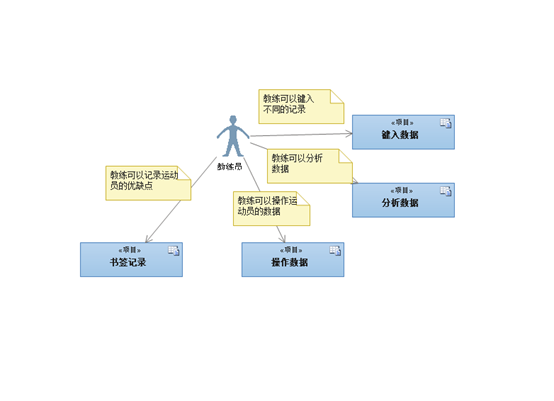
ID int ;
num string 球员号 NotNull
name string 姓名 NotNull
faqiu string 发球 NotNull
lanwang string 拦网 NotNull
kouqiu string 扣球 NotNull
zhugong string 助攻 NotNull
youdian string 优点 NotNull
quedian string 缺点 NotNull
jianyi string 建议 NotNull

数据库的设计映射了队员的得分与优缺点,教练可以清晰明了的了解每一位运动员。
我将要使用EF框架创建数库,这样可以简便的完成软件的功能的使用,简单,但是非常实用。
软件首页设计:
软件的此版本是为了提供给教练使用,软件的首页简洁使用,可以为教练员轻松的提供
他想使用的功能,设计简洁,使使用者一目了然,使用起来遂心应手。
具体设计如下:

首页的生成是由Hmoe控制器生成的视图代码完成的,具体代码如下:
@{

    ViewBag.Title = "计分软件";

}

<style>

    div { width:300px;

          height:300px;

          margin:50px auto;

         border:1px solid green;

         background-color: #F1F1F1;

        padding-left:50px;

        padding-top:50px;

    }

</style>

<html>

   <head>

       <title>

         计分软件

       </title>

   </head>

    <body>

        <div>

            <h2>排球计分(教练版本)</h2>

            <h3>

                @Html.ActionLink("记录分数", "Index","JiaoLian")

                 @Html.ActionLink("教练备战", "Index","BeforeStart")

            </h3>

            <p>现在时间是:@DateTime.Now.ToShortTimeString()</p>

            <p>软件使用说明:本软件的此功能是提供给教练使用,教练通过点击上面的功能按钮,然后进入

                软件计分功能,教练可以通过此软件记录运动远的平时的优缺点,可以给运动员建议及指导,

                可以很清晰的记录。

            </p>

        </div>

 </body>

</html>
到这里软件的主视图就算是完成了,简洁,易使用。
使用EF框架,创建Controller,生成数据库。
在上面我们设计了数据库,接下来我们就开始来实现数据库的生成,
我们使用的数据库连接方式code first 由EF框架产生数据库。
code first需要对模型类设计和实现。模型类是现实实体在计算机中的表示。它贯穿于整个架构,
负担着在各层次及模块间传递数据的职责。
模型类和数据库中的表(这里指实体表,不包括表示多对多对应的关系表)是一一对应的
在此软件中,模型类和表是一一对应的,并且模型类中的属性和表中的字段也是对应的。
在生成数据库前 ,我们需要先设计模型类,具体设计如下:
Pscore.sc
public class Pscore

    {

        public int ID { get; set; }

        [DisplayName("球员编号")]

        public int pid { get; set;}

        [DisplayName("姓名")]

        public string Name { get; set; }

        [DisplayName("发球得分")]

        public int faqiu { get; set; }

        [DisplayName("扣球得分")]

        public int kouqiu { get; set; }

        [DisplayName("拦网得分")]

        public int langwang { get; set; }

        [DisplayName("助攻得分")]

        public int zhugong { get; set; }

        [DisplayName("球员优点")]

        public string youdian { get; set; }

        [DisplayName("失误")]

        public string shiwu { get; set; }

        [DisplayName("总结")]

        public string zongjie { get; set; }

        [DisplayName("教练建议")]

        public string jianyi { get; set; }

    }

    public class pDBContext : DbContext

    {

        public DbSet<Pscore> pscore{ get; set; }

    }
设计好模型类后,我们需要生成一下,快捷键(Ctrl+shift+b),目的是为了我们下步生成数据库。
在完成模型类后,这时候我们就可以通过创建controller 来进行数据库的 连接了。
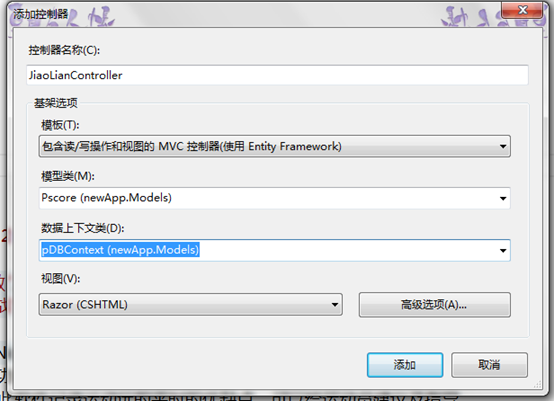
右键单击controller 文件夹,点击添加,添加控制器,控制器名字改写为:JiaoLianController
模板选择:包含读写操作的和视图的MVC,
模型类选择刚才创建的模型类:pScore (VolleyBall.Models),数据上下文类选择:gDBContext (VolleyBall.Models)
具体操作如图:
填写完全后,点击添加。
选择添加后,系统会自动帮我们生成,controller的视图控制代码;
具体代码如下:
public class JiaoLianController : Controller

    {

        private pDBContext db = new pDBContext();

        //

        // GET: /JiaoLian/

        public ActionResult Index()

        {

            return View(db.pscore.ToList());

        }

        //

        // GET: /JiaoLian/Details/5

        public ActionResult Details(int id = )

        {

            Pscore pscore = db.pscore.Find(id);

            if (pscore == null)

            {

                return HttpNotFound();

            }

            return View(pscore);

        }

        //

        // GET: /JiaoLian/Create

        public ActionResult Create()

        {

            return View();

        }

        //

        // POST: /JiaoLian/Create

        [HttpPost]

        public ActionResult Create(Pscore pscore)

        {

            if (ModelState.IsValid)

            {

                db.pscore.Add(pscore);

                db.SaveChanges();

                return RedirectToAction("Index");

            }

            return View(pscore);

        }

        //

        // GET: /JiaoLian/Edit/5

        public ActionResult Edit(int id = )

        {

            Pscore pscore = db.pscore.Find(id);

            if (pscore == null)

            {

                return HttpNotFound();

            }

            return View(pscore);

        }

        //

        // POST: /JiaoLian/Edit/5

        [HttpPost]

        public ActionResult Edit(Pscore pscore)

        {

            if (ModelState.IsValid)

            {

                db.Entry(pscore).State = EntityState.Modified;

                db.SaveChanges();

                return RedirectToAction("Index");

            }

            return View(pscore);

        }

        //

        // GET: /JiaoLian/Delete/5

        public ActionResult Delete(int id = )

        {

            Pscore pscore = db.pscore.Find(id);

            if (pscore == null)

            {

                return HttpNotFound();

            }

            return View(pscore);

        }

        //

        // POST: /JiaoLian/Delete/5

        [HttpPost, ActionName("Delete")]

        public ActionResult DeleteConfirmed(int id)

        {

            Pscore pscore = db.pscore.Find(id);

            db.pscore.Remove(pscore);

            db.SaveChanges();

            return RedirectToAction("Index");

        }

        protected override void Dispose(bool disposing)

        {

            db.Dispose();

            base.Dispose(disposing);

        }

    }
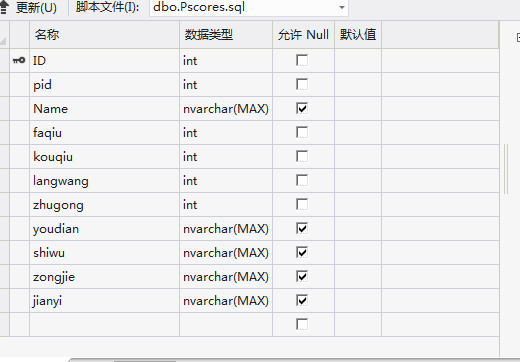
这个时候我们的数据库就生成了。数据库如图:
当我们完成数据库的生成后 ,系统会自动为我们生成操作数据库的视图,这时候我么就可以对系统生成的视图做操作,
用来完成我们想要的功能。
到这里,我们就使用EF框架,完成了通过模型类,然后创建controller,进行数据库的连接,与访问。
在使用EF框架的情况下,数据库的连接是非常方便和好用的。不过在某些方面,这个框架使用起来也是很麻烦的。
软件功能页面的设计:
系统为我们生成了视图,我们在系统生成的视图下再修改,以用来完成软件功能的实现。
功能主页面的设计如图:

具体代码如下:
@model IEnumerable<newApp.Models.Pscore>

@{

    ViewBag.Title = "教练计分";

}

<style>

    div { width:900px;

          height:700px;

          margin:50px auto;

         border:1px solid red;

         background-color:#F1F1F1;

        padding-left:80px;

        padding-top:50px;

    }

    .two {

        color:green;

    }

    .three {

        text-align:right;

    }

</style>

<html>

    <head>

<title>

         计分软件

  </title>

    </head>

<body>

    <div>

<h2>您可以点击下面的按钮进行计分操作</h2>

<p>

    @Html.ActionLink("添加记录", "Create")

</p>

<table>

    <tr>

        <th>

            @Html.DisplayNameFor(model => model.pid)

        </th>

        <th>

            @Html.DisplayNameFor(model => model.Name)

        </th>

        <th>

            @Html.DisplayNameFor(model => model.faqiu)

        </th>

        <th>

            @Html.DisplayNameFor(model => model.kouqiu)

        </th>

        <th>

            @Html.DisplayNameFor(model => model.langwang)

        </th>

        <th>

            @Html.DisplayNameFor(model => model.zhugong)

        </th>

        <th>

            @Html.DisplayNameFor(model => model.youdian)

        </th>

        <th>

            @Html.DisplayNameFor(model => model.shiwu)

        </th>

        <th>

            @Html.DisplayNameFor(model => model.zongjie)

        </th>

        <th>

            @Html.DisplayNameFor(model => model.jianyi)

        </th>

        <th></th>

    </tr>

@foreach (var item in Model) {

    <tr>

        <td>

            @Html.DisplayFor(modelItem => item.pid)

        </td>

        <td>

            @Html.DisplayFor(modelItem => item.Name)

        </td>

        <td>

            @Html.DisplayFor(modelItem => item.faqiu)

        </td>

        <td>

            @Html.DisplayFor(modelItem => item.kouqiu)

        </td>

        <td>

            @Html.DisplayFor(modelItem => item.langwang)

        </td>

        <td>

            @Html.DisplayFor(modelItem => item.zhugong)

        </td>

        <td>

            @Html.DisplayFor(modelItem => item.youdian)

        </td>

        <td>

            @Html.DisplayFor(modelItem => item.shiwu)

        </td>

        <td>

            @Html.DisplayFor(modelItem => item.zongjie)

        </td>

        <td>

            @Html.DisplayFor(modelItem => item.jianyi)

        </td>

        <td>

            @Html.ActionLink("Edit", "Edit", new { id=item.ID }) |

            @Html.ActionLink("Details", "Details", new { id=item.ID }) |

            @Html.ActionLink("Delete", "Delete", new { id=item.ID })

        </td>

    </tr>

}

</table>

  <p class="three">@Html.ActionLink("返回主界面","Index","Home")</p>

        </div>

    </body>

</html>
添加功能设计如下:
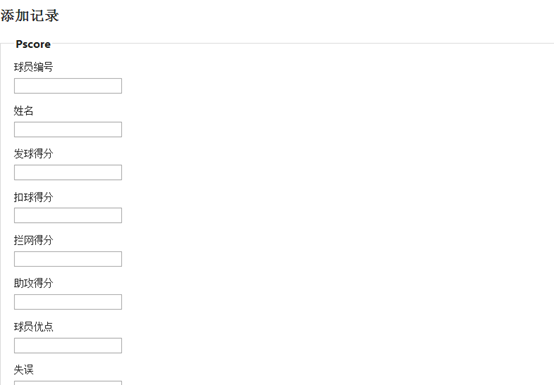
具体代码如下:
@model newApp.Models.Pscore

@{

    ViewBag.Title = "添加记录";

}

<h2>添加记录</h2>

@using (Html.BeginForm()) {

    @Html.ValidationSummary(true)

    <fieldset>

        <legend>Pscore</legend>

        <div class="editor-label">

            @Html.LabelFor(model => model.pid)

        </div>

        <div class="editor-field">

            @Html.EditorFor(model => model.pid)

            @Html.ValidationMessageFor(model => model.pid)

        </div>

        <div class="editor-label">

            @Html.LabelFor(model => model.Name)

        </div>

        <div class="editor-field">

            @Html.EditorFor(model => model.Name)

            @Html.ValidationMessageFor(model => model.Name)

        </div>

        <div class="editor-label">

            @Html.LabelFor(model => model.faqiu)

        </div>

        <div class="editor-field">

            @Html.EditorFor(model => model.faqiu)

            @Html.ValidationMessageFor(model => model.faqiu)

        </div>

        <div class="editor-label">

            @Html.LabelFor(model => model.kouqiu)

        </div>

        <div class="editor-field">

            @Html.EditorFor(model => model.kouqiu)

            @Html.ValidationMessageFor(model => model.kouqiu)

        </div>

        <div class="editor-label">

            @Html.LabelFor(model => model.langwang)

        </div>

        <div class="editor-field">

            @Html.EditorFor(model => model.langwang)

            @Html.ValidationMessageFor(model => model.langwang)

        </div>

        <div class="editor-label">

            @Html.LabelFor(model => model.zhugong)

        </div>

        <div class="editor-field">

            @Html.EditorFor(model => model.zhugong)

            @Html.ValidationMessageFor(model => model.zhugong)

        </div>

        <div class="editor-label">

            @Html.LabelFor(model => model.youdian)

        </div>

        <div class="editor-field">

            @Html.EditorFor(model => model.youdian)

            @Html.ValidationMessageFor(model => model.youdian)

        </div>

        <div class="editor-label">

            @Html.LabelFor(model => model.shiwu)

        </div>

        <div class="editor-field">

            @Html.EditorFor(model => model.shiwu)

            @Html.ValidationMessageFor(model => model.shiwu)

        </div>

        <div class="editor-label">

            @Html.LabelFor(model => model.zongjie)

        </div>

        <div class="editor-field">

            @Html.EditorFor(model => model.zongjie)

            @Html.ValidationMessageFor(model => model.zongjie)

        </div>

        <div class="editor-label">

            @Html.LabelFor(model => model.jianyi)

        </div>

        <div class="editor-field">

            @Html.EditorFor(model => model.jianyi)

            @Html.ValidationMessageFor(model => model.jianyi)

        </div>

        <p>

            <input type="submit" value="添加" />

        </p>

    </fieldset>

}

<div>

    @Html.ActionLink("返回功能主页面", "Index")

</div>

@section Scripts {

    @Scripts.Render("~/bundles/jqueryval")

}
编辑功能设计如下:
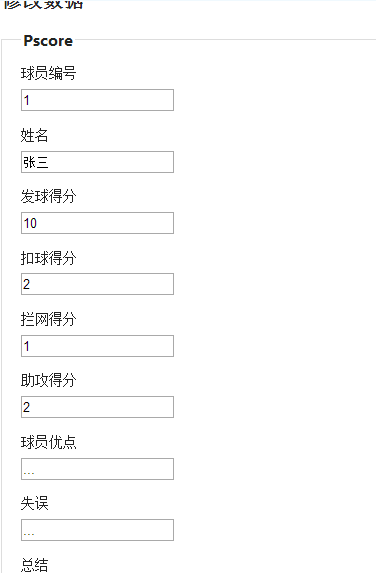
具体代码如下:
@model newApp.Models.Pscore

@{

    ViewBag.Title = "修改数据";

}

<h2>修改数据</h2>

@using (Html.BeginForm()) {

    @Html.ValidationSummary(true)

    <fieldset>

        <legend>Pscore</legend>

        @Html.HiddenFor(model => model.ID)

        <div class="editor-label">

            @Html.LabelFor(model => model.pid)

        </div>

        <div class="editor-field">

            @Html.EditorFor(model => model.pid)

            @Html.ValidationMessageFor(model => model.pid)

        </div>

        <div class="editor-label">

            @Html.LabelFor(model => model.Name)

        </div>

        <div class="editor-field">

            @Html.EditorFor(model => model.Name)

            @Html.ValidationMessageFor(model => model.Name)

        </div>

        <div class="editor-label">

            @Html.LabelFor(model => model.faqiu)

        </div>

        <div class="editor-field">

            @Html.EditorFor(model => model.faqiu)

            @Html.ValidationMessageFor(model => model.faqiu)

        </div>

        <div class="editor-label">

            @Html.LabelFor(model => model.kouqiu)

        </div>

        <div class="editor-field">

            @Html.EditorFor(model => model.kouqiu)

            @Html.ValidationMessageFor(model => model.kouqiu)

        </div>

        <div class="editor-label">

            @Html.LabelFor(model => model.langwang)

        </div>

        <div class="editor-field">

            @Html.EditorFor(model => model.langwang)

            @Html.ValidationMessageFor(model => model.langwang)

        </div>

        <div class="editor-label">

            @Html.LabelFor(model => model.zhugong)

        </div>

        <div class="editor-field">

            @Html.EditorFor(model => model.zhugong)

            @Html.ValidationMessageFor(model => model.zhugong)

        </div>

        <div class="editor-label">

            @Html.LabelFor(model => model.youdian)

        </div>

        <div class="editor-field">

            @Html.EditorFor(model => model.youdian)

            @Html.ValidationMessageFor(model => model.youdian)

        </div>

        <div class="editor-label">

            @Html.LabelFor(model => model.shiwu)

        </div>

        <div class="editor-field">

            @Html.EditorFor(model => model.shiwu)

            @Html.ValidationMessageFor(model => model.shiwu)

        </div>

        <div class="editor-label">

            @Html.LabelFor(model => model.zongjie)

        </div>

        <div class="editor-field">

            @Html.EditorFor(model => model.zongjie)

            @Html.ValidationMessageFor(model => model.zongjie)

        </div>

        <div class="editor-label">

            @Html.LabelFor(model => model.jianyi)

        </div>

        <div class="editor-field">

            @Html.EditorFor(model => model.jianyi)

            @Html.ValidationMessageFor(model => model.jianyi)

        </div>

        <p>

            <input type="submit" value="保存修改" />

        </p>

    </fieldset>

}

<div>

    @Html.ActionLink("返回功能主界面", "Index")

</div>

@section Scripts {

    @Scripts.Render("~/bundles/jqueryval")

}
删除设计如下:
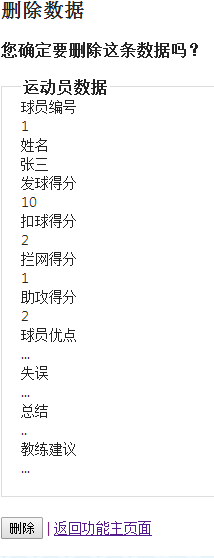
具体代码如下:
@model newApp.Models.Pscore

@{

    ViewBag.Title = "删除数据";

}

<h2>删除数据</h2>

<h3>您确定要删除这条数据吗?</h3>

<fieldset>

    <legend>运动员数据</legend>

    <div class="display-label">

         @Html.DisplayNameFor(model => model.pid)

    </div>

    <div class="display-field">

        @Html.DisplayFor(model => model.pid)

    </div>

    <div class="display-label">

         @Html.DisplayNameFor(model => model.Name)

    </div>

    <div class="display-field">

        @Html.DisplayFor(model => model.Name)

    </div>

    <div class="display-label">

         @Html.DisplayNameFor(model => model.faqiu)

    </div>

    <div class="display-field">

        @Html.DisplayFor(model => model.faqiu)

    </div>

    <div class="display-label">

         @Html.DisplayNameFor(model => model.kouqiu)

    </div>

    <div class="display-field">

        @Html.DisplayFor(model => model.kouqiu)

    </div>

    <div class="display-label">

         @Html.DisplayNameFor(model => model.langwang)

    </div>

    <div class="display-field">

        @Html.DisplayFor(model => model.langwang)

    </div>

    <div class="display-label">

         @Html.DisplayNameFor(model => model.zhugong)

    </div>

    <div class="display-field">

        @Html.DisplayFor(model => model.zhugong)

    </div>

    <div class="display-label">

         @Html.DisplayNameFor(model => model.youdian)

    </div>

    <div class="display-field">

        @Html.DisplayFor(model => model.youdian)

    </div>

    <div class="display-label">

         @Html.DisplayNameFor(model => model.shiwu)

    </div>

    <div class="display-field">

        @Html.DisplayFor(model => model.shiwu)

    </div>

    <div class="display-label">

         @Html.DisplayNameFor(model => model.zongjie)

    </div>

    <div class="display-field">

        @Html.DisplayFor(model => model.zongjie)

    </div>

    <div class="display-label">

         @Html.DisplayNameFor(model => model.jianyi)

    </div>

    <div class="display-field">

        @Html.DisplayFor(model => model.jianyi)

    </div>

</fieldset>

@using (Html.BeginForm()) {

    <p>

        <input type="submit" value="删除" /> |

        @Html.ActionLink("返回功能主页面", "Index")

    </p>

}
详细功能设计如下:

具体代码如下:
@model newApp.Models.Pscore

@{

    ViewBag.Title = "详细数据";

}

<h2>详细数据</h2>

<fieldset>

    <legend>运动员数据</legend>

    <div class="display-label">

         @Html.DisplayNameFor(model => model.pid)

    </div>

    <div class="display-field">

        @Html.DisplayFor(model => model.pid)

    </div>

    <div class="display-label">

         @Html.DisplayNameFor(model => model.Name)

    </div>

    <div class="display-field">

        @Html.DisplayFor(model => model.Name)

    </div>

    <div class="display-label">

         @Html.DisplayNameFor(model => model.faqiu)

    </div>

    <div class="display-field">

        @Html.DisplayFor(model => model.faqiu)

    </div>

    <div class="display-label">

         @Html.DisplayNameFor(model => model.kouqiu)

    </div>

    <div class="display-field">

        @Html.DisplayFor(model => model.kouqiu)

    </div>

    <div class="display-label">

         @Html.DisplayNameFor(model => model.langwang)

    </div>

    <div class="display-field">

        @Html.DisplayFor(model => model.langwang)

    </div>

    <div class="display-label">

         @Html.DisplayNameFor(model => model.zhugong)

    </div>

    <div class="display-field">

        @Html.DisplayFor(model => model.zhugong)

    </div>

    <div class="display-label">

         @Html.DisplayNameFor(model => model.youdian)

    </div>

    <div class="display-field">

        @Html.DisplayFor(model => model.youdian)

    </div>

    <div class="display-label">

         @Html.DisplayNameFor(model => model.shiwu)

    </div>

    <div class="display-field">

        @Html.DisplayFor(model => model.shiwu)

    </div>

    <div class="display-label">

         @Html.DisplayNameFor(model => model.zongjie)

    </div>

    <div class="display-field">

        @Html.DisplayFor(model => model.zongjie)

    </div>

    <div class="display-label">

         @Html.DisplayNameFor(model => model.jianyi)

    </div>

    <div class="display-field">

        @Html.DisplayFor(model => model.jianyi)

    </div>

</fieldset>

<p>

    @Html.ActionLink("编辑", "Edit", new { id=Model.ID }) |

    @Html.ActionLink("返回功能主页面", "Index")

</p>
到这里功能的视图全都设计与实现完毕,软件的功能也能够使用了,
使用者可以使用软件开始记录分数,简单实用。
软件的测试:
软件通过添加数据,删除数据,编辑数据,进行功能的测试。具体测试如下列组图:

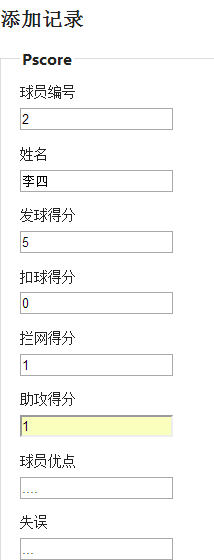
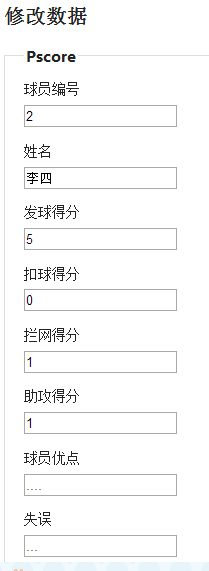


通过测试,软件的功能可以正常实用,而且使用起来相对简单,教练员通过此软件可以轻松
记录运动员的分数以及优缺点,软件虽然简单,但是挺实用。到这里软件的实现就算是全部完成了。
总结:
软件的此功能是通过面向对象的想法来实现的,软件的此功能是根据教练员的需要来设计的,
通过教练员的想法来实现软件的功能,这样软件才能使用起来方便快捷,用户体验效果才会更好,
软件的制作是通过使用EF框架来连接数据库,大大的节约了连接数库的时间,而且系统生成的视图,
可以为我们很好的提供了我们想要的数据,这样我们设计此软件需要花费的精力就不需要很多很多,
而且软件的代码,通读性相对来说较高,使用起来非常的方便。
此软件的制作只是假期的一个小练习,存在很多的问题,我会在以后的学习中,慢慢的把这些问题
解决,并慢慢的完善软件的功能,使软件的使用性更强,软件的功能更强大。到这里这篇博客算是完成了。
MVC实战之排球计分软件(深入了解面向对象编程)的更多相关文章
- MVC实战之排球计分(八)——软件制作总结
此系列博客目的是制作一款排球计分程序.这系列博客将讲述此软件的 各个功能的设计与实现.到这篇博客,此系列博客就算是结束了. 在最后的这篇博客里 我们来做一些总结. 一,制作此程序,我们使用的是MVC框 ...
- MVC实战之排球计分(七)——软件的具体实现与测试
在前面的几篇博客中咱们已经写过了软件的大概实现,在这篇博客中将讲述此软件的具体实现与测试. 1,新建一个项目,命名为:Volleyball,选择基本模板.如图: 点击确定.创建项目. 2,右键单击mo ...
- MVC实战之排球计分(五)—— Controller的设计与实现
控制器 控制器接受用户的输入并调用模型和视图去完成用户的需求.所以当单击Web页面中的超链接和发送HTML表单时, 控制器本身不输出任何东西和做任何处理.它只是接收请求并决定调用哪个模型构件去处理请求 ...
- MVC实战之排球计分(一)—— 需求分析与数据库设计
此系列博客目的是制作一款排球计分程序.这系列博客讲讲述此软件的 各个功能的设计与实现. 一.需求分析: 这个程序是排球计分程序,其业务非常简单,具体如下: 1.本程序可以选择用户身份,通过不同角度记录 ...
- MVC实战之排球计分(六)—— 使用EF框架,创建Controller,生成数据库。
在上篇博客我们写到,此软件的数据库连接我们使用的是EF框架,code first模式下, 通过模型类,在创建controller的时候直接生成数据库,完成数据库的连接,与操作. 在使用EF框架之前,我 ...
- MVC实战之排球计分(三)—— 模型类的设计与实现
此软件使用的数据库连接方式code first 由EF框架产生数据库. code first需要对模型类设计和实现.模型类是现实实体在计算机中的表示.它贯穿于整个架构, 负担着在各层次及模块间传递数据 ...
- MVC实战之排球计分(二)—— 构架概要设计
本程序主要基于MVC4框架,使应用程序的输入,处理和输出强制性分开,使得软件可维护性,可扩展性,灵活性以及封装性得到提高, MVC应用程序分为三个核心部件:Model,View, Controller ...
- MVC实战之排球计分(四)—— View设计与实现
(view)视图 视图是用户看到并与之交互的界面.对老式的Web应用程序来说,视图就是由HTML元素组成的界面,在新式的Web应用程序中,HTML依旧在视图中扮演着重要的角色,但一些新的技术已层出不穷 ...
- 总结/PSP初体验—排球计分程序1.0
要做一个排球计分程序,墨迹了很长时间才做出个的东西,过程很不爽: 功能:这个软件有两个页面,可以实现窗体A的部分变化控制窗体B的部分变化.A是操作人员使用看到的,B是投放给观众的,完全由A操控: 学到 ...
随机推荐
- caffe中的卷积
https://www.zhihu.com/question/28385679 如上,将三维的操作转换到二维上面去做,然后调用GEMM库进行矩阵间的运算得到最后结果. 两个矩阵相乘,需要中间的那个维度 ...
- vue2Leaflet使用 Vue2Leaflet-master 的demo
首先下载该demo 地址:https://github.com/KoRiGaN/Vue2Leaflet 下载后可以运行里面的例子,在examples文件夹内,该文件夹本身就是一个完整的项目 然后cmd ...
- DOM_xss预备知识
http://xuelinf.github.io/2016/05/18/%E7%BC%96%E7%A0%81%E4%B8%8E%E8%A7%A3%E7%A0%81-%E6%B5%8F%E8%A7%88 ...
- linux 创建用户和添加到组
1.添加用户 先用root用户登录 useradd -m testuser #这样的做会在/home下创建目录 2.指定shell #cat /etc/passwd #查看用户指定shell roo ...
- Lua C/C++互相调用
先来说下大致脚本引擎框架,此次采用如下,即运行C++代码启动程序,然后加载Lua脚本执行! 1.基础 Lua脚本中只能调用 int (*lua_CFunction) (lua_State *L) 这种 ...
- Java代码质量改进之:同步对象的选择
在Java中,让线程同步的一种方式是使用synchronized关键字,它可以被用来修饰一段代码块,如下: synchronized(被锁的同步对象) { // 代码块:业务代码 } 当synchro ...
- thymeleaf 添加语法提示
thymeleaf 添加语法提示: xmlns:th="http://www.thymeleaf.org"
- pjax转发
pjax几大特点: 1.异步(ajax) 2.地址栏改变路径 3.实现前进和后退back和forword 如何解决:地址变了之后,万一F5刷新的问题,主要是通过后台判断是否为pjax请求,是的话做个标 ...
- [autocomplete]如果条目末尾有空格,MustMatch不起作用
如果mustMatch被激活,我们发现,当条目最后包含一个空格时,一旦我们从列表中选择值,它将被拒绝.我们已经发现了这个问题,它在搜索事件中:在第184行,您修剪了输入的值: $.each(trimW ...
- easyUI 创建详情页dialog
使用easyui dialog先下载jQuery easyui 的压缩包 下载地址http://www.jeasyui.com/download/v155.php 解压后放在项目WebContent ...
