[转]【Angular4】基础(二):创建组件 Component
本文转自:https://blog.csdn.net/u013451157/article/details/79445138
创建一个组件很简单,比如我们创建一个 card 组件:
ng g c card- 1
这里我使用的是 Angular CLI 脚手架,当然你要是不觉得麻烦,也可以一个个文件建。
不过!要提醒一点,当使用 ng 创建时,会将创建的组件、服务这些自动添加到 app/app.module.ts 中,如果你是手动创建的话一定要记得在模块中写入你创建的。
现在来看下 app/card/card.component.ts :
import { Component, OnInit } from '@angular/core';

@Component({

    selector: 'app-card',

    templateUrl: './card.component.html',

    styleUrls: ['./card.component.scss']

})

export class CardComponent implements OnInit {

  constructor() { }

  ngOnInit() {}

}- 1
- 2
- 3
- 4
- 5
- 6
- 7
- 8
- 9
- 10
- 11
- 12
@Component() 是一个装饰器,唯一需要的参数是一个元数据对象。
参数说明:
- selector:组件选择器名称,一般采取横杠方式
- templateUrl:模板文件路径
styleUrls:样式文件路径
当然,如果你使用内联模板和内联样式的话,可以将templateUrl换为template,styleUrls换成stylestemplate:模板字符串
- styles:样式数组
export class CardComponent implements OnInit { } 是一个控制器
现在我们动手做一个小 demo
创建一个 demo-component 组件,用来放置实例
比如在 app/demo/demo-component.component.html 中直接使用:
<app-card></app-card>- 1
你可能会问为什么是 app-card,之前创建的不是 card 组件么?
这里需要看你的配置文件 .angular-cli.json,一般默认添加 app 的前缀 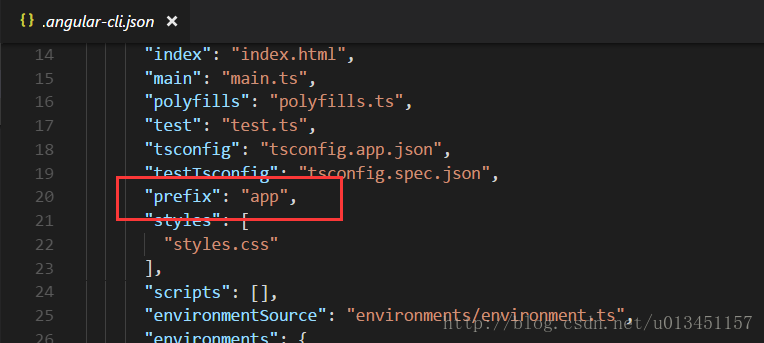
所以你创建的 card 组件的 selector 就变成了 app-card。 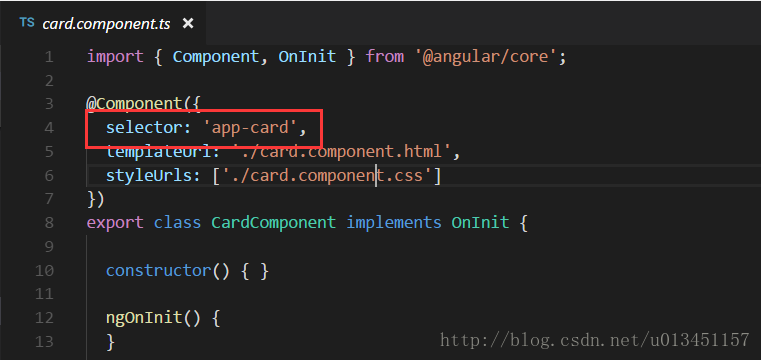
这时你启动项目后会发现页面中显示 card works!(当你用 ng 创建组件后都会自动在 template 中添加 “组件名 works!”)
若没有显示这预期的效果,就去检查下 app/app.component.html 中是否为
<app-demo-component></app-demo-component>- 1
这里暂停下来梳理下思路,
index.html 为整个应用的入口文件 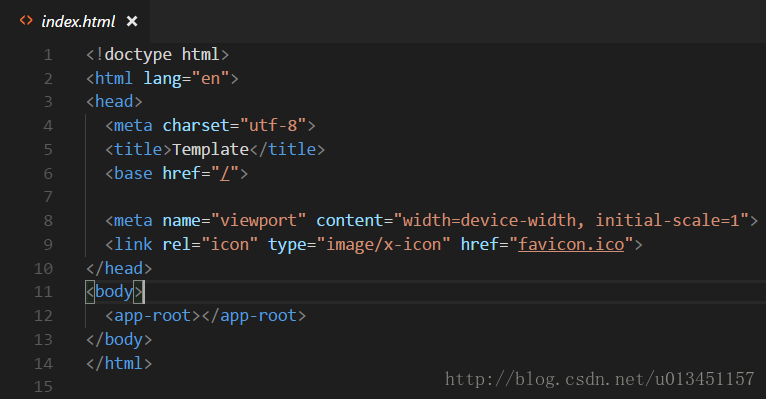
你会发现 body 中嵌入了 <app-root></app-root>
而这个组件也就是根组件 app.component.ts 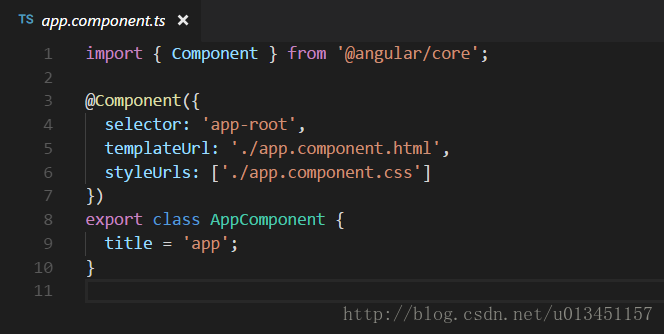
为了方便管理我们就将所有的实例都放置在 app.component.html 中,这里只有一个实例
<app-demo-component></app-demo-component>- 1
在 demo-component.html 中实例化的是一个 card 组件,内容为:
<app-card></app-card>- 1
好了!想着思路应该也梳理清楚了,那么思考下如何 动态嵌入内容 呢?
在 app/demo/demo-component.html 中修改如下:
<app-card>

    <h3>卡头</h3>

    我是卡的内容

</app-card>- 1
- 2
- 3
- 4
当打开页面时发现没有出现动态嵌入的内容?别慌~
// app/card/card.component.html

<ng-content></ng-content>- 1
- 2
- 3
上面的代码表示将组件内部的内容插入指定位置,ng-content 还有一个特别的属性,值可以是”element”, #id”, “.class”, “[name=value]”等CSS选择器,比如我们可以这样:
// card.component.html

<ng-content selector="h3"></ng-content>- 1
- 2
- 3
上面的代码意思是将包含h3的内容插入指定位置。
模板ts文件说明
import {BrowserModule} from '@angular/platform-browser';

import {NgModule} from '@angular/core';

import {AppComponent} from './app.component';

import {FormsModule} from '@angular/forms';

import {HttpModule} from '@angular/http';

@NgModule({

    declarations: [ // 声明在该模块中有哪些东西(组件、指令、管道)

        AppComponent

    ],

    imports: [ // 声明该模块需要正常运转时需要用到哪些模块(即:该模块依赖哪些其它模块)

        BrowserModule,

        FormsModule,

        HttpModule

    ],

    providers: [], // 声明模块中的服务

    bootstrap: [AppComponent] // 声明该模块的主组件

})

export class AppModule {

}- 1
- 2
- 3
- 4
- 5
- 6
- 7
- 8
- 9
- 10
- 11
- 12
- 13
- 14
- 15
- 16
- 17
- 18
- 19
- 20
- 21
关于 moduleId(Angular2 与 Angular4区别)
上述创建的组件是用 Angular4,默认配置了 moduleId。
这里主要说下 Angular2 中的 moduleId。
没有module.id:
@Component({

    selector: 'my-component',

    templateUrl: 'app/components/my.component.html', <- Starts from base path

    styleUrls:  ['app/components/my.component.css'] <- Starts from base path

})- 1
- 2
- 3
- 4
- 5
- 6
使用module.id:
tsconfig.json:

{

    "compilerOptions": {

        "module": "commonjs", <- need to change this if you want to use module.id property

...

@Component({

    moduleId: module.id,

    selector: 'my-component',

    templateUrl: 'my.component.html', <- relative to the components current path

    styleUrls:  ['my.component.css'] <- relative to the components current path

})
[转]【Angular4】基础(二):创建组件 Component的更多相关文章
- vue(基础二)_组件,过滤器,具名插槽
一.前言 主要包括: 1.组件(全局组件和局部组件) 2.父组件和子组件之间的通信(单层) 3.插槽和具名插槽 ...
- Android 基础 二 四大组件 Activity
Activity Intent IntentFilter 一理论概述 一. Activity 用来提供一个能让用户操作并与之交互的界面. 1.1 启动 startActivity(Intent int ...
- JavaScript 基础(二) - 创建 function 对象的方法, String对象, Array对象
创建 function 对象的两种方法: 方式一(推荐) function func1(){ alert(123); return 8 } var ret = func1() alert(ret) 方 ...
- MySQL 基础二 创建表格
1.界面创建 2.SQL创建 教程地址:http://blog.csdn.net/brucexia/article/details/53738596 提供学习视频下载 链接:http://pan.ba ...
- react 创建组件 (二)component
因为ES6对类和继承有语法级别的支持,所以用ES6创建组件的方式更加优雅,下面是示例: import React from 'react'; class Greeting extends React. ...
- Angular4.x 创建组件|绑定数据|绑定属性|数据循环|条件判断|事件|表单处理|双向数据绑定
Angular4.x 创建组件|绑定数据|绑定属性|数据循环|条件判断|事件|表单处理|双向数据绑定 创建 angular 组件 https://github.com/angular/angular- ...
- Angular4.x 安装|创建项目|目录结构|创建组件
Angular4.x 安装|创建项目|目录结构|创建组件 安装最新版本的 nodejs node.js 官网:https://nodejs.org/zh-cn/ 去官网下载 node.js,下一步下一 ...
- vue组件基础之创建与使用
一.创建组件 <script src="vue.js"></script> <!--引入vue.js文件--> <div id=" ...
- Angular4.0用命令行创建组件服务出错
之前使用cnpm创建的angular4.0项目,由于cnpm下载的node_modules资源经常会有部分缺失,所以在用命令行创建模板.服务的时候会报错: Error: ELOOP: too many ...
随机推荐
- MySQL安装及后续配置
rpm -qa | grep mysql 检查已安装的mysql版本 rpm -e --nodeps mysql-libs-5.1.71 卸载 tar -zxvf MySQL.tar.gz 解压 安 ...
- FastJSON基础
对象的类型 json文本 json数组 json对象 java对象 类型的转换 json文本 转 json对象 JSON.parseObject(str) json文本 ...
- tabel表格的dom操作
对table表格的操作比较麻烦,一直字符串的连接会比较麻烦 var nod = cwgk_msg_list.insertRow();//这个是上边获取过的dom元素,一般是tbody的元素,对元素进行 ...
- 51nod1683
代码参考:http://blog.csdn.net/sdfzyhx/article/details/74359927 //dp[i][j][k]表示到了第i列,最下边的点最短路为j,剩下的点之间的关系 ...
- ReSharper 10.0.0.2 Ultimate 破解
文件下载地址:http://pan.baidu.com/s/1gf7l8cF 1.安装ReSharper 10.0.0.2 Ultimate 2.修改Products.json文件的FilePath, ...
- Pycharm 开发 Django 项目
1. 安装Pycharm, 自行百度安装教程 2. 安装python3 自行百度安装教程 3. 安装Django框架 使用命令: Window的终端控制台输入:安装Django框架. pip inst ...
- Monkey测试简介【转载】
转载:https://www.xuebuyuan.com/3182523.html 一.Monkey测试简介 Monkey测试是Android平台自动化测试的一种手段,通过Monkey程序模拟用户触摸 ...
- Android RxJava zip 操作符
不说话,直接举例 // zip 2 observables Observable.zip(Observable.just(0), Observable.just(0), BiFunction { t1 ...
- Varnish实现Web站点加速
Varnish 是一款高性能的开源HTTP加速器,挪威最大的在线报纸 Verdens Gang使用3台Varnish代替了原来的12台Squid,性能比以前更好. Varnish 的作者Poul-He ...
- 构建一个Gods Eye Android应用程序:第1部分 – 收集已安装的Android应用程序
首先问候一下我的黑客伙伴们,在之前的Introduction to Amunet 教程中,我们了解到Amunet可能是一个间谍Android应用程序. 我不浪费太多时间因而直入主题. 在本教程中,我们 ...