python网络爬虫之requests库
Requests库是用Python编写的HTTP客户端。Requests库比urlopen更加方便。可以节约大量的中间处理过程,从而直接抓取网页数据。来看下具体的例子:
def request_function_try():

    headers={'User-Agent':'Mozilla/5.0 (Windows NT 10.0; WOW64; rv:44.0) Gecko/20100101 Firefox/44.0'}

    r=requests.get(url="http://www.baidu.com",headers=headers)

    print "status code:%s" % r.status_code

    print "headers:%s" % r.headers

    print "encoding:%s" % r.encoding

    print "cookies:%s" % r.cookies

    print "url:%s" % r.url

    print r.content.decode('utf-8').encode('mbcs')
直接用requests.get()方法进行http链接,其中输入参数url以及headers。返回值就是网页的response。从返回的response中可以得到状态吗,头信息。编码范式,cookie值,网页地址以及网页代码
E:\python2.7.11\python.exe E:/py_prj/test3.py
status code:200
headers:{'Content-Encoding': 'gzip', 'Transfer-Encoding': 'chunked', 'Set-Cookie': 'BDORZ=27315; max-age=86400; domain=.baidu.com; path=/', 'Server': 'bfe/1.0.8.18', 'Last-Modified': 'Mon, 23 Jan 2017 13:28:24 GMT', 'Connection': 'Keep-Alive', 'Pragma': 'no-cache', 'Cache-Control': 'private, no-cache, no-store, proxy-revalidate, no-transform', 'Date': 'Sun, 17 Sep 2017 02:53:11 GMT', 'Content-Type': 'text/html'}
encoding:ISO-8859-1
cookies:{'.baidu.com': {'/': {'BDORZ': Cookie(version=0, name='BDORZ', value='27315', port=None, port_specified=False, domain='.baidu.com', domain_specified=True, domain_initial_dot=True, path='/', path_specified=True, secure=False, expires=1505702637, discard=False, comment=None, comment_url=None, rest={}, rfc2109=False)}}}
url:http://www.baidu.com/
注意在获取网页代码的时候,由于有中文,在python2中直接打印会有问题。因此需要先解码然后编码。在这里编码的方式为mbcs。具体的编码方式可以通过如下的方式获取到。
sys.setdefaultencoding('utf-8')

type = sys.getfilesystemencoding()
requests中也有一个内置的json解码器,可以帮助解析得到的json数据
r=requests.get('https://github.com/timeline.json')

print r.json()
E:\python2.7.11\python.exe E:/py_prj/test3.py
{u'documentation_url': u'https://developer.github.com/v3/activity/events/#list-public-events', u'message': u'Hello there, wayfaring stranger. If you\u2019re reading this then you probably didn\u2019t see our blog post a couple of years back announcing that this API would go away: http://git.io/17AROg Fear not, you should be able to get what you need from the shiny new Events API instead.'}
如果想要传递数据,如何处理呢。在这里我们以百度搜索为例。在输入框中输入python,然后得到返回的结果。
def request_function_try1():

    reload(sys)

    sys.setdefaultencoding('utf-8')

    type = sys.getfilesystemencoding()

    print type

    headers={'User-Agent':'Mozilla/5.0 (Windows NT 10.0; WOW64; rv:44.0) Gecko/20100101 Firefox/44.0'}

    payload={'wd':'python'}

    r=requests.get(url="http://www.baidu.com/s",params=payload,headers=headers)

    print r.status_code

    print r.content.decode('utf-8').encode(type)

    fp = open('search2.html', 'w')

    for line in r.content:

        fp.write(line)

    fp.close()
这里为什么网址要用到http://www.baidu.com/s呢。我们从网页上来看下。在输入框中输入了python之后,网页其实跳转到了https://www.baidu.com/s的界面。后面跟的wd=python等都是输入的数据

执行结果如下:
status code:200
headers:{'Strict-Transport-Security': 'max-age=172800', 'Bdqid': '0xeb453e0b0000947a', 'Content-Encoding': 'gzip', 'Transfer-Encoding': 'chunked', 'Set-Cookie': 'BDSVRTM=0; path=/, BD_HOME=0; path=/, H_PS_PSSID=1421_21078_17001_24394; path=/; domain=.baidu.com', 'Expires': 'Sun, 17 Sep 2017 02:56:13 GMT', 'Bduserid': '0', 'X-Powered-By': 'HPHP', 'Server': 'BWS/1.1', 'Connection': 'Keep-Alive', 'Cxy_all': 'baidu+2455763ad13223918d1e7f7431d4d18e', 'Cache-Control': 'private', 'Date': 'Sun, 17 Sep 2017 02:56:43 GMT', 'Vary': 'Accept-Encoding', 'Content-Type': 'text/html; charset=utf-8', 'Bdpagetype': '1', 'X-Ua-Compatible': 'IE=Edge,chrome=1'}
encoding:utf-8
cookies:<RequestsCookieJar[<Cookie H_PS_PSSID=1421_21078_17001_24394 for .baidu.com/>, <Cookie BDSVRTM=0 for www.baidu.com/>, <Cookie BD_HOME=0 for www.baidu.com/>]>
url:https://www.baidu.com/
如果我们访问的网站返回的状态码不是200.这个时候requests库也有异常处理的方式就是raise_for_status.当返回为非200响应的时候抛出异常
url='http://www.baidubaidu.com/'

try:

    r=requests.get(url)

    r.raise_for_status()

except requests.RequestException as e:

    print e
执行结果如下,在异常中会返回具体的错误码信息。
E:\python2.7.11\python.exe E:/py_prj/test3.py
409 Client Error: Conflict for url: http://www.baidubaidu.com/
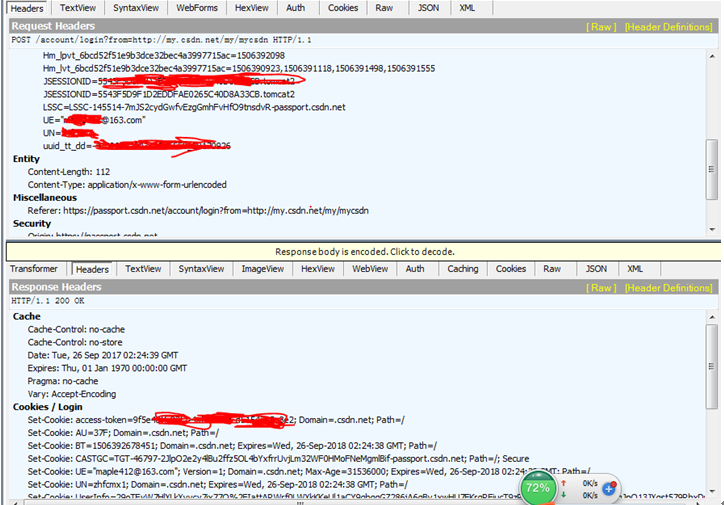
我们再来看下如何模拟访问一个HTTPS网站。我们以CSDN网站为例。要想模拟登陆,首先要采集网页数据进行分析,这里用Fidder来采集。
(一)分析网页跳转,首先是登陆界面,网址是https://passport.csdn.net/account/login?from=http://my.csdn.net/my/mycsdn。 然后是自动跳转到my.csdn.net

(二)分析网页递交的数据。在右侧界面会出现网页实际递交的数据。上面的框是发送的头信息。下面是服务器返回数据的头信息。我们通过上面的数据来构造我们发送的头信息
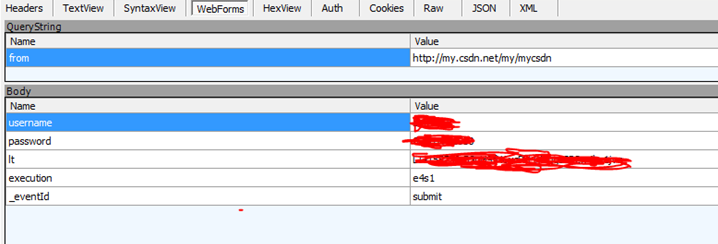
(三)从上面第三步我们看到递交数据的方式是POST。那么我们需要看下POST的数据有哪些。点击webForms可以看到上传的数据,其中有username,password,lt,execution,_eventId等字段。我们将这些字段存取下来便于在代码中构造。
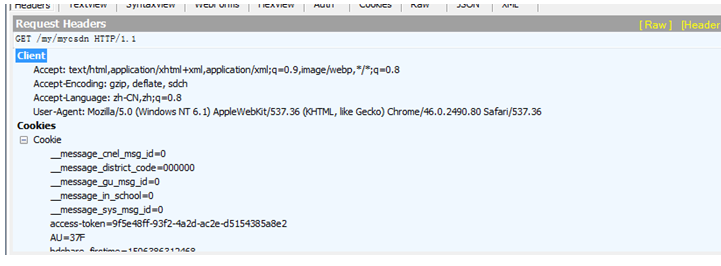
(四)最后一步就是查看跳转到mycsdn界面的数据,这一步是采用get的方法,只发送了头信息。因此只需要构造头信息就可以了。
数据流分析完了,下面就可以开始来构造代码了:
首先是构造头信息,最重要的是User-Agent,如果没有设置的话,会被网站给禁掉
headers={'host':'passport.csdn.net','User-Agent':'Mozilla/5.0 (Windows NT 6.1) AppleWebKit/537.36 (KHTML, like Gecko) Chrome/46.0.2490.80 Safari/537.36'}

headers1={'User-Agent':'Mozilla/5.0 (Windows NT 6.1) AppleWebKit/537.36 (KHTML, like Gecko) Chrome/46.0.2490.80 Safari/537.36'}
然后就是构造头信息中的cookie值
cookie={'JSESSIONID':'5543aaaaaaaaaaaaaaaabbbbbB.tomcat2',

        'uuid_tt_dd':'-411111111111119_20170926','JSESSIONID':'2222222222222220265C40D8A33CB.tomcat2',

        'UN':'XXXXX','UE':'xxxxx@163.com','BT':'334343481','LSSC':'LSSC-145514-7aaaaaaaaaaazgGmhFvHfO9taaaaaaaR-passport.csdn.net',

        'Hm_lvt_6bcd52f51bbbbbb2bec4a3997715ac':'15044213,150656493,15064444445,1534488843','Hm_lpvt_6bcd52f51bbbbbbbe32bec4a3997715ac':'1506388843',

        'dc_tos':'oabckz','dc_session_id':'15063aaaa027_0.7098840409889817','__message_sys_msg_id':'0','__message_gu_msg_id':'0','__message_cnel_msg_id':'0','__message_district_code':'000000','__message_in_school':'0'}
然后设置url以及post的data

url='https://passport.csdn.net/account/login?from=http://my.csdn.net/my/mycsdn'

data={'username':'xxxx','password':'xxxxx','lt':'LT-1522220-BSnH9fN6ycbbbbbqgsSP2waaa1jvq','execution':'e4ab','_eventId':'submit'}
开始准备链接,这里用Session是为了保持后面的链接都是用的同一个回话,比如cookie值等
r=requests.Session()

r.post(url=url,headers=headers,cookies=cookie,data=data)
在这一步报错了,返回如下结果提示certificate verify failed
File "E:\python2.7.11\lib\site-packages\requests\adapters.py", line 506, in send
raise SSLError(e, request=request)
requests.exceptions.SSLError: HTTPSConnectionPool(host='passport.csdn.net', port=443): Max retries exceeded with url: /account/login?from=http://my.csdn.net/my/mycsdn (Caused by SSLError(SSLError(1, u'[SSL: CERTIFICATE_VERIFY_FAILED] certificate verify failed (_ssl.c:590)'),))
这个错误的原因在于Python 2.7.9 之后引入了一个新特性,当你urllib.urlopen一个 https 的时候会验证一次 SSL 证书

当目标使用的是自签名的证书时就会爆出一个 urllib2.URLError: <urlopen error [SSL: CERTIFICATE_VERIFY_FAILED] certificate verify failed (_ssl.c:581)> 的错误消息
要解决这个问题PEP-0476文档这样说的:
For users who wish to opt out of certificate verification on a single connection, they can achieve this by providing the contextargument to urllib.urlopen
就是说你可以禁掉这个证书的要求,urllib来说有两种方式,一种是urllib.urlopen()有一个参数context,把他设成ssl._create_unverified_context
import ssl
context = ssl._create_unverified_context()

urllib.urlopen("https://no-valid-cert", context=context)
但其实在requests中,有一个verify的参数,把它设成False就可以了
r.post(url=url,headers=headers,cookies=cookie,data=data,verify=False)
接下来访问mycsdn的地址。这样就成功的登录csdn网站了
s=r.get('http://my.csdn.net/my/mycsdn',headers=headers1)

print s.status_code

print s.content.decode('utf-8').encode(type)
python网络爬虫之requests库的更多相关文章
- python网络爬虫之requests库 二
前面一篇在介绍request登录CSDN网站的时候,是采用的固定cookie的方式,也就是先通过抓包的方式得到cookie值,然后将cookie值加在发送的数据包中发送到服务器进行认证. 就好比获取如 ...
- 04.Python网络爬虫之requests模块(1)
引入 Requests 唯一的一个非转基因的 Python HTTP 库,人类可以安全享用. 警告:非专业使用其他 HTTP 库会导致危险的副作用,包括:安全缺陷症.冗余代码症.重新发明轮子症.啃文档 ...
- Python网络爬虫之requests模块(1)
引入 Requests 唯一的一个非转基因的 Python HTTP 库,人类可以安全享用. 警告:非专业使用其他 HTTP 库会导致危险的副作用,包括:安全缺陷症.冗余代码症.重新发明轮子症.啃文档 ...
- Python 网络爬虫的常用库汇总
爬虫的编程语言有不少,但 Python 绝对是其中的主流之一.下面就为大家介绍下 Python 在编写网络爬虫常常用到的一些库. 请求库:实现 HTTP 请求操作 urllib:一系列用于操作URL的 ...
- 06.Python网络爬虫之requests模块(2)
今日内容 session处理cookie proxies参数设置请求代理ip 基于线程池的数据爬取 知识点回顾 xpath的解析流程 bs4的解析流程 常用xpath表达式 常用bs4解析方法 引入 ...
- Python网络爬虫之requests模块(2)
session处理cookie proxies参数设置请求代理ip 基于线程池的数据爬取 xpath的解析流程 bs4的解析流程 常用xpath表达式 常用bs4解析方法 引入 有些时候,我们在使用爬 ...
- Python网络爬虫之requests模块
今日内容 session处理cookie proxies参数设置请求代理ip 基于线程池的数据爬取 知识点回顾 xpath的解析流程 bs4的解析流程 常用xpath表达式 常用bs4解析方法 引入 ...
- 04,Python网络爬虫之requests模块(1)
引入 Requests 唯一的一个非转基因的 Python HTTP 库,人类可以安全享用. 警告:非专业使用其他 HTTP 库会导致危险的副作用,包括:安全缺陷症.冗余代码症.重新发明轮子症.啃文档 ...
- 【python网络爬虫】之requests相关模块
python网络爬虫的学习第一步 [python网络爬虫]之0 爬虫与反扒 [python网络爬虫]之一 简单介绍 [python网络爬虫]之二 python uillib库 [python网络爬虫] ...
随机推荐
- BZOJ 3943 [Usaco2015 Feb]SuperBull:最大生成树
题目链接:http://www.lydsy.com/JudgeOnline/problem.php?id=3943 题意: 有n只队伍,每个队伍有一个编号a[i]. 每场比赛有两支队伍参加,然后选一支 ...
- python习题-注册用户程序
把上周的注册程序改一下,用字典保存# 字典格式如下:# {# "niuhanyang":{"passwd":"123456","r ...
- bzoj 3572: [Hnoi2014]世界树 虚树
题目: Description 世界树是一棵无比巨大的树,它伸出的枝干构成了整个世界.在这里,生存着各种各样的种族和生灵,他们共同信奉着绝对公正公平的女神艾莉森,在他们的信条里,公平是使世界树能够生生 ...
- C#中如何获取一个二维数组的两维长度,即行数和列数?以及多维数组各个维度的长度?
如何获取二维数组中的元素个数呢? int[,] array = new int[,] {{1,2,3},{4,5,6},{7,8,9}};//定义一个3行3列的二维数组int row = array. ...
- 浏览器全屏的JS代码实现
方法一:该方法是从一个网上的效果看到不错,然后自己就拿来下来实验了一下,还是比较满意度,下面直接给出代码 <!DOCTYPE HTML> <html lang="en-US ...
- 查找图像中椭圆轮廓的快速随机hough变换
查找图像中椭圆轮廓的快速随机hough变换 图像中椭圆轮廓的查找在视频监控等领域有着广泛的应用,经典hough变换给我们提供了一种查找各种图形轮廓的方法,特别是在直线查找方面具有非常高的精确度.但是由 ...
- Azure上部署FTP服务
FTP是个比较复杂的协议,其协议分为控制层和数据层,工作模式分为主动和被动两种模式. 在默认的Active模式下其工作原理如下: 可以看到,客户端发起FTP的请求道服务器端,FTP的端口是21.用户在 ...
- java内存模型(netty权威指南)
1.Java内存模型 Java虚拟机规范中试图定义一种java内存模型(java Memory Model,jmm)来屏蔽掉各种操作系统.虚拟机实现厂商和硬件的内存访问差异,以确保Java程序在所有操 ...
- Linux如何打开执行脚本
命令行下例如要打开startmysql.sh就直接 sh /目录/目录当前界面下就简单了在这个SH文件目录下打开终端 输入 sh startmysql.sh 回车或者对这个文件右键 打开 选择“在终端 ...
- JAVA基础知识(12)-----同步
好处:解决了线程安全问题.弊端:相对降低性能,因为判断锁需要消耗资源,产生了死锁.定义同步是有前提的:1,必须要有两个或者两个以上的线程,才需要同步.2,多个线程必须保证使用的是同一个锁. 同步的第二 ...