[转帖]Shell~echo -e 颜色输出
https://www.cnblogs.com/ElegantSmile/p/11144879.html
echo -e 可以控制字体颜色和背景颜色输出
从一个例子开始:
# echo -e "\e[1;33;41m test content \e[0m"
输出效果:

1. \e 转义起始符,定义一个转义序列, 可以使用 \033代替

2. [ 表示开始定义颜色

3. 1表示高亮,33表示字体颜色为黄色,45表示背景色为红色

4. “test content” 属于文字内容

5. m 转义终止符,表示颜色定义完毕

6. 再次使用 \e[ ,表示再次开启颜色定义,0表示使用默认的颜色,m表示颜色定义结束,所以 \e[0m 的作用是恢复之前的配色方案
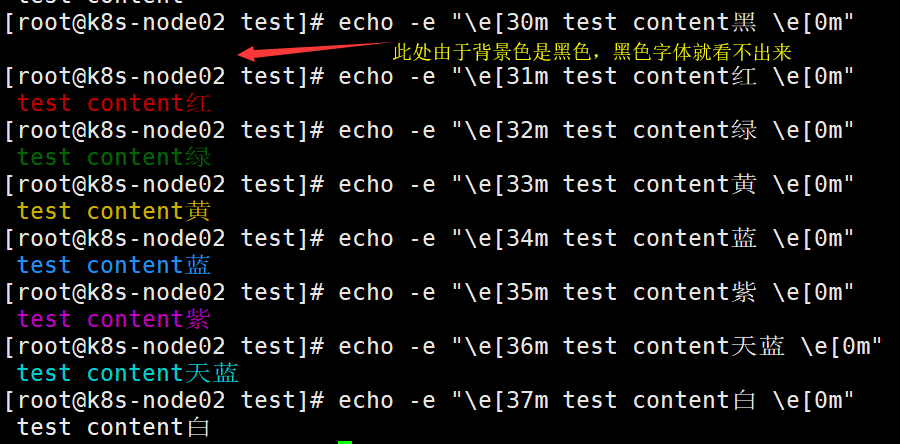
一、字体颜色
字体颜色:30——37
默认=0,黑色=30,红色=31,绿色=32,黄色=33,蓝色=34,紫色=35,天蓝色=36,白色=3
[root@k8s-node02 test]# echo -e "\e[30m test content黑 \e[0m"

 test content黑

[root@k8s-node02 test]# echo -e "\e[31m test content红 \e[0m"

 test content红

[root@k8s-node02 test]# echo -e "\e[32m test content绿 \e[0m"

 test content绿

[root@k8s-node02 test]# echo -e "\e[33m test content黄 \e[0m"

 test content黄

[root@k8s-node02 test]# echo -e "\e[34m test content蓝 \e[0m"

 test content蓝

[root@k8s-node02 test]# echo -e "\e[35m test content紫 \e[0m"

 test content紫

[root@k8s-node02 test]# echo -e "\e[36m test content天蓝 \e[0m"

 test content天蓝

[root@k8s-node02 test]# echo -e "\e[37m test content白 \e[0m"

 test content白
输出效果:
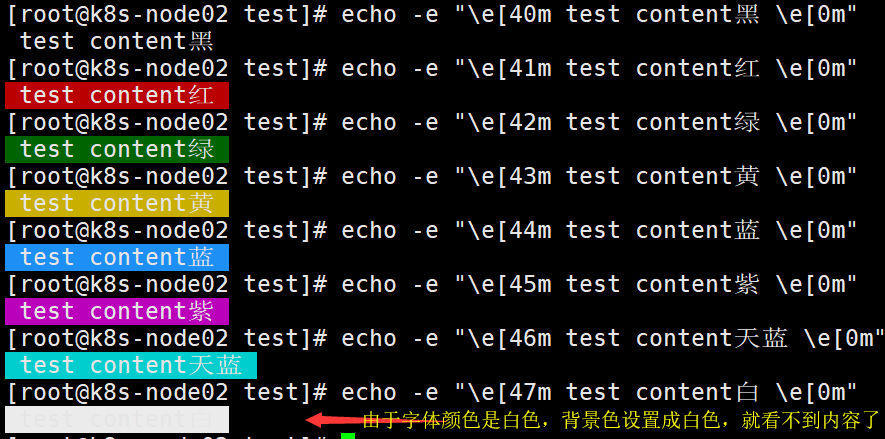
二、字背景颜色
字背景颜色:40——47
默认=0,黑色=40,红色=41,绿色=42,黄色=43,蓝色=44,紫色=45,天蓝色=46,白色=47
[root@k8s-node02 test]# echo -e "\e[40m test content黑 \e[0m"

 test content黑

[root@k8s-node02 test]# echo -e "\e[41m test content红 \e[0m"

 test content红

[root@k8s-node02 test]# echo -e "\e[42m test content绿 \e[0m"

 test content绿

[root@k8s-node02 test]# echo -e "\e[43m test content黄 \e[0m"

 test content黄

[root@k8s-node02 test]# echo -e "\e[44m test content蓝 \e[0m"

 test content蓝

[root@k8s-node02 test]# echo -e "\e[45m test content紫 \e[0m"

 test content紫

[root@k8s-node02 test]# echo -e "\e[46m test content天蓝 \e[0m"

 test content天蓝

[root@k8s-node02 test]# echo -e "\e[47m test content白 \e[0m"

 test content白
输出效果:
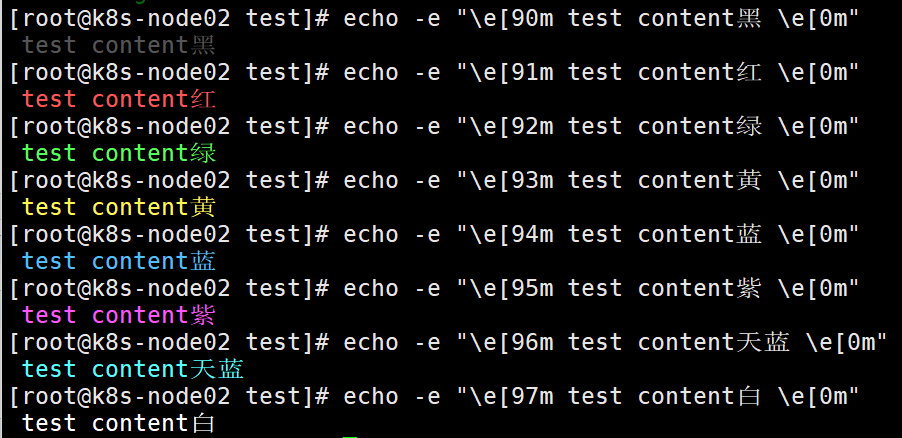
三、黑底彩色
黑底彩色:90——97
黑=90 深红=91 绿=92 黄色=93 蓝色=94 紫色=95 深绿=96 白色=97
[root@k8s-node02 test]# echo -e "\e[90m test content黑 \e[0m"

 test content黑

[root@k8s-node02 test]# echo -e "\e[91m test content红 \e[0m"

 test content红

[root@k8s-node02 test]# echo -e "\e[92m test content绿 \e[0m"

 test content绿

[root@k8s-node02 test]# echo -e "\e[93m test content黄 \e[0m"

 test content黄

[root@k8s-node02 test]# echo -e "\e[94m test content蓝 \e[0m"

 test content蓝

[root@k8s-node02 test]# echo -e "\e[95m test content紫 \e[0m"

 test content紫

[root@k8s-node02 test]# echo -e "\e[96m test content天蓝 \e[0m"

 test content天蓝

[root@k8s-node02 test]# echo -e "\e[97m test content白 \e[0m"

 test content白
输出结果:
四、字体控制选项:
\033[0m 关闭所有属性
\033[1m 设置高亮度
\033[4m 下划线
\033[5m 闪烁
\033[7m 反显,撞色显示,显示为白色黑底,或者显示为黑底白字
\033[8m 消影,字符颜色将会与背景颜色相同
\033[nA 光标上移n行
\033[nB 光标下移n行
\033[nC 光标右移n行
\033[nD 光标左移n行
\033[y;xH 设置光标位置
\033[2J 清屏
\033[K 清除从光标到行尾的内容
\033[s 保存光标位置
\033[u 恢复光标位置
\033[?25l 隐藏光标
\033[?25h 显示光标
五、实例演示
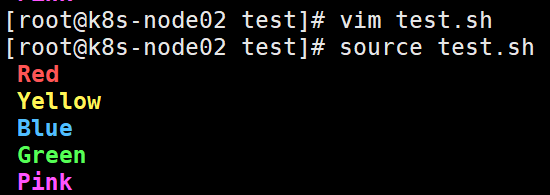
1.示例1:定义颜色变量
# vim color_test1.sh
#!/bin/bash

# 定义颜色变量,\033、\e、\E是等价的,都是转义起始符

RED='\e[1;31m'  # 红

GREEN='\e[1;32m'  # 绿

YELLOW='\033[1;33m'  # 黄

BLUE='\E[1;34m'  # 蓝

PINK='\E[1;35m'  # 粉红

RES='\033[0m'  # 清除颜色

echo -e "${RED} Red ${RES}"

echo -e "${YELLOW} Yellow ${RES}"

echo -e "${BLUE} Blue ${RES}"

echo -e "${GREEN} Green ${RES}"

echo -e "${PINK} Pink ${RES}"
# source color_test1.sh
2.示例2:定义颜色动作
# vim color_test2.sh
#!/bin/bash

# 定义颜色动作

SETCOLOR_SUCCESS="echo -en \\E[1;32m"

SETCOLOR_FAILURE="echo -en \\E[1;31m"

SETCOLOR_WARNING="echo -en \\E[1;33m"

SETCOLOR_NORMAL="echo -en  \\E[0;39m"

# 使用时直接调用颜色动作,跟上相应的内容

$SETCOLOR_SUCCESS && echo test1

$SETCOLOR_FAILURE && echo test2

$SETCOLOR_WARNING && echo test3

$SETCOLOR_NORMAL  && echo test4
需要注意其中的一些细节:
(1)需要增加-n选项,这样引用时不会出现换行的问题。

(2)\\本质是\,在双引号中反斜线符号一定要写成\\。

(3)引用变量要放到其他语句前面,并使用&&连接。
# source color_test2.sh

六、tput命令
tput 命令会利用 terminfo 数据库中的信息,来控制和更改我们的终端,比如控制光标、更改文本属性、控制屏幕,以及为文本涂色。
其中,为文本涂色的方法是:
1 tput setab:用于设置背景色

2 tput setaf:用于设置前景色

3 sgr0:表示颜色重置
颜色定义如下:

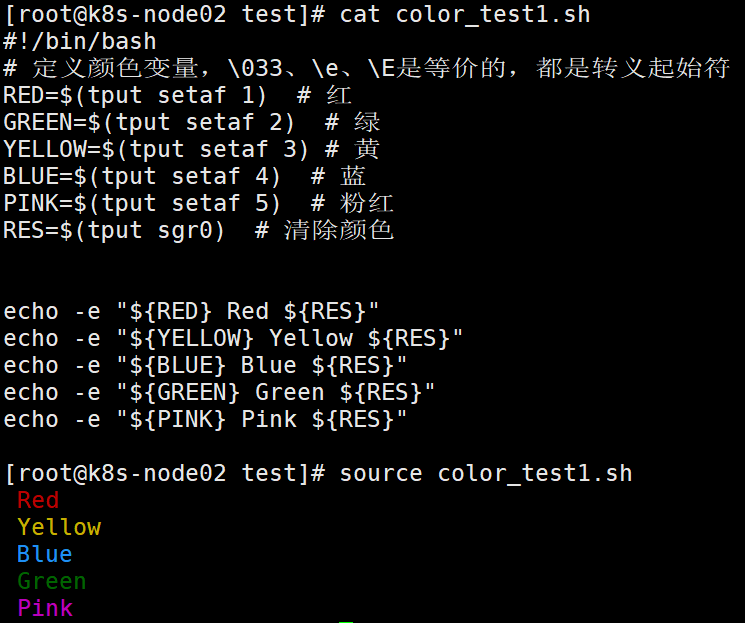
改写 实例演示中的 color_test1.sh
#!/bin/bash

# 定义颜色变量,\033、\e、\E是等价的,都是转义起始符

RED=$(tput setaf 1)  # 红

GREEN=$(tput setaf 2)  # 绿

YELLOW=$(tput setaf 3) # 黄

BLUE=$(tput setaf 4)  # 蓝

PINK=$(tput setaf 5)  # 粉红

RES=$(tput sgr0)  # 清除颜色

echo -e "${RED} Red ${RES}"

echo -e "${YELLOW} Yellow ${RES}"

echo -e "${BLUE} Blue ${RES}"

echo -e "${GREEN} Green ${RES}"

echo -e "${PINK} Pink ${RES}"
# source color_test1.sh
[转帖]Shell~echo -e 颜色输出的更多相关文章
- Shell~echo -e 颜色输出
echo -e 可以控制字体颜色和背景颜色输出 从一个例子开始: # echo -e "\e[1;33;41m test content \e[0m" 输出效果: . \e 转义起 ...
- shell实现带颜色输出的进度条
1.基础版 #!/bin/bash b='' ;$i<=;i+=)) do printf "执行进度 :[%-50s]%d%%\r" $b $i sleep 0.001 b= ...
- 【Shell】带颜色输出(白底x色)
echo -e "\033[31mHello World.\033[0m" 红色31m 绿色32m 黄色33m 蓝色34m 黑色30m 白色37m 紫色35m 深绿色36m
- 让shell脚本中的echo输出带颜色
转载自:http://www.linuxidc.com/Linux/2014-12/110463.htm 让echo输出带颜色的方法有两种 1.在shell脚本中定义颜色变量,使用echo -e调用变 ...
- shell脚本颜色输出(实例未编辑)
颜色输出通过echo 输出,需要加-e echo -e "\033[背景颜色;字体颜色\033[0m" 背景颜色 40 设置黑色背景 41 设置红色背景 42 设置绿色背景 43 ...
- Linux终端和win32控制台文本颜色输出
在使用putty.secureCRT.XShell等终端仿真器连接linux系统时,ls.vim等工具的输出都含有各种颜色,这些颜色的输出大大地增强了文本的可读性. 通常我们可以使用echo命令加-e ...
- shell 终端字符颜色
终端的字符颜色是用转义序列控制的,是文本模式下的系统显示功能,和具体的语言无关,shell,python,perl等均可以调用. 转义序列是以 ESC 开头,可以用 \033 完成相同的工作(ESC ...
- (转)shell脚本输出带颜色字体
shell脚本输出带颜色字体 原文:http://blog.csdn.net/andylauren/article/details/60873400 输出特效格式控制:\033[0m 关闭所有属性 ...
- jenkins调用shell脚本 输出带颜色字体
jenkins需要安装AnsiColor插件在构建环境项选择“color ansi console output” 安装插件AnsiColor shell 脚本相关颜色设置 echo -e " ...
- shell单引号中输出参数值
因为在shell的单引号中,所有的特殊字符和变量都会变成文本,那么如果需要在字符串中输出变量值怎么办呢? 这里记录以下两种方法: 使用双引号 shell> X='parameter' shell ...
随机推荐
- 华为云CodeArts Req需求管理工具,7大特性限时免费体验
摘要:一图了解什么是华为云CodeArts Req 本文分享自华为云社区<华为云CodeArts Req需求管理工具,7大特性限时免费体验>,作者:华为云PaaS服务小智. 一图了解什么是 ...
- 如何快速上手 angular.js
摘要:angular.js 准确的来说,应该不是一个框架,是一个 js 库,一个依赖于 jQuery 的进一步封装,去除繁琐的 DOM 操作,使用数据驱动的 MVC 模块化库. 哎,很难受,连续两个大 ...
- 带你读AI论文丨用于细粒度分类的Transformer结构—TransFG
摘要:本文解读了<TransFG: A Transformer Architecture for Fine-grained Recognition>,该论文针对细粒度分类任务,提出了对应的 ...
- 在Spark Scala/Java应用中调用Python脚本,会么?
摘要:本文将介绍如何在 Spark scala 程序中调用 Python 脚本,Spark java程序调用的过程也大体相同. 本文分享自华为云社区<[Spark]如何在Spark Scala/ ...
- Mapper that could not be found
现象1 mapper 资源扫不到 resources 建的是 目录 ,不是 package 所以如果直接 a.b 的方式创建,会扫描不到 mapper.xml 文件 现象2 缺少配置文件 HisDru ...
- SpringBoot 接口并发限制(Semaphore)
可以使用 JMeter 辅助测试 https://blog.csdn.net/weixin_45014379/article/details/124190381 @RestController @Re ...
- xTestRunner
高颜值测试报告-xTestRunner pip install XTestRunner # test_unit.py import unittest from XTestRunner import H ...
- 深入了解 ReadDirectoryChangesW 并应用其监控文件目录
简介 监视指定目录的更改,并将有关更改的信息打印到控制台,该功能的实现不仅可以在内核层,在应用层同样可以.程序中使用 ReadDirectoryChangesW 函数来监视目录中的更改,并使用 FIL ...
- 【计算机网络】soap和rest简单比较整理
https://www.bilibili.com/video/BV1ht411U7fC/?spm_id_from=333.337.search-card.all.click&vd_source ...
- 机器学习 | 剖析感知器算法 & Python实现
前言:本系列博客参考于 <机器学习算法导论>和<Python机器学习> 如有侵权,敬请谅解.本书尽量用总结性的语言重述本书内容,避免侵权. 上一篇已经初步介绍了机器学习相关知识 ...