简单研究Android View绘制一 测量过程
2015-07-27 16:52:58
一、如何通过继承ViewGroup来实现自定义View?首先得搞清楚Android时如何绘制View的,参考Android官方文档:How Android Draws Views
以下翻译摘自:http://blog.csdn.net/linghu_java/article/details/23882681,这也是一片好文章,推荐大家看看~
When an Activity receives focus, it will be requested to draw its layout. The Android framework will handle the procedure for drawing, but the Activity must provide the root node of its layout hierarchy.
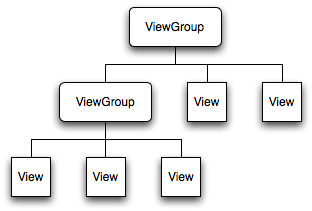
当一个Activity获取焦点的时候,它就会被要求去画出它的布局。Android框架会处理绘画过程,但是Activity必须提供布局的根节点,在上面的图中,我们可以理解为最上面的ViewGroup,而实际上还有一个更深的root view。
Drawing begins with the root node of the layout. It is requested to measure and draw the layout tree. Drawing is handled by walking the tree and rendering each View that intersects the invalid region. In turn, each View group is responsible for requesting each of its children to be drawn (with the draw() method) and each View is responsible for drawing itself. Because the tree is traversed in-order, this means that parents will be drawn before (i.e., behind) their children, with siblings drawn in the order they appear in the tree.
绘画开始于布局的根节点,要求测量并且画出整个布局树。绘画通过遍历整个树来完成,不可见的区域的View被放弃。每个ViewGroup负责要求它的子View去绘画,每个子View则负责去绘画自己。因为布局树是顺序遍历的,这意味着父View在子View之前被画出来(这个符合常理,后面解释)。
注解:假设一个TextView设置为(FILL_PAREMT, FILL_PARENT),则很明显必须先画出父View的尺寸,才能去画出这个TextView,而且从上至下也就是先画父View再画子View,显示的时候才正常,否则父View会挡住子View的显示。说白了,不是子View你想要多大就能有多大的空间给你,前提是父View得先知道自己有权利使用多大的空间。
Drawing the layout is a two pass process: a measure pass and a layout pass. The measuring pass is implemented in measure(int, int) and is a top-down traversal of the View tree. Each View pushes dimension specifications down the tree during the recursion. At the end of the measure pass, every View has stored its measurements. The second pass happens in layout(int, int, int, int) and is also top-down. During this pass each parent is responsible for positioning all of its children using the sizes computed in the measure pass.
布局绘画涉及两个过程:测量过程和布局过程。测量过程通过measure方法实现,是View树自顶向下的遍历,每个View在循环过程中将尺寸细节往下传递,当测量过程完成之后,所有的View都存储了自己的尺寸。第二个过程则是通过方法layout来实现的,也是自顶向下的。在这个过程中,每个父View负责通过计算好的尺寸放置它的子View。
注解:这和前面说的一样,一个过程是用来丈量尺寸的,一个过程是用来摆放位置的。
When a View's measure() method returns, its getMeasuredWidth() and getMeasuredHeight() values must be set, along with those for all of that View's descendants. A View's measured width and measured height values must respect the constraints imposed by the View's parents. This guarantees that at the end of the measure pass, all parents accept all of their children's measurements. A parent View may call measure() more than once on its children. For example, the parent may measure each child once with unspecified dimensions to find out how big they want to be, then call measure() on them again with actual numbers if the sum of all the children's unconstrained sizes is too big or too small (i.e., if the children don't agree among themselves as to how much space they each get, the parent will intervene and set the rules on the second pass).
当一个View的measure()方法返回的时候,它的getMeasuredWidth和getMeasuredHeight方法的值一定是被设置好的。它所有的子节点同样被设置好。一个View的测量宽和测量高一定要遵循父View的约束,这保证了在测量过程结束的时候,所有的父View可以接受子View的测量值。一个父View或许会多次调用子View的measure()方法。举个例子,父View会使用不明确的尺寸去丈量看看子View到底需要多大,当子View总的尺寸太大或者太小的时候会再次使用实际的尺寸去调用onmeasure().
二、结合自己写的代码框架,分析一下绘制的过程
这是一个布局文件:
 <com.test.touch.MyLinear2 xmlns:android="http://schemas.android.com/apk/res/android"

     android:layout_width="300dp"

     android:layout_height="200dp"

     android:paddingTop="22dp"

     android:layout_marginLeft="10dp" >

     <TextView

         android:id="@+id/tv1"

         android:layout_width="match_parent"

         android:layout_height="100dp"

         android:background="#f00"

         android:layout_marginLeft="10dp"

         android:text="Hello World Text" />

     <com.test.touch.MyTextView

         android:layout_width="match_parent"

         android:layout_height="100dp"

         android:background="#0f0"

         android:paddingTop="22dp"

         android:text="Hello World" />

 </com.test.touch.MyLinear2>
MyLinear2.java代码框架:
 public class MyLinear2 extends ViewGroup {

     private static final String TAG = "David_MyLinear2";

     public MyLinear2(Context context) {

         super(context);

     }

     public MyLinear2(Context context, AttributeSet attrs) {

         super(context, attrs);

     }

     @Override

     protected void onLayout(boolean changed, int l, int t, int r, int b) {

     }

     @Override

     public ViewGroup.LayoutParams generateLayoutParams(AttributeSet attrs) {

         Log.e(TAG, "generateLayoutParams attrs");

         return new MarginLayoutParams(getContext(), attrs);

     }

     @Override

     protected ViewGroup.LayoutParams generateDefaultLayoutParams() {

         Log.e(TAG, "generateDefaultLayoutParams");

         return new LayoutParams(LayoutParams.MATCH_PARENT, LayoutParams.MATCH_PARENT);

     }

     @Override

     protected boolean checkLayoutParams(LayoutParams p) {

         return super.checkLayoutParams(p);

     }

     @Override

     protected ViewGroup.LayoutParams generateLayoutParams(ViewGroup.LayoutParams p) {

         Log.e(TAG, "generateLayoutParams p");

         return new MarginLayoutParams(p);

     }

     @Override

     protected void onMeasure(int widthMeasureSpec, int heightMeasureSpec) {

         int measuredHeight = measureHeight(heightMeasureSpec);

         int measuredWidth = measureWidth(widthMeasureSpec);

         Log.e(TAG, "onMeasure measuredHeight = " + measuredHeight);

         Log.e(TAG, "onMeasure measuredWidth = " + measuredWidth);

         setMeasuredDimension(measuredWidth, measuredHeight);

         measureChildren(widthMeasureSpec, heightMeasureSpec);

     }

     private int measureHeight(int measureSpec) {

         int specMode = MeasureSpec.getMode(measureSpec);

         int specSize = MeasureSpec.getSize(measureSpec);

         // Default size if no limits are specified.

         int result = 500;

         if (specMode == MeasureSpec.AT_MOST){

             // Calculate the ideal size of your

             // control within this maximum size.

             // If your control fills the available

             // space return the outer bound.

             result = specSize;

         } else if (specMode == MeasureSpec.EXACTLY){

             // If your control can fit within these bounds return that value.

             result = specSize;

         }

         return result;

     }

     private int measureWidth(int measureSpec) {

         int specMode = MeasureSpec.getMode(measureSpec);

         int specSize = MeasureSpec.getSize(measureSpec);

         // Default size if no limits are specified.

         int result = 500;

         if (specMode == MeasureSpec.AT_MOST){

             // Calculate the ideal size of your control

             // within this maximum size.

             // If your control fills the available space

             // return the outer bound.

             result = specSize;

         } else if (specMode == MeasureSpec.EXACTLY){

             // If your control can fit within these bounds return that value.

             result = specSize;

         }

         return result;

     }

 }
MyTextView.java代码框架:
 public class MyTextView extends TextView {

     private static final String TAG = "David__MyTextView";

     public MyTextView(Context context, AttributeSet attrs) {

         super(context, attrs);

     }

     public MyTextView(Context context) {

         super(context);

     }

     @Override

     protected void onMeasure(int widthMeasureSpec, int heightMeasureSpec) {

         int measuredHeight = measureHeight(heightMeasureSpec);

         int measuredWidth = measureWidth(widthMeasureSpec);

         Log.e(TAG, "measuredHeight = " + measuredHeight);

         Log.e(TAG, "measuredWidth = " + measuredWidth);

         setMeasuredDimension(measuredWidth, measuredHeight);

     }

     private int measureHeight(int measureSpec) {

         ***

     }

     private int measureWidth(int measureSpec) {

         ***

     }

 }
既然前面说到View的绘制涉及到两个过程:测量过程和布局过程,而且他们是有先后顺序的,那么我们先分析测量过程。
三、测量过程
View.java中有measure()、onMeasure(int widthMeasureSpec, int heightMeasureSpec)方法,measure()被设计成了final方法,这就意味着此方法不允许被重写。measure()中调用了onMeasure()方法,所以onMeasure()是可以用来被子类重写的,源码如下,有兴趣的可以展开看看。
measure()源码:
 /**

      * <p>

      * This is called to find out how big a view should be. The parent

      * supplies constraint information in the width and height parameters.

      * </p>

      *

      * <p>

      * The actual measurement work of a view is performed in

      * {@link #onMeasure(int, int)}, called by this method. Therefore, only

      * {@link #onMeasure(int, int)} can and must be overridden by subclasses.

      * </p>

      *

      *

      * @param widthMeasureSpec Horizontal space requirements as imposed by the

      *        parent

      * @param heightMeasureSpec Vertical space requirements as imposed by the

      *        parent

      *

      * @see #onMeasure(int, int)

      */

     public final void measure(int widthMeasureSpec, int heightMeasureSpec) {

         if (DBG_SYSTRACE_MEASURE){

             Trace.traceBegin(Trace.TRACE_TAG_VIEW, "measure : " + getClass().getSimpleName());

         }

         boolean optical = isLayoutModeOptical(this);

         if (optical != isLayoutModeOptical(mParent)) {

             Insets insets = getOpticalInsets();

             int oWidth  = insets.left + insets.right;

             int oHeight = insets.top  + insets.bottom;

             widthMeasureSpec  = MeasureSpec.adjust(widthMeasureSpec,  optical ? -oWidth  : oWidth);

             heightMeasureSpec = MeasureSpec.adjust(heightMeasureSpec, optical ? -oHeight : oHeight);

         }

         if (DBG_LAYOUT) {

             Xlog.d(VIEW_LOG_TAG, "veiw measure start, this =" + this + ", widthMeasureSpec = " +

                 MeasureSpec.toString(widthMeasureSpec) + ", heightMeasureSpec = " + MeasureSpec.toString(heightMeasureSpec)

                 + ", mOldWidthMeasureSpec = " + MeasureSpec.toString(mOldWidthMeasureSpec) + ", mOldHeightMeasureSpec = "

                 + MeasureSpec.toString(mOldHeightMeasureSpec));

         }

         // Suppress sign extension for the low bytes

         long key = (long) widthMeasureSpec << 32 | (long) heightMeasureSpec & 0xffffffffL;

         if (mMeasureCache == null) mMeasureCache = new LongSparseLongArray(2);

         if ((mPrivateFlags & PFLAG_FORCE_LAYOUT) == PFLAG_FORCE_LAYOUT ||

                 widthMeasureSpec != mOldWidthMeasureSpec ||

                 heightMeasureSpec != mOldHeightMeasureSpec) {

             // first clears the measured dimension flag

             mPrivateFlags &= ~PFLAG_MEASURED_DIMENSION_SET;

             resolveRtlPropertiesIfNeeded();

             int cacheIndex = (mPrivateFlags & PFLAG_FORCE_LAYOUT) == PFLAG_FORCE_LAYOUT ? -1 :

                     mMeasureCache.indexOfKey(key);

             if (cacheIndex < 0 || sIgnoreMeasureCache) {

                 // measure ourselves, this should set the measured dimension flag back

                 /// M: Monitor onMeasue time if longer than 3s print log.

                 long logTime = System.currentTimeMillis();

                 onMeasure(widthMeasureSpec, heightMeasureSpec);

                 long nowTime = System.currentTimeMillis();

                 if (nowTime - logTime > DBG_TIMEOUT_VALUE) {

                     Xlog.d(VIEW_LOG_TAG, "[ANR Warning]onMeasure time too long, this =" + this + "time =" + (nowTime - logTime));

                 }

                 if (DBG_LAYOUT) {

                     Xlog.d(VIEW_LOG_TAG, "veiw measure end, this =" + this + ", mMeasuredWidth = "

                         + mMeasuredWidth + ", mMeasuredHeight = " + mMeasuredHeight + ", time =" + (nowTime - logTime) + " ms");

                 }

                 mPrivateFlags3 &= ~PFLAG3_MEASURE_NEEDED_BEFORE_LAYOUT;

             } else {

                 long value = mMeasureCache.valueAt(cacheIndex);

                 // Casting a long to int drops the high 32 bits, no mask needed

                 setMeasuredDimension((int) (value >> 32), (int) value);

                 mPrivateFlags3 |= PFLAG3_MEASURE_NEEDED_BEFORE_LAYOUT;

             }

             // flag not set, setMeasuredDimension() was not invoked, we raise

             // an exception to warn the developer

             if ((mPrivateFlags & PFLAG_MEASURED_DIMENSION_SET) != PFLAG_MEASURED_DIMENSION_SET) {

                 throw new IllegalStateException("onMeasure() did not set the"

                         + " measured dimension by calling"

                         + " setMeasuredDimension()");

             }

             mPrivateFlags |= PFLAG_LAYOUT_REQUIRED;

         }

         mOldWidthMeasureSpec = widthMeasureSpec;

         mOldHeightMeasureSpec = heightMeasureSpec;

         mMeasureCache.put(key, ((long) mMeasuredWidth) << 32 |

                 (long) mMeasuredHeight & 0xffffffffL); // suppress sign extension

         if (DBG_SYSTRACE_MEASURE){

             Trace.traceEnd(Trace.TRACE_TAG_VIEW);

         }

     }
onMeasure(int widthMeasureSpec, int heightMeasureSpec)源码:
 /**

      * <p>

      * Measure the view and its content to determine the measured width and the

      * measured height. This method is invoked by {@link #measure(int, int)} and

      * should be overriden by subclasses to provide accurate and efficient

      * measurement of their contents.

      * </p>

      *

      * <p>

      * <strong>CONTRACT:</strong> When overriding this method, you

      * <em>must</em> call {@link #setMeasuredDimension(int, int)} to store the

      * measured width and height of this view. Failure to do so will trigger an

      * <code>IllegalStateException</code>, thrown by

      * {@link #measure(int, int)}. Calling the superclass'

      * {@link #onMeasure(int, int)} is a valid use.

      * </p>

      *

      * <p>

      * The base class implementation of measure defaults to the background size,

      * unless a larger size is allowed by the MeasureSpec. Subclasses should

      * override {@link #onMeasure(int, int)} to provide better measurements of

      * their content.

      * </p>

      *

      * <p>

      * If this method is overridden, it is the subclass's responsibility to make

      * sure the measured height and width are at least the view's minimum height

      * and width ({@link #getSuggestedMinimumHeight()} and

      * {@link #getSuggestedMinimumWidth()}).

      * </p>

      *

      * @param widthMeasureSpec horizontal space requirements as imposed by the parent.

      *                         The requirements are encoded with

      *                         {@link android.view.View.MeasureSpec}.

      * @param heightMeasureSpec vertical space requirements as imposed by the parent.

      *                         The requirements are encoded with

      *                         {@link android.view.View.MeasureSpec}.

      *

      * @see #getMeasuredWidth()

      * @see #getMeasuredHeight()

      * @see #setMeasuredDimension(int, int)

      * @see #getSuggestedMinimumHeight()

      * @see #getSuggestedMinimumWidth()

      * @see android.view.View.MeasureSpec#getMode(int)

      * @see android.view.View.MeasureSpec#getSize(int)

      */

     protected void onMeasure(int widthMeasureSpec, int heightMeasureSpec) {

         setMeasuredDimension(getDefaultSize(getSuggestedMinimumWidth(), widthMeasureSpec),

                 getDefaultSize(getSuggestedMinimumHeight(), heightMeasureSpec));

     }

     /**

      * <p>This method must be called by {@link #onMeasure(int, int)} to store the

      * measured width and measured height. Failing to do so will trigger an

      * exception at measurement time.</p>

      *

      * @param measuredWidth The measured width of this view.  May be a complex

      * bit mask as defined by {@link #MEASURED_SIZE_MASK} and

      * {@link #MEASURED_STATE_TOO_SMALL}.

      * @param measuredHeight The measured height of this view.  May be a complex

      * bit mask as defined by {@link #MEASURED_SIZE_MASK} and

      * {@link #MEASURED_STATE_TOO_SMALL}.

      */

     protected final void setMeasuredDimension(int measuredWidth, int measuredHeight) {

         boolean optical = isLayoutModeOptical(this);

         if (optical != isLayoutModeOptical(mParent)) {

             Insets insets = getOpticalInsets();

             int opticalWidth  = insets.left + insets.right;

             int opticalHeight = insets.top  + insets.bottom;

             measuredWidth  += optical ? opticalWidth  : -opticalWidth;

             measuredHeight += optical ? opticalHeight : -opticalHeight;

         }

         mMeasuredWidth = measuredWidth;

         mMeasuredHeight = measuredHeight;

         mPrivateFlags |= PFLAG_MEASURED_DIMENSION_SET;

     }
可以看到,在onMeasure()方法中调用了setMeasuredDimension()方法,其中mMeasuredWidth和mMeasuredHeight都已经被计算好了,而这两个值就是以下方法的返回值,很重要:
 public final int getMeasuredWidth() {

     return mMeasuredWidth & MEASURED_SIZE_MASK;

 }

 public final int getMeasuredHeight() {

     return mMeasuredHeight & MEASURED_SIZE_MASK;

 }
OK,这两个测量相关的重要方法我们已经知道他们的来历了,那么看看ViewGroup中是怎么使用他们的。
首先,因为measure()方法是不能被重写的,所以ViewGroup中并没有重写此方法,而onMeasure()方法呢,ViewGroup也并没有重写,但是ViewGroup的子类却全部重写了onMeasure()方法,比如LinearLayout,如下:
 @Override

     protected void onMeasure(int widthMeasureSpec, int heightMeasureSpec) {

         int level = getCurrentLevel();

         if (mOrientation == VERTICAL) {

             measureVertical(widthMeasureSpec, heightMeasureSpec);

         } else {

             measureHorizontal(widthMeasureSpec, heightMeasureSpec);

         }

     }
我们再简单的看看measureVertical(int widthMeasureSpec, int heightMeasureSpec)方法中干了些什么事情,源码很多,就不贴出来了,但基本是计算竖向布局下如何计算并设置自身和子View所需要的space,其中调用了一句很重要的代码,是用来计算每一个子View所需的space的,如下:
     // Determine how big this child would like to be. If this or

     // previous children have given a weight, then we allow it to

     // use all available space (and we will shrink things later

     // if needed).

     measureChildBeforeLayout(

            child, i, widthMeasureSpec, 0, heightMeasureSpec,

            totalWeight == 0 ? mTotalLength : 0);
接着看measureChildBeforeLayout()方法:
 void measureChildBeforeLayout(View child, int childIndex,

            int widthMeasureSpec, int totalWidth, int heightMeasureSpec,

            int totalHeight) {

            measureChildWithMargins(child, widthMeasureSpec, totalWidth,

                   heightMeasureSpec, totalHeight);

 }
measureChildWithMargins()方法并不是LinearLayout类的方法,而是ViewGroup的方法,源码如下:
 protected void measureChildWithMargins(View child,

             int parentWidthMeasureSpec, int widthUsed,

             int parentHeightMeasureSpec, int heightUsed) {

         final MarginLayoutParams lp = (MarginLayoutParams) child.getLayoutParams();

         final int childWidthMeasureSpec = getChildMeasureSpec(parentWidthMeasureSpec,

                 mPaddingLeft + mPaddingRight + lp.leftMargin + lp.rightMargin

                         + widthUsed, lp.width);

         final int childHeightMeasureSpec = getChildMeasureSpec(parentHeightMeasureSpec,

                 mPaddingTop + mPaddingBottom + lp.topMargin + lp.bottomMargin

                         + heightUsed, lp.height);

         int level = -1;

         child.measure(childWidthMeasureSpec, childHeightMeasureSpec);

     }
请注意,红色的这行代码很重要哦,在LinearLayout的onMeasure()方法中,遍历每一个子View,然后计算每个子View的measure()方法来计算子View需要的space。我们前面说过,View的measure()方法调用了onMeasure()方法,这就是说,我们在实现自己的View时所重写的onMeasure()方法会在此时被调用。而调用onMeasure()方法后,子View的mMeasuredWidth和mMeasuredHeight等值就已经被计算出来了。结合前面的Demo代码,日志如下:
 07-27 15:37:24.196 E/David_MyLinear2(18290): onMeasure measuredHeight = 600

 07-27 15:37:24.196 E/David_MyLinear2(18290): onMeasure measuredWidth = 900

 07-27 15:37:24.196 E/David___MyTextView(18290): onMeasure measuredHeight = 300

 07-27 15:37:24.196 E/David___MyTextView(18290): onMeasure measuredWidth = 900

 ===========================================

 07-27 15:37:24.306 E/David_MyLinear2(18290): onMeasure measuredHeight = 600

 07-27 15:37:24.306 E/David_MyLinear2(18290): onMeasure measuredWidth = 900

 07-27 15:37:24.306 E/David___MyTextView(18290): onMeasure measuredHeight = 300

 07-27 15:37:24.306 E/David___MyTextView(18290): onMeasure measuredWidth = 900

 ===========================================

 07-27 15:37:26.436 E/David_MyLinear2(18290): onMeasure measuredHeight = 600

 07-27 15:37:26.436 E/David_MyLinear2(18290): onMeasure measuredWidth = 900

 07-27 15:37:26.436 E/David___MyTextView(18290): onMeasure measuredHeight = 300

 07-27 15:37:26.436 E/David___MyTextView(18290): onMeasure measuredWidth = 900
可见,onMeasure方法被多次调用,而且先调用ViewGroup子类的onMeasure方法,然后才是View子类的onMeasure方法,至于为什么MyLinear2的measuredHeight=600和measuredWidth=900,以及MyTextView的measuredHeight=300和measuredWidth=900,请看布局文件:
 <com.test.touch.MyLinear2 xmlns:android="http://schemas.android.com/apk/res/android"

     android:layout_width="300dp"

     android:layout_height="200dp"

     android:paddingTop="22dp"

     android:layout_marginLeft="10dp" >

     <TextView

         android:id="@+id/tv1"

         android:layout_width="match_parent"

         android:layout_height="100dp"

         android:background="#f00"

         android:layout_marginLeft="10dp"

         android:text="Hello World Text" />

     <com.test.touch.MyTextView

         android:layout_width="match_parent"

         android:layout_height="100dp"

         android:background="#0f0"

         android:paddingTop="22dp"

         android:text="Hello World" />

 </com.test.touch.MyLinear2>
我是在1080P的手机上运行的,desenty为3,所以MyLinear2的宽为900px,高为600。至于MyTextView的高为300px,这很好理解,但是宽度为什么时900px呢?我这值得明明是match_parent,应该是1080px啊?前面说过了,不是你子View想要多大的空间就能要多大。这还取决于父View有权力使用多大的空间,在这个例子中,父View能使用的最大宽度是900px,所以你子View能使用的最大宽度撑死了不会超过900px啊~
至此,简单的总结一下测量过程:
Android View绘制系统首先取到Activity布局的根View,当然这一般是一个ViewGroup了,然后调用ViewGroup的measure()方法,我们知道,ViewGroup没有自己的measure方法,事实上任何一个子View都不会有自己的measure()方法的,在View中被设置成了final了嘛~所以其实调用的是View的measure方法,measure()会调用子类的onMeasure()方法,所以这个onMeasure方法我们需要给出自己的实现。
ViewGroup子类的onMeasure方法中我们必须得显式的调用ViewGroup的measureChildWithMargins()或者measureChildren(widthMeasureSpec, heightMeasureSpec);这两个方法最大的区别是measureChildWithMargins()必须得传入子View,同时会计算子View的padding和margin值,而measureChildren()会自己循环取出每一个子View。共同点是都会调用子View的measure()方法,也就调到子View的onMeasure()方法了。
所以总的大致流程是:Android UI绘制系统 --> ViewGroup的measure() --> ViewGroup的onMeasure() --> [必须得写代码,主动计算每一个子View所需的空间,同时传入ViewGroup自身(widthMeasureSpec, heightMeasureSpec),限制子View计算自身所需space] --> ViewGroup中子View的measure() --> ViewGroup中子View的onMeasure()。
简单研究Android View绘制一 测量过程的更多相关文章
- 简单研究Android View绘制三 布局过程
2015-07-28 17:29:19 这一篇主要看看布局过程 一.布局过程肯定要不可避免的涉及到layout()和onLayout()方法,这两个方法都是定义在View.java中,源码如下: /* ...
- 简单研究Android View绘制二 LayoutParams
2015-07-28 17:23:20 本篇是关于LayoutParams相关 ViewGroup.LayoutParams文档解释如下: LayoutParams are used by views ...
- Android View绘制流程
框架分析 在之前的下拉刷新中,小结过触屏消息先到WindowManagerService(Wms)然后顺次传递给ViewRoot(派生自Handler),经decor view到Activity再传递 ...
- Android View绘制13问13答
1.View的绘制流程分几步,从哪开始?哪个过程结束以后能看到view? 答:从ViewRoot的performTraversals开始,经过measure,layout,draw 三个流程.draw ...
- Android View 绘制刷新流程分析
Android中对View的更新有很多种方式,使用时要区分不同的应用场合.1.不使用多线程和双缓冲 这种情况最简单,一般只是希望在View发生改变时对UI进行重绘.你只需显式地调用View对 ...
- Android View 绘制流程(Draw) 完全解析
前言 前几篇文章,笔者分别讲述了DecorView,measure,layout流程等,接下来将详细分析三大工作流程的最后一个流程——绘制流程.测量流程决定了View的大小,布局流程决定了View的位 ...
- Android View绘制原理分析
推荐两篇分析view绘制原理比较好的文章,感谢作者的分享. <Android应用层View绘制流程与源码分析> <View 绘制流程>
- Android View绘制过程
Android的View绘制是从根节点(Activity是DecorView)开始,他是一个自上而下的过程.View的绘制经历三个过程:Measure.Layout.Draw.基本流程如下图: per ...
- Android View 绘制过程
Android的View绘制是从根节点(Activity是DecorView)开始,他是一个自上而下的过程.View的绘制经历三个过程:Measure.Layout.Draw.基本流程如下图: per ...
随机推荐
- 关注微信 即可连上wifi 的设计思路
这个功能之前是在知乎上有人在询问后台的实现逻辑,然后才知道的。其实对微信的各种关注,实在是不想沾惹。 但是这个功能很有意思,当我关注了你,那么就可以在你的店里上wifi 。如果取消则立刻不能上网。 这 ...
- android 加载大图片
引用:http://my.eoe.cn/littlebirds/archive/4646.html 尽量不要使用setImageBitmap或setImageResource或BitmapFactor ...
- android stutio 快捷键
[F] [F] F2 在错误代码之间切换 F3 往前定位(Shift + F3:往后定位 )有问题 F4\Ctrl+鼠标点击\Ctrl+B 转到定义,查看类继承关系 F5 但不调试进入函数内部. F6 ...
- [已解决]Tomcat启动报 java.net.BindException: Address already in use: JVM_Bind
启动多个Tomcat的的时候记得要改3个端口: <Server port="8001" shutdown="SHUTDOWN"> <Conne ...
- eclipse 设置jsp页面为HTML5
window-preferences-web-jspFiles-Editor-Templates-jsp with html... 然后修改为<!DOCTYPE html>就行了
- GMF Q&A(1): 如何让palette支持拖拽(DnD)等10则
1,如何让palette支持拖拽(DnD) 在*PaletteFactory类中,把私有类NodeToolEntry 和LinkToolEntry的基类修改为PaletteToolEntry.并在构造 ...
- c#委托(1)
// 委托声明 -- 定义一个签名:delegate double MathAction(double num); class DelegateTest{ // 符合委托声明的常规方法 static ...
- 第 十一 天 Flagmeng 和动画
1.flagment 的使用,生命周期. 传递数据. 2. 基本动画的使用. 3. 对话框的使用. 4.样式和主题.
- linux权限,所有者、所在组、其他组(其他人员),chmod,chown
用户组 在linux中的每个用户必须属于一个组,不能独立于组外.在linux中每个文件有所有者.所在组.其它组的概念 - 所有者 - 所在组 - 其它组 - 改变用户所在的组 所有者 一般为文件的创建 ...
- Android TextView自动换行文字排版参差不齐的原因
今天项目没什么进展,公司后台出问题了.看了下刚刚学习Android时的笔记,发现TextView会自动换行,而且排版文字参差不齐.查了下资料,总结原因如下: 1.半角字符与全角字符混乱所致:这种情况一 ...