spring-自动加载配置文件\使用属性文件注入
在上一篇jsf环境搭建的基础上 , 加入spring框架 , 先看下目录结构
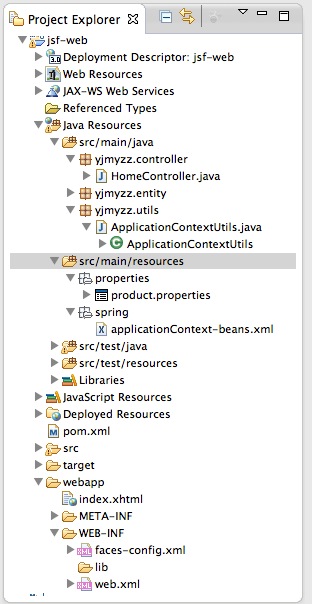
src/main/resources 这个source folder 放置web项目所需的主要配置,打包时,会自动打包到WEB-INF下
首先看下pom.xml,需要引入一些依赖项:
 <project xmlns="http://maven.apache.org/POM/4.0.0" xmlns:xsi="http://www.w3.org/2001/XMLSchema-instance"

     xsi:schemaLocation="http://maven.apache.org/POM/4.0.0 http://maven.apache.org/xsd/maven-4.0.0.xsd">

     <modelVersion>4.0.0</modelVersion>

     <groupId>yjmyzz</groupId>

     <artifactId>jsf-web</artifactId>

     <version>1.0</version>

     <packaging>war</packaging>

     <dependencies>

         <!-- 单元测试 -->

         <dependency>

             <groupId>junit</groupId>

             <artifactId>junit</artifactId>

             <version>4.7</version>

             <scope>test</scope>

         </dependency>

         <!-- jsf -->

         <dependency>

             <groupId>org.jboss.spec.javax.faces</groupId>

             <artifactId>jboss-jsf-api_2.1_spec</artifactId>

             <version>2.1.19.1.Final-redhat-1</version>

             <scope>compile</scope>

         </dependency>

         <!-- spring -->

         <dependency>

             <groupId>org.springframework</groupId>

             <artifactId>spring-context</artifactId>

             <version>4.0.2.RELEASE</version>

         </dependency>

         <dependency>

             <groupId>org.springframework</groupId>

             <artifactId>spring-web</artifactId>

             <version>4.0.2.RELEASE</version>

         </dependency>

         <!-- servlet支持 -->

         <dependency>

             <groupId>javax.servlet</groupId>

             <artifactId>servlet-api</artifactId>

             <version>2.5</version>

         </dependency>

     </dependencies>

     <build>

         <plugins>

             <plugin>

                 <artifactId>maven-compiler-plugin</artifactId>

                 <version>3.1</version>

                 <configuration>

                     <source>1.7</source>

                     <target>1.7</target>

                 </configuration>

             </plugin>

             <plugin>

                 <artifactId>maven-war-plugin</artifactId>

                 <version>2.3</version>

                 <configuration>

                     <warSourceDirectory>webapp</warSourceDirectory>

                     <failOnMissingWebXml>false</failOnMissingWebXml>

                 </configuration>

             </plugin>

         </plugins>

     </build>

 </project>
pom.xml
1. 自动加载配置文件
在web项目中,可以让spring自动加载配置文件(即上图中的src/main/resouces/spring下的xml文件),WEB-INF/web.xml中参考以下设置:
 <?xml version="1.0" encoding="UTF-8"?>

 <web-app xmlns:xsi="http://www.w3.org/2001/XMLSchema-instance" xmlns="http://java.sun.com/xml/ns/javaee" xsi:schemaLocation="http://java.sun.com/xml/ns/javaee http://java.sun.com/xml/ns/javaee/web-app_3_0.xsd" id="WebApp_ID" version="3.0">

      <display-name>jsf-web</display-name>

      <welcome-file-list>

        <welcome-file>index.html</welcome-file>

      </welcome-file-list>

     <listener>

      <listener-class>

        org.springframework.web.context.ContextLoaderListener

       </listener-class>

     </listener>

     <context-param>

      <param-name>contextConfigLocation</param-name>

       <param-value>

        classpath*:spring/applicationContext-*.xml

       </param-value>

     </context-param>

 </web-app>
web.xml
解释一下: classpath*:spring/applicationContext-*.xml 这里表示将加载classpath路径下 spring目录下的所有以applicationContext-开头的xml文件 , 通常为了保持配置文件的清爽 , 我们会把配置分成多份 : 比如 applicationContext-db.xml 用来配置DataSource , applicationContext-cache.xml用来配置缓存...等等.
2.代码中如何取得ApplicationContext实例
 package yjmyzz.utils;

 import javax.faces.context.FacesContext;

 import javax.servlet.ServletContext;

 import org.springframework.context.ApplicationContext;

 import org.springframework.web.context.support.WebApplicationContextUtils;

 public class ApplicationContextUtils {

     public static ApplicationContext getApplicationContext() {

         ServletContext context = (ServletContext) FacesContext

                 .getCurrentInstance().getExternalContext().getContext();

         ApplicationContext appctx = WebApplicationContextUtils

                 .getRequiredWebApplicationContext(context);

         return appctx;

     }

     public static <T> T getBean(Class<T> t) {

         return getApplicationContext().getBean(t);

     }

 }
ApplicationContextUtils
有了这个工具类 , 就可以方便的取得注入的Bean
3. 使用properties文件注入
为了演示注入效果,先定义一个基本的Entity类
 package yjmyzz.entity;

 import java.io.Serializable;

 public class ProductEntity implements Serializable {

     private static final long serialVersionUID = -2055674628624266800L;

     /*

      * 产品编码

      */

     private String productNo;

     /**

      * 产品名称

      */

     private String productName;

     /**

      * 产品ID

      */

     private Long productId;

     public String getProductNo() {

         return productNo;

     }

     public void setProductNo(String productNo) {

         this.productNo = productNo;

     }

     public String getProductName() {

         return productName;

     }

     public void setProductName(String productName) {

         this.productName = productName;

     }

     public Long getProductId() {

         return productId;

     }

     public void setProductId(Long productIdLong) {

         this.productId = productIdLong;

     }

     @Override

     public String toString() {

         return productId + "/" + productNo + "/" + productName;

     }

 }
ProductEntity
然后在applicationContext-beans.xml中配置以下内容:
 <?xml version="1.0" encoding="UTF-8"?>

 <beans xmlns="http://www.springframework.org/schema/beans"

     xmlns:xsi="http://www.w3.org/2001/XMLSchema-instance"

     xsi:schemaLocation="http://www.springframework.org/schema/beans

            http://www.springframework.org/schema/beans/spring-beans-3.0.xsd">

     <bean id="propertyConfigurer"

         class="org.springframework.beans.factory.config.PropertyPlaceholderConfigurer">

         <property name="locations">

             <list>

                 <value>classpath:properties/*.properties</value>

             </list>

         </property>

     </bean>

     <bean id="productEntity" class="yjmyzz.entity.ProductEntity">

         <property name="productId" value="${product.id}" />

         <property name="productNo" value="${product.no}" />

         <property name="productName" value="${product.name}" />

         <!-- <property name="productId">

             <bean class="java.lang.Long">

                 <constructor-arg index="0" value="${product.id}" />

             </bean>

         </property>

          -->

     </bean>

 </beans>
spring配置文件
注:classpath:properties/*.properties表示运行时 , spring容器会自动加载classpath\properties目录下的所有以.properties后缀结尾的文件 , 我们在src/main/resources/properties/下放置一个product.properties属性文件 , 内容如下:
 product.id=3

 product.no=n95

 product.name=phone
product.properties
该文件被spring自动加载后 , 就可以用里面定义的属性值 , 为Bean做setter属性注入 , 即配置文件中的<property name="productId" value="${product.id}" />
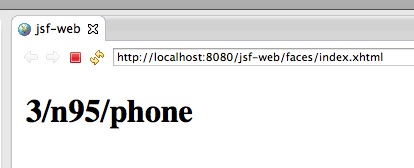
4.验证注入是否成功
在HomeController里 , 向Spring容器要一个Bean , 显示下它的属性:
 package yjmyzz.controller;

 import javax.faces.bean.ManagedBean;

 import yjmyzz.entity.ProductEntity;

 import yjmyzz.utils.ApplicationContextUtils;

 @ManagedBean(name = "Home")

 public class HomeController {

     public String sayHello() {

         ProductEntity product = ApplicationContextUtils

                 .getBean(ProductEntity.class);

         return product.toString();

     }

 }
HomeController
index.xhtml里仍然跟上篇相同:
 <!DOCTYPE html PUBLIC "-//W3C//DTD XHTML 1.0 Transitional//EN" "http://www.w3.org/TR/xhtml1/DTD/xhtml1-transitional.dtd">

 <html xmlns="http://www.w3.org/1999/xhtml"

       xmlns:h="http://java.sun.com/jsf/html"

       xmlns:f="http://java.sun.com/jsf/core"

       xmlns:ui="http://java.sun.com/jsf/facelets">

 <h:head>

     <title>jsf-web</title>

 </h:head>

 <body>

     <h1>

         #{Home.sayHello()}

     </h1>

 </body>

 </html>
index.xhtml
最后部署到jboss上 , 运行截图如下:
spring-自动加载配置文件\使用属性文件注入的更多相关文章
- springboot属性类自动加载配置文件中的值
springboot属性类自动加载配置文件中的值,如Person类加载在yml中配置的name,age等属性值,可以通过如下步骤获取: 类上添加@ConfigurationProperties注解,p ...
- 关于不重启Tomcat自动加载改变的class文件
修改server.xml,在Host标签下加入以下配置 <Context path="" docBase="FileManager" reloadable ...
- tmux不自动加载配置文件.tmux.conf
/********************************************************************** * tmux不自动加载配置文件.tmux.conf * ...
- Nginx自动加载配置文件方案
nginx自动加载配置文件方案一.nginx+consul+consul-template实现过程:consul作为服务发现软件,consul-template作为nginx配置文件的模板,consu ...
- Spring Boot加载配置文件
问题1:Spring如何加载配置,配置文件位置? 1.默认位置: Spring Boot默认的配置文件名称为application.properties,SpringApplication将从以下位置 ...
- Tomcat7 自动加载类及检测文件变动原理
在一般的web应用开发里通常会使用开发工具(如Eclipse.IntelJ)集成tomcat,这样可以将web工程项目直接发布到tomcat中,然后一键启动.经常遇到的一种情况是直接修改一个类的源文件 ...
- Tomcat 7 自动加载类及检测文件变动原理
在一般的 web 应用开发里通常会使用开发工具(如 Eclipse.IntelJ )集成 tomcat ,这样可以将 web 工程项目直接发布到 tomcat 中,然后一键启动.经常遇到的一种情况是直 ...
- Spring中加载配置文件的方式
原文:http://blog.csdn.net/snowjlz/article/details/8158560 Spring 中加载XML配置文件的方式,好像有3种, XML是最常见的Spring 应 ...
- spring boot加载配置文件的顺序
四个默认加载配置文件地方的优先级,四个文件相同配置有优先级概念 不同位置相互补充 外部配置文件不建议使用,不符合maven项目结构,打包会打不进去
随机推荐
- 区别和详解:jQuery extend()和jQuery.fn.extend()
1.认识jQuery extend()和jQuery.fn.extend() jQuery的API手册中,extend方法挂载在jQuery和jQuery.fn两个不同对象上方法,但在jQuery内部 ...
- 关于input全选反选恶心的异常情况
上一篇讲到:第一次点击全选按钮input显示对勾,第二次则不显示,需要用prop来添加checked属性. 但是用prop会出现一个问题,对勾显示,而checked属性不会被添加(比如:$(" ...
- CVEH项目观察与思考
2013-07-01 项目进展: 从启动至今已有三个星期,但是进展甚慢,取得的进展有: A. 封装成库,和HB调用库的接口有些进展,但进未完成 B. 整个框架,类视图,调用视图,只有两三层的进展: C ...
- 【转发】揭秘Facebook 的系统架构
揭底Facebook 的系统架构 www.MyException.Cn 发布于:2012-08-28 12:37:01 浏览:0次 0 揭秘Facebook 的系统架构 www.MyExcep ...
- innoDB源码分析--缓冲池
最开始学Oracle的时候,有个概念叫SGA和PGA,是非常重要的概念,其实就是内存中的缓冲池.InnoDB的设计类似于Oracle,也会在内存中开辟一片缓冲池.众所周知,CPU的速度和磁盘的IO速度 ...
- python中mysqldb的用法
1.引入MySQLdb库 import MySQLdb 2.和数据库建立连接 conn=MySQLdb.connect(host="localhost",user="ro ...
- cocos2d-x 3.10 屏幕适配问题
cocos2d-x 的屏幕适配问题困扰了我很久,差不多有一个星期吧.通过亲身实践才解决了问题,分享一下解决办法,供大家借鉴学习. 其实解决办法很简单,把下面代码注释掉就好了 // if (frameS ...
- IIS 500.19 错误
HTTP 错误 500.19 - Internal Server Error 错误代码 0x80070021 配置错误 不能在此路径中使用此配置节.如果在父级别上锁定了该节,便会出现这种情况.锁定是默 ...
- python标准库00 学习准备
Python标准库----走马观花 python有一套很有用的标准库.标准库会随着python解释器一起安装在你的电脑上的.它是python的一个组成部分.这些标准库是python为你准备的利器,可以 ...
- Android程序函数 将assets文件夹下的文件复制到手机的sd卡中(包括子文件夹)
最近在做个功能是将asset文件夹下的所有文件(包括子文件)全部拷贝出来到指定目录下.所用的方法无非是用AssetManager.但是这里 有个问题是也要讲子文件夹和子文件都要拷贝出来.到网上Goog ...