基于TensorFlow Object Detection API进行迁移学习训练自己的人脸检测模型(二)
前言
已完成数据预处理工作,具体参照:
基于TensorFlow Object Detection API进行迁移学习训练自己的人脸检测模型(一)
设置配置文件
新建目录face_faster_rcnn
将上文已完成预数据处理的目录data移动至face_faster_rcnn目录下,
并在face_faster_rcnn目录下创建face_label.pbtxt文件,内容如下:
item {

  id: 1

  name: 'face'

}
在已下载的TensorFlow Object Detection API目录下搜索faster_rcnn_inception_v2_coco.config,具体目录models-master\research\object_detection\samples\configs,将其拷贝至face_faster_rcnn目录下
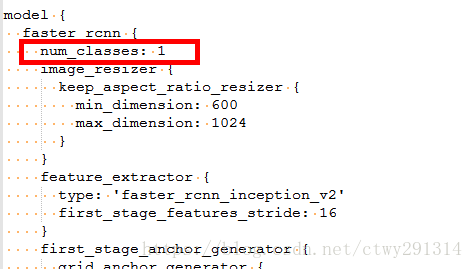
在存储库中,faster_rcnn_inception_v2_coco.config文件用来训练人工神经网络的配置文件。该文件基于pet检测器。
在本例中,num_classes的数量仍然是一个,因为只有人脸才会被识别。
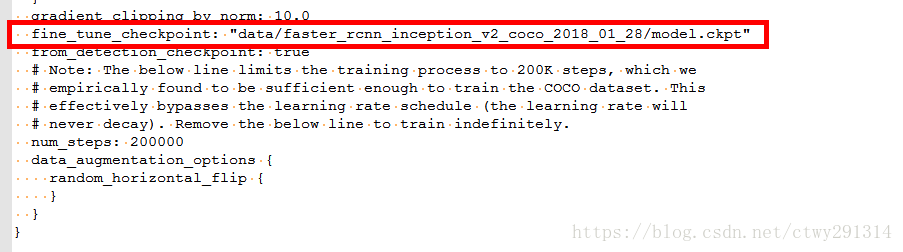
变量fine_tune_checkpoint用于指示以前模型的路径以获得学习。微调检查点文件(fine tune checkpoint file)在应用转移学习上被使用。转移学习是一种机器学习方法,它专注于将从一个问题中获得的知识应用到另一个问题上。
在类train_input_reader中,用带有TFRecord文件的链接以训练模型。在配置文件中,需要将其自定义到正确的位置。
变量label_map_path包含索引ID和名称。使用这个文件,0被用作占位符,所以我们从数字1开始。
验证有两个很重要的变量。在eval_config类中的变量 num_examples用于设置示例的数量。
eval_input_reader类描述了验证数据的位置。在这个位置也有一条路径。

此外,还可以改变学习速度、批量大小和其他设置。现在,我保留了默认设置。

完整的faster_rcnn_inception_v2_coco.config
# Faster R-CNN with Inception v2, configuration for MSCOCO Dataset.

# Users should configure the fine_tune_checkpoint field in the train config as

# well as the label_map_path and input_path fields in the train_input_reader and

# eval_input_reader. Search for "PATH_TO_BE_CONFIGURED" to find the fields that

# should be configured.

model {

  faster_rcnn {

    num_classes: 1

    image_resizer {

      keep_aspect_ratio_resizer {

        min_dimension: 600

        max_dimension: 1024

      }

    }

    feature_extractor {

      type: 'faster_rcnn_inception_v2'

      first_stage_features_stride: 16

    }

    first_stage_anchor_generator {

      grid_anchor_generator {

        scales: [0.25, 0.5, 1.0, 2.0]

        aspect_ratios: [0.5, 1.0, 2.0]

        height_stride: 16

        width_stride: 16

      }

    }

    first_stage_box_predictor_conv_hyperparams {

      op: CONV

      regularizer {

        l2_regularizer {

          weight: 0.0

        }

      }

      initializer {

        truncated_normal_initializer {

          stddev: 0.01

        }

      }

    }

    first_stage_nms_score_threshold: 0.0

    first_stage_nms_iou_threshold: 0.7

    first_stage_max_proposals: 300

    first_stage_localization_loss_weight: 2.0

    first_stage_objectness_loss_weight: 1.0

    initial_crop_size: 14

    maxpool_kernel_size: 2

    maxpool_stride: 2

    second_stage_box_predictor {

      mask_rcnn_box_predictor {

        use_dropout: false

        dropout_keep_probability: 1.0

        fc_hyperparams {

          op: FC

          regularizer {

            l2_regularizer {

              weight: 0.0

            }

          }

          initializer {

            variance_scaling_initializer {

              factor: 1.0

              uniform: true

              mode: FAN_AVG

            }

          }

        }

      }

    }

    second_stage_post_processing {

      batch_non_max_suppression {

        score_threshold: 0.0

        iou_threshold: 0.6

        max_detections_per_class: 100

        max_total_detections: 300

      }

      score_converter: SOFTMAX

    }

    second_stage_localization_loss_weight: 2.0

    second_stage_classification_loss_weight: 1.0

  }

}

train_config: {

  batch_size: 1

  optimizer {

    momentum_optimizer: {

      learning_rate: {

        manual_step_learning_rate {

          initial_learning_rate: 0.0002

          schedule {

            step: 900000

            learning_rate: .00002

          }

          schedule {

            step: 1200000

            learning_rate: .000002

          }

        }

      }

      momentum_optimizer_value: 0.9

    }

    use_moving_average: false

  }

  gradient_clipping_by_norm: 10.0

  fine_tune_checkpoint: "data/faster_rcnn_inception_v2_coco_2018_01_28/model.ckpt"

  from_detection_checkpoint: true

  # Note: The below line limits the training process to 200K steps, which we

  # empirically found to be sufficient enough to train the COCO dataset. This

  # effectively bypasses the learning rate schedule (the learning rate will

  # never decay). Remove the below line to train indefinitely.

  num_steps: 200000

  data_augmentation_options {

    random_horizontal_flip {

    }

  }

}

train_input_reader: {

  tf_record_input_reader {

    input_path: "data/train.record"

  }

  label_map_path: "face_label.pbtxt"

}

eval_config: {

  num_examples: 8000

  # Note: The below line limits the evaluation process to 10 evaluations.

  # Remove the below line to evaluate indefinitely.

  max_evals: 10

}

eval_input_reader: {

  tf_record_input_reader {

    input_path: "data/val.record"

  }

  label_map_path: "face_label.pbtxt"

  shuffle: false

  num_readers: 1

}
训练
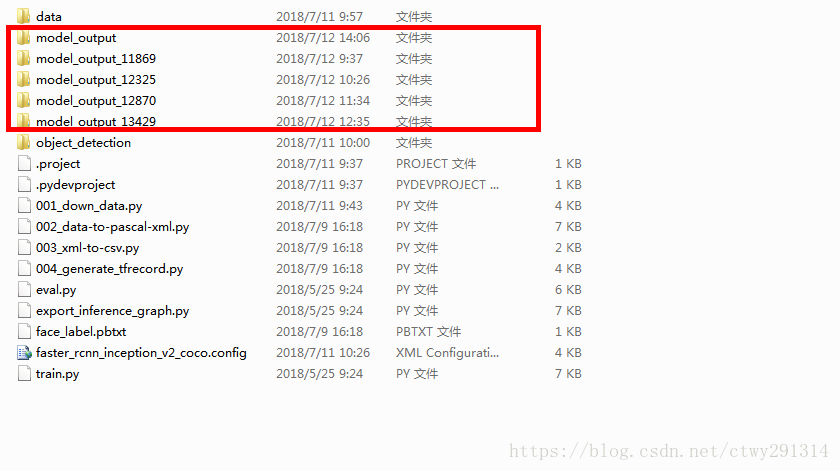
将models-master\research目录下的object_detection文件夹整个拷贝至face_faster_rcnn目录下,并将object_detection目录下的train.py、export_inference_graph.py、eval.py三个文件拷贝至face_faster_rcnn目录,至此目录结构全部完成
红框可忽略,为已训练的模型
现在,它将开始真正的工作。计算机将从人脸检测数据集中学习并建立一个神经网络。当我在CPU上模拟训练时,需要几天的时间才能得到一个好的结果。但强大的Nvidia显卡可以将时间缩短为几个小时。
python train.py --logtostderr --train_dir=data/ --pipeline_config_path=faster_rcnn_inception_v2_coco.config --train_dir=model_output运行会出现以下异常
ValueError: Tried to convert 't' to a tensor and failed. Error: Argument must be a dense tensor: range(0, 3) - got shape [3], but wanted [].可能是python3兼容性问题
把object_detection/utils/learning_schedules.py文件的 第167-169行由
#修改167-169行

rate_index = tf.reduce_max(tf.where(tf.greater_equal(global_step, boundaries),

                                    range(num_boundaries),

                                    [0] * num_boundaries))

#修改成

rate_index = tf.reduce_max(tf.where(tf.greater_equal(global_step, boundaries),

                                    list(range(num_boundaries)),

                                    [0] * num_boundaries))
Tensorboard深入的了解了学习过程。该工具是Tensorflow的一部分,且可以自动安装。
tensorboard --logdir=model_output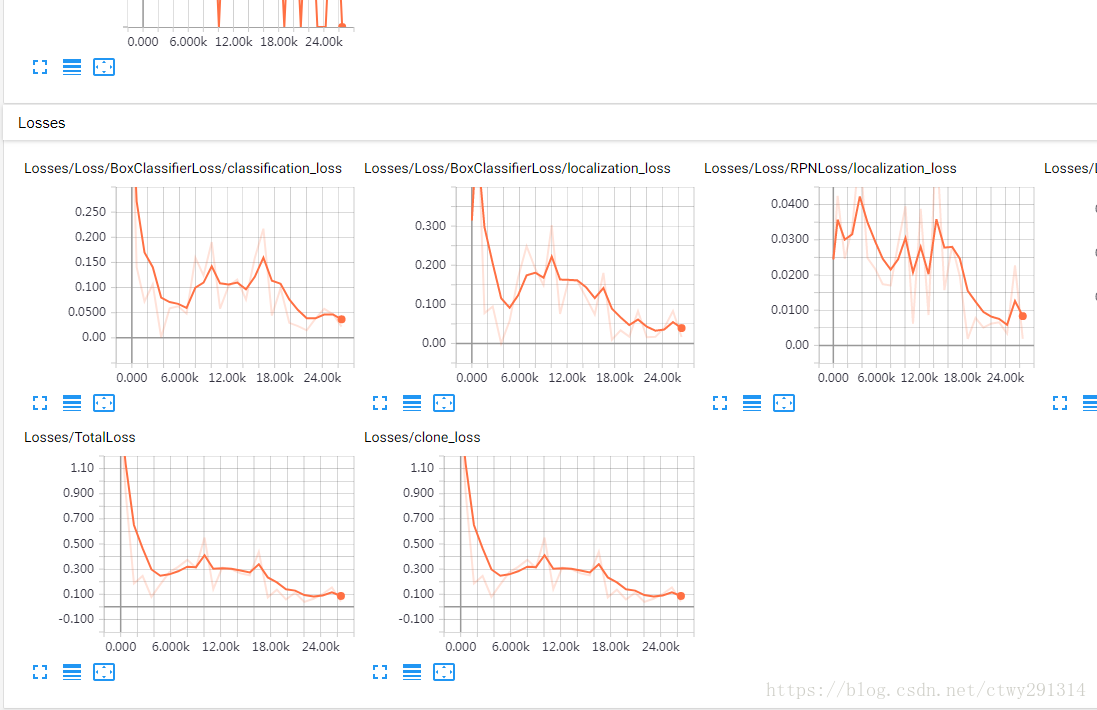
检查点转换为protobuf变为可运行的模型
在带有计算机视觉库Tensorflow目标识别检测中使用该模型。 以下命令提供了模型存储库的位置和最后一个检查点。文件夹文件夹将包含frozen_inference_graph.pb
python export_inference_graph.py --input_type image_tensor --pipeline_config_path faster_rcnn_inception_v2_coco.config --trained_checkpoint_prefix model_output/model.ckpt-11543 --output_directory face_faster_rcnn_model/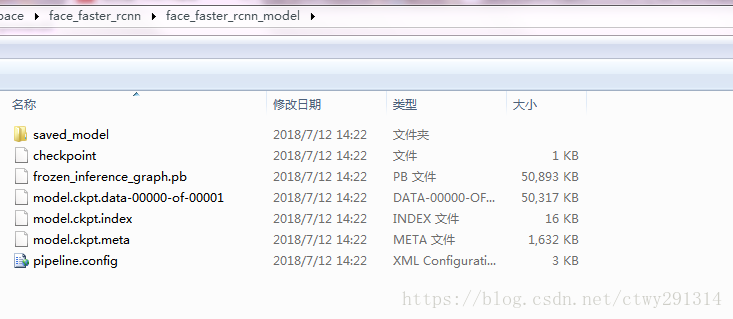
打包模型
tar zcvf face_faster_rcnn_model.tar.gz face_faster_rcnn_model预测新图片
编写ImageTest.py
# coding: utf-8

import numpy as np

import os

import six.moves.urllib as urllib

import sys

import tarfile

import tensorflow as tf

import zipfile

from collections import defaultdict

from io import StringIO

from matplotlib import pyplot as plt

from PIL import Image

# This is needed since the notebook is stored in the object_detection folder.

#sys.path.append("..")

from object_detection.utils import ops as utils_ops

if tf.__version__ < '1.4.0':

    raise ImportError('Please upgrade your tensorflow installation to v1.4.* or later!')

# This is needed to display the images.

from object_detection.utils import label_map_util

from object_detection.utils import visualization_utils as vis_util

os.environ['TF_CPP_MIN_LOG_LEVEL'] = '2'

##Model preparation##

# What model to download.

MODEL_NAME = 'face_faster_rcnn_model'

MODEL_FILE = MODEL_NAME + '.tar.gz'

DOWNLOAD_BASE = 'http://download.tensorflow.org/models/object_detection/'

# Path to frozen detection graph. This is the actual model that is used for the object detection.

PATH_TO_CKPT = MODEL_NAME + '/frozen_inference_graph.pb'

# List of the strings that is used to add correct label for each box.

PATH_TO_LABELS = os.path.join('data', 'face_label.pbtxt')

NUM_CLASSES = 1

## Download Model##

#opener = urllib.request.URLopener()

#opener.retrieve(DOWNLOAD_BASE + MODEL_FILE, MODEL_FILE)

tar_file = tarfile.open(MODEL_FILE)

for file in tar_file.getmembers():

  file_name = os.path.basename(file.name)

  if 'frozen_inference_graph.pb' in file_name:

    tar_file.extract(file, os.getcwd())

## Load a (frozen) Tensorflow model into memory.

detection_graph = tf.Graph()

with detection_graph.as_default():

  od_graph_def = tf.GraphDef()

  with tf.gfile.GFile(PATH_TO_CKPT, 'rb') as fid:

    serialized_graph = fid.read()

    od_graph_def.ParseFromString(serialized_graph)

    tf.import_graph_def(od_graph_def, name='')

## Loading label map

label_map = label_map_util.load_labelmap(PATH_TO_LABELS)

categories = label_map_util.convert_label_map_to_categories(label_map, max_num_classes=NUM_CLASSES, use_display_name=True)

category_index = label_map_util.create_category_index(categories)

def load_image_into_numpy_array(image):

  (im_width, im_height) = image.size

  return np.array(image.getdata()).reshape(

      (im_height, im_width, 3)).astype(np.uint8)

# For the sake of simplicity we will use only 2 images:

# image1.jpg

# image2.jpg

# If you want to test the code with your images, just add path to the images to the TEST_IMAGE_PATHS.

PATH_TO_TEST_IMAGES_DIR = 'test_images'

TEST_IMAGE_PATHS = [ os.path.join(PATH_TO_TEST_IMAGES_DIR, 'image{}.jpg'.format(i)) for i in range(1, 3) ]

# Size, in inches, of the output images.

IMAGE_SIZE = (12, 8)

def run_inference_for_single_image(image, graph):

  with graph.as_default():

    with tf.Session() as sess:

      # 获取输入和输出张量

      ops = tf.get_default_graph().get_operations()

      all_tensor_names = {output.name for op in ops for output in op.outputs}

      tensor_dict = {}

      for key in [

          'num_detections', 'detection_boxes', 'detection_scores',

          'detection_classes', 'detection_masks'

      ]:

        tensor_name = key + ':0'

        if tensor_name in all_tensor_names:

          tensor_dict[key] = tf.get_default_graph().get_tensor_by_name(

              tensor_name)

      if 'detection_masks' in tensor_dict:

        # 以下处理仅针对单个图像

        detection_boxes = tf.squeeze(tensor_dict['detection_boxes'], [0])

        detection_masks = tf.squeeze(tensor_dict['detection_masks'], [0])

        # 需要重从框坐标转换成图像坐标,并适合图像大小。

        real_num_detection = tf.cast(tensor_dict['num_detections'][0], tf.int32)

        detection_boxes = tf.slice(detection_boxes, [0, 0], [real_num_detection, -1])

        detection_masks = tf.slice(detection_masks, [0, 0, 0], [real_num_detection, -1, -1])

        detection_masks_reframed = utils_ops.reframe_box_masks_to_image_masks(

            detection_masks, detection_boxes, image.shape[0], image.shape[1])

        detection_masks_reframed = tf.cast(

            tf.greater(detection_masks_reframed, 0.5), tf.uint8)

        # 通过添加批次尺寸来遵循惯例

        tensor_dict['detection_masks'] = tf.expand_dims(

            detection_masks_reframed, 0)

      image_tensor = tf.get_default_graph().get_tensor_by_name('image_tensor:0')

      # Run inference

      output_dict = sess.run(tensor_dict,

                             feed_dict={image_tensor: np.expand_dims(image, 0)})

      # 所有输出都是FLUAT32 NUMPY数组,以适应转换类型

      output_dict['num_detections'] = int(output_dict['num_detections'][0])

      output_dict['detection_classes'] = output_dict[

          'detection_classes'][0].astype(np.uint8)

      output_dict['detection_boxes'] = output_dict['detection_boxes'][0]

      output_dict['detection_scores'] = output_dict['detection_scores'][0]

      if 'detection_masks' in output_dict:

        output_dict['detection_masks'] = output_dict['detection_masks'][0]

  return output_dict

for image_path in TEST_IMAGE_PATHS:

  image = Image.open(image_path)

  # 这个array在之后会被用来准备为图片加上框和标签

  image_np = load_image_into_numpy_array(image)

  # 扩展维度,因为模型期望图像具有形状:: [1, None, None, 3]

  image_np_expanded = np.expand_dims(image_np, axis=0)

  # 执行侦测任务

  output_dict = run_inference_for_single_image(image_np, detection_graph)

  # 检测结果的可视化

  vis_util.visualize_boxes_and_labels_on_image_array(

      image_np,

      output_dict['detection_boxes'],

      output_dict['detection_classes'],

      output_dict['detection_scores'],

      category_index,

      instance_masks=output_dict.get('detection_masks'),

      use_normalized_coordinates=True,

      line_thickness=8)

  plt.figure(figsize=IMAGE_SIZE)

  plt.imshow(image_np)

  plt.show()
新建test_images文件夹,并放入图片

修改MODEL_NAME,PATH_TO_LABELS
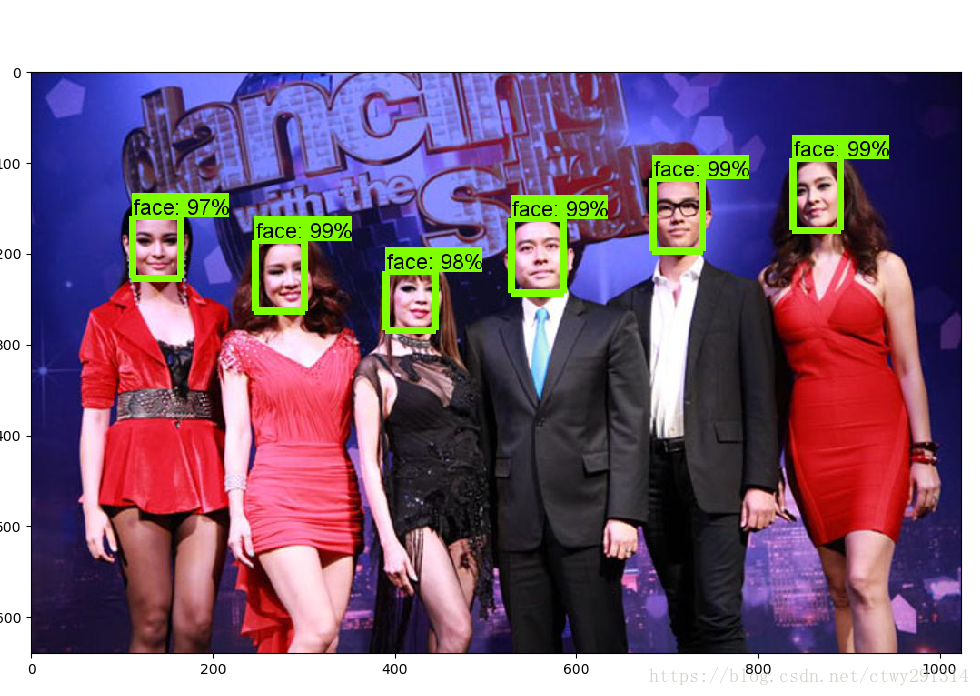
python ImageTest.py效果

评估
除了用于Tensorflow目标识别检测训练的数据外,还有一个评估数据集。基于此评估数据集,可以计算精度。对于我的模型,我计算了精度(平均精度)。我以14392步的速度获得了83.80%的分数(epochs)。对于这个过程,Tensorflow有一个脚本,使它可以在Tensorboard中看到分数是多少。除了训练之外,建议你运行评估过程。
python eval.py --logtostderr --pipeline_config_path=faster_rcnn_inception_v2_coco.config --checkpoint_dir=model_output --eval_dir=eval检测视频人脸
新建CameraFaceTest.py
# coding: utf-8

# # Object Detection Demo

# Welcome to the object detection inference walkthrough!  This notebook will walk you step by step through the process of using a pre-trained model to detect objects in an image. Make sure to follow the [installation instructions](https://github.com/tensorflow/models/blob/master/object_detection/g3doc/installation.md) before you start.

# # Imports

# In[1]:

import numpy as np

import os

import six.moves.urllib as urllib

import sys

import tarfile

import tensorflow as tf

import zipfile

from collections import defaultdict

from io import StringIO

from matplotlib import pyplot as plt

from PIL import Image

import cv2                  #add 20170825

#此处修改rtsp路径

cap = cv2.VideoCapture(1)   #add 20170825

# ## Env setup

# In[2]:                                  #delete 20170825

# This is needed to display the images.    #delete 20170825

#get_ipython().magic('matplotlib inline')   #delete 20170825

# This is needed since the notebook is stored in the object_detection folder.

sys.path.append("..")

# ## Object detection imports

# Here are the imports from the object detection module.

# In[3]:

from object_detection.utils import label_map_util

from object_detection.utils import visualization_utils as vis_util

# # Model preparation

# ## Variables

#

# Any model exported using the `export_inference_graph.py` tool can be loaded here simply by changing `PATH_TO_CKPT` to point to a new .pb file.

#

# By default we use an "SSD with Mobilenet" model here. See the [detection model zoo](https://github.com/tensorflow/models/blob/master/object_detection/g3doc/detection_model_zoo.md) for a list of other models that can be run out-of-the-box with varying speeds and accuracies.

# In[4]:

# What model to download.

#此处修改模型路径

#模型地址:https://github.com/tensorflow/models/blob/master/research/object_detection/g3doc/detection_model_zoo.md

MODEL_NAME = 'faster_rcnn_inception_v2_coco_2018_01_28'

MODEL_FILE = MODEL_NAME + '.tar.gz'

DOWNLOAD_BASE = 'http://download.tensorflow.org/models/object_detection/'

# Path to frozen detection graph. This is the actual model that is used for the object detection.

PATH_TO_CKPT = MODEL_NAME + '/frozen_inference_graph.pb'

# List of the strings that is used to add correct label for each box.

PATH_TO_LABELS = os.path.join('data', 'face_label.pbtxt')

NUM_CLASSES = 1

# ## Download Model

# In[5]:

#opener = urllib.request.URLopener()

#opener.retrieve(DOWNLOAD_BASE + MODEL_FILE, MODEL_FILE)

tar_file = tarfile.open(MODEL_FILE)

for file in tar_file.getmembers():

  file_name = os.path.basename(file.name)

  if 'frozen_inference_graph.pb' in file_name:

    tar_file.extract(file, os.getcwd())

# ## Load a (frozen) Tensorflow model into memory.

# In[6]:

detection_graph = tf.Graph()

with detection_graph.as_default():

  od_graph_def = tf.GraphDef()

  with tf.gfile.GFile(PATH_TO_CKPT, 'rb') as fid:

    serialized_graph = fid.read()

    od_graph_def.ParseFromString(serialized_graph)

    tf.import_graph_def(od_graph_def, name='')

# ## Loading label map

# Label maps map indices to category names, so that when our convolution network predicts `5`, we know that this corresponds to `airplane`.  Here we use internal utility functions, but anything that returns a dictionary mapping integers to appropriate string labels would be fine

# In[7]:

label_map = label_map_util.load_labelmap(PATH_TO_LABELS)

categories = label_map_util.convert_label_map_to_categories(label_map, max_num_classes=NUM_CLASSES, use_display_name=True)

category_index = label_map_util.create_category_index(categories)

gpu_options = tf.GPUOptions(allow_growth=True)

#gpu_options = tf.GPUOptions(per_process_gpu_memory_fraction=0.2)

with detection_graph.as_default():

  with tf.Session(graph=detection_graph,config=tf.ConfigProto(gpu_options=gpu_options)) as sess:

    while True:

      ret, image_np = cap.read()

      # 扩展维度,应为模型期待: [1, None, None, 3]

      image_np_expanded = np.expand_dims(image_np, axis=0)

      image_tensor = detection_graph.get_tensor_by_name('image_tensor:0')

      # 每个框代表一个物体被侦测到

      boxes = detection_graph.get_tensor_by_name('detection_boxes:0')

       #每个分值代表侦测到物体的可信度.

      scores = detection_graph.get_tensor_by_name('detection_scores:0')

      classes = detection_graph.get_tensor_by_name('detection_classes:0')

      num_detections = detection_graph.get_tensor_by_name('num_detections:0')

      # 执行侦测任务.

      (boxes, scores, classes, num_detections) = sess.run(

          [boxes, scores, classes, num_detections],

          feed_dict={image_tensor: image_np_expanded})

      # 检测结果的可视化

      vis_util.visualize_boxes_and_labels_on_image_array(

          image_np,

          np.squeeze(boxes),

          np.squeeze(classes).astype(np.int32),

          np.squeeze(scores),

          category_index,

          use_normalized_coordinates=True,

          line_thickness=8)

      cv2.imshow('object detection', cv2.resize(image_np,(800,600)))

      if cv2.waitKey(25) & 0xFF ==ord('q'):

        cv2.destroyAllWindows()

        break

基于TensorFlow Object Detection API进行迁移学习训练自己的人脸检测模型(二)的更多相关文章
- 基于TensorFlow Object Detection API进行相关开发的步骤
*以下二/三.四步骤确保你当前的文件目录是以research文件夹为相对目录. 一/安装或升级protoc 查看protoc版本命令: protoc --version 如果发现版本低于2.6.0或运 ...
- 使用TensorFlow Object Detection API+Google ML Engine训练自己的手掌识别器
上次使用Google ML Engine跑了一下TensorFlow Object Detection API中的Quick Start(http://www.cnblogs.com/take-fet ...
- TensorFlow Object Detection API(Windows下训练)
本文为作者原创,转载请注明出处(http://www.cnblogs.com/mar-q/)by 负赑屃 最近事情比较多,前面坑挖的有点久,今天终于有时间总结一下,顺便把Windows下训练跑通.Li ...
- [Tensorflow] Object Detection API - predict through your exclusive model
开始预测 一.训练结果 From: Testing Custom Object Detector - TensorFlow Object Detection API Tutorial p.6 训练结果 ...
- 谷歌开源的TensorFlow Object Detection API视频物体识别系统实现教程
视频中的物体识别 摘要 物体识别(Object Recognition)在计算机视觉领域里指的是在一张图像或一组视频序列中找到给定的物体.本文主要是利用谷歌开源TensorFlow Object De ...
- Tensorflow object detection API 搭建物体识别模型(四)
四.模型测试 1)下载文件 在已经阅读并且实践过前3篇文章的情况下,读者会有一些文件夹.因为每个读者的实际操作不同,则文件夹中的内容不同.为了保持本篇文章的独立性,制作了可以独立运行的文件夹目标检测. ...
- TensorFlow Object Detection API中的Faster R-CNN /SSD模型参数调整
关于TensorFlow Object Detection API配置,可以参考之前的文章https://becominghuman.ai/tensorflow-object-detection-ap ...
- TensorFlow object detection API
cloud执行:https://github.com/tensorflow/models/blob/master/research/object_detection/g3doc/running_pet ...
- Tensorflow object detection API 搭建属于自己的物体识别模型
一.下载Tensorflow object detection API工程源码 网址:https://github.com/tensorflow/models,可通过Git下载,打开Git Bash, ...
随机推荐
- 使用Github 当作自己个人博客的图床
使用Github 当作自己个人博客的图床 前提 本文前提: 我个人博客的草稿是存放在 github上的一个仓库 diarynote 截图存放的图片或者需要放在文章中图片,会固定存放在对应的文件夹中,我 ...
- 了解卷积神经网络如何使用TDA学习
在我之前的文章中,我讨论了如何对卷积神经网络(CNN)学习的权重进行拓扑数据分析,以便深入了解正在学习的内容以及如何学习它. 这项工作的重要性可归纳如下: 它使我们能够了解神经网络如何执行分类任务. ...
- sonar-runner命令模式运行sonar
适用环境:该种配置的模式适用于本地调试模式 前提条件:在工程路径下创建sonar-project.properties文件 该客户端的路径在系统配置文件中进行了定义 alias sonar-runne ...
- /usr,/usr/local/ 还是 /opt 目录区别
Linux 的软件安装目录是也是有讲究的,理解这一点,在对系统管理是有益的 /us(Unix Software Resource)r:系统级的目录,可以理解为C:/Windows/, /usr/lib ...
- java中super的用法总结
package com.ssm.java; /** * Super * usage1:super. 直接去调用父类的方法和属性. * usage2:放在构造器中的第一位,代表引用父类的构造器. */ ...
- REST服务地址
https://www.cnblogs.com/loveis715/p/4669091.html https://www.cnblogs.com/duanxz/p/4384454.html REST服 ...
- Nginx负载均衡与反向代理—《亿级流量网站架构核心技术》
当我们的应用单实例不能支撑用户请求时,此时就需要扩容,从一台服务器扩容到两台.几十台.几百台.然而,用户访问时是通过如http://www.XX.com的方式访问,在请求时,浏览器首先会查询DNS服务 ...
- mysql中 key 、primary key 、unique key 和 index 有什么不同
mysql中 key .primary key .unique key 和 index 有什么不同 key 是数据库的物理结构,它包含两层意义和作用, 一是约束(偏重于约束和规范数据库的结构完整性), ...
- Java-访问控制权限
Java面向对象-访问控制权限 Java中,可以通过一些Java关键字,来设置访问控制权限: 主要有 private(私有), package(包访问权限),protected(子类访问权限),pub ...
- loj#500 「LibreOJ β Round」ZQC 的拼图
分析 二分倍数 然后考虑dp[i][j]表示选到第i个x轴覆盖到j的情况y轴最多覆盖多少 贡献柿子可以画图然后相似三角形得到 代码 #include<bits/stdc++.h> usin ...