vue2.0 之 douban (三)创建header组件
1.分析

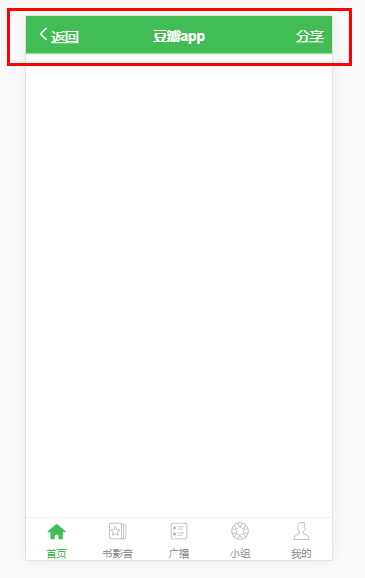
首页的header背景是绿色的,并且有一个搜索框,其他页面都是灰色的背景,在header的左侧,是一个返回按钮,右侧,有分享或者评论等图标,中间就是header的标题。我们先不做有搜索框的header。
我们先在components文件中创建一个header.vue文件,并且在less文件里新建一个颜色变量var.less(统一管理app的颜色,保持统一),我们先将有其他元素的组件的大致框架,以及样式先写出来。然后在Index.vue里面引入。
var.less
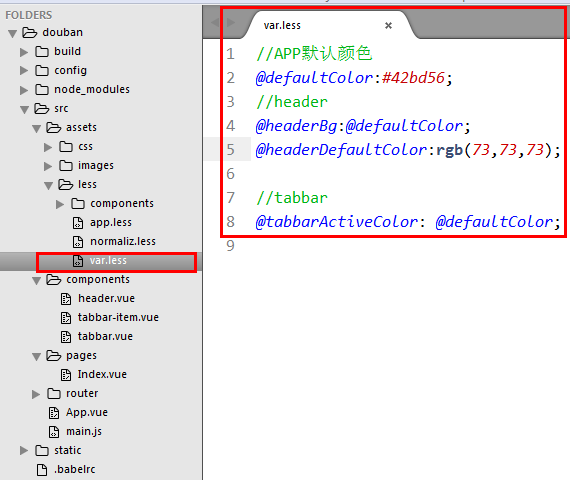
//APP默认颜色

@defaultColor:#42bd56;

//header

@headerBg:@defaultColor;

@headerDefaultColor:rgb(73,73,73);

//tabbar

@tabbarActiveColor: @defaultColor;
header.vue
<template>

  <header class="m-header is-bg is-fixed" >

    <div class="m-header-button is-left">

      <a href="javascript:;"><img class="m-icon-img" src="../assets/images/ic_bar_back_white.png"/>返回</a>

    </div>

    <h1 class="m-header-title">豆瓣app</h1>

    <div class="m-header-button is-right">

      <a href="javascript:;">分享</a>

    </div>

  </header>

</template>

<script>

</script>

<style lang="less">

/*导入颜色变量*/

@import "../assets/less/var.less";

.m-header{

  display: flex;

  align-items: center;

  height: 44px;

  padding: 0 10px;

  background: #fff;

  color: @headerDefaultColor;

  border-bottom:1px solid #eee;

  a{

    color: @headerDefaultColor;

  }

  .m-header-button{

    width: 70px;

    align-items:stretch;

    &.is-left{

      text-align: left;

    }

    &.is-right{

      text-align: right;

    }

    .m-icon-img{

      width: 20px;

      height: 20px;

    }

    .margin-right-10{

      margin-right: 10px;

    }

  }

  .m-header-title{

    flex: 1;

    text-align: center;

    font-size: 16px;

    text-overflow: ellipsis;

    white-space: nowrap;

    overflow: hidden;

  }

  &.is-bg{

    background:@headerBg;

    color: #fff;

    a{color: #fff;}

    .m-header-title{

      color: #fff;

    }

  }

  &.is-fixed{

    position: fixed;

    left: 0;

    right: 0;

    top: 0;

    z-index: 9;

  }

}

</style>
Index.vue 引入

效果图:
2.接下来我们就来把header改造成可以配置属性的组件,可以传递props(title,fixed,bg)
header.vue
<template>

  <header class="m-header" :class="{'is-bg':bg,'is-fixed':fixed}">

    <div class="m-header-button is-left">

      <slot name="left"></slot>

    </div>

    <h1 class="m-header-title" v-text="title"></h1>

    <div class="m-header-button is-right">

      <slot name="right"></slot>

    </div>

  </header>

</template>

<script>

  export default{

    props:{

      title:{

        type:String,

        default:''

      },

      bg:{

        type:Boolean,

        default:false

      },

      fixed:{

        type:Boolean,

        default:false

      }

    }

  }

</script>

<style lang="less">

/*导入颜色变量*/

@import "../assets/less/var.less";

.m-header{

  display: flex;

  align-items: center;

  height: 44px;

  padding: 0 10px;

  background: #fff;

  color: @headerDefaultColor;

  border-bottom:1px solid #eee;

  a{

    color: @headerDefaultColor;

  }

  .m-header-button{

    width: 70px;

    align-items:stretch;

    &.is-left{

      text-align: left;

    }

    &.is-right{

      text-align: right;

    }

    .m-icon-img{

      width: 20px;

      height: 20px;

    }

    .margin-right-10{

      margin-right: 10px;

    }

  }

  .m-header-title{

    flex: 1;

    text-align: center;

    font-size: 16px;

    text-overflow: ellipsis;

    white-space: nowrap;

    overflow: hidden;

  }

  &.is-bg{

    background:@headerBg;

    color: #fff;

    a{color: #fff;}

    .m-header-title{

      color: #fff;

    }

  }

  &.is-fixed{

    position: fixed;

    left: 0;

    right: 0;

    top: 0;

    z-index: 9;

  }

}

</style>
3.改造tabbar,完成路由跳转
我们先新建底部tabbar的路由页面,豆瓣app这个项目说大不大说小也不小,为了规划好结构,我们将每一个路由都新建一个文件夹,然后在文件夹里面,新建这个页面。在每个页面都添加不同的header组件,如图所示:

然后在每一个路由页面里面,我们都添加上header组件.
Index.vue
<template>

  <div>

    <m-header title="豆瓣app" fixed :bg="true">

    </m-header>

  </div>

</template>

<script>

  import mHeader from '../../components/header'

  export default {

    name: 'mine',

    components: {

      mHeader

    }

  }

</script>
AudioBook.vue
<template>

  <div>

    <m-header title="书影音" fixed>

      <a href="javascript:;" slot="right"><img class="m-icon-img margin-right-10" src="../../assets/images/ic_actionbar_search_icon.png"/></a>

      <a href="javascript:;" slot="right"><img class="m-icon-img" src="../../assets/images/ic_chat_green.png"/></a>

    </m-header>

  </div>

</template>

<script>

  import mHeader from '../../components/header'

  export default {

    name: 'mine',

    components: {

      mHeader

    }

  }

</script>
Broadcast.vue
<template>

  <div>

    <m-header title="广播" fixed>

      <a href="javascript:;" slot="right"><img class="m-icon-img margin-right-10" src="../../assets/images/ic_actionbar_search_icon.png"/></a>

      <a href="javascript:;" slot="right"><img class="m-icon-img" src="../../assets/images/ic_chat_green.png"/></a>

    </m-header>

  </div>

</template>

<script>

  import mHeader from '../../components/header'

  export default {

    name: 'mine',

    components: {

      mHeader

    }

  }

</script>
Group.vue
<template>

  <div>

    <m-header title="小组" fixed>

      <a href="javascript:;" slot="right"><img class="m-icon-img margin-right-10" src="../../assets/images/ic_actionbar_search_icon.png"/></a>

      <a href="javascript:;" slot="right"><img class="m-icon-img" src="../../assets/images/ic_chat_green.png"/></a>

    </m-header>

  </div>

</template>

<script>

  import mHeader from '../../components/header'

  export default {

    name: 'mine',

    components: {

      mHeader

    }

  }

</script>
Mine.vue
<template>

  <div>

    <m-header title="我的" fixed>

      <a href="javascript:;" slot="right"><img class="m-icon-img margin-right-10" src="../../assets/images/ic_actionbar_search_icon.png"/></a>

      <a href="javascript:;" slot="right"><img class="m-icon-img" src="../../assets/images/ic_chat_green.png"/></a>

    </m-header>

  </div>

</template>

<script>

  import mHeader from '../../components/header'

  export default {

    name: 'mine',

    components: {

      mHeader

    }

  }

</script>
路由的页面完成后我们就需要在router文件夹下面的index.js里面,来配置页面路由。如下:
index.js
import Vue from 'vue'

import Router from 'vue-router'

import Index from '../pages/Index/Index'

import Broadcast from '../pages/Broadcast/Broadcast'

import AudioBook from '../pages/AudioBook/AudioBook'

import Group from '../pages/Group/Group'

import Mine from '../pages/Mine/Mine'

Vue.use(Router)

// 路由配置

export default new Router({

  routes: [

    // 默认首页

    {

      path: '/',

      name: 'Index',

      component: Index

    },

    // 广播

    {

      path: '/broadcast',

      name: 'Broadcast',

      component: Broadcast

    },

    // 书影音

    {

      path: '/audioBook',

      name: 'AudioBook',

      component: AudioBook

    },

    // 小组

    {

      path: '/group',

      name: 'Group',

      component: Group

    },

    // 我的

    {

      path: '/mine',

      name: 'Mine',

      component: Mine

    },

    {

      path: '/Index',

      redirect: '/'

    },

    {

      path: '*',

      redirect: '/'

    },

  ]

})
App.vue
<template>

  <div id="app">

    <router-view></router-view>

    <m-tabbar v-model="select">

     <m-tabbar-item id='Index' isRouter>

        <img src="./assets/images/ic_tab_home_normal.png" alt="" slot="icon-normal">

        <img src="./assets/images/ic_tab_home_active.png" alt="" slot="icon-active">

        首页

      </m-tabbar-item>

      <m-tabbar-item id='AudioBook' isRouter>

        <img src="./assets/images/ic_tab_subject_normal.png" alt="" slot="icon-normal">

        <img src="./assets/images/ic_tab_subject_active.png" alt="" slot="icon-active">

        书影音

      </m-tabbar-item>

      <m-tabbar-item id='Broadcast' isRouter>

        <img src="./assets/images/ic_tab_status_normal.png" alt="" slot="icon-normal">

        <img src="./assets/images/ic_tab_status_active.png" alt="" slot="icon-active">

        广播

      </m-tabbar-item>

      <m-tabbar-item id='Group' isRouter>

        <img src="./assets/images/ic_tab_group_normal.png" alt="" slot="icon-normal">

        <img src="./assets/images/ic_tab_group_active.png" alt="" slot="icon-active">

        小组

      </m-tabbar-item>

       <m-tabbar-item id='Mine' isRouter>

        <img src="./assets/images/ic_tab_profile_normal.png" alt="" slot="icon-normal">

        <img src="./assets/images/ic_tab_profile_active.png" alt="" slot="icon-active">

        我的

      </m-tabbar-item>

    </m-tabbar>

  </div>

</template>

<script>

import mTabbar from './components/tabbar'

import mTabbarItem from './components/tabbar-item'

export default {

  name: 'app',

  components:{

    mTabbar,

    mTabbarItem

  },

  data() {

    return {

      select:"Index"

    }

  }

}

</script>

<style>

</style>
tabbar-item.vue
<template>

  <a class="m-tabbar-item" :class="{'is-active':isActive}" @click="goToRouter">

    <span class="m-tabbar-item-icon" v-show="!isActive"><slot name="icon-normal"></slot></span>

    <span class="m-tabbar-item-icon" v-show="isActive"><slot name="icon-active"></slot></span>

    <span class="m-tabbar-item-text"><slot></slot></span>

  </a>

</template>

<script>

  export default{

    props: {

      id:{

        type:String

      },

      isRouter:{

        type:Boolean,

        default:false

      }

    },

    computed: {

      isActive(){

        if(this.$parent.value===this.id){

          return true;

        }

      }

    },

    methods:{

      goToRouter(){

        this.$parent.$emit('input',this.id)

        //判断是否为路由跳转

        if(this.isRouter){

          //根据id跳转到对应的路由页面

          this.$router.push(this.id)

        }

      }

    }

  }

</script>

<style lang="less">

@import "../assets/less/var.less";

.m-tabbar-item{

  flex: 1;

  text-align: center;

  .m-tabbar-item-icon{

    display: block;

    padding-top: 2px;

    img{

      width: 28px;

      height: 28px;

    }

  }

  .m-tabbar-item-text{

    display: block;

    font-size: 10px;

    color:#949494;

  }

  &.is-active{

    .m-tabbar-item-text{

      color: @tabbarActiveColor;

    }

  }

}

</style>
tabbar.vue
通过计算返回当前路由的值
<template>

  <div class="m-tabbar">

    <slot></slot>

  </div>

</template>

<script>

  import mTabbarItem from './tabbar-item';

  export default {

    computed:{

      value(){

        return this.$route.matched[0].name

      }

    }

  }

</script>

<style lang="less">

.m-tabbar{

  display: flex;

  flex-direction: row;

  position: fixed;

  bottom: 0;

  left: 0;

  right: 0;

  width: 100%;

  overflow: hidden;

  height: 50px;

  background: #fff;

  border-top: 1px solid #e4e4e4;

}

</style>
效果图

vue2.0 之 douban (三)创建header组件的更多相关文章
- vue2.0 + vux (一)Header 组件
1.main.js import Vue from 'vue' import FastClick from 'fastclick' import VueRouter from 'vue-router' ...
- 《React后台管理系统实战 :三》header组件:页面排版、天气请求接口及页面调用、时间格式化及使用定时器、退出函数
一.布局及排版 1.布局src/pages/admin/header/index.jsx import React,{Component} from 'react' import './header. ...
- vue2.0 之 douban (四)创建Swipe图片轮播组件
swiper中文文档:http://www.swiper.com.cn 1.我们在components文件夹里创建一个swipe组件,将需要用到的js以及css文件复制到assets/lib文件夹下, ...
- vue2.0 之 douban (二)创建自定义组件tabbar
1.大体布局 这个组件分为两部分:第一个是组件的外层容器,第二个是组件的子容器item,子组件里面又分为图片和文字组合.子组件有2个状态,一个默认灰色的状态,一个选中状态,我们来实现一下这个组件的布局 ...
- vue2.0 之 douban (五)创建cell,media-cell组件
1.组件cell 这里的cell分为三种样式,左侧带图标,不带图标,以及左侧带竖线的cell. 每一个组件都有一个底部边框: 这里我们采用了移动端1px像素问题的解决方法:父级元素设置相对定位,构建1 ...
- vue2.0 之 douban (六)axios的简单使用
由于项目中用到了豆瓣api,涉及到跨域访问,就需要在config的index.js添加代理,例如 proxyTable: { // 设置代理,解决跨域问题 '/api': { target: 'htt ...
- vue2.0 自定义 弹窗(MessageBox)组件
组件模板 src/components/MessageBox/index.vue <!-- 自定义 MessageBox 组件 --> <template> <div c ...
- vue2.0 之 douban (一)框架搭建 及 整体布局
1.创建豆瓣项目 我们通过官方vue-cli初始化项目 vue init webpack douban 填写项目描述,作者,安装vue-router 初始化后,通过npm install安装依赖 cd ...
- vue2.0 之 douban (七)APP 打包
在打包之前需要修改一个地方,那就是config->index.js文件,修改assetsPublicPath: '/'为assetsPublicPath: './',截图如下 上面文件改好后,开 ...
随机推荐
- 3.golang 的注释
package main import ( "fmt" "math" ) func main() { fmt.Println(pi(5000)) } // pi ...
- 小白学Python——Matplotlib 学习(1)
众所周知,通过数据绘图,我们可以将枯燥的数字转换成容易被人们接受的图表,从而让人留下更加深刻的印象.而大多数编程语言都有自己的绘图工具,matplotlib就是基于Python的绘图工具包,使用它我们 ...
- 安装Pycharm(方便编辑代码的IDE(编辑器))以及 使用Pycharm新建项目
安装Pycharm(方便编辑代码的IDE(编辑器))以及 使用Pycharm新建项目 一.下载安装Pycharm 首先要下载Pycharm这个软件,官网的下载地址是: http://www.jetbr ...
- kotlin学习(7)高阶函数
高阶函数 以另一个函数作为参数或者返回值的函数被称为高阶函数. 函数类型 //隐式声明(省略了变量类型) val sum = (x:Int, y:Int -> x+y) val action = ...
- 原生js事件委托(事件代理)方法扩展
原生js事件委托(事件代理)方法扩展: 通过Node底层原型扩展委托方法 /** * 事件委托方法 * @param eventName {string}:事件名称,如'click' * @param ...
- hdu6468 zyb的面试 (思维)
题目传送门 题意: 将1~n个数按字典序排序后,求第k个数 思路: 代码: #include<stdio.h> #include<iostream> #include<a ...
- java中遍历实体类属性和类型,属性值
public static void testReflect(Object model) throws NoSuchMethodException, IllegalAccessException, I ...
- Docker其他操作:查看内部细节、IP、删除容器
1.查看容器内部细节 查看容器运行内部细节,比如可看容器的IP docker inspect mycentos2 2.查看容器IP地址 直接显示IP地址 docker inspect --format ...
- 06java进阶——集合框架(list和泛型)
1.ArrayList ArrayList集合是程序中最常见的一种集合,它属于引用数据类型(类).在ArrayList内部封装了一个长度可变的数组,当存入的元素超过数组长度时,ArrayList会在内 ...
- fhq_treap || BZOJ1861: [Zjoi2006]Book 书架 || Luogu P2596 [ZJOI2006]书架
题面:P2596 [ZJOI2006]书架 题解:记录每本书对应的节点编号 普通fhq_treap无法查询一个权值的排名,所以在普通fhq_treap上多记录每个节点的父亲(可加在pushup函数中) ...