分布式任务队列 Celery
目录
前言
分布式任务队列 Celery,Python 开发者必备技能,结合之前的 RabbitMQ 系列,深入梳理一下 Celery 的知识点。当然,这也将会是一个系列的文章。
快速入门分布式消息队列之 RabbitMQ(1)
快速入门分布式消息队列之 RabbitMQ(2)
快速入门分布式消息队列之 RabbitMQ(3)
简介
Celery 是一个简单、灵活且可靠的分布式任务队列(Distributed Task Queue)。队列是一种常见的数据结构,具有 FIFO(First in First Out)的特性,阻塞队列能够有效的将应用程序解耦为生产者和消费者,从而实现异步调用。任务的主体是被 celery.task 装饰器包装过的函数,而在队列中传递的 “任务” 其实是执行这些函数所需要的全部参数。
首先需要明确的是,Celery 虽然称之为分布式任务队列,但其本身并不提供队列服务,它更像是队列的 Controller,而非队列本身。所以应用 Celery 还需要集成第三方的消息队列中间件(e.g. RabbitMQ or Redis)。
那 Celery 和 RabbitMQ 有什么区别呢?简单来说 RabbitMQ 专注于消息队列的管理,而 Celery 专注于实时的任务处理。
Celery 的应用场景
即时响应需求:网页的响应时间是用户体验的关键,Amazon 曾指出响应时间每提高 100ms,他们的收入便会增加 1%。对于一些需要长时间执行的任务,大多会采用异步调用的方式来释放用户操作。Celery 的异步调用特性,和前端使用 Ajax 异步加载类似,能够有效缩短响应时间。
周期性任务需求(Periodic Task):对于心跳测试、日志归档、运维巡检这类指定时间周期执行的任务,可以应用 Celery 任务调度模块 Celery Beat,支持 crontab 定时模式,简单方便。
高并发及可扩展性需求:解耦应用程序最直接的好处就是可扩展性和并发性能的提高。Celery 支持以多线程、多进程、协程的方式来并发执行任务,同时支持自动动态扩展。
架构组成
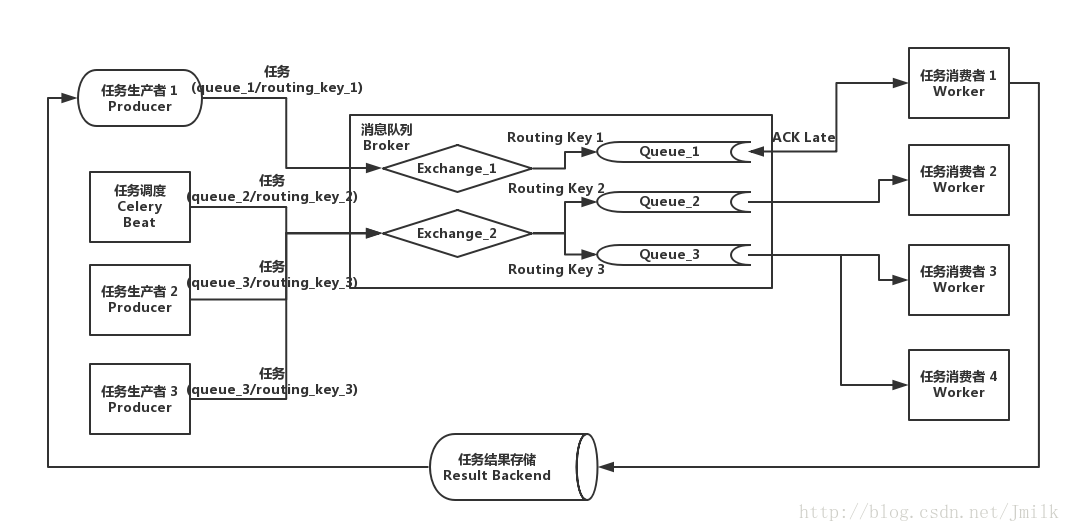
Broker
消息代理,作为临时储存任务的中间媒介,为 Celery 提供了队列服务。生产者将任务发送到 Broker,消费者再从 Broker 获取任务。Beat
任务调度器,负责调度并触发 Celery 定时周期任务。Beat 进程读取 CeleryConfig 中自定义的定时周期任务列表,将到期需要执行的定时任务发送到任务队列中。Worker
任务执行单元,实际负责执行任务的服务进程,每一个 Worker 都有一个并发池(Prefork/Eventlet/Gevent/Thread)来支持多并发。Worker 会监听订阅的任务队列,当队列中有任务时,就会获取任务并执行。Result Backend/Store
任务执行状态和结果存储,Celery 支持任务实时处理,也就是说 Celery 可以把任务执行的实时状态和最终结果回传生产者。这种回传也需要通过中间存储媒介。
Celery 应用基础
先通过一个简单的例子来认识 Celery,这里使用 RabbitMQ 充当 Broker,使用 Redis 充当 Result Backend。
- 安装 Celery & RabbitMQ & Redis
pip install celery

pip install redis

sudo apt-get install -yq rabbitmq-server

sudo apt-get install -yq redis-server- 初始化 Celery Proj 项目
jmilkfan@aju-dev:/workspace$ tree proj/

proj/

├── app_factory.py       # Celery application 工厂模块

├── celeryconfig.py      # Celery 常规配置文件模块

├── celery.py            # Celery 启动模块

├── __init__.py

└── task                 # 任务包

    ├── api.py           # 任务 API 模块

    ├── tasks.py         # 任务实现模块

└── __init__.py- 配置 Celery Config
vim proj/celeryconfig.py
# 直接使用 RabbitMQ 的缺省用户 guest 以及缺省虚拟主机 '/'

BROKER_URL = 'amqp://guest:guest@localhost:5672//'

# Redis 同样使用默认数据库 '0'

CELERY_RESULT_BACKEND = 'redis://localhost:6379/0'

# 设定导入任务模块路径

CELERY_IMPORTS = ['proj.task.tasks']- 实现 App Factory
vim proj/app_factory.py
这里使用__future__.absolute_import是因为 proj 包中的 celery 模块与 celery 库重名了,所以需要指明 celery 从绝对路径中导入。
from __future__ import absolute_import

from celery import Celery

def make_app():

    app = Celery('proj')

    # 指定常规配置模块路径

    app.config_from_object('proj.celeryconfig')

return app- 实现 Celery Runner
vim proj/celery.py
该模块能够自动被 celery cmd 识别,并自动加载模块中的 app 对象,以此来启动 worker service。
from proj.app_factory import make_app

app = make_app()- 实现 Celery Tasks
vim proj/task/tasks.py
from proj.celery import app

# 使用 celery.task 装饰器包装的函数就是任务的主体

@app.task

def add(x, y):
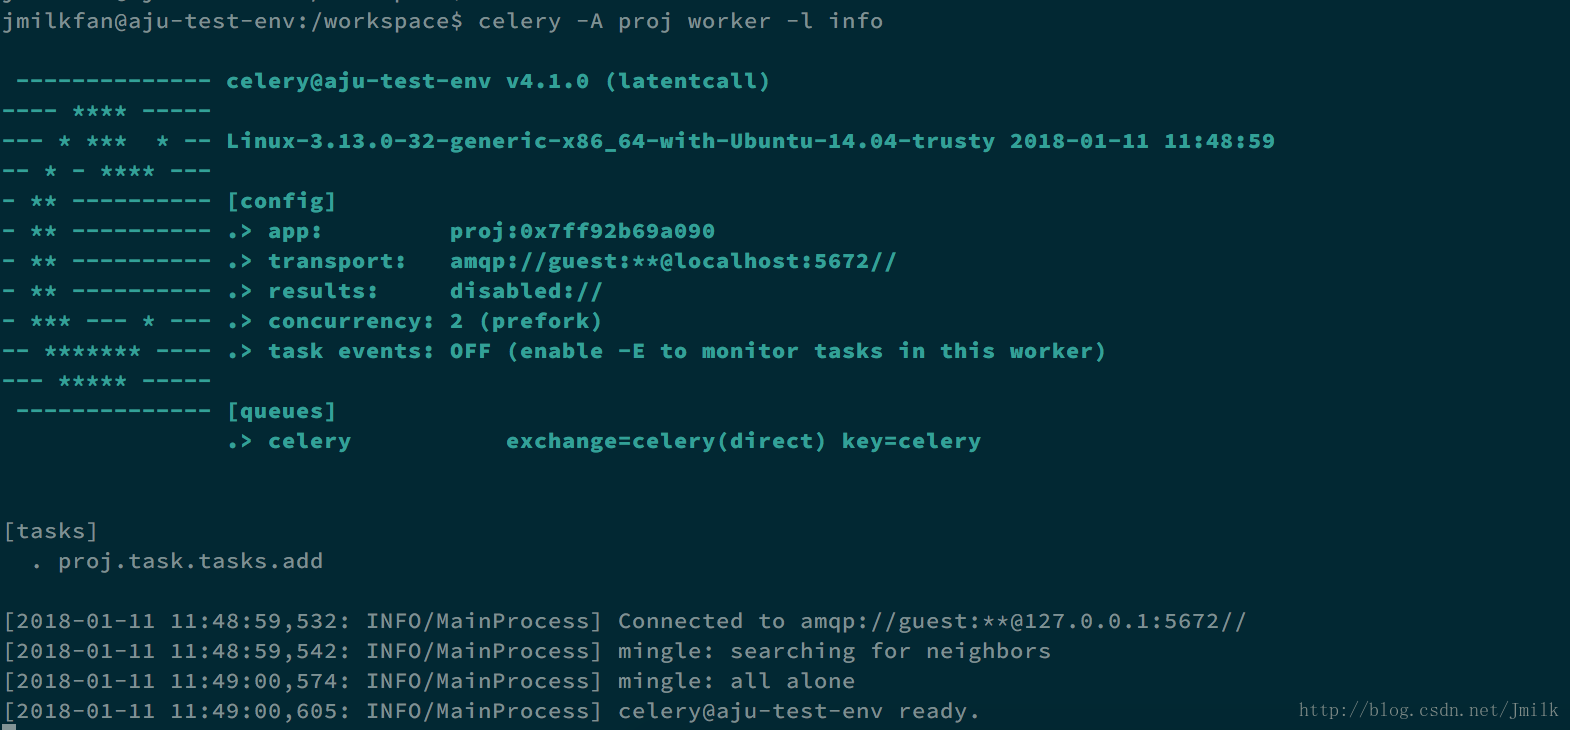
return x + y- 启动 Celery Worker
/workspace$ celery worker -A proj -l info选项 -A/--app,指定 Celery 的项目,如果参数是一个 Package,那么 celery cmd 会自动搜索 celery.py 模块。当然了,你也可以使用 app 所在的 module_name 作为参数。celery cmd 最终要加载的实际上是 app 对象。
- 执行任务
执行任务的代码逻辑一般在 “生产者” 实现。
>>> from proj.task import tasks

>>> tasks.add

<@task: proj.task.tasks.add of proj at 0x7f9149e6e250>

>>> result = tasks.add.delay(1, 2)

>>> result.status

u'SUCCESS'

>>> result.failed()

False

>>> result.info

3

>>> result.result

3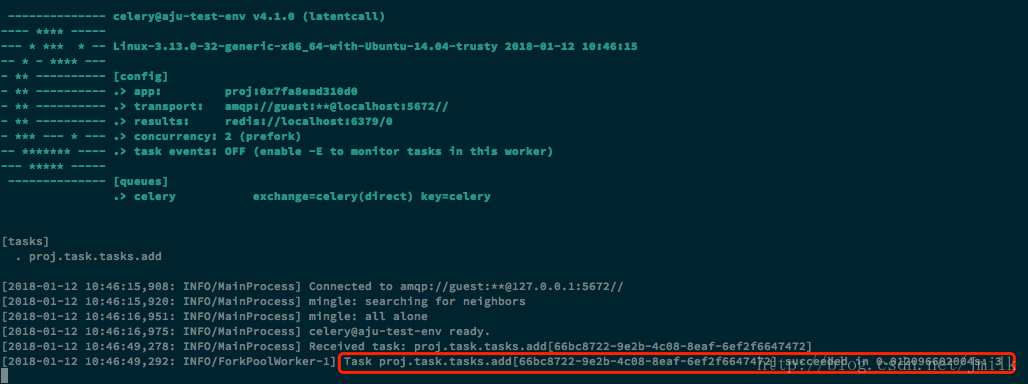
NOTE:想要获取任务执行结果必须启用 Result Backend,否则会触发异常
>>> result.status

Traceback (most recent call last):

  File "<stdin>", line 1, in <module>

  File "/usr/local/lib/python2.7/dist-packages/celery/result.py", line 436, in state

    return self._get_task_meta()['status']

  File "/usr/local/lib/python2.7/dist-packages/celery/result.py", line 375, in _get_task_meta

    return self._maybe_set_cache(self.backend.get_task_meta(self.id))

  File "/usr/local/lib/python2.7/dist-packages/celery/backends/base.py", line 352, in get_task_meta

    meta = self._get_task_meta_for(task_id)

AttributeError: 'DisabledBackend' object has no attribute ‘_get_task_meta_for'- 使用自定义 Exchange 和 Queue
vim proj/app_factory.py
自定义 Exchange 和 Queue 需要依赖 kombu 库,kombu 是一个 Messaging library for Python,Python 写的消息库。目标是为 AMQP 协议提供高层接口,让 Python 的消息传递尽可能变得简单,并且也提供一些常见的消息传递问题解决方案。
from __future__ import absolute_import

from celery import Celery

from kombu import Queue, Exchange

def make_app():

    app = Celery('proj')

    app.config_from_object('proj.celeryconfig')

    # 除了 config_from_object,也支持 celery.conf 直接设置 Celery Config

    # 定义 Exchange

    default_exchange = Exchange('default', type='direct')

    web_exchange = Exchange('task', type='direct')

    # 定义默认 Exchange 和 Queue,所有没有指定队列的任务,都会放置在这里

    app.conf.task_default_queue = 'default'

    app.conf.task_default_exchange = 'default'

    app.conf.task_default_routing_key = 'default'

    # 定义 Queues

    app.conf.task_queues = (

        Queue('default', default_exchange, routing_key='default'),

        Queue('high_queue', web_exchange, routing_key='hign_task'),

        Queue('low_queue', web_exchange, routing_key='low_task'),

    )

    return app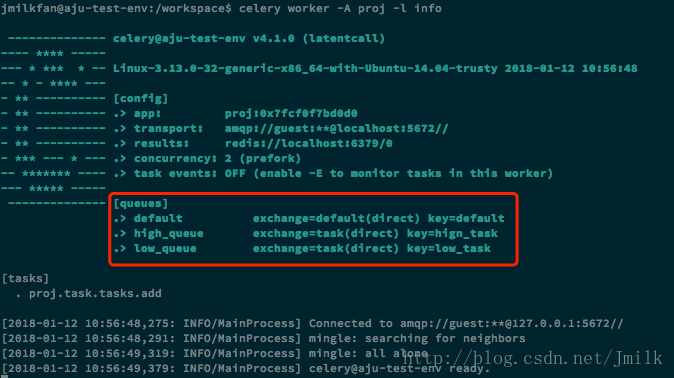
- 指定任务队列
task.apply_async 和 task.delay 一样用于触发任务,区别在于前者的功能更多。
例如:指定任务队列
>>> from proj.task import tasks

>>> result  = tasks.add.apply_async(args=(1, 2), queue='low_queue')

>>> result.status

u'SUCCESS'

>>> result.result

3- task.apply_async
使用 celery.task 装饰器包装函数之后,实际上得到的是一个类对象,其含有 delay、apply_async 等属性方法,当我们调用这两个方法时,才实际触发了一个任务。当我们直接调用这个函数时,其实跟调用一个普通函数没有区别。
apply_async 的参数列表(加粗为常用参数)- args (Tuple): The positional arguments to pass on to the task.
- kwargs (Dict): The keyword arguments to pass on to the task.
- countdown (float): Number of seconds into the future that the task should execute. Defaults to immediate execution. 指定 Worker 接收到任务后,执行任务之前等待的时间(s)。
- eta (~datetime.datetime): Absolute time and date of when the task should be executed. May not be specified if
countdownis also supplied. 使用 datetime 指定 Worker 接收到任务后,开始执行任务的精确时间 - expires (float, ~datetime.datetime): Datetime or seconds in the future for the task should expire. The task won’t be executed after the expiration time. 使用 datetime 指定 Worker 接收到任务后的任务过期时间,过期后则不再执行。
- shadow (str): Override task name used in logs/monitoring. Default is retrieved from :meth:
shadow_name. - connection (kombu.Connection): Re-use existing broker connection instead of acquiring one from the connection pool. 重新指定消息代理的 connection。
- retry (bool): If enabled sending of the task message will be retried in the event of connection loss or failure. Default is taken from the :setting:
task_publish_retrysetting. Note that you need to handle the producer/connection manually for this to work. 在消息代理 connection 失败或断开的情况下,重试任务发送。 - retry_policy (Mapping): Override the retry policy used. See the :setting:
task_publish_retry_policysetting. 任务重试发送策略。 - queue (str, kombu.Queue): The queue to route the task to. This must be a key present in :setting:
task_queues, or :setting:task_create_missing_queuesmust be enabled. See :ref:guide-routingfor more information. 指定任务储存队列。 - exchange (str, kombu.Exchange): Named custom exchange to send the task to. Usually not used in combination with the
queueargument. 指定任务传递交换机 - routing_key (str): Custom routing key used to route the task to a worker server. If in combination with a
queueargument only used to specify custom routing keys to topic exchanges. 指定队列与交换机的 Routing Key。 - priority (int): The task priority, a number between 0 and 9. Defaults to the :attr:
priorityattribute. 设定队列优先级 0~9。 - serializer (str): Serialization method to use. Can be
pickle,json,yaml,msgpackor any custom serialization method that’s been registered with :mod:kombu.serialization.registry. Defaults to the :attr:serializerattribute. 指定任务数据的序列化方式,默认为 json。 - compression (str): Optional compression method to use. Can be one of
zlib,bzip2, or any custom compression methods registered with :func:kombu.compression.register. Defaults to the :setting:task_compressionsetting. - link (~@Signature): A single, or a list of tasks signatures to apply if the task returns successfully. 如果任务执行成功,则紧接着执行一系列任务签名。
- link_error (~@Signature): A single, or a list of task signatures to apply if an error occurs while executing the task. 如果任务执行发生错误,则紧接着执行一系列任务签名。
- producer (kombu.Producer): custom producer to use when publishing the task.
- add_to_parent (bool): If set to True (default) and the task is applied while executing another task, then the result will be appended to the parent tasks
request.childrenattribute. Trailing can also be disabled by default using the :attr:trailattribute - publisher (kombu.Producer): Deprecated alias to
producer. - headers (Dict): Message headers to be included in the message.
分布式任务队列 Celery的更多相关文章
- 分布式任务队列 Celery —— Task对象
转载至 JmilkFan_范桂飓:http://blog.csdn.net/jmilk 目录 目录 前文列表 前言 Task 的实例化 任务的名字 任务的绑定 任务的重试 任务的请求上下文 任务的继 ...
- 分布式任务队列 Celery —— 深入 Task
目录 目录 前文列表 前言 Task 的实例化 任务的名字 任务的绑定 任务的重试 任务的请求上下文 任务的继承 前文列表 分布式任务队列 Celery 分布式任务队列 Celery -- 详解工作流 ...
- 分布式任务队列 Celery —— 应用基础
目录 目录 前文列表 前言 Celery 的周期定时任务 Celery 的同步调用 Celery 结果储存 Celery 的监控 Celery 的调试 前文列表 分布式任务队列 Celery 分布式任 ...
- 分布式任务队列 Celery —— 详解工作流
目录 目录 前文列表 前言 任务签名 signature 偏函数 回调函数 Celery 工作流 group 任务组 chain 任务链 chord 复合任务 chunks 任务块 mapstarma ...
- [源码解析] 分布式任务队列 Celery 之启动 Consumer
[源码解析] 分布式任务队列 Celery 之启动 Consumer 目录 [源码解析] 分布式任务队列 Celery 之启动 Consumer 0x00 摘要 0x01 综述 1.1 kombu.c ...
- [源码解析] 并行分布式任务队列 Celery 之 Task是什么
[源码解析] 并行分布式任务队列 Celery 之 Task是什么 目录 [源码解析] 并行分布式任务队列 Celery 之 Task是什么 0x00 摘要 0x01 思考出发点 0x02 示例代码 ...
- [源码解析] 并行分布式任务队列 Celery 之 消费动态流程
[源码解析] 并行分布式任务队列 Celery 之 消费动态流程 目录 [源码解析] 并行分布式任务队列 Celery 之 消费动态流程 0x00 摘要 0x01 来由 0x02 逻辑 in komb ...
- [源码解析] 并行分布式任务队列 Celery 之 多进程模型
[源码解析] 并行分布式任务队列 Celery 之 多进程模型 目录 [源码解析] 并行分布式任务队列 Celery 之 多进程模型 0x00 摘要 0x01 Consumer 组件 Pool boo ...
- [源码分析] 分布式任务队列 Celery 之 发送Task & AMQP
[源码分析] 分布式任务队列 Celery 之 发送Task & AMQP 目录 [源码分析] 分布式任务队列 Celery 之 发送Task & AMQP 0x00 摘要 0x01 ...
随机推荐
- 在ubuntu上使用Openresty+lua实现WAF----折腾笔记
1.1 参考loveshell的waf实现思路,再此感谢下面其中一部分是转载 1.2 WAF的功能 支持IP白名单和黑名单功能,直接将黑名单的IP访问拒绝.支持URL白名单,将不需要过滤的URL进行定 ...
- IDEA debug模式鼠标悬停提示变量值
- linux命令详解——tee
tee 重定向输出到多个文件 在执行Linux命令时,我们既想把输出保存到文件中,又想在屏幕上看到输出内容,就可以使用tee命令 要注意的是:在使用管道线时,前一个命令的标准错误输出不会被tee读取. ...
- Matlab 快速多通道积分图计算函数
所谓快速多通道积分图计算,其实就是 cumsum2D. 我写了一个比较快的版本(比 VLFeat 的快),用 mex 编译一下就能用了. 代码 #include <string.h> #i ...
- 利用logrotate切割nginx的access.log日志
一.新建一个nginx的logrotate配置文件 /var/log/nginx/access.log { daily rotate compress delaycompress missingok ...
- mysql orderby 问题
开发写的sql select * from aaa where course_id=xx order by a,b 当a,b条件都一致时,默认应该以id排序,当数据条数大于1x条(17)时,结果变为 ...
- Java 集合类库
java类库的基本结构 Iterable public interface Iterable<T> 实现这个接口允许对象成为 "foreach" 语句的目标. 也就是说 ...
- Spring 核心之IOC 容器
核心概念: IOC(Inversion of Control)控制反转:所谓控制反转,就是把原先我们代码里面需要实现的对象创建.依赖的代码,反转给容器来帮忙实现. DI(Dependency Inje ...
- 在vue-cli中使用px2rem,配合lib-flexible使用
原文地址 附上github源码 看这里 1.下载lib-flexible npm安装 npm i lib-flexible --save 2.引入lib-flexible 在main.js中引入li ...
- Linux基础教程 linux下使用find命令根据系统时间查找文件用法
LinuxFind 兄弟连Linux培训 总结这些时间戳包括 复制代码代码如下: mtime 文件内容上次修改时间 atime 文件被读取或访问的时间 ctime 文件状态变化时间 mtime 和 ...