spring框架总结(04)----介绍的是Spring中的JDBC模板
1.1 Jdbc模板概述
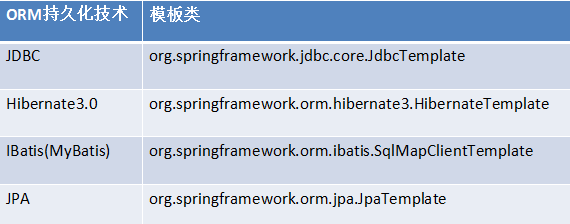
它是spring框架中提供的一个对象,是对原始Jdbc API对象的简单封装。spring框架为我们提供了很多的操作模板类,入下图所示:

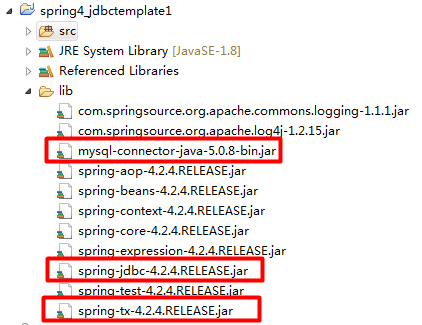
我们今天的主角在spring-jdbc-4.24.RELEASE.jar中,我们在导包的时候,除了要导入这个jar包外,还需要导入一个spring-tx-4.2.4.RELEASE.jar(它是和事务相关的)。
1、Spring中的jdbc模板入门
1.1.1. 创建工程、引入jar包

1.1.2. 创建测试表
CREATE TABLE account(
id BIGINT PRIMARY KEY AUTO_INCREMENT,
NAME VARCHAR(40),
money DOUBLE
)CHARACTER SET utf8 COLLATE utf8_general_ci;
1.1.3. 创建测试类
注意:需要导入c3p0的jar包
public class TestJdbcTemplate {
@Test
public void test1(){
//创建jdbc模板对象
JdbcTemplate jdbcTemplate = new JdbcTemplate();
//创建c3p0数据源
ComboPooledDataSource dataSource = new ComboPooledDataSource();
try {
dataSource.setDriverClass("com.mysql.jdbc.Driver");
dataSource.setJdbcUrl("jdbc:mysql://localhost:3306/spring_itheima10");
dataSource.setUser("root");
dataSource.setPassword("123456");
} catch (PropertyVetoException e) {
e.printStackTrace();
}
//设置数据源
jdbcTemplate.setDataSource(dataSource);
//插入操作
jdbcTemplate.update("insert into account(name,money) values(?,?)","张三",1000.0);
}
1.1.4. 将JdbcTemplate交给Spring管理(讲某一对象或者围着交给spring进行管理,需要的时候直接从注解中进行管理是实现,降低耦合性)
<!-- 配置JdbcTemplate -->
<bean id="jdbcTemplate" class="org.springframework.jdbc.core.JdbcTemplate">
<property name="dataSource" ref="dataSource"></property>
</bean>
<!-- 配置数据源 -->
<bean id="dataSource" class="com.mchange.v2.c3p0.ComboPooledDataSource">
<property name="driverClass" value="com.mysql.jdbc.Driver"></property>
<property name="jdbcUrl" value="jdbc:mysql://localhost:3306/spring_itheima10"></property>
<property name="user" value="root"></property>
<property name="password" value="123456"></property>
</bean>
1.1.5. 在DAO中使用JdbcTemplate
n 创建AccountDao接口
public interface AccountDao {
public void save(Account account);
}
n 创建AccountDaoImpl实现类
public class AccountDaoImpl implements AccountDao {
private JdbcTemplate jdbcTemplate;
}
@Override
public void save(Account account) {
this.jdbcTemplate.update("insert into account(name,money) values(?,?)",account.getName(),account.getMoney());
}
}
1.1.6. 把JdbcTemplate注入给DAO(然后再通过spring把持久层中需要的东西添加给这个表上的是直接从spring容器中获取,不用从业务层中进行获取)
<bean id="accountDao" class="cn.itcast.dao.impl.AccountDaoImpl">
<property name="jdbcTemplate" ref="jdbcTemplate"></property>
</bean>
<bean id="jdbcTemplate" class="org.springframework.jdbc.core.JdbcTemplate">
<property name="dataSource" ref="dataSource"></property>
</bean>
<bean id="dataSource" class="com.mchange.v2.c3p0.ComboPooledDataSource">
<property name="driverClass" value="com.mysql.jdbc.Driver"></property>
<property name="jdbcUrl" value="jdbc:mysql://localhost:3306/spring_itheima10"></property>
<property name="user" value="root"></property>
<property name="password" value="123456"></property>
</bean>
1.1.7. 编写测试类
/**
* 测试保存
*/
@Test
public void test2(){
Account account = new Account();
account.setName("JAY");
account.setMoney(1000.0);
accountDao.save(account);
}
1.2. 配置DBCP连接池
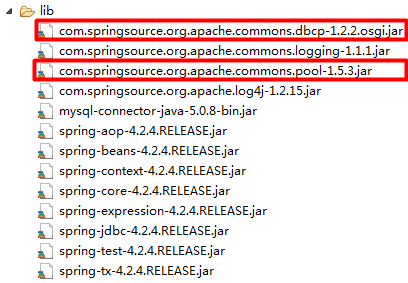
1.2.1. 导入jar包

1.2.2. 配置DBCP连接池
<!-- 配置dbcp数据库源 -->
<bean id="dataSource" class="org.apache.commons.dbcp.BasicDataSource">
<property name="driverClassName" value="com.mysql.jdbc.Driver"></property>
<property name="url" value="jdbc:mysql://localhost:3306/spring"></property>
<property name="username" value="root"></property>
<property name="password" value="123456"></property>
</bean>
1.3. 配置Spring自带的数据库连接池
<!-- 配置spring自带的数据源 -->
<bean id="dataSource" class="org.springframework.jdbc.datasource.DriverManagerDataSource">
<property name="driverClassName" value="com.mysql.jdbc.Driver"></property>
<property name="url" value="jdbc:mysql://localhost:3306/spring_itheima10"></property>
<property name="username" value="root"></property>
<property name="password" value="123456"></property>
</bean>
总结:
三种方式:一种是c3p0数据源进行配置,一种是dbcp数据源进行配置,第三种Spring自带的数据源进行配置实现这个过程中的数据。
1.4. 将数据库连接信息保存到属性文件中
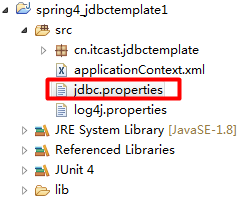
1.4.1. 新建jdbc.properties属性文件

jdbc.driverClass=com.mysql.jdbc.Driver
jdbc.url=jdbc:mysql://localhost:3306/hibernate_itcast55
jdbc.username=root
jdbc.password=123456
1.4.2. 在applicationContext.xml中引入jdbc.properties文件
n 配置bean引入
<!-- 配置bean引入jdbc.properties -->
<bean class="org.springframework.beans.factory.config.PropertyPlaceholderConfigurer">
<property name="location" value="classpath:jdbc.properties"></property>
</bean>
<!-- 配置数据源 -->
<bean id="dataSource" class="org.springframework.jdbc.datasource.DriverManagerDataSource">
<property name="driverClassName" value="${driverClass}"></property>
<property name="url" value="${jdbcUrl}"></property>
<property name="username" value="${user}"></property>
<property name="password" value="${password}"></property>
</bean>
n 通过context标签引入
<!-- 通过context标签引入jdbc.properties -->
<context:property-placeholder location="classpath:jdbc.properties"/>
提示:此处不加classpath也行,因为jdbc.properties就放在类路径下,就放在类一般加上。
总结:引入jdbc.properties配置文件的两种方式:1、使用配置bean进行引入(第一种方式)
2、通过context方式进行引入
1.5. 使用Jdbc模板完成CRUD
1.5.1. 新增数据
/**
* JdbcTemplate之新增
*/
@Test
public void test1(){
jdbcTemplate.update("insert into account(name,money) values(?,?)","李四",1000);
}
1.5.2. 修改数据
/**
* JdbcTemplate之修改
*/
@Test
public void test2(){
jdbcTemplate.update("update account set money = ? where id = ?",1100,1);
}
1.5.3. 删除数据
/**
* JdbcTemplate之删除
*/
@Test
public void test3(){
jdbcTemplate.update("delete from account where id = ?",2);
}
查询数据比较简单此处省略
1.1.1.1. 查询某列的值
/**
* JdbcTemplate之查询某列的值
*/
@Test
public void test5(){
double money = jdbcTemplate.queryForObject("select money from account where id = ?", Double.class, 1);
System.out.println(money);
}
1.1.1.1. 查询一个对象
n 创建实体类
public class Account implements Serializable{
private static final long serialVersionUID = 1L;
private Long id;
private String name;
private Double money;
public Long getId() {
return id;
}
public void setId(Long id) {
this.id = id;
}
public String getName() {
return name;
}
public void setName(String name) {
this.name = name;
}
public Double getMoney() {
return money;
}
public void setMoney(Double money) {
this.money = money;
}
@Override
public String toString() {
return "Account [id=" + id + ", name=" + name + ", money=" + money + "]";
}
}
n 创建RowMapper
public class AccountRowMapper implements RowMapper<Account>{
@Override
public Account mapRow(ResultSet rs, int rownum) throws SQLException {
Account account = new Account();
account.setId(rs.getInt("id"));
account.setName(rs.getString("name"));
account.setMoney(rs.getDouble("money"));
return account;
}
}
n 查询得到一个对象
/**
* JdbcTemplate之查询一个对象
*/
@Test
public void test4(){
AccountRowMapper mapper = new AccountRowMapper();
Account account = jdbcTemplate.queryForObject("select * from account where id = ?", mapper, 1);
System.out.println(account);
}
1.1.1.2. 查询一个集合
/**
* JdbcTemplate之查询一个集合
*/
@Test
public void test6(){
AccountRowMapper rowMapper = new AccountRowMapper();
List<Account> accounts = jdbcTemplate.query("select * from account", rowMapper);
for(int i = 0;i < accounts.size();i++){
System.out.println(accounts.get(i));
}
}
1.6. 在DAO中使用JdbcTemplate的两种方式
1.6.1. 方式一:在DAO中直接注入JdbcTemplate
编写DAO,注入JdbcTemplate
public class AccountDaoImpl implements AccountDao {
private JdbcTemplate jdbcTemplate;
public void setJdbcTemplate(JdbcTemplate jdbcTemplate) {
this.jdbcTemplate = jdbcTemplate;
}
@Override
public void save(Account account) {
jdbcTemplate.update("insert into account(name,money) values(?,?)", account.getName(),account.getMoney());
}
}
把DAO配置到Spring中
<bean id="accountDao" class="cn.itcast.dao.impl.AccountDaoImpl">
<property name="jdbcTemplate" ref="jdbcTemplate"></property>
</bean>
1.6.2. 方式二:在DAO中使用JdbcDaoSupport
让DAO继承JdbcDaoSupport
public class AccountDaoImpl extends JdbcDaoSupport implements AccountDao {
@Override
public void save(Account account) {
this.getJdbcTemplate().update("insert into account(name,money) values(?,?)", account.getName(),account.getMoney());
}
}
给DAO注入DataSource
<bean id="accountDao" class="cn.itcast.dao.impl.AccountDaoImpl">
<property name="dataSource" ref="dataSource"></property>
</bean>
比较:两版Dao有什么区别呢?
第一种在Dao类中定义JdbcTemplate的方式,适用于所有配置方式(xml和注解都可以)。
第二种让Dao继承JdbcDaoSupport的方式,只能用于基于XML的方式,注解用不了。
两种dao类中定义jdbcTemplate的方式,适用于所有的配置方式,(xml和注解都是可以使用的一种方式)
2、第二大块内容介绍----------------------------------------------Spring中的事务控制
事务的回顾:
l 事务的概念
n 事务是逻辑上一组操作,组成这组操作各个逻辑单元,要么一起成功,要么一起失败。
l 事务的特性
n 原子性
n 一致性
n 隔离性
n 持久性
l 如果不考虑隔离性,引发安全问题
n 读问题
u 脏读
u 不可重复读
u 虚读
n 写问题
u 丢失更新
l 解决读问题
n 设置事务隔离级别
u read uncommitted
u read committed
u repeatable read
u Serializable
spring框架总结(04)----介绍的是Spring中的JDBC模板的更多相关文章
- Spring框架详解介绍-基本使用方法
1.Spring框架-控制反转(IOC) 2.Spring框架-面向切面编程(AOP) 3.Spring 内置的JdbcTemplate(Spring-JDBC) Spring框架-控制反转(IOC) ...
- Spring框架学习笔记(5)——Spring Boot创建与使用
Spring Boot可以更为方便地搭建一个Web系统,之后服务器上部署也较为方便 创建Spring boot项目 1. 使用IDEA创建项目 2. 修改groupid和artifact 3. 一路n ...
- Spring框架学习笔记(8)——spring boot+mybatis plus+mysql项目环境搭建
之前写的那篇Spring框架学习笔记(5)--Spring Boot创建与使用,发现有多小细节没有提及,,正好现在又学习了mybatis plus这款框架,打算重新整理一遍,并将细节说清楚 1.通过I ...
- Spring中的JDBC模板类入门
1.Spring框架中提供了很多持久层的模板类来简化编程,使用模板类编写程序会变的简单 2.提供了JDBC模板,Spring框架提供的 *JdbcTemplate类 3.Spring框架可以整合Hib ...
- Spring框架核心知识介绍
一:spring框架介绍 1.spring框架是为了解决复杂的企业级应用而创建的, 使用Spring可以让简单的JavaBean实现之前只有EJB才能完成的事情.但是Spring不仅仅局限于服务器 ...
- Spring 框架基础(04):AOP切面编程概念,几种实现方式演示
本文源码:GitHub·点这里 || GitEE·点这里 一.AOP基础简介 1.切面编程简介 AOP全称:Aspect Oriented Programming,面向切面编程.通过预编译方式和运行期 ...
- 吴裕雄--天生自然JAVA SPRING框架开发学习笔记:Java Spring的特点和优点
Spring 是另一个主流的 Java Web 开发框架,该框架是一个轻量级的应用框架,具有很高的凝聚力和吸引力. Spring 是分层的 Java SE/EE full-stack 轻量级开源框架, ...
- Spring框架学习笔记(7)——Spring Boot 实现上传和下载
最近忙着都没时间写博客了,做了个项目,实现了下载功能,没用到上传,写这篇文章也是顺便参考学习了如何实现上传,上传和下载做一篇笔记吧 下载 主要有下面的两种方式: 通过ResponseEntity实现 ...
- Struts1、Struts2、Hibernate、Spring框架工作原理介绍
Struts1工作原理 Struts1工作原理图 1.初始化:struts框架的总控制器ActionServlet是一个Servlet,它在web.xml中配置成自动启动的Servlet,在启动时总控 ...
随机推荐
- markdown常用语法教程
1. 标题 总共六级标题,"#"号后面最好加空格,美观可以在后面加上对应数量的"#" # 一级标题 ## 二级标题 ### 三级标题 #### 四级标题 ### ...
- IOS UIScrollView常用代理方法
iOS UIScrollView代理方法有很多,从头文件中找出来学习一下 //只要滚动了就会触发 - (void)scrollViewDidScroll:(UIScrollView *)scrollV ...
- memcache的原理和命中率的总结
详见:http://blog.yemou.net/article/query/info/tytfjhfascvhzxcyt267 1 Memcache是什么Memcache是danga.c ...
- 老板让我们去陪睡!-It高管的焦虑
老板是我非常敬重的前领导之一,他的一些管理风格,也影响了后来我对技术团队的管理.就是这样一个非常令人尊敬的领导,为什么会有这么过分的要求,请允许我先卖个关子,接下来就会知道. 理想企业 什么是程序员理 ...
- 201521123095 《Java程序设计》第8周学习总结
1. 本周学习总结 1.1 以你喜欢的方式(思维导图或其他)归纳总结集合与泛型相关内容. 2. 书面作业 本次作业题集集合 Q1 List中指定元素的删除(题目4-1) 1.1 实验总结 对于删除函数 ...
- 201521123024《Java程序设计》第8周学习总结
1. 本周学习总结 1.1 以你喜欢的方式(思维导图或其他)归纳总结集合与泛型相关内容. 2. 书面作业 本次作业题集集合 1.List中指定元素的删除(题目4-1) 1.1 实验总结 注意conve ...
- 201521123015 《Java程序设计》第6周学习总结
1. 本周学习总结 1.1 面向对象学习暂告一段落,请使用思维导图,以封装.继承.多态为核心概念画一张思维导图,对面向对象思想进行一个总结. 2. 书面作业 1.clone方法 1.1 Object对 ...
- 201521123013 《Java程序设计》第4周学习总结
1. 本章学习总结 1.1 尝试使用思维导图总结有关继承的知识点. 1.2 使用常规方法总结其他上课内容. 1.多态是面向对象的三大特性之一.多态的意思:相同的形态,可以实不同的行为.Java中实现多 ...
- 201521123112《Java程序设计》第3周学习总结
1.本周学习总结 使用工具:百度脑图 2.书面作业 1.代码阅读 public class Test1 { private int i = 1;//这行不能修改 private static int ...
- 201521123029《Java程序设计》第1周学习总结
1. 本周学习总结 1.认识了Java的发展: 2.Java语言的特点,简单性和结构中立: 3.了解到了JDK.JRE,JVM: 4.学习Java数据类型分类,如整形,char型等. 2. 书面作业 ...
