ios之UITabelViewCell的自定义(xib实现2)
上篇文章介绍了如何用UITableView显示表格,并讲了几种UITableViewCell的风格。不过有时候我们需要自己定义 UITableViewCell的风格,其实就是向行中添加子视图。添加子视图的方法主要有两种:使用代码以及从.xib文件加载。当然后一种方法比较直 观。
我们这次要自定义一个Cell,使得它像QQ好友列表的一行一样:左边是一张图片,图片的右边是三行标签:

当然,我们不会搞得这么复杂,只是有点意思就行。
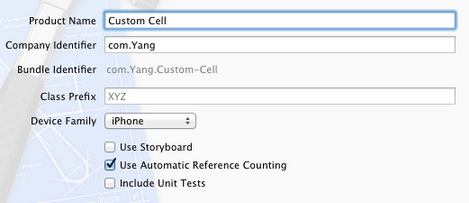
1、运行Xcode 4.2,新建一个Single View Application,名称为Custom Cell:
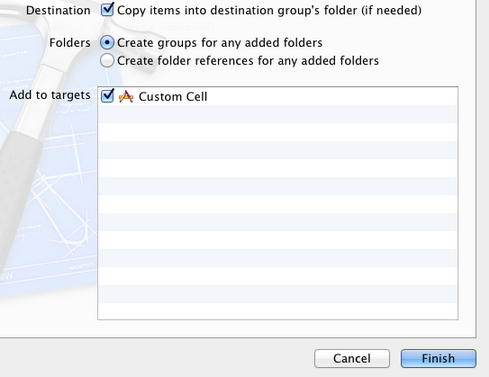
2、将图片资源导入到工程。为此,我找了14张50×50的.png图片,名称依次是1、2、……、14,放在一个名为Images的文件夹中。将此文件夹拖到工程中,在弹出的窗口中选中Copy items into…
添加完成后,工程目录如下:

3、创建一个UITableViewCell的子类:选中Custom Cell目录,依次选择File — New — New File,在弹出的窗口,左边选择Cocoa Touch,右边选择Objective-C class:
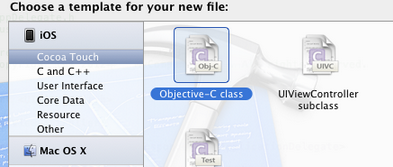
单击Next,输入类名CustomCell,Subclass of选择UITableViewCell:

之后选择Next和Create,就建立了两个文件:CustomCell.h和CustomCell.m。
4、创建CustomCell.xib:依次选择File — New — New File,在弹出的窗口,左边选择User Interface,右边选择Empty:

单击Next,选择iPhone,再单击Next,输入名称为CustomCell,选择好位置:
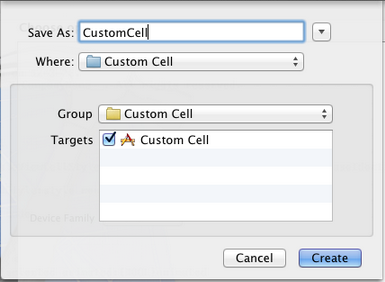
单击Create,这样就创建了CustomCell.xib。
5、打开CustomCell.xib,拖一个Table View Cell控件到面板上:
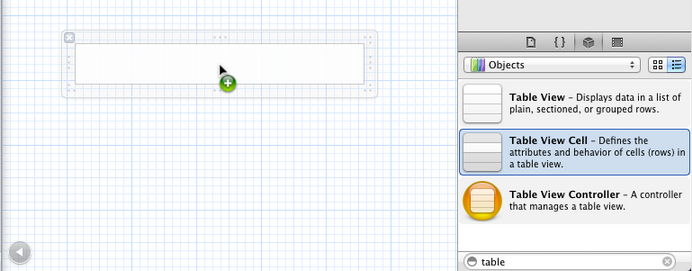
选中新加的控件,打开Identity Inspector,选择Class为CustomCell;然后打开Size Inspector,调整高度为60。
6、向新加的Table View Cell添加控件:拖放一个ImageView控件到左边,并设置大小为50×50。然后在ImageView右边添加三个Label,设置标签字号,最上边的是14,其余两个是12:

接下来向CustomCell.h添加Outlet映射,将ImageView与三个Label建立映射,名称分别为imageView、nameLabel、decLabel以及locLable,分别表示头像、昵称、个性签名,地点。
选中Table View Cell,打开Attribute Inspector,将Identifier设置为CustomCellIdentifier:

为了充分使用这些标签,还要自己创建一些数据,存在plist文件中,后边会做。
7、打开CustomCell.h,添加属性:
@property (copy, nonatomic) UIImage *image;

@property (copy, nonatomic) NSString *name;

@property (copy, nonatomic) NSString *dec;

@property (copy, nonatomic) NSString *loc;
8、打开CustomCell.m,向其中添加代码:
8.1 在@implementation下面添加代码:
@synthesize image;

@synthesize name;

@synthesize dec;

@synthesize loc;
8.2 在@end之前添加代码:
- (void)setImage:(UIImage *)img {

    if (![img isEqual:image]) {

        image = [img copy];

        self.imageView.image = image;

    }

}

-(void)setName:(NSString *)n {

    if (![n isEqualToString:name]) {

        name = [n copy];

        self.nameLabel.text = name;

    }

}

-(void)setDec:(NSString *)d {

    if (![d isEqualToString:dec]) {

        dec = [d copy];

        self.decLabel.text = dec;

    }

}

-(void)setLoc:(NSString *)l {

    if (![l isEqualToString:loc]) {

        loc = [l copy];

        self.locLabel.text = loc;

    }

}
这相当于重写了各个set函数,从而当执行赋值操作时,会执行我们自己写的函数。
好了,现在自己定义的Cell已经可以使用了。
不过在此之前,我们先新建一个plist,用于存储想要显示的数据。建立plist文件的方法前面的文章有提到。我们建好一个friendsInfo.plist,往其中添加数据如下:

注意每个节点类型选择。
9、打开ViewController.xib,拖一个Table View到视图上,并将Delegate和DataSource都指向File’ Owner,就像上一篇文章介绍的一样。
10、打开ViewController.h,向其中添加代码:
#import <UIKit/UIKit.h>

@interface ViewController : UIViewController<UITableViewDelegate, UITableViewDataSource>

@property (strong, nonatomic) NSArray *dataList;

@property (strong, nonatomic) NSArray *imageList;

@end
11、打开ViewController.m,添加代码:
11.1 在首部添加:
#import "CustomCell.h"
11.2 在@implementation后面添加代码:
@synthesize dataList;

@synthesize imageList;
11.3 在viewDidLoad方法中添加代码:
- (void)viewDidLoad

{

    [super viewDidLoad];

    // Do any additional setup after loading the view, typically from a nib.

    //加载plist文件的数据和图片

    NSBundle *bundle = [NSBundle mainBundle];

    NSURL *plistURL = [bundle URLForResource:@"friendsInfo" withExtension:@"plist"];

    NSDictionary *dictionary = [NSDictionary dictionaryWithContentsOfURL:plistURL];

    NSMutableArray *tmpDataArray = [[NSMutableArray alloc] init];

    NSMutableArray *tmpImageArray = [[NSMutableArray alloc] init];

    for (int i=0; i<[dictionary count]; i++) {

        NSString *key = [[NSString alloc] initWithFormat:@"%i", i+1];

        NSDictionary *tmpDic = [dictionary objectForKey:key];

        [tmpDataArray addObject:tmpDic];

        NSString *imageUrl = [[NSString alloc] initWithFormat:@"%i.png", i+1];

        UIImage *image = [UIImage imageNamed:imageUrl];

        [tmpImageArray addObject:image];

    }

    self.dataList = [tmpDataArray copy];

    self.imageList = [tmpImageArray copy];

}
11.4 在ViewDidUnload方法中添加代码:
self.dataList = nil;

self.imageList = nil;
11.5 在@end之前添加代码:
#pragma mark -

#pragma mark Table Data Source Methods

- (NSInteger)tableView:(UITableView *)tableView numberOfRowsInSection:(NSInteger)section {

    return [self.dataList count];

}

- (UITableViewCell *)tableView:(UITableView *)tableView cellForRowAtIndexPath:(NSIndexPath *)indexPath {

    static NSString *CustomCellIdentifier = @"CustomCellIdentifier";

    static BOOL nibsRegistered = NO;

    if (!nibsRegistered) {

        UINib *nib = [UINib nibWithNibName:@"CustomCell" bundle:nil];

        [tableView registerNib:nib forCellReuseIdentifier:CustomCellIdentifier];

        nibsRegistered = YES;

    }

    CustomCell *cell = [tableView dequeueReusableCellWithIdentifier:CustomCellIdentifier];

    NSUInteger row = [indexPath row];

    NSDictionary *rowData = [self.dataList objectAtIndex:row];

    cell.name = [rowData objectForKey:@"name"];

    cell.dec = [rowData objectForKey:@"dec"];

    cell.loc = [rowData objectForKey:@"loc"];

    cell.image = [imageList objectAtIndex:row];

    return cell;

}

#pragma mark Table Delegate Methods

- (CGFloat)tableView:(UITableView *)tableView heightForRowAtIndexPath:(NSIndexPath *)indexPath {

    return 60.0;

}

- (NSIndexPath *)tableView:(UITableView *)tableView

  willSelectRowAtIndexPath:(NSIndexPath *)indexPath {

    return nil;

}
12、运行:

ios之UITabelViewCell的自定义(xib实现2)的更多相关文章
- ios之UITabelViewCell的自定义(xib实现)
通过继承UITableViewCell来自定义cell 1.创建一个空的项目.命名: 2.创建一个UITableViewController 并且同时创建xib: 3.设置AppDelegate.m中 ...
- ios之UITabelViewCell的自定义(代码实现)
在用到UITableVIew的时候,经常会自定义每行的Cell 在IOS控件UITableView详解中的下面代码修改部分代码就可以实现自定义的Cell了 [cpp] view plaincopy - ...
- iOS开发UI篇—使用xib自定义UItableviewcell实现一个简单的团购应用界面布局
iOS开发UI篇—使用xib自定义UItableviewcell实现一个简单的团购应用界面布局 一.项目文件结构和plist文件 二.实现效果 三.代码示例 1.没有使用配套的类,而是直接使用xib文 ...
- iOS开发多线程篇—自定义NSOperation
iOS开发多线程篇—自定义NSOperation 一.实现一个简单的tableView显示效果 实现效果展示: 代码示例(使用以前在主控制器中进行业务处理的方式) 1.新建一个项目,让控制器继承自UI ...
- iOS应用的入口自定义和事件处理的自定义
iOS应用的入口自定义和事件处理的自定义 - (BOOL)application:(UIApplication *)application didFinishLaunchingWithOptions: ...
- iOS开发——UI基础-自定义构造方法,layoutSubviews,Xib文件,利用Xib自定义View
一.自定义构造方法 有时候需要快速创建对象,可以自定义构造方法 + (instancetype)shopView { return [[self alloc] init]; } - (instance ...
- ios --xib自定义,解决在导航栏不透明的情况下,自定义xib view高度被压缩64的问题
在使用xib自定义view的时候,个人习惯性的直接使用xib中的约束,所以自然而然的要打开Autolayout.以前在使用的时候没有发现什么问题,最近项目中使用的时候突然发现在导航栏透明的情况下,出现 ...
- iOS Interface Builder:在.xib文件中加载另一个.xib文件
在开发中,经常会用到一个需要重复使用的模块,比如好友列表中每个用户的展示或每条动态,这些都是相同的模版,这样我们就可以把这个部分提取出来放到一个单独的.xib中.那么提取出的.xib如何在其他.xib ...
- 【ios开发】使用自定义的TableViewCell
当系统自带的cell无法满足我们的要求的时候,我们就可以自定义自己的cell. 先看看效果,这个效果有点重复造轮子的感觉,因为UITableView已经实现了这种布局. 打造自己的cell只需简单的3 ...
随机推荐
- __setitem__,__getitem,__delitem__
目录 __setitem__ __getitem__ __delitem__与__delattr__ class Foo: def __init__(self, name): self.name = ...
- 01 | Jewels and Stones
Question You're given strings J representing the types of stones that are jewels, and S representing ...
- hibernate错误总结2
- socket编程模拟linux下的ssh代码实现
实现思路: 1.提供输入指令的客户端: 2.提供返回执行指令结果的服务端 3.寻找服务端返回结果一次无法全部接收的解决思路 服务端代码(ssh_server.py) #coding=utf-8 imp ...
- [題解]luogu_P1120小木棍(搜索)
好久以前抄的題解,現在重新抄題解做一下 1.對所有木棍從大到小排序,後用小的比較靈活 2.限制加入的木棍單調遞減,因為先/后用長/短木棍等價,反正就是那兩根 3.預處理出重複木棍的位置,防止重複搜索相 ...
- python模块之hmac
# hmac模块使用步骤: # hmac模块模块的使用步骤与hashlib模块的使用步骤基本一致,只是在第1步获取hmac对象时,只能使用hmac.new()函数, # 因为hmac模块没有提供与具体 ...
- 如何使用程序调用webApi接口
如何使用程序调用webApi接口 在C#中,传统调用HTTP接口一般有两种办法: WebRequest/WebResponse组合的方法调用 WebClient类进行调用. 第一种方法抽象程度较低,使 ...
- centOS+uwsgi+nginx 部署flask项目,问题记录
用flask做的项目想要部署到centOS系统上,填了一些坑,终于成功了,记录一下遇到的问题: 此次部署主要是按照这个博客进行的 https://www.cnblogs.com/Ray-liang/p ...
- 094 Binary Tree Inorder Traversal 中序遍历二叉树
给定一个二叉树,返回其中序遍历.例如:给定二叉树 [1,null,2,3], 1 \ 2 / 3返回 [1,3,2].说明: 递归算法很简单,你可以通过迭代算法完成吗?详见 ...
- VMware下OSSIM 4.1.0的下载、安装和初步使用(图文详解)
不多说,直接上干货! 为什么,我写了一篇OSSIM 5.2.0的,还要再来写OSSIM 4.1.0呢,是因为,OSSIM 5.2.0所需内存较大,8G甚至16G,但是,肯定性能和里面集成组件越高级.也 ...
