MongoDB3.6 一键化自动部署方案
1.系统基础配置
下面的命令默认都使用root用户进行操作,操作系统为Centos7,mongodb3.6.x以上版本
1.1 修改系统配置文件/etc/security/limits.conf和/etc/profile
修改/etc/security/limits.conf持久化设置允许用户/进程打开文件句柄数,这一步需要重启系统,不然不起作用
* soft nofile 1048576
* hard nofile 1048576
* soft nproc 524288
* hard nproc 524288
修改/etc/profile,在最后添加ulimit -s 1024,然后保存并source /etc/profile
1.2 关闭每台机器的防火墙
Centos7以下命令:
chkconfig iptables off && service iptables stop

使用命令查看chkconfig --list 是否设置自动启动为关闭

Centos7以上命令:
systemctl stop firewalld

systemctl is-enabled firewalld

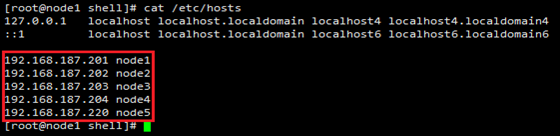
1.3 每台机器修改/etc/hosts和hostname
在/etc/hosts添加集群所有的ip及对应的hostname
注意:配置的ip数与选择的模板相关联
1.4 机器之间配置ssh免密登录
每台机器分别执行下面命令,这里以5台机器为准:
ssh-keygen -t rsa -P "" -f /root/.ssh/id_rsa
ssh-copy-id node1
ssh-copy-id node2
ssh-copy-id node3
ssh-copy-id node4
ssh-copy-id node5
1.5 检测自动化部署所需的命令是否可用
ifconfig、ssh需要可用
需要安装numactl,使用rpm -qa | grep numactl查看numactl是否已安装
注意:完成上面5步操作后重启每台机器。重启完毕,使用命令ulimit -a 查看
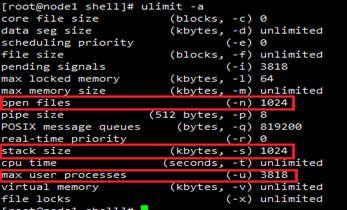
要保证 open files 对应的值为
Stack size 对应的值为
Max user processes对应的值为
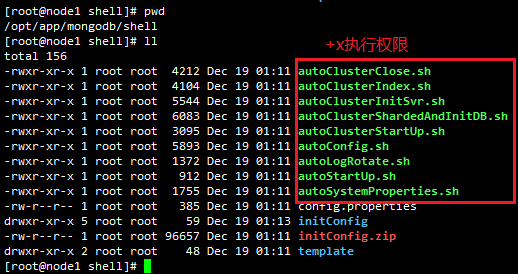
1.6 检查mongodb安装下bin目录和shell目录执行权限
进入到shell目录,执行chmod +x auto*加执行权限
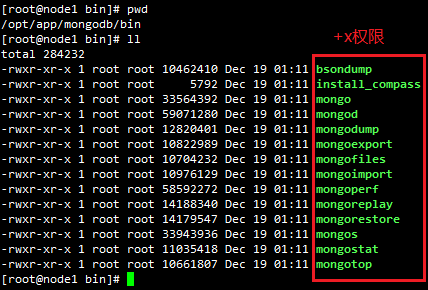
进入mongodb的bin目录,执行chmod +x ./*加执行权限
2.MongoDB 一键化部署
2.1 一键化部署shell文件介绍
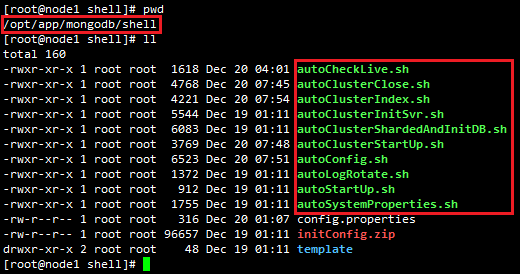
shell脚本文件目前放置在mongodb的安装目录下:
⑪config.properties,配置文件,包括mongodb安装目录、mongoCluster集群安装目录、所需主机、数据库等等。如图:
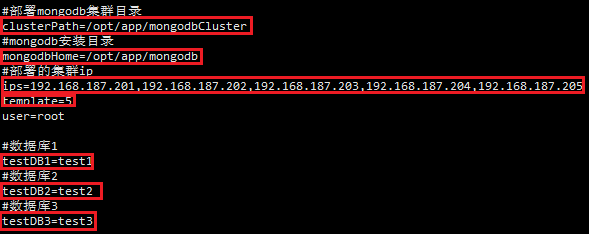
上图几个参数可能需要随环境不同而修改。
说明:
ips=192.168.187.201, 192.168.187.202, 192.168.187.203, 192.168.187.204, 192.168.187.205
这里默认192.168.187.201为mongdb集群的节点node1,192.168.187.202为mongdb集群的节点node2,192.168.187.203为mongdb集群的节点node3,192.168.187.204为mongdb集群的节点node4,,192.168.187.205为mongdb集群的节点node5。
template与ips的ip数量对应,ips的ip数为5,则意味着采用5台机器的模板,这里默认为5。
⑬template 目录包括3.conf、4.conf和5.conf,为mongodb3台机器、4台机器和5台机器安装模板,有需要者可以自行修改模板。
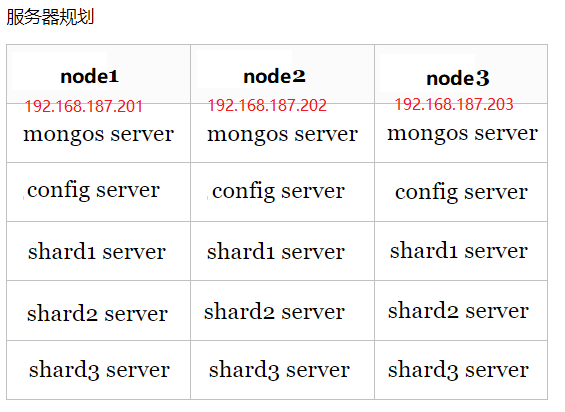
3.conf 3台机器分配的mongodb节点模板为
- #所有mongo节点
- nodes=config,shard1,shard2,shard3,mongos
- #机器分配到的mongo节点
- node1=mongos,config,shard1,shard2,shard3
- node2=mongos,config,shard1,shard2,shard3
- node3=mongos,config,shard1,shard2,shard3
- #mongo节点分配到的机器,注意shard部分排在第一的为master,第二为secondary,第三位arbitery
- config=node1,node2,node3
- mongos=node1,node2,node3
- shard1=node1,node2,node3
- shard2=node2,node3,node1
- shard3=node3,node2,node1
- #mongo节点端口
- config_port=29040
- mongos_port=29050
- shard1_port=29010
- shard2_port=29020
- shard3_port=29030
注意:这里的node1、node2、node3不是机器hostname(当然也可以以这种node1、node2方式去命名hostname),只是机器ip的代名称,因为不同开发环境中的ip总是不同的,所以使用node1、node2...去代替变化的ip。这里的node1、node2、node3默认与config.properties中的ips属性对应,即ips中的第一个ip默认为node1,第二个ip默认为node2,第三个ip默认为node3,4.conf和5.conf类同。查看下图,可以清晰看到mongodb分布的节点:
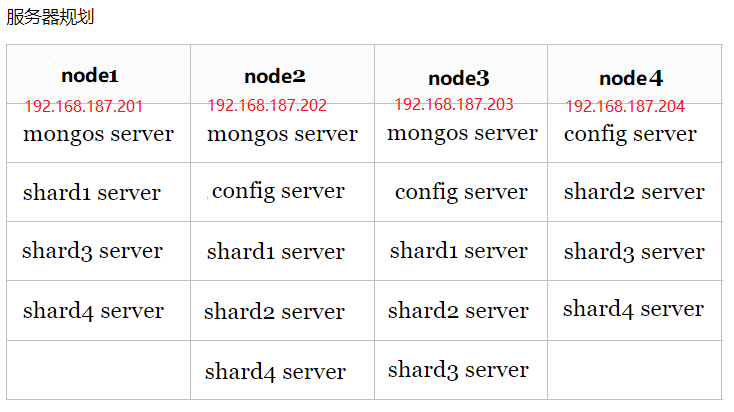
4.conf 4台机器分配mongodb节点的模版为
- #所有mongo节点
- nodes=config,shard1,shard2,shard3,shard4,mongos
- #机器分配到的mongo节点
- node1=mongos,shard1,shard3,shard4
- node2=mongos,config,shard1,shard2,shard4
- node3=mongos,config,shard1,shard2,shard3
- node4=config,shard2,shard3,shard4
- #mongo节点分配到的机器,注意shard部分排在第一的为master,第二为secondary,第三位arbitery
- config=node2,node3,node4
- mongos=node1,node2,node3
- shard1=node1,node2,node3
- shard2=node2,node3,node4
- shard3=node3,node4,node1
- shard4=node4,node1,node2
- #mongo节点端口
- config_port=29040
- mongos_port=29050
- shard1_port=29000
- shard2_port=29010
- shard3_port=29020
- shard4_port=29030
5.conf 5台机器分配mongodb节点的模版为
- #所有mongo节点
- nodes=config,shard1,shard2,shard3,shard4,shard5,mongos
- #机器分配到的mongo节点
- node1=mongos,shard1,shard4,shard5
- node2=mongos,shard1,shard2,shard5
- node3=config,shard1,shard2,shard3
- node4=config,shard2,shard3,shard4
- node5=config,shard3,shard4,shard5
- #mongo节点分配到的机器, 注意shard部分排在第一的为master,第二为secondary,第三位arbitery
- config=node3,node4,node5
- mongos=node1,node2
- shard1=node1,node2,node3
- shard2=node2,node3,node4
- shard3=node3,node4,node5
- shard4=node4,node5,node1
- shard5=node5,node1,node2
- #mongo节点端口
- config_port=29040
- mongos_port=29050
- shard1_port=29060
- shard2_port=29070
- shard3_port=29080
- shard4_port=29090
- shard5_port=29100

模板需要配置的几项内容:
- mongodb所有节点
- 每台机器分配的mongodb节点
- 每个mongodb节点分配的机器
- mongo节点的端口
如有需要,可自行配置6、7或者更多的机器分配mongo模板
①autoCheckLive.sh脚本为创建所在服务器对应的mongodb的进程存活监控,不存在则自动拉起。
- #! /bin/bash
- #shell目录的绝对路径
- shellPath=$
- configPath=$shellPath/config.properties
- #从config.properties文件读取数据出来
- clusterPath=`awk -F= -v k=clusterPath '{ if ( $1 == k ) print $2; }' $configPath`
- template=`awk -F= -v k=template '{ if ( $1 == k ) print $2; }' $configPath`
- templatePath=$shellPath/template/$template.conf
- ips=`awk -F= -v k=ips '{ if ( $1 == k ) print $2; }' $configPath`
- #ip数组
- eval $(echo $ips | awk '{split($0, arr, ","); for(i in arr) print "ipArray["i"]="arr[i]}')
- #本地ip
- localIp=`/sbin/ifconfig -a|grep inet|grep -v 127.0.0.1|grep -v inet6 | awk '{print $2}' | tr -d "addr:"`
- suffix=""
- #判断linux系统cpu是否为numa架构,如果是则传回_numa,禁用numactl
- numaCount=`grep -i numa /var/log/dmesg | wc -l`
- nodeCount=`grep -i numa /var/log/dmesg | grep -wi "node" | wc -l`
- offCount=`grep -i numa /var/log/dmesg | grep -wi "numa=off" | wc -l`
- if [[ ($numaCount -gt ) && ($nodeCount -gt ) && ($offCount -eq ) ]]
- then
- suffix="_numa"
- fi
- #遍历ip数组
- for((i=; i<=${#ipArray[@]}; i++))
- do
- #获取本地ip在模板中的代称号,根据本地ip所在ip数组中的下标数字获取
- if [[ $localIp = ${ipArray[i]} ]]
- then
- #获取模板中本地ip对应的代称号所拥有的mongo节点
- mongodbNodes=`awk -F= -v k=node$i '{ if ( $1 == k ) print $2; }' $templatePath`
- eval $(echo $mongodbNodes | awk '{split($0, mongodbArr, ","); for(y in mongodbArr) print "mongodbArray["y"]="mongodbArr[y]}')
- for n in ${mongodbArray[*]}
- do
- pid=`cat $clusterPath/$n/pid/$n.pid`
- #判断是否存活
- count=`ps -ef | grep $pid | grep -v grep | wc -l`
- #程序挂掉啦,启动
- if [ $count -eq ];then
- cd $shellPath && $shellPath/autoStartUp.sh $n$suffix
- fi
- done
- fi
- done
②autoClusterClose.sh脚本为mongodb集群关闭脚本,用法:./autoClusterClose.sh shutdown或者./autoClusterClose.sh kill,这里建议使用shutdown方式关闭。
- #! /bin/bash
- configPath=config.properties
- #mongodb的安装目录
- mongodb_home=`awk -F= -v k=mongodbHome '{ if ( $1 == k ) print $2; }' $configPath`
- #mongodb集群安装目录
- clusterPath=`awk -F= -v k=clusterPath '{ if ( $1 == k ) print $2; }' $configPath`
- #所采用的安装模板
- template=`awk -F= -v k=template '{ if ( $1 == k ) print $2; }' $configPath`
- #模板所在的位置
- templatePath=template/$template.conf
- user=`awk -F= -v k=user '{ if ( $1 == k ) print $2; }' $configPath`
- localIp=`/sbin/ifconfig -a|grep inet|grep -v 127.0.0.1|grep -v inet6 | awk '{print $2}' | tr -d "addr:"`
- ips=`awk -F= -v k=ips '{ if ( $1 == k ) print $2; }' $configPath`
- eval $(echo $ips | awk '{split($0, arr, ","); for(i in arr) print "ipArray["i"]="arr[i]}')
- #获取所有的配置、路由、分片
- nodes=`awk -F= -v k=nodes '{ if ( $1 == k ) print $2; }' $templatePath`
- eval $(echo $nodes | awk '{split($0, nodeArr, ","); for(i in nodeArr) print "nodeArray["i"]="nodeArr[i]}')
- #查看/etc/crontab是否开启定时任务,有则关闭
- for((i=; i<=${#ipArray[@]}; i++))
- do
- if [[ $localIp = ${ipArray[i]} ]]
- then
- #kill本地的mongod、mongos
- echo "*****close ${ipArray[i]} 定时任务:日志切割和mongo进程存活监控*****"
- $mongodb_home/shell/autoConfig.sh removeCronTask
- else
- echo "*****close ${ipArray[i]} 定时任务:日志切割和mongo进程存活监控*****"
- ssh $user@${ipArray[i]} "cd $mongodb_home/shell && $mongodb_home/shell/autoConfig.sh removeCronTask"
- fi
- done
- if [[ $ = "kill" ]]
- then
- for((i=; i<=${#ipArray[@]}; i++))
- do
- if [[ $localIp = ${ipArray[i]} ]]
- then
- #kill本地的mongod、mongos
- echo "*****close ${ipArray[i]} mongodb*****"
- ps -ef | grep $clusterPath/conf | grep -v grep | cut -c - | xargs kill -
- else
- echo "*****close ${ipArray[i]} mongodb*****"
- ssh $user@${ipArray[i]} "ps -ef | grep $clusterPath/conf | grep -v grep | cut -c 9-15 | xargs kill -2"
- fi
- done
- fi
- if [[ $ = "shutdown" ]]
- then
- #.先关闭mongos
- #找到mongos对应的机器节点
- mongoss=`awk -F= -v k=mongos '{ if ( $1 == k ) print $2; }' $templatePath`
- eval $(echo $mongoss | awk '{split($0, mongosArr, ","); for(i in mongosArr) print "mongosArray["i"]="mongosArr[i]}')
- for mongosNode in ${mongosArray[*]}
- do
- #删除node,保留右边字符。下面两句是根据机器节点的代名称数字找到其对应的ip
- mongosIpNum=${mongosNode#*node}
- mongosIp=${ipArray[$mongosIpNum]}
- if [[ $localIp = $mongosIp ]]
- then
- echo "****************close $mongosIp mongos****************"
- ps -ef | grep $clusterPath/conf/mongos.conf | grep -v grep | cut -c - | xargs kill -
- else
- echo "****************close $mongosIp mongos****************"
- ssh $user@$mongosIp "ps -ef | grep $clusterPath/conf/mongos.conf | grep -v grep | cut -c 9-15 | xargs kill -2"
- fi
- done
- #.再关闭configs
- configs=`awk -F= -v k=config '{ if ( $1 == k ) print $2; }' $templatePath`
- eval $(echo $configs | awk '{split($0, configArr, ","); for(i in configArr) print "configArray["i"]="configArr[i]}')
- #副本集,先关闭仲裁节点、从节点,最后关闭主节点
- for((i=${#configArray[@]}; i>=; i--))
- do
- configNode=${configArray[i]}
- #删除node,保留右边字符
- configIpNum=${configNode#*node}
- configIp=${ipArray[$configIpNum]}
- if [[ $localIp = $configIp ]]
- then
- echo "****************close $configIp config****************"
- $mongodb_home/bin/mongod -f $clusterPath/conf/config.conf --shutdown
- else
- echo "****************close $configIp config****************"
- ssh $user@$configIp "$mongodb_home/bin/mongod -f $clusterPath/conf/config.conf --shutdown"
- fi
- done
- #.最后关闭shards
- for node in ${nodeArray[*]}
- do
- if [[ $node =~ "shard" ]]
- then
- shards=`awk -F= -v k=$node '{ if ( $1 == k ) print $2; }' $templatePath`
- eval $(echo $shards | awk '{split($0, shardArr, ","); for(i in shardArr) print "shardArray["i"]="shardArr[i]}')
- #副本集,先关闭仲裁节点、从节点,最后关闭主节点
- for((i=${#shardArray[@]}; i>=; i--))
- do
- shardNode=${shardArray[i]}
- #删除node,保留右边字符
- shardIpNum=${shardNode#*node}
- shardIp=${ipArray[$shardIpNum]}
- if [[ $localIp = $shardIp ]]
- then
- echo "****************close $shardIp $node****************"
- $mongodb_home/bin/mongod -f $clusterPath/conf/$node.conf --shutdown
- else
- echo "****************close $shardIp $node****************"
- ssh $user@$shardIp "$mongodb_home/bin/mongod -f $clusterPath/conf/$node.conf --shutdown"
- fi
- done
- fi
- done
- fi
③autoClusterIndex.sh脚本为mongodb集群初始化配置文件和修改系统配置、config和shard副本集以及mongos路由启动并初始化、mongodb集群数据库表分片和基础数据初始化的脚本、添加定时任务。用法:./ autoClusterIndex.sh。使用该脚本,可以全自动化安装mongodb。
- #! /bin/bash
- configPath=config.properties
- #从config.properties文件读取数据出来
- clusterPath=`awk -F= -v k=clusterPath '{ if ( $1 == k ) print $2; }' $configPath`
- mongodb_home=`awk -F= -v k=mongodbHome '{ if ( $1 == k ) print $2; }' $configPath`
- ips=`awk -F= -v k=ips '{ if ( $1 == k ) print $2; }' $configPath`
- localIp=`/sbin/ifconfig -a|grep inet|grep -v 127.0.0.1|grep -v inet6 | awk '{print $2}' | tr -d "addr:"`
- user=`awk -F= -v k=user '{ if ( $1 == k ) print $2; }' $configPath`
- template=`awk -F= -v k=template '{ if ( $1 == k ) print $2; }' $configPath`
- templatePath=template/$template.conf
- #获取所有的配置、路由、分片
- nodes=`awk -F= -v k=nodes '{ if ( $1 == k ) print $2; }' $templatePath`
- eval $(echo $nodes | awk '{split($0, nodeArr, ","); for(i in nodeArr) print "nodeArray["i"]="nodeArr[i]}')
- eval $(echo $ips | awk '{split($0, arr, ","); for(i in arr) print "ipArray["i"]="arr[i]}')
- #遍历ip数组
- for((i=; i<=${#ipArray[@]}; i++))
- do
- if [[ $localIp = ${ipArray[i]} ]]
- then
- #.创建mongodbCluster并修改系统配置
- echo "********************************start ${ipArray[i]} autoConfig && autoSystemProperties********************************"
- $mongodb_home/shell/autoConfig.sh && $mongodb_home/shell/autoSystemProperties.sh
- else
- #把远程服务器旧的mongodb安装包删除
- ssh $user@${ipArray[i]} "rm -rf $mongodb_home"
- #把mongodb安装包拷贝到远程服务器
- scp -r $mongodb_home $user@${ipArray[i]}:$mongodb_home
- echo "********************************start ${ipArray[i]} autoConfig && autoSystemProperties********************************"
- ssh $user@${ipArray[i]} "cd $mongodb_home/shell && $mongodb_home/shell/autoConfig.sh && $mongodb_home/shell/autoSystemProperties.sh"
- fi
- done
- #.mongodb集群启动config、shard1、shard2、shard3
- echo "********************************start mongodb集群启动config、shard1、shard2、shard3********************************"
- #不启动mongos,只启动config,shards
- $mongodb_home/shell/autoClusterStartUp.sh notmongos
- #.mongodb集群配置、分片的副本集初始化
- echo "********************************start mongodb集群分片和副本集初始化********************************"
- $mongodb_home/shell/autoClusterInitSvr.sh cs
- #.mongodb集群启动mongos
- echo "********************************start mongodb集群mongos********************************"
- mongoss=`awk -F= -v k=mongos '{ if ( $1 == k ) print $2; }' $templatePath`
- eval $(echo $mongoss | awk '{split($0, mongosArr, ","); for(i in mongosArr) print "mongosArray["i"]="mongosArr[i]}')
- for mongosNode in ${mongosArray[*]}
- do
- #删除node,保留右边字符
- mongosIpNum=${mongosNode#*node}
- mongosIp=${ipArray[$mongosIpNum]}
- if [[ $localIp = $mongosIp ]]
- then
- echo "****************start $mongosIp mongos****************"
- $mongodb_home/shell/autoStartUp.sh mongos
- else
- echo "****************start $mongosIp mongos****************"
- ssh $user@$mongosIp "cd $mongodb_home/shell && ./autoStartUp.sh mongos"
- fi
- done
- #.mongodb集群mongos初始化
- echo "********************************start mongodb集群mongos初始化********************************"
- $mongodb_home/shell/autoClusterInitSvr.sh mongos
- #.mongodb集群数据库表分片和初始化
- echo "********************************start mongodb集群数据库表分片和初始化********************************"
- $mongodb_home/shell/autoClusterShardedAndInitDB.sh
- #.mongodb集群配置定时任务:日志每天切割,保留7天日志/每隔10分钟监控mongo进程是否存活,不存活则自动拉起
- for((i=; i<=${#ipArray[@]}; i++))
- do
- if [[ $localIp = ${ipArray[i]} ]]
- then
- echo "******************************** ${ipArray[i]} 添加定时任务:日志切割和mongo存活监控 ********************************"
- $mongodb_home/shell/autoConfig.sh addCronTask
- else
- echo "******************************** ${ipArray[i]} 添加定时任务:日志切割和mongo存活监控 ********************************"
- ssh $user@${ipArray[i]} "cd $mongodb_home/shell && $mongodb_home/shell/autoConfig.sh addCronTask"
- fi
- done
④autoClusterInitSvr.sh脚本为mongodb集群config、shard和mongos初始化脚本。用法:./autoClusterInitSvr.sh cs,初始化config和shard副本集配置;./autoClusterInitSvr.sh mongos,初始化mongos路由配置。
- #! /bin/bash
- configPath=config.properties
- mongodb_home=`awk -F= -v k=mongodbHome '{ if ( $1 == k ) print $2; }' $configPath`
- template=`awk -F= -v k=template '{ if ( $1 == k ) print $2; }' $configPath`
- templatePath=template/$template.conf
- ips=`awk -F= -v k=ips '{ if ( $1 == k ) print $2; }' $configPath`
- eval $(echo $ips | awk '{split($0, arr, ","); for(i in arr) print "ipArray["i"]="arr[i]}')
- #获取所有的配置、路由、分片
- nodes=`awk -F= -v k=nodes '{ if ( $1 == k ) print $2; }' $templatePath`
- eval $(echo $nodes | awk '{split($0, nodeArr, ","); for(i in nodeArr) print "nodeArray["i"]="nodeArr[i]}')
- param=$
- if [[ $param = "cs" ]]
- then
- #自动化设置配置副本集
- config_numbers=""
- ccount=
- config_port=`awk -F= -v k=config_port '{ if ( $1 == k ) print $2; }' $templatePath`
- configs=`awk -F= -v k=config '{ if ( $1 == k ) print $2; }' $templatePath`
- eval $(echo $configs | awk '{split($0, configArr, ","); for(i in configArr) print "configArray["i"]="configArr[i]}')
- configMasterNode=${configArray[]}
- echo "configMasterNode: $configMasterNode"
- #删除node,保留右边字符
- configMasterIpNum=${configMasterNode#*node}
- #echo "configMasterIpNum: $configMasterIpNum"
- configMasterIp=${ipArray[$configMasterIpNum]}
- #echo "configMasterIp: $configMasterIp"
- for((i=; i<=${#configArray[@]}; i++))
- do
- configNode=${configArray[i]}
- #删除node,保留右边字符
- configIpNum=${configNode#*node}
- config_numbers=$config_numbers"{_id : $ccount, host : '${ipArray[$configIpNum]}:$config_port'},"
- ccount=`expr $ccount + `
- done
- #删除最后一个,保留左边字符
- echo "********************************设置config副本集********************************"
- config_numbers=${config_numbers%,*}
- echo $config_numbers
- $mongodb_home/bin/mongo $configMasterIp:$config_port/admin << EOF
- config = {_id : "configs", members : [ $config_numbers ] };
- rs.initiate(config);
- EOF
- #自动化设置分片shard副本集
- for node in ${nodeArray[*]}
- do
- if [[ $node =~ "shard" ]]
- then
- shard_numbers=""
- shardMasterIp=""
- scount=
- shard_port=`awk -F= -v k=$node"_port" '{ if ( $1 == k ) print $2; }' $templatePath`
- shards=`awk -F= -v k=$node '{ if ( $1 == k ) print $2; }' $templatePath`
- eval $(echo $shards | awk '{split($0, shardArr, ","); for(i in shardArr) print "shardArray["i"]="shardArr[i]}')
- for((i=; i<=${#shardArray[@]}; i++))
- do
- shardNode=${shardArray[i]}
- #echo "shardNode: $shardNode"
- #删除node,保留右边字符
- shardIpNum=${shardNode#*node}
- #echo "shardIpNum: $shardIpNum"
- if [[ $scount = ]]
- then
- shardMasterIp=${ipArray[$shardIpNum]}
- shard_numbers=$shard_numbers"{_id : $scount, host : '${ipArray[$shardIpNum]}:$shard_port', priority : 2},"
- fi
- if [[ $scount = ]]
- then
- shard_numbers=$shard_numbers"{_id : $scount, host : '${ipArray[$shardIpNum]}:$shard_port', priority : 1},"
- fi
- if [[ $scount = ]]
- then
- shard_numbers=$shard_numbers"{_id : $scount, host : '${ipArray[$shardIpNum]}:$shard_port', arbiterOnly : true}"
- fi
- scount=`expr $scount + `
- done
- #echo "shard_numbers: $shard_numbers"
- echo "********************************设置$node副本集********************************"
- $mongodb_home/bin/mongo $shardMasterIp:$shard_port/admin << EOF
- config = {_id : "$node", members : [ $shard_numbers ] };
- rs.initiate(config);
- EOF
- fi
- done
- fi
- if [[ $param = "mongos" ]]
- then
- #自动化设置路由分片
- mongos_numbers=""
- mongos_port=`awk -F= -v k=mongos_port '{ if ( $1 == k ) print $2; }' $templatePath`
- mongoss=`awk -F= -v k=mongos '{ if ( $1 == k ) print $2; }' $templatePath`
- eval $(echo $mongoss | awk '{split($0, mongosArr, ","); for(i in mongosArr) print "mongosArray["i"]="mongosArr[i]}')
- mongosNode=${mongosArray[]}
- #删除node,保留右边字符
- mongosIpNum=${mongosNode#*node}
- mongosIp=${ipArray[$mongosIpNum]}
- for node in ${nodeArray[*]}
- do
- if [[ $node =~ "shard" ]]
- then
- shard_numbers=""
- shard_port=`awk -F= -v k=$node"_port" '{ if ( $1 == k ) print $2; }' $templatePath`
- shards=`awk -F= -v k=$node '{ if ( $1 == k ) print $2; }' $templatePath`
- eval $(echo $shards | awk '{split($0, shardArr, ","); for(i in shardArr) print "shardArray["i"]="shardArr[i]}')
- for((i=; i<=${#shardArray[@]}; i++))
- do
- shardNode=${shardArray[i]}
- #删除node,保留右边字符
- shardIpNum=${shardNode#*node}
- shardIp=${ipArray[$shardIpNum]}
- shard_numbers=$shard_numbers$shardIp:$shard_port","
- done
- shard_numbers=${shard_numbers%,*}
- echo "mongos add $node shard_numbers:"$shard_numbers
- echo "********************************添加mongos分片$node********************************"
- $mongodb_home/bin/mongo $mongosIp:$mongos_port/admin << EOF
- sh.addShard("$node/$shard_numbers");
- EOF
- fi
- done
- $mongodb_home/bin/mongo $mongosIp:$mongos_port/admin << EOF
- sh.status();
- EOF
- fi
上述代码实现的config、shards以及mongos配置内容如下:
config副本集配置,参考示例:
> config = {
... _id : "configs",
... members : [
... {_id : 0, host : "192.168.187.203:29040"},
... {_id : 1, host : "192.168.187.204:29040"},
... {_id : 2, host : "192.168.187.205:29040"}
... ]
... }
> rs.initiate(config)
shards副本集配置,参考示例:
> config = {
... _id : "shard1",
... members : [
... {_id : 0, host : "192.168.187.201:29060",priority:2},
... {_id : 1, host : "192.168.187.202:29060",priority:1},
... {_id : 2, host : "192.168.187.203:29060", arbiterOnly : true}
... ]
... }
> rs.initiate(config)
这里默认,第一个ip的优先级为2,第二个ip的优先级为1,第三个ip为仲裁节点,所以第一个ip为primary主节点,第二位secondary从节点,第三个只参与投票,shard1根据分片的数据变化为shard2、shard3、shard4、shard5等等。
mongos配置内容为添加shards,参考示例为:
sh.addShard("shard1/192.168.187.201:29060,192.168.187.202:29060,192.168.187.203:29060")
sh.addShard("shard2/192.168.187.202:29070,192.168.187.203:29070,192.168.187.204:29070")
sh.addShard("shard3/192.168.187.203:29080,192.168.187.204:29080,192.168.187.205:29080")
sh.addShard("shard4/192.168.187.204:29090,192.168.187.205:29090,192.168.187.201:29090")
sh.addShard("shard5/192.168.187.205:29100,192.168.187.201:29100,192.168.187.202:29100")
sh.status() #参考分片的情况是否添加上
⑤autoClusterShardedAndInitDB.sh 脚本为指定数据库testDB1、testDB2、testDB3及其数据库表分片。
- #! /bin/bash
- configPath=config.properties
- mongodb_home=`awk -F= -v k=mongodbHome '{ if ( $1 == k ) print $2; }' $configPath`
- ips=`awk -F= -v k=ips '{ if ( $1 == k ) print $2; }' $configPath`
- template=`awk -F= -v k=template '{ if ( $1 == k ) print $2; }' $configPath`
- templatePath=template/$template.conf
- mongoss=`awk -F= -v k=mongos '{ if ( $1 == k ) print $2; }' $templatePath`
- testDB1=`awk -F= -v k=testDB1 '{ if ( $1 == k ) print $2; }' $configPath`
- testDB2=`awk -F= -v k=testDB2 '{ if ( $1 == k ) print $2; }' $configPath`
- testDB3=`awk -F= -v k=testDB3 '{ if ( $1 == k ) print $2; }' $configPath`
- eval $(echo $ips | awk '{split($0, arr, ","); for(i in arr) print "ipArray["i"]="arr[i]}')
- eval $(echo $mongoss | awk '{split($0, mongosArr, ","); for(i in mongosArr) print "mongosArray["i"]="mongosArr[i]}')
- for mongosNode in ${mongosArray[*]}
- do
- #删除node,保留右边字符
- mongosIpNum=${mongosNode#*node}
- mongosIp=${ipArray[$mongosIpNum]}
- #指定数据库分片生效
- $mongodb_home/bin/mongo $mongosIp:/admin << EOF
- db.runCommand({enablesharding : "$testDB1"});
- db.runCommand({shardcollection : "$testDB1.account", key : {_id : "hashed"}});
- db.runCommand({shardcollection : "$testDB1.alarm", key : {_id : "hashed"}});
- db.runCommand({shardcollection : "$testDB1.blackClass", key : {_id : "hashed"}});
- db.runCommand({enablesharding : "$testDB2"});
- db.runCommand({shardcollection : "$testDB2.device", key : {_id : "hashed"}});
- db.runCommand({shardcollection : "$testDB2.deviceParam", key : {_id : "hashed"}});
- db.runCommand({enablesharding : "$testDB3"});
- db.runCommand({shardcollection : "$testDB3.blackImsiFace", key : {_id : "hashed"}});
- db.runCommand({shardcollection : "$testDB3.face", key : {_id : "hashed"}});
- EOF
- done
- mongosInitNode=${mongosArray[]}
- #删除node,保留右边字符
- mongosInitIpNum=${mongosInitNode#*node}
- mongosInitIp=${ipArray[$mongosInitIpNum]}
- port=`awk -F= -v k=mongos_port '{ if ( $1 == k ) print $2; }' $templatePath`
- #初始化数据库
- initDBPath=$mongodb_home/shell
- #解压initConfig.zip包 -o:不提示的情况下覆盖文件,-d /opt:指明将文件解压缩到/opt目录
- unzip -o -d $initDBPath/initConfig $initDBPath/initConfig.zip
- $mongodb_home/bin/mongorestore --host $mongosInitIp:$port --authenticationDatabase admin -d $testDB1 $initDBPath/initConfig/testDB1
- $mongodb_home/bin/mongorestore --host $mongosInitIp:$port --authenticationDatabase admin -d $testDB2 $initDBPath/initConfig/testDB2
- $mongodb_home/bin/mongorestore --host $mongosInitIp:$port --authenticationDatabase admin -d $testDB3 $initDBPath/initConfig/testDB3
⑥autoClusterStartUp.sh 脚本为config和shard副本集、mongos路由启动脚本,用法:./ autoClusterStartUp.sh,全部启动,包括config和shard副本集、mongos路由;./ autoClusterStartUp.sh notmongos,只启动config和shard副本集。
- #! /bin/bash
- configPath=config.properties
- #从config.properties文件读取数据出来
- clusterPath=`awk -F= -v k=clusterPath '{ if ( $1 == k ) print $2; }' $configPath`
- mongodb_home=`awk -F= -v k=mongodbHome '{ if ( $1 == k ) print $2; }' $configPath`
- template=`awk -F= -v k=template '{ if ( $1 == k ) print $2; }' $configPath`
- ips=`awk -F= -v k=ips '{ if ( $1 == k ) print $2; }' $configPath`
- user=`awk -F= -v k=user '{ if ( $1 == k ) print $2; }' $configPath`
- localIp=`/sbin/ifconfig -a|grep inet|grep -v 127.0.0.1|grep -v inet6 | awk '{print $2}' | tr -d "addr:"`
- templatePath=template/$template.conf
- #获取所有的配置、路由、分片
- nodes=`awk -F= -v k=nodes '{ if ( $1 == k ) print $2; }' $templatePath`
- eval $(echo $nodes | awk '{split($0, nodeArr, ","); for(i in nodeArr) print "nodeArray["i"]="nodeArr[i]}')
- #ips切割为数组array
- eval $(echo $ips | awk '{split($0, arr, ","); for(i in arr) print "ipArray["i"]="arr[i]}')
- suffix=""
- #判断linux系统cpu是否为numa架构
- numaCount=`grep -i numa /var/log/dmesg | wc -l`
- nodeCount=`grep -i numa /var/log/dmesg | grep -wi "node" | wc -l`
- offCount=`grep -i numa /var/log/dmesg | grep -wi "numa=off" | wc -l`
- if [[ ($numaCount -gt ) && ($nodeCount -gt ) && ($offCount -eq ) ]]
- then
- suffix="_numa"
- fi
- #轮询启动mongodb的节点,先config,后shard,再mongos
- for n in ${nodeArray[*]}
- do
- if [[ $n = "mongos" ]]
- then
- #传参为空,则mongos也执行,不为空则不执行
- if [[ $ = "" ]]
- then
- mongoss=`awk -F= -v k=mongos '{ if ( $1 == k ) print $2; }' $templatePath`
- eval $(echo $mongoss | awk '{split($0, mongosArr, ","); for(i in mongosArr) print "mongosArray["i"]="mongosArr[i]}')
- for((i=; i<=${#mongosArray[@]}; i++))
- do
- mongosNode=${mongosArray[i]}
- #删除node,保留右边字符
- mongosIpNum=${mongosNode#*node}
- mongosIp=${ipArray[$mongosIpNum]}
- echo "********************************start $mongosIp $n********************************"
- #启动本地服务或ssh远程调用
- if [[ $localIp = $mongosIp ]]
- then
- $mongodb_home/shell/autoStartUp.sh $n
- else
- ssh $user@$mongosIp "cd $mongodb_home/shell && ./autoStartUp.sh $n"
- fi
- done
- #mongos也启动,即mongodb集群全启动
- #查看/etc/crontab是否开启定时任务,没有则开启
- for((i=; i<=${#ipArray[@]}; i++))
- do
- if [[ $localIp = ${ipArray[i]} ]]
- then
- echo "*****start ${ipArray[i]} 定时任务:日志切割和mongo进程存活监控*****"
- $mongodb_home/shell/autoConfig.sh addCronTask
- else
- echo "*****start ${ipArray[i]} 定时任务:日志切割和mongo进程存活监控*****"
- ssh $user@${ipArray[i]} "cd $mongodb_home/shell && $mongodb_home/shell/autoConfig.sh addCronTask"
- fi
- done
- fi
- else
- shards=`awk -F= -v k=$n '{ if ( $1 == k ) print $2; }' $templatePath`
- eval $(echo $shards | awk '{split($0, shardArr, ","); for(i in shardArr) print "shardArray["i"]="shardArr[i]}')
- for((i=; i<=${#shardArray[@]}; i++))
- do
- shardNode=${shardArray[i]}
- #删除node,保留右边字符
- shardIpNum=${shardNode#*node}
- shardIp=${ipArray[$shardIpNum]}
- echo "********************************start $shardIp $n********************************"
- #启动本地服务或ssh远程调用
- if [[ $localIp = $shardIp ]]
- then
- $mongodb_home/shell/autoStartUp.sh $n$suffix
- else
- ssh $user@$shardIp "cd $mongodb_home/shell && ./autoStartUp.sh $n$suffix"
- fi
- done
- fi
- done
⑦autoConfig.sh脚本为创建所在服务器对应的mongodb的配置文件如config.conf、shard1.conf、mongos.conf,以及添加日志切割和mongo进程存活监控定时任务,用法:./autoConfig.sh addCronTask。
- #! /bin/bash
- #适用于3台或5台机器搭建15个或20个节点的mongodb高可用集群,3个或5个分片,每个分片(1主+1副+1仲裁)、3个配置、3个或2个路由
- configPath=config.properties
- #从config.properties文件读取数据出来
- template=`awk -F= -v k=template '{ if ( $1 == k ) print $2; }' $configPath`
- clusterDataPath=`awk -F= -v k=clusterDataPath '{ if ( $1 == k ) print $2; }' $configPath`
- clusterLogPath=`awk -F= -v k=clusterLogPath '{ if ( $1 == k ) print $2; }' $configPath`
- mongodb_home=`awk -F= -v k=mongodbHome '{ if ( $1 == k ) print $2; }' $configPath`
- function createConfig()
- {
- ips=`awk -F= -v k=ips '{ if ( $1 == k ) print $2; }' $configPath`
- hostname=`hostname`
- localIp=`cat /etc/hosts | grep $hostname | awk -F " " '{print $1}'`
- #localIp=`/sbin/ifconfig -a|grep inet|grep -v 127.0.0.1|grep -v inet6 | awk '{print $2}' | tr -d "addr:"`
- #配置mongodb_home
- #echo "配置mongodb_home"
- #editMongodbHome
- #创建conf文件夹
- echo "********************************创建conf文件夹********************************"
- createConfFolders
- eval $(echo $ips | awk '{split($0, arr, ","); for(i in arr) print "ipArray["i"]="arr[i]}')
- templatePath=template/$template.conf
- #遍历ip数组
- for((i=; i<=${#ipArray[@]}; i++))
- do
- if [[ $localIp = ${ipArray[i]} ]]
- then
- nodes=`awk -F= -v k=node$i '{ if ( $1 == k ) print $2; }' $templatePath`
- echo "********************************${ipArray[i]}:$nodes********************************"
- eval $(echo $nodes | awk '{split($0, nodeArr, ","); for(i in nodeArr) print "nodeArray["i"]="nodeArr[i]}')
- for node in ${nodeArray[*]}
- do
- port=`awk -F= -v k=$node"_port" '{ if ( $1 == k ) print $2; }' $templatePath`
- case "$node" in
- "config")
- #创建config配置文件
- echo "***************创建config配置文件***************"
- createConfigFoldersConf $port
- ;;
- "mongos")
- #创建mongos路由配置文件
- echo "***************创建mongos路由配置文件***************"
- configPort=`awk -F= -v k=config_port '{ if ( $1 == k ) print $2; }' $templatePath`
- getConfigsIpsPort $configPort
- createMongosFoldersConf $port $ipsAndPorts
- ;;
- esac
- if [[ $node =~ "shard" ]]
- then
- #创建shard分片配置文件
- echo "***************创建$node分片配置文件***************"
- createShardFoldersConf $node $port
- fi
- done
- fi
- done
- }
- function getConfigsIpsPort()
- {
- ipsAndPorts=""
- for((i=; i<=${#ipArray[@]}; i++))
- do
- nodes=`awk -F= -v k=node$i '{ if ( $1 == k ) print $2; }' $templatePath`
- if [[ $nodes =~ "config" ]]
- then
- ipsAndPorts=$ipsAndPorts"${ipArray[i]}:$1,"
- fi
- done
- ipsAndPorts=${ipsAndPorts%,*}
- }
- #为每台机器创建6个目录,shard1、shard2、shard3、config、mongos、conf
- function createConfFolders()
- {
- if [[ -d $clusterDataPath/conf ]]
- then
- rm -rf $clusterDataPath/conf
- fi
- #创建配置文件夹
- mkdir -p $clusterDataPath/conf
- }
- function createMongosFoldersConf()
- {
- #创建mongos路由服务器的日志文件夹log、进程文件夹pid
- mkdir -p $clusterLogPath/mongos/log
- mkdir -p $clusterDataPath/mongos/pid
- #设置路由服务器
- cat >> $clusterDataPath/conf/mongos.conf << EOF
- systemLog:
- destination: file
- path: $clusterLogPath/mongos/log/mongos.log
- logAppend: true
- processManagement:
- fork: true
- pidFilePath: $clusterDataPath/mongos/pid/mongos.pid
- net:
- bindIp: $localIp
- port: $
- maxIncomingConnections:
- sharding:
- configDB: configs/$
- EOF
- }
- function createConfigFoldersConf()
- {
- #创建config配置服务器的数据文件夹data、日志文件夹log、进程文件夹pid
- mkdir -p $clusterDataPath/config/data
- mkdir -p $clusterLogPath/config/journal
- mkdir -p $clusterLogPath/config/log
- mkdir -p $clusterDataPath/config/pid
- #把数据目录的journal日志映射到日志目录里面
- ln -s $clusterLogPath/config/journal $clusterDataPath/config/data/journal
- #设置配置服务器副本集
- cat >> $clusterDataPath/conf/config.conf << EOF
- systemLog:
- destination: file
- path: $clusterLogPath/config/log/config.log
- logAppend: true
- processManagement:
- fork: true
- pidFilePath: $clusterDataPath/config/pid/config.pid
- net:
- bindIp: $localIp
- port: $
- maxIncomingConnections:
- storage:
- dbPath: $clusterDataPath/config/data
- journal:
- enabled: true
- commitIntervalMs:
- directoryPerDB: true
- syncPeriodSecs:
- engine: wiredTiger
- replication:
- oplogSizeMB:
- replSetName: configs
- sharding:
- clusterRole: configsvr
- EOF
- }
- function createShardFoldersConf()
- {
- #创建shard1分片服务器的数据文件夹data、日志文件夹log、进程文件夹pid
- mkdir -p $clusterDataPath/$/data
- mkdir -p $clusterLogPath/$/journal
- mkdir -p $clusterLogPath/$/log
- mkdir -p $clusterDataPath/$/pid
- #把数据目录的journal日志映射到日志目录里面
- ln -s $clusterLogPath/$/journal $clusterDataPath/$/data/journal
- #设置第一个分片副本集
- cat >> $clusterDataPath/conf/$.conf << EOF
- systemLog:
- destination: file
- path: $clusterLogPath/$/log/$.log
- logAppend: true
- processManagement:
- fork: true
- pidFilePath: $clusterDataPath/$/pid/$.pid
- net:
- bindIp: $localIp
- port: $
- maxIncomingConnections:
- storage:
- dbPath: $clusterDataPath/$/data
- journal:
- enabled: true
- commitIntervalMs:
- directoryPerDB: true
- syncPeriodSecs:
- engine: wiredTiger
- wiredTiger:
- engineConfig:
- cacheSizeGB:
- statisticsLogDelaySecs:
- journalCompressor: snappy
- directoryForIndexes: false
- collectionConfig:
- blockCompressor: snappy
- indexConfig:
- prefixCompression: true
- replication:
- oplogSizeMB:
- replSetName: $
- sharding:
- clusterRole: shardsvr
- EOF
- }
- #配置mongodb环境变量
- function editMongodbHome()
- {
- profile=/etc/profile
- #配置MONGODB_HOME
- sed -i "/^export MONGODB_HOME/d" $profile
- echo "export MONGODB_HOME=$mongodb_home" >> $profile
- #配置PATH
- sed -i "/^export PATH=\$PATH:\$MONGODB_HOME\/bin/d" $profile
- echo "export PATH=\$PATH:\$MONGODB_HOME/bin" >> $profile
- #使/etc/profile文件生效
- source /etc/profile
- }
- if [[ $ = "" ]]
- then
- createConfig
- fi
- if [[ $ = "addCronTask" ]]
- then
- cronfile=/etc/crontab
- shellPath=${mongodb_home//\//\\/}\\/shell
- logRotateCronTaskNum=`sed -n -e "/\0 \0 \* \* \* root $shellPath\/autoLogRotate.sh $shellPath/=" $cronfile`
- if [[ $logRotateCronTaskNum = "" ]]
- then
- #没有则追加
- echo "0 0 * * * root $mongodb_home/shell/autoLogRotate.sh $mongodb_home/shell > /dev/null 2>&1 &" >> $cronfile
- fi
- checkLiveCronTaskNum=`sed -n -e "/\*\/10 \* \* \* \* root $shellPath\/autoCheckLive.sh $shellPath/=" $cronfile`
- if [[ $checkLiveCronTaskNum = "" ]]
- then
- #没有则追加
- echo "*/10 * * * * root $mongodb_home/shell/autoCheckLive.sh $mongodb_home/shell > /dev/null 2>&1 &" >> $cronfile
- fi
- fi
- if [[ $ = "removeCronTask" ]]
- then
- cronfile=/etc/crontab
- shellPath=${mongodb_home//\//\\/}\\/shell
- sed -i "/^\*\/10 \* \* \* \* root $shellPath\/autoCheckLive.sh $shellPath/d" $cronfile
- sed -i "/^\0 \0 \* \* \* root $shellPath\/autoLogRotate.sh $shellPath/d" $cronfile
- fi
⑧autoLogRotate.sh脚本为创建所在服务器对应的mongodb的日志切割脚本,并添加定时任务,默认为每天凌晨0点0分,对mongodb数据库日志进行切割并删除7天前的日志。
- #! /bin/bash
- #Rotate the MongoDB logs to prevent a single logfile from consuming too much disk space.
- shellPath=$
- configPath=$shellPath/config.properties
- #从config.properties文件读取数据出来
- clusterPath=`awk -F= -v k=clusterPath '{ if ( $1 == k ) print $2; }' $configPath`
- template=`awk -F= -v k=template '{ if ( $1 == k ) print $2; }' $configPath`
- templatePath=$shellPath/template/$template.conf
- ips=`awk -F= -v k=ips '{ if ( $1 == k ) print $2; }' $configPath`
- eval $(echo $ips | awk '{split($0, arr, ","); for(i in arr) print "ipArray["i"]="arr[i]}')
- localIp=`/sbin/ifconfig -a|grep inet|grep -v 127.0.0.1|grep -v inet6 | awk '{print $2}' | tr -d "addr:"`
- #代表删除7天前的备份,即只保留最近7天的备份
- days=
- #遍历ip数组
- for((i=; i<=${#ipArray[@]}; i++))
- do
- if [[ $localIp = ${ipArray[i]} ]]
- then
- mongodbNodes=`awk -F= -v k=node$i '{ if ( $1 == k ) print $2; }' $templatePath`
- eval $(echo $mongodbNodes | awk '{split($0, mongodbArr, ","); for(i in mongodbArr) print "mongodbArray["i"]="mongodbArr[i]}')
- for((n=; n<=${#mongodbArray[@]}; n++))
- do
- pid=`cat $clusterPath/${mongodbArray[n]}/pid/${mongodbArray[n]}.pid`
- logdir=$clusterPath/${mongodbArray[n]}/log
- #切割日志
- /bin/kill -SIGUSR1 $pid
- find $logdir/ -mtime +$days -delete
- done
- fi
- done
⑨autoStartUp.sh脚本为启动该脚本所在服务器的config、shard、mongos节点,启动分正常启动和禁止numactl启动两种。
- #! /bin/bash
- configPath=config.properties
- mongodb_home=`awk -F= -v k=mongodbHome '{ if ( $1 == k ) print $2; }' $configPath`
- clusterPath=`awk -F= -v k=clusterPath '{ if ( $1 == k ) print $2; }' $configPath`
- param=$
- #config
- if [[ $param = "config" ]]
- then
- $mongodb_home/bin/mongod -f $clusterPath/conf/config.conf
- fi
- if [[ $param = "config_numa" ]]
- then
- numactl --interleave=all $mongodb_home/bin/mongod -f $clusterPath/conf/config.conf
- fi
- #shard1
- paramLegth=`echo "$param" |wc -L`
- if [[ ($param =~ "shard") && ($paramLegth -lt ) && ($paramLegth -gt )]]
- then
- $mongodb_home/bin/mongod -f $clusterPath/conf/$param.conf
- fi
- if [[ ($param =~ "shard") && $param =~ "numa" ]]
- then
- shardName=${param%_*}
- numactl --interleave=all $mongodb_home/bin/mongod -f $clusterPath/conf/$shardName.conf
- fi
- #mongos
- if [[ $param = "mongos" ]]
- then
- $mongodb_home/bin/mongos -f $clusterPath/conf/mongos.conf
- fi
⑩autoSystemProperties.sh 脚本为修改服务器的系统配置,TCP配置等。
- #! /bin/bash
- #系统全局允许分配的最大文件句柄数
- sysctl -w fs.file-max=
- sysctl -w fs.nr_open=
- echo > /proc/sys/fs/nr_open
- #允许当前会话/进程打开文件句柄数
- ulimit -n
- #修改fs.file-max设置到 /etc/sysctl.conf 文件:
- #fs.file-max =
- #修改/etc/security/limits.conf 持久化设置允许用户/进程打开文件句柄数,手动添加
- #* soft nofile
- #* hard nofile
- #* soft nproc
- #* hard nproc
- #并发连接backlog设置
- sysctl -w net.core.somaxconn=
- sysctl -w net.ipv4.tcp_max_syn_backlog=
- sysctl -w net.core.netdev_max_backlog=
- #可用知名端口范围:
- sysctl -w net.ipv4.ip_local_port_range='80 65535'
- #sysctl -w net.core.rmem_default=
- sysctl -w net.core.wmem_default=
- sysctl -w net.core.rmem_max=
- sysctl -w net.core.wmem_max=
- sysctl -w net.core.optmem_max=
- #TCP Socket 读写 Buffer 设置:
- sysctl -w net.core.rmem_default=
- sysctl -w net.core.wmem_default=
- sysctl -w net.core.rmem_max=
- sysctl -w net.core.wmem_max=
- sysctl -w net.core.optmem_max=
- sysctl -w net.ipv4.tcp_rmem='1024 4096 16777216'
- sysctl -w net.ipv4.tcp_wmem='1024 4096 16777216'
- #修改系统内核参数:
- echo "never" > /sys/kernel/mm/transparent_hugepage/enabled
- echo "never" > /sys/kernel/mm/transparent_hugepage/defrag
- #TCP 连接追踪设置:
- sysctl -w net.nf_conntrack_max=
- sysctl -w net.netfilter.nf_conntrack_max=
- sysctl -w net.netfilter.nf_conntrack_tcp_timeout_time_wait=
- #修改stack size为1024,不启作用,只能手动source
- #if [ `grep -c "ulimit -s 1024" /etc/profile` -eq '0' ];then
- # echo "ulimit -s 1024" >> /etc/profile
- # source /etc/profile
- #fi
⑫initConfig.zip 为数据库test及其数据库表的初始化文件,有需要的可以自行配置。
2.2 全自动化部署
1. 把mongodb安装目录放置在5台机器中的任意一台上面即可,选定好安装的路径。
2.进入mongodb/shell目录。

根据实际环境需要修改config.properties文件的clusterPath、mongodbHome、ips、template、数据库5个属性
3.autoClusterIndex.sh脚本所在的目录执行如下命令,否则脚本会不起作用,执行命令:
./autoClusterIndex.sh
执行上面命令,会一键自动化部署。

至此,完成部署。
2.3 部署验证
5台机器的验证:
服务器node1(192.168.187.201):

服务器node2(192.168.187.202):

服务器node3(192.168.187.203):

服务器node4(192.168.187.204):

服务器node5(192.168.187.205):

4台机器的验证:
服务器node1(192.168.187.201):

服务器node2(192.168.187.202):

服务器node3(192.168.187.203):

服务器node4(192.168.187.204):

3台机器的验证:
服务器node1(192.168.187.201)、服务器node2(192.168.187.202)、服务器node3(192.168.187.203)都会启动如下服务:
一键化部署的shell命令github地址为:
https://github.com/SwordfallYeung/MongodbCluster_autoDeploy
MongoDB3.6 一键化自动部署方案的更多相关文章
- spring boot 自动部署方案
现在主流的自动部署方案大都是基于Docker的了,但传统的自动部署方案比较适合中小型公司,下面的方案就是比较传统的自动部署方案. 1.为什么需要自动部署 基于微服务的架构,自动部署显得非常重要.因为每 ...
- Jenkins spring boot 自动部署方案
原文地址:http://www.cnblogs.com/skyblog/p/5632869.html 现在主流的自动部署方案大都是基于Docker的了,但传统的自动部署方案比较适合中小型公司,下面的方 ...
- 基于webhook方案的Git自动部署方案
之前已经用Git实现了自己博客的提交自动部署,并自动提交到GitHub和coding以备不时之需.平时项目代码都托管在Coding或者GitHub上,也已经用上了coding提供的webhook功能, ...
- Java代码自动部署
注:本文来源于<it小熊> [ ①Java代码自动部署-总结简介] 代码部署是每一个软件开发项目组都会有的一个流程,也是从开发环节到发布功能必不可少的环节.对于Java开发者来说,Java ...
- 自己开发shell脚本实现一键化安装。
一.说明在现实环境中可能需要批量部署服务器,那么在我们已经部署好一台服务以后如果实现剩下的服务批量安装呢: 使用shell能否实现功能: 假设我们要部署lamp或者是lnmp如何实现脚本部署? 使用以 ...
- Asp.net Core Jenkins Docker 实现一键化部署
写在前面 在前段时间尝试过用Jenkins来进行asp.net core 程序在IIS上面的自动部署.大概的流程是Jenkins从git上获取代码 最开始Jenkins是放在Ubuntu的Docker ...
- 5分钟快速掌握Jenkins,项目一键自动部署
5分钟快速掌握Jenkins,项目一键自动部署 目录 前言 Jenkins是什么? Jenkins环境安装搭建 Jenkins基本使用介绍 Jenkins快速构建项目,项目自动化部署 学习总结 前言 ...
- 一种让运行在CentOS下的.NET CORE的Web项目简单方便易部署的自动更新方案
一.项目运行环境 项目采用的是.NET5开发的Web系统,独立部署在省内异地多台CentOS服务器上,它们运行在甲方专网环境中(不接触互联网),甲方进行业务运作时(一段时间内)会要求异地服务器开机上线 ...
- 简进祥-SVN版本控制方案:多分支并行开发,多环境自动部署
两地同时开发一个产品,目前线上有3个环境:测试环境.预发布环境.生产环境.目前系统部署采用jenkins自动化部署工具 用jenkins部署的方案 jenkins 测试环境:配置了各个分支的svn 地 ...
随机推荐
- LeetCode算法题-Convert BST to Greater Tree(Java实现)
这是悦乐书的第255次更新,第268篇原创 01 看题和准备 今天介绍的是LeetCode算法题中Easy级别的第122题(顺位题号是538).给定二进制搜索树(BST),将其转换为更大树,使原始BS ...
- 我的第一个python web开发框架(31)——定制ORM(七)
几个复杂的ORM方式都已介绍完了,剩下一些常用的删除.获取记录数量.统计合计数.获取最大值.获取最小值等方法我就不一一详细介绍了,直接给出代码大家自行查看. #!/usr/bin/env python ...
- 【导航】Python相关
[博客导航] Python相关导航 [索引]Python常用资源(从新手到大牛) [任务]Python语言程序设计.MOOC学习 [笔记]Python集成开发环境——PyCharm 2018.3下载. ...
- C#基础知识之泛型
泛型在c#中有很重要的位置,对于写出高可读性,高性能的代码有着关键的作用. 其实官方文档说明的很详细,我这边算是做个记录吧 一.什么是泛型? 泛型是 2.0 版 C# 语言和公共语言运行库 (CLR) ...
- vue2.0阻止事件冒泡
<!--picker弹窗--><transition name="fade"> <div class="picker_wrap" ...
- Elastic Stack-Elasticsearch使用介绍(一)
一.前言 Elasticsearch对外提供RESTful API,下面的演示我们主要使用Postman,进行一系列的Demo演示,这款工具方便各位前端大大或者对接口调试的神器: 安装过于简单 ...
- Write your own operating system Day(1)
工具准备: VirtualBox.exe是一个免费的轻巧的虚拟机 Bz.exe是二进制编辑器 NASM则是用来编译汇编语言的,具体使用方法自行百度 HZK16.fnt 中文GB2312的二进制点阵文件 ...
- Uint 7.文本和字体属性,background,精灵图和3种定位
一. 文本属性 CSS 文本属性可定义文本的外观. 通过文本属性,您可以改变文本的颜色.字符间距,对齐文本,装饰文本,对文本进行缩进,等等. <!DOCTYPE html> <htm ...
- linux rzsz(lrzsz)安装
lrzsz 官网入口:https://ohse.de/uwe/software/lrzsz.html lrzsz是一个unix通信套件提供的X,Y,和ZModem文件传输协议,可以用在windows与 ...
- Maven基础:Maven环境搭建及基本使用(1)
1. Maven环境搭建 1.1 Maven简介 1.2 Maven下载及环境设置 Maven下载地址:http://maven.apache.org/download.cgi 当前下载版本:apac ...