eshop6-nginx
1. Nginx 是什么?
Nginx 是一款轻量级Web服务器,也是一款反向代理服务器
2. Nginx 能干什么
可以直接支持Rails 和PHP 程序
可以作为HTTP反向代理
作为负载均衡服务器
作为邮件代理服务器
帮助前端实现动静分离
3. Nginx 特点
高稳定
高性能
资源占用少
功能丰富
模块化结构
支持热部署
4. Nginx 安装
(1) 安装gcc (yum install gcc)
备注:可以输入gcc -v 查询版本信息,看系统是否自带安装
(2) 安装pcre (yum install pcre-devel)
(3) 安装zlib (yum install zlib zlib-devel)
(4) 安装openssl (yum install openssh openssh-devel)
(5) 下载源码包,选择稳定版本(http://www.nginx.org/)
wget http://nginx.org/download/nginx-1.10.2.tar.gz
tar -zxvf nginx-1.10..tar.gz
(6) 进入nginx目录之后执行./configure
也可以指定安装目录,增加参数--prefix=/usr/nginx
如果不指定路径,可以通过whereis nginx进行查询
默认安装在/usr/local/nginx
(7) 继续执行make
(8) 继续执行make install
5. nginx 常用命令
(1). 测试配置文件
安装目录下的/nginx/sbin/nginx -t
(2). 启动命令
安装路径下的/nginx/sbin/nginx
(3).停止命令
安装路径下的/nginx/sbin/nginx -s stop 或者 nginx -s quit
(4). 重启命令
安装路径下的/nginx/sbin/nginx -s reload
(5). 查看进程命令
ps -ef | grep nginx
(6). 平滑重启
kill -HUP {Nginx 主进程号(既查看进程命令查到的PID)}
(7). 增加防火墙权限
sudo vi /etc/sysconfig/iptables
-A INPUT -p tcp -m state --state NEW -m tcp --dport -j ACCEPT
sudo service iptables restart
6. 虚拟域名配置及测试验证
(1)编辑sudo vi /usr/local/nginx/conf/nginx.conf
(2)增加include vhost/*.conf
#user  nobody;

worker_processes  ;

#error_log  logs/error.log;

#error_log  logs/error.log  notice;

#error_log  logs/error.log  info;

#pid        logs/nginx.pid;

events {

    worker_connections  ;

}

http {

    include       mime.types;

    default_type  application/octet-stream;

    #log_format  main  '$remote_addr - $remote_user [$time_local] "$request" '

    #                  '$status $body_bytes_sent "$http_referer" '

    #                  '"$http_user_agent" "$http_x_forwarded_for"';

    #access_log  logs/access.log  main;

    sendfile        on;

    #tcp_nopush     on;

    #keepalive_timeout  ;

    keepalive_timeout  ;

    #gzip  on;

    server {

        listen       ;

        server_name  localhost;

        #charset koi8-r;

        #access_log  logs/host.access.log  main;

        location / {

            root   html;

            index  index.html index.htm;

        }

        #error_page                /.html;

        # redirect server error pages to the static page /50x.html

        #

        error_page        /50x.html;

        location = /50x.html {

            root   html;

        }

        # proxy the PHP scripts to Apache listening on 127.0.0.1:

        #

        #location ~ \.php$ {

        #    proxy_pass   http://127.0.0.1;

        #}

        # pass the PHP scripts to FastCGI server listening on 127.0.0.1:

        #

        #location ~ \.php$ {

        #    root           html;

        #    fastcgi_pass   127.0.0.1:;

        #    fastcgi_index  index.php;

        #    fastcgi_param  SCRIPT_FILENAME  /scripts$fastcgi_script_name;

        #    include        fastcgi_params;

        #}

        # deny access to .htaccess files, if Apache's document root

        # concurs with nginx's one

        #

        #location ~ /\.ht {

        #    deny  all;

        #}

    }

    ##########################vhost#####################################

    include vhost/*.conf;

    # another virtual host using mix of IP-, name-, and port-based configuration

    #

    #server {

    #    listen       8000;

    #    listen       somename:8080;

    #    server_name  somename  alias  another.alias;

    #    location / {

    #        root   html;

    #        index  index.html index.htm;

    #    }

    #}

    # HTTPS server

    #

    #server {

    #    listen       443 ssl;

    #    server_name  localhost;

    #    ssl_certificate      cert.pem;

    #    ssl_certificate_key  cert.key;

    #    ssl_session_cache    shared:SSL:1m;

    #    ssl_session_timeout  5m;

    #    ssl_ciphers  HIGH:!aNULL:!MD5;

    #    ssl_prefer_server_ciphers  on;

    #    location / {

    #        root   html;

    #        index  index.html index.htm;

    #    }

    #}

}
(3)在/usr/local/nginx/conf/ 目录新建vhost文件夹,既:/usr/local/nginx/conf/vhost
(4)创建域名转发配置文件,点击查看详情

admin.happymmall.com.conf
server {

listen ;

autoindex on;

server_name admin.happymmall.com;

access_log /usr/local/nginx/logs/access.log combined;

index index.html index.htm index.jsp index.php;

#root /devsoft/apache-tomcat-7.0./webapps/mmall;

#error_page  /.html;

if ( $query_string ~* ".*[\;'\<\>].*" ){

        return ;

        }

location = / {

        root /product/front/mmall_admin_fe/dist/view;

        index index.html;

}

location ~ .*\.(html|htm)$ {

        root /product/front/mmall_admin_fe/dist/view;

        index index.html;

        }

location / {

        proxy_pass http://127.0.0.1:8080/;

        add_header Access-Control-Allow-Origin '*';

        }

}
happymmall.com.conf
server {

listen ;

autoindex on;

server_name happymmall.com www.happymmall.com;

access_log /usr/local/nginx/logs/access.log combined;

index index.html index.htm index.jsp index.php;

if ( $query_string ~* ".*[\;'\<\>].*" ){

        return ;

        }

location = / {

        root /product/front/mmall_fe/dist/view;

        index index.html;

}

location ~ .*\.html$ {

        root /product/front/mmall_fe/dist/view;

        index index.html;

}

location / {

        proxy_pass http://127.0.0.1:8080/;

        }

location ~ .*\.(gif|jpg|jpeg|png|bmp|swf|flv|ico)$ {

        proxy_pass http://127.0.0.1:8080;

        expires 30d;

        }

location ~ .*\.(js|css)?$ {

        proxy_pass http://127.0.0.1:8080;

        expires 7d;

        }

}
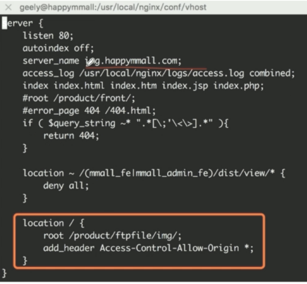
img.happymmall.com.conf
server {

    listen ;

    autoindex off;

    server_name img.happymmall.com;

    access_log /usr/local/nginx/logs/access.log combined;

    index index.html index.htm index.jsp index.php;

    #error_page  /.html;

    if ( $query_string ~* ".*[\;'\<\>].*" ){

        return ;

    }

    location ~ /(mmall_fe|mmall_admin_fe)/dist/view/* {

        deny all;

    }

    location / {

        root /product/ftpfile/img/;

        add_header Access-Control-Allow-Origin *;

    }

}
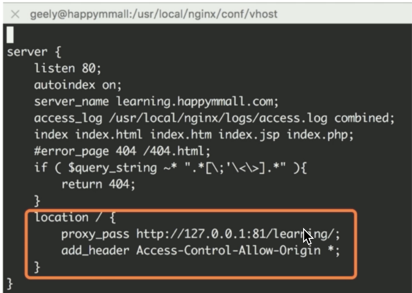
learning.happymmall.com.conf
server {

    default_type 'text/html';

    charset utf-;

    listen ;

    autoindex on;

    server_name learning.happymmall.com;

    access_log /usr/local/nginx/logs/access.log combined;

    index index.html index.htm index.jsp index.php;

    #error_page  /.html;

    if ( $query_string ~* ".*[\;'\<\>].*" ){

        return ;

    }

    location ~ /(mmall_fe|mmall_admin_fe)/dist/view/* {

        deny all;

    }

    location / {

        root /product/ftpfile/learning/;

        add_header Access-Control-Allow-Origin *;

    }

}
s.happymmall.com.conf
server {

    listen ;

    autoindex off;

    server_name s.happymmall.com;

    access_log /usr/local/nginx/logs/access.log combined;

    index index.html index.htm index.jsp index.php;

    if ( $query_string ~* ".*[\;'\<\>].*" ){

        return ;

    }

    location ~ /(mmall_fe|mmall_admin_fe)/dist/view/* {

        deny all;

    }

    location / {

        root /product/front/;

        add_header Access-Control-Allow-Origin *;

    }

}
(5)启动(重启)验证
启动:${nginx}/sbin/nginx
重启:${nginx}/sbin/nginx -s reload
${nginx} 安装路径, /usr/local/nginx
(6)访问验证
使用默认80端口访问验证:http://localhost:80 或http://127.0.0.1:80 ,本次验证,我们使用的虚拟机因此http://172.31.8.112:80

7. Nginx 虚拟域名配置


8. Nginx 本地搭建环境注意事项
(1). 可以配置域名转发,但是请注意要配置host,并且使host生效之后才可以,设置完成之后要重启浏览器
(2). Linux
sudo vi /etc/hosts
添加好对应的域名及IP

eshop6-nginx的更多相关文章
- accept_mutex与性能的关系 (nginx)
注:运行环境CentOS 6+ 背景 在对启动了20个worker的nginx进行压力测试的时候发现:如果把配置文件中event配置块中的accept_mutex开关打开(1.11.3版 ...
- nginx配置反向代理或跳转出现400问题处理记录
午休完上班后,同事说测试站点访问接口出现400 Bad Request Request Header Or Cookie Too Large提示,心想还好是测试服务器出现问题,影响不大,不过也赶紧上 ...
- 【大型网站技术实践】初级篇:借助Nginx搭建反向代理服务器
一.反向代理:Web服务器的“经纪人” 1.1 反向代理初印象 反向代理(Reverse Proxy)方式是指以代理服务器来接受internet上的连接请求,然后将请求转发给内部网络上的服务器,并将从 ...
- Docker笔记一:基于Docker容器构建并运行 nginx + php + mysql ( mariadb ) 服务环境
首先为什么要自己编写Dockerfile来构建 nginx.php.mariadb这三个镜像呢?一是希望更深入了解Dockerfile的使用,也就能初步了解docker镜像是如何被构建的:二是希望将来 ...
- nginx+php的使用
原文来自:windows下配置nginx+php环境 按照他的步骤走,亲测可用! 但是这里他后面说的根目录可能有些人有点懵. 其实在设置的时候就设置了: 网站根目录就是www这个目录,如果没创建请自行 ...
- nginx的使用
1.nginx的下载 解压后文件目录: 2.nginx的常用命令 nginx -s stop 强制关闭 nginx -s quit 安全关闭 nginx -s reload 改变配置文件的时候,重 ...
- nginx+iis+redis+Task.MainForm构建分布式架构 之 (redis存储分布式共享的session及共享session运作流程)
本次要分享的是利用windows+nginx+iis+redis+Task.MainForm组建分布式架构,上一篇分享文章制作是在windows上使用的nginx,一般正式发布的时候是在linux来配 ...
- windows+nginx+iis+redis+Task.MainForm构建分布式架构 之 (nginx+iis构建服务集群)
本次要分享的是利用windows+nginx+iis+redis+Task.MainForm组建分布式架构,由标题就能看出此内容不是一篇分享文章能说完的,所以我打算分几篇分享文章来讲解,一步一步实现分 ...
- nginx源码分析之模块初始化
在nginx启动过程中,模块的初始化是整个启动过程中的重要部分,而且了解了模块初始化的过程对应后面具体分析各个模块会有事半功倍的效果.在我看来,分析源码来了解模块的初始化是最直接不过的了,所以下面主要 ...
- Nginx如何处理一个请求
看了下nginx的官方文档,其中nginx如何处理一个请求讲解的很好,现在贴出来分享下.Nginx首先选定由哪一个虚拟主机来处理请求.让我们从一个简单的配置(其中全部3个虚拟主机都在端口*:80上监听 ...
随机推荐
- jdk动态代理和cglib动态代理底层实现原理超详细解析(jdk动态代理篇)
代理模式是一种很常见的模式,本文主要分析jdk动态代理的过程 1.举例 public class ProxyFactory implements InvocationHandler { private ...
- nopad++将制表符替换为换行符
将制表符换位换行
- vue中 el [$el] 的理解
<template> <div class="a"> <div class="basic" ref="ba"& ...
- 图片切换.----so屌
<!doctype html> <html lang="en"> <head> <meta charset="UTF-8&quo ...
- Spring Schedule 实现定时任务
很多时候我们都需要为系统建立一个定时任务来帮我们做一些事情,SpringBoot 已经帮我们实现好了一个,我们只需要直接使用即可,当然你也可以不用 SpringBoot 自带的定时任务,整合 Quar ...
- 浅谈PHP组件、框架以及Composer
本篇文章主要介绍了PHP组件.框架以及Composer,具有一定的学习价值,感兴趣的朋友可以了解一下. 什么是组件 组件是一组打包的代码,是一系列相关的类.接口和Trait,用于帮助我们解决PHP应用 ...
- iOS收起键盘
在UIViewController中收起键盘,有四种代码方式: 1.让相应的控件放弃第一响应者 /** 放弃第一响应者 */ [self.nameTextField resignFirstRespon ...
- Victor and String[Bestcoder #52 1004](回文树)
题目描述 Victor喜欢玩字符串.他认为一个字符串是迷人的,当且仅当字符串是回文的.Victor想玩n次.每次他都会做以下四种操作中的一种.操作1:在字符串的开头添加一个字符 c.操作2:在字符串的 ...
- js实现深度拷贝
js实现拷贝,使用普通赋值对象,在操作其中一个对象值的时候,另一个也会更改,不符合需求 因此引入深度拷贝,以下为实现深度拷贝的几种法: Object.assign // 合并多个对象 var targ ...
- Linux用户和用户组管理命令
一.用户管理命令 1.useradd 创建用户或更新默认新用户的信息 使用方法 useradd [options] 用户名 选项: useradd -u 指定UID具体数值, ...