吴裕雄 python 机器学习——集成学习随机森林RandomForestClassifier分类模型
import numpy as np

import matplotlib.pyplot as plt

from sklearn import datasets,ensemble

from sklearn.model_selection import train_test_split

def load_data_classification():

    '''

    加载用于分类问题的数据集

    '''

    # 使用 scikit-learn 自带的 digits 数据集

    digits=datasets.load_digits()

    # 分层采样拆分成训练集和测试集,测试集大小为原始数据集大小的 1/4

    return train_test_split(digits.data,digits.target,test_size=0.25,random_state=0,stratify=digits.target)

#集成学习随机森林RandomForestClassifier分类模型

def test_RandomForestClassifier(*data):

    X_train,X_test,y_train,y_test=data

    clf=ensemble.RandomForestClassifier()

    clf.fit(X_train,y_train)

    print("Traing Score:%f"%clf.score(X_train,y_train))

    print("Testing Score:%f"%clf.score(X_test,y_test))

# 获取分类数据

X_train,X_test,y_train,y_test=load_data_classification()

# 调用 test_RandomForestClassifier

test_RandomForestClassifier(X_train,X_test,y_train,y_test)

def test_RandomForestClassifier_num(*data):

    '''

    测试 RandomForestClassifier 的预测性能随 n_estimators 参数的影响

    '''

    X_train,X_test,y_train,y_test=data

    nums=np.arange(1,100,step=2)

    fig=plt.figure()

    ax=fig.add_subplot(1,1,1)

    testing_scores=[]

    training_scores=[]

    for num in nums:

        clf=ensemble.RandomForestClassifier(n_estimators=num)

        clf.fit(X_train,y_train)

        training_scores.append(clf.score(X_train,y_train))

        testing_scores.append(clf.score(X_test,y_test))

    ax.plot(nums,training_scores,label="Training Score")

    ax.plot(nums,testing_scores,label="Testing Score")

    ax.set_xlabel("estimator num")

    ax.set_ylabel("score")

    ax.legend(loc="lower right")

    ax.set_ylim(0,1.05)

    plt.suptitle("RandomForestClassifier")

    plt.show()

# 调用 test_RandomForestClassifier_num

test_RandomForestClassifier_num(X_train,X_test,y_train,y_test)

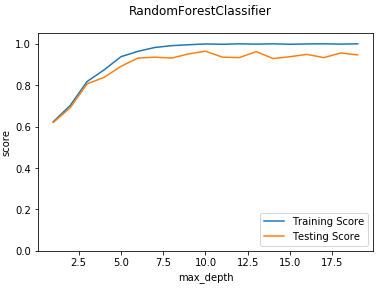
def test_RandomForestClassifier_max_depth(*data):

    '''

    测试 RandomForestClassifier 的预测性能随 max_depth 参数的影响

    '''

    X_train,X_test,y_train,y_test=data

    maxdepths=range(1,20)

    fig=plt.figure()

    ax=fig.add_subplot(1,1,1)

    testing_scores=[]

    training_scores=[]

    for max_depth in maxdepths:

        clf=ensemble.RandomForestClassifier(max_depth=max_depth)

        clf.fit(X_train,y_train)

        training_scores.append(clf.score(X_train,y_train))

        testing_scores.append(clf.score(X_test,y_test))

    ax.plot(maxdepths,training_scores,label="Training Score")

    ax.plot(maxdepths,testing_scores,label="Testing Score")

    ax.set_xlabel("max_depth")

    ax.set_ylabel("score")

    ax.legend(loc="lower right")

    ax.set_ylim(0,1.05)

    plt.suptitle("RandomForestClassifier")

    plt.show()

# 调用 test_RandomForestClassifier_max_depth

test_RandomForestClassifier_max_depth(X_train,X_test,y_train,y_test)

def test_RandomForestClassifier_max_features(*data):

    '''

    测试 RandomForestClassifier 的预测性能随 max_features 参数的影响

    '''

    X_train,X_test,y_train,y_test=data

    max_features=np.linspace(0.01,1.0)

    fig=plt.figure()

    ax=fig.add_subplot(1,1,1)

    testing_scores=[]

    training_scores=[]

    for max_feature in max_features:

        clf=ensemble.RandomForestClassifier(max_features=max_feature)

        clf.fit(X_train,y_train)

        training_scores.append(clf.score(X_train,y_train))

        testing_scores.append(clf.score(X_test,y_test))

    ax.plot(max_features,training_scores,label="Training Score")

    ax.plot(max_features,testing_scores,label="Testing Score")

    ax.set_xlabel("max_feature")

    ax.set_ylabel("score")

    ax.legend(loc="lower right")

    ax.set_ylim(0,1.05)

    plt.suptitle("RandomForestClassifier")

    plt.show()

# 调用 test_RandomForestClassifier_max_features

test_RandomForestClassifier_max_features(X_train,X_test,y_train,y_test)

吴裕雄 python 机器学习——集成学习随机森林RandomForestClassifier分类模型的更多相关文章
- 吴裕雄 python 机器学习——集成学习随机森林RandomForestRegressor回归模型
import numpy as np import matplotlib.pyplot as plt from sklearn import datasets,ensemble from sklear ...
- 吴裕雄 python 机器学习——集成学习梯度提升决策树GradientBoostingRegressor回归模型
import numpy as np import matplotlib.pyplot as plt from sklearn import datasets,ensemble from sklear ...
- 吴裕雄 python 机器学习——集成学习AdaBoost算法回归模型
import numpy as np import matplotlib.pyplot as plt from sklearn import datasets,ensemble from sklear ...
- 吴裕雄 python 机器学习——集成学习AdaBoost算法分类模型
import numpy as np import matplotlib.pyplot as plt from sklearn import datasets,ensemble from sklear ...
- 机器学习:集成学习:随机森林.GBDT
集成学习(Ensemble Learning) 集成学习的思想是将若干个学习器(分类器&回归器)组合之后产生一个新学习器.弱分类器(weak learner)指那些分类准确率只稍微好于随机猜测 ...
- 吴裕雄 python 机器学习——伯努利贝叶斯BernoulliNB模型
import numpy as np import matplotlib.pyplot as plt from sklearn import datasets,naive_bayes from skl ...
- 吴裕雄 python 机器学习——数据预处理过滤式特征选取SelectPercentile模型
from sklearn.feature_selection import SelectPercentile,f_classif #数据预处理过滤式特征选取SelectPercentile模型 def ...
- 吴裕雄 python 机器学习——数据预处理过滤式特征选取VarianceThreshold模型
from sklearn.feature_selection import VarianceThreshold #数据预处理过滤式特征选取VarianceThreshold模型 def test_Va ...
- 吴裕雄 python 机器学习——数据预处理字典学习模型
from sklearn.decomposition import DictionaryLearning #数据预处理字典学习DictionaryLearning模型 def test_Diction ...
随机推荐
- AcWing 11. 背包问题求方案数
//g[i,j]表示f[i,j]取最大值的方案数目 //体积最多是j 全部为0,v>=0 //体积恰好为j f[0][0]=0,f[i]=无穷,v>=0 //体积至少是j f[0][0]= ...
- window snmp
https://blog.csdn.net/weixin_30367543/article/details/99923014 https://jingyan.baidu.com/article/e3c ...
- vue 截取字符串
let str = 'abcdef'; str = str.slice();//返回整个字符串 abcdef str = str.substring();//返回整个字符串 abcdef str = ...
- JavaWeb学习(三) : 如何在 Eclipse 中创建一个Web 项目并成功运行?
前置条件 : 1.确保已安装 Eclipse.Tomcat 服务器安装包 2.jdk.环境变量都已配置成功. 3.注意在安装 Eclipse 时一定要选择第二个有 Web 项目的进行安装, 不然安装成 ...
- 安装vmware tools后仍然不能拖拽文件
运行/usr/bin/vmware-user文件 ./vmware-user
- 本地项目如何上传到github
首先登录官网注册用户(此处不多介绍),然后需要登录github创建仓库 https://github.com/ 然后取一个自己喜欢的名字(这里我的名字是webclock),点击Create rep ...
- AcWing 1023. 买书 完全背包
//完全背包 求方案数目 //f[i][j] 只从前i个物品中选,且总体积恰好为j的方案的集合 //f[i][j]=f[i-1][j]+f[i-1][j-v*1]+f[i-1][j-v*2]+...f ...
- 洛谷P1093 奖学金
https://www.luogu.org/problem/P1093 #include <bits/stdc++.h> using namespace std; struct Node{ ...
- 深度优先搜索 DFS(Depath First Search, DFS)
深度优先搜索是一种枚举所有完整路径以遍历所有情况的搜索方法.(不撞南墙不回头) DFS一般用递归来实现,其伪代码思路过程一般如下: void DFS(必要的参数){ if (符和遍历到一条完整路 ...
- 【网站】i新媒上线了!
[New]i新媒上线了! i新媒,是新媒体人常用和必备的工具导航,我们整合了自媒体平台.行业资讯.运营营销.学习创业等常用的网站,让新媒体人更快地获取有用的知识. 访问链接:https://ixm.h ...
