【笔记5-购物车及地址模块】从0开始 独立完成企业级Java电商网站开发(服务端)
购物车模块
数据库表设计
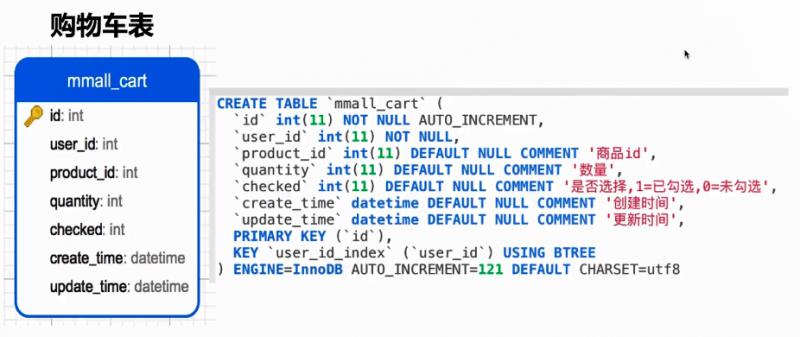
购物车表

CREATE TABLE mmall_ cart (

'id' int(11) NOT NULL AUTO_ INCREMENT,

'user_ id' int(11) NOT NULL,

'product_ id' int(11) DEFAULT NULL COMMENT ' 商品id',

'quantity' int(11) DEFAULT NULL COMMENT  '数量',

'checked' int(11) DEFAULT NULL COMMENT ' 是否选择,1=已勾选,0=未勾选' ,

'create_ time' datetime DEFAULT NULL COMMENT ' 创建时间'

'update_ _time' datetime DEFAULT NULL COMMENT ' 更新时间' ,

PRIMARY KEY (' id'),

KEY 'user_ id_ index' (user_ id') USING BTREE

) ENGINE=InnoDB AUTO_ INCREMENT=121 DEFAULT CHARSET=utf8
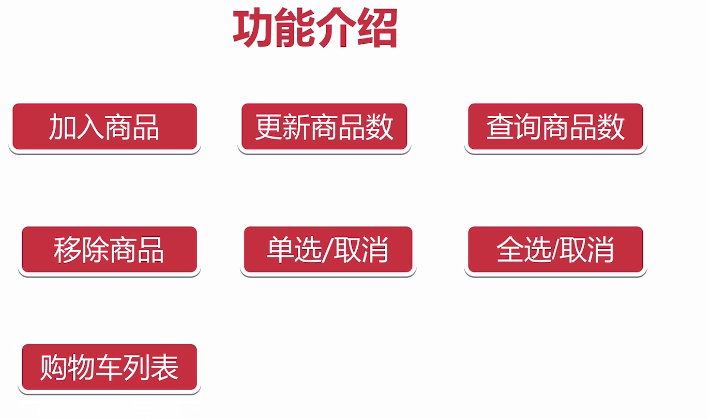
功能

加入商品
更新商品数
查询商品数
移除商品
单选/取消
全选/取消
购物车列表
涉及知识点
购物车模块的设计思想
如何封装一个高复用购物车核心方法
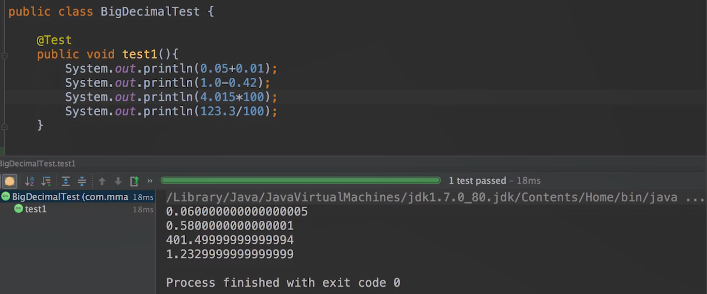
解决浮点型商业运算中丢失精度的问题

接口设计
【门户】
1.购物车List列表
/cart/list.do
http://localhost:8080/cart/list.do
注意点:
- 需要先登录,所有的密码都是123
- NEED_LOGIN(10, "NEED_LOGIN"),//需要登录的错误编码
- 价格的单位是元,保留小数后2位
request
无参数,需要登录状态
response
success
{

    "status": 0,

    "data": {

        "cartProductVoList": [

            {

                "id": 1,

                "userId": 13,

                "productId": 1,

                "quantity": 1,

                "productName": "iphone7",

                "productSubtitle": "双十一促销",

                "productMainImage": "mainimage.jpg",

                "productPrice": 7199.22,

                "productStatus": 1,

                "productTotalPrice": 7199.22,

                "productStock": 86,

                "productChecked": 1,

                "limitQuantity": "LIMIT_NUM_SUCCESS"

            },

            {

                "id": 2,

                "userId": 13,

                "productId": 2,

                "quantity": 1,

                "productName": "oppo R8",

                "productSubtitle": "oppo促销进行中",

                "productMainImage": "mainimage.jpg",

                "productPrice": 2999.11,

                "productStatus": 1,

                "productTotalPrice": 2999.11,

                "productStock": 86,

                "productChecked": 1,

                "limitQuantity": "LIMIT_NUM_SUCCESS"

            }

        ],

        "allChecked": true,

        "cartTotalPrice": 10198.33

    }

}
2.购物车添加商品
/cart/add.do
http://localhost:8080/cart/add.do?productId=1&count=10
请注意这个字段,超过数量会返回这样的标识"limitQuantity"
失败的:LIMIT_NUM_FAIL
成功的:LIMIT_NUM_SUCCESS
request
productId,count
response
success
{

    "status": 0,

    "data": {

        "cartProductVoList": [

            {

                "id": 1,

                "userId": 13,

                "productId": 1,

                "quantity": 12,

                "productName": "iphone7",

                "productSubtitle": "双十一促销",

                "productMainImage": "mainimage.jpg",

                "productPrice": 7199.22,

                "productStatus": 1,

                "productTotalPrice": 86390.64,

                "productStock": 86,

                "productChecked": 1,

                "limitQuantity": "LIMIT_NUM_SUCCESS"

            },

            {

                "id": 2,

                "userId": 13,

                "productId": 2,

                "quantity": 1,

                "productName": "oppo R8",

                "productSubtitle": "oppo促销进行中",

                "productMainImage": "mainimage.jpg",

                "productPrice": 2999.11,

                "productStatus": 1,

                "productTotalPrice": 2999.11,

                "productStock": 86,

                "productChecked": 1,

                "limitQuantity": "LIMIT_NUM_SUCCESS"

            }

        ],

        "allChecked": true,

        "cartTotalPrice": 89389.75

    }

}
3.更新购物车某个产品数量
/cart/update.do
http://localhost:8080/cart/update.do?productId=1&count=2
request
productId,count
response
响应同2
success
{

    "status": 0,

    "data": {

        "cartProductVoList": [

            {

                "id": 1,

                "userId": 13,

                "productId": 1,

                "quantity": 12,

                "productName": "iphone7",

                "productSubtitle": "双十一促销",

                "productMainImage": "mainimage.jpg",

                "productPrice": 7199.22,

                "productStatus": 1,

                "productTotalPrice": 86390.64,

                "productStock": 86,

                "productChecked": 1,

                "limitQuantity": "LIMIT_NUM_SUCCESS"

            },

            {

                "id": 2,

                "userId": 13,

                "productId": 2,

                "quantity": 1,

                "productName": "oppo R8",

                "productSubtitle": "oppo促销进行中",

                "productMainImage": "mainimage.jpg",

                "productPrice": 2999.11,

                "productStatus": 1,

                "productTotalPrice": 2999.11,

                "productStock": 86,

                "productChecked": 1,

                "limitQuantity": "LIMIT_NUM_SUCCESS"

            }

        ],

        "allChecked": true,

        "cartTotalPrice": 89389.75

    }

}
4.移除购物车某个产品
/cart/delete_product.do
http://localhost:8080/cart/delete_product.do?productIds=1,3
request
productIds
response
success
{

    "status": 0,

    "data": {

        "cartProductVoList": [

            {

                "id": 2,

                "userId": 13,

                "productId": 2,

                "quantity": 1,

                "productName": "oppo R8",

                "productSubtitle": "oppo促销进行中",

                "productMainImage": "mainimage.jpg",

                "productPrice": 2999.11,

                "productStatus": 1,

                "productTotalPrice": 2999.11,

                "productStock": 86,

                "productChecked": 1,

                "limitQuantity": "LIMIT_NUM_SUCCESS"

            }

        ],

        "allChecked": true,

        "cartTotalPrice": 2999.11

    }

}
5.购物车选中某个商品
/cart/select.do
http://localhost:8080/cart/select.do?productId=1
request
productId
response
success
{

    "status": 0,

    "data": {

        "cartProductVoList": [

            {

                "id": 2,

                "userId": 13,

                "productId": 2,

                "quantity": 1,

                "productName": "oppo R8",

                "productSubtitle": "oppo促销进行中",

                "productMainImage": "mainimage.jpg",

                "productPrice": 2999.11,

                "productStatus": 1,

                "productTotalPrice": 2999.11,

                "productStock": 86,

                "productChecked": 1,

                "limitQuantity": "LIMIT_NUM_SUCCESS"

            }

        ],

        "allChecked": true,

        "cartTotalPrice": 2999.11

    }

}
6.购物车取消选中某个商品
/cart/un_select.do
http://localhost:8080/cart/un_select.do?productId=2
注意返回值中的cartTotalPrice,如果反选之后总价的变化
request
productId
response
success
{

    "status": 0,

    "data": {

        "cartProductVoList": [

            {

                "id": 2,

                "userId": 13,

                "productId": 2,

                "quantity": 1,

                "productName": "oppo R8",

                "productSubtitle": "oppo促销进行中",

                "productMainImage": "mainimage.jpg",

                "productPrice": 2999.11,

                "productStatus": 1,

                "productTotalPrice": 2999.11,

                "productStock": 86,

                "productChecked": 0,

                "limitQuantity": "LIMIT_NUM_SUCCESS"

            }

        ],

        "allChecked": true,

        "cartTotalPrice": 0

    }

}
7.查询在购物车里的产品数量
/cart/get_cart_product_count.do
http://localhost:8080/cart/get_cart_product_count.do
未登录返回0
request
无
response
success
{

    "status": 0,

    "data": 0

}
8.购物车全选
/cart/select_all.do
http://localhost:8080/cart/select_all.do
注意返回值中的cartTotalPrice的变化
request
无
response
success
{

    "status": 0,

    "data": {

        "cartProductVoList": [

            {

                "id": 2,

                "userId": 13,

                "productId": 2,

                "quantity": 1,

                "productName": "oppo R8",

                "productSubtitle": "oppo促销进行中",

                "productMainImage": "mainimage.jpg",

                "productPrice": 2999.11,

                "productStatus": 1,

                "productTotalPrice": 2999.11,

                "productStock": 86,

                "productChecked": 0,

                "limitQuantity": "LIMIT_NUM_SUCCESS"

            }

        ],

        "allChecked": true,

        "cartTotalPrice": 2999.11

    }

}
9.购物车取消全选
/cart/un_select_all.do
http://localhost:8080/cart/un_select_all.do
注意返回值中的cartTotalPrice总价的变化
request
无
response
success
{

    "status": 0,

    "data": {

        "cartProductVoList": [

            {

                "id": 2,

                "userId": 13,

                "productId": 2,

                "quantity": 1,

                "productName": "oppo R8",

                "productSubtitle": "oppo促销进行中",

                "productMainImage": "mainimage.jpg",

                "productPrice": 2999.11,

                "productStatus": 1,

                "productTotalPrice": 2999.11,

                "productStock": 86,

                "productChecked": 0,

                "limitQuantity": "LIMIT_NUM_SUCCESS"

            }

        ],

        "allChecked": true,

        "cartTotalPrice": 0

    }

}
收货地址模块
数据库表设计
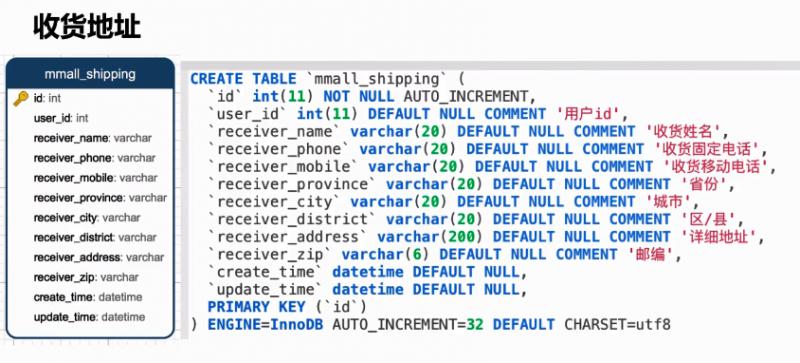
收货地址表

CREATE TABLE‘mmall_ shipping (

'id' int(11) NOT NULL AUTO_INCREMENT,

'user_ id'  int(11) DEFAULT NULL COMMENT '用户id'',

'receiver_ name' varchar(20) DEFAULT NULL COMMENT '收货姓名',

'receiver_ phone' varchar(20) DEFAULT NULL COMMENT '收货固定电话',

'receiver_ _mobile' varchar(20) DEFAULT NULL COMMENT ' 收货移动电话'',

'receiver_ province' varchar(20) DEFAULT NULL COMMENT '省份',

'receiver_ _city' varchar(20) DEFAULT NULL COMMENT ' 城市'',

'receiver_ _district' varchar (20) DEFAULT NULL COMMENT '区/县'',

'receiver_ address'  varchar(200) DEFAULT NULL COMMENT ' 详细地址',

'receiver_ zip'  varchar(6) DEFAULT NULL COMMENT ' 邮编' ,

'create_ _time' datetime DEFAULT NULL,

'update_ time' datetime DEFAULT NULL,

PRIMARY KEY ('id')

) ENGINE=InnoDB AUTO_ INCREMENT=32 DEFAULT CHARSET=utf8
功能
添加地址
删除地址
更新地址
地址列表
地址分页
地址详情
涉及知识点
SpringMVC数据绑定中对象绑定
mybatis自动生成主键、配置和使用
如何避免横向越权漏洞的巩固
接口设计
【前台】
1.添加地址
/shipping/add.do
request
userId=1

receiverName=geely

receiverPhone=010

receiverMobile=18688888888

receiverProvince=北京

receiverCity=北京市

receiverAddress=中关村

receiverZip=100000
response
success
{

    "status": 0,

    "msg": "新建地址成功",

    "data": {

        "shippingId": 28

    }

}
2.删除地址
/shipping/del.do
request
shippingId
response
success
{

    "status": 0,

    "msg": "删除地址成功"

}
3.登录状态更新地址
/shipping/update.do
request
id=1

receiverName=geely

receiverPhone=010

receiverMobile=18688888888

receiverProvince=北京

receiverCity=北京市

receiverAddress=中关村

receiverZip=100000
response
success
{

    "status": 0,

    "msg": "更新地址成功"

}
4.选中查看具体的地址
/shipping/select.do
request
shippingId
response
success
{

    "status": 0,

    "data": {

        "id": 4,

        "userId": 13,

        "receiverName": "geely",

        "receiverPhone": "010",

        "receiverMobile": "18688888888",

        "receiverProvince": "北京",

        "receiverCity": "北京市",

        "receiverAddress": "中关村",

        "receiverZip": "100000",

        "createTime": 1485066385000,

        "updateTime": 1485066385000

    }

}
5.地址列表
/shipping/list.do
http://localhost:8080/shipping/list.do
request
pageNum(默认1),pageSize(默认10)
response
success
{

    "status": 0,

    "data": {

        "pageNum": 1,

        "pageSize": 10,

        "size": 2,

        "orderBy": null,

        "startRow": 1,

        "endRow": 2,

        "total": 2,

        "pages": 1,

        "list": [

            {

                "id": 4,

                "userId": 13,

                "receiverName": "geely",

                "receiverPhone": "010",

                "receiverMobile": "18688888888",

                "receiverProvince": "北京",

                "receiverCity": "北京市",

                "receiverAddress": "中关村",

                "receiverZip": "100000",

                "createTime": 1485066385000,

                "updateTime": 1485066385000

            },

            {

                "id": 5,

                "userId": 13,

                "receiverName": "AAA",

                "receiverPhone": "010",

                "receiverMobile": "18688888888",

                "receiverProvince": "北京",

                "receiverCity": "北京市",

                "receiverAddress": "中关村",

                "receiverZip": "100000",

                "createTime": 1485066392000,

                "updateTime": 1485075875000

            }

        ],

        "firstPage": 1,

        "prePage": 0,

        "nextPage": 0,

        "lastPage": 1,

        "isFirstPage": true,

        "isLastPage": true,

        "hasPreviousPage": false,

        "hasNextPage": false,

        "navigatePages": 8,

        "navigatepageNums": [

            1

        ]

    }

}
【笔记5-购物车及地址模块】从0开始 独立完成企业级Java电商网站开发(服务端)的更多相关文章
- 【笔记6-支付及订单模块】从0开始 独立完成企业级Java电商网站开发(服务端)
支付模块 实际开发工作中经常会遇见如下场景,一个支付模块,一个订单模块,有一定依赖,一个同事负责支付模块,另一个同事负责订单模块,但是开发支付模块的时候要依赖订单模块的相关类 ,方法,或者工具类,这些 ...
- 【笔记4-商品模块】从0开始 独立完成企业级Java电商网站开发(服务端)
分类管理模块 数据表结构设计 分类表 CREATE TABLE.mmall_ category' ( 'id' int(11) NOT NULL AUTO_ INCREMENT COMMENT ' 类 ...
- 【笔记3-用户模块】从0开始 独立完成企业级Java电商网站开发(服务端)
数据表结构设计 关系设计 为什么不用外键? 分库分表有外键会非常麻烦,清洗数据也很麻烦.数据库内置触发器也不适合采用. 查业务问题的后悔药--时间戳 create_time 数据创建时间 update ...
- 【笔记7-部署发布】从0开始 独立完成企业级Java电商网站开发(服务端)
阿里云服务 购买 连接 购买域名 域名备案 域名解析 源配置步骤 资源地址 http://learning.happymmall.com/ 配置阿里云的yum源 1.备份 mv /etc/yum.re ...
- 【笔记8-Redis分布式锁】从0开始 独立完成企业级Java电商网站开发(服务端)
Redis分布式锁 Redis分布式锁命令 setnx当且仅当 key 不存在.若给定的 key 已经存在,则 setnx不做任何动作.setnx 是『set if not exists』(如果不存在 ...
- 【笔记2-环境配置及初始化】从0开始 独立完成企业级Java电商网站开发(服务端)
准备工作 Linux系统安装 云服务器部署 概要 申请和配置 域名的购买.解析.配置.绑定流程 用户创建实操 环境安装及部署 JDK.Tomcat.Maven下载安装及配置 vsftpd下载安装及配置 ...
- 从0开始独立完成企业级Java电商网站开发(服务端)
数据表结构设计 唯一索引unique,保证数据唯一性 CREATE TABLE `mmall_user` ( `id` int(11) NOT NULL AUTO_INCREMENT COMMENT ...
- 如何一步一步用DDD设计一个电商网站(十)—— 一个完整的购物车
阅读目录 前言 回顾 梳理 实现 结语 一.前言 之前的文章中已经涉及到了购买商品加入购物车,购物车内购物项的金额计算等功能.本篇准备把剩下的购物车的基本概念一次处理完. 二.回顾 在动手之前我对之 ...
- 如何一步一步用DDD设计一个电商网站(六)—— 给购物车加点料,集成售价上下文
阅读目录 前言 如何在一个项目中实现多个上下文的业务 售价上下文与购买上下文的集成 结语 一.前言 前几篇已经实现了一个最简单的购买过程,这次开始往这个过程中增加一些东西.比如促销.会员价等,在我们的 ...
随机推荐
- js面向对象的程序设计 --- 中篇(创建对象) 之 原型模式
·原型模式 我们创建的每一个函数都由一个prototype(原型)属性,这个属性是一个指针,指向一个对象,而这个对象的用途是包含可以由特定类型的所有 实例共享的属性和方法. 如果按照字面意思来理解,那 ...
- Django中间件,CSRF(跨站请求伪造),缓存,信号,BootStrap(模板)-响应式(栅格)+模板
Django中间件,CSRF(跨站请求伪造),缓存,信号,BootStrap(模板)-响应式(栅格)+模板 1.中间件(重要): 在Django的setting中有个MIDDLEWARE列表,里面的东 ...
- quartus在线调试的方法
quartus在线调试的方法 在Quartus II Version 7.2 Handbook Volume 3: Verification中的Section V. In-System Design ...
- python接口自动化之用HTMLTestRunner生成html测试报告
[第一步]:引入HTMLTestRunner包 1.下载HTMLTestRunner,下载地址:http://tungwaiyip.info/software/HTMLTestRunner.html ...
- CentOS 7下用firewall-cmd控制端口与端口转发
# 将80端口的流量转发至192.168.0.1的8080端口 1.firewall-cmd --permanent --add-forward-port=port=80:proto=tcp:toad ...
- HTML学习(10)图像
HTML图像标签<img>,没有闭合标签 <img src="" alt="" width="" height=" ...
- Python出现Could not find a version that satisfies the requirement openpyxl (from versions: )
一.环境使用python3.7时,用pip安装openpyxl出现如下错误: 系统环境:windows10家庭版Python版本:python3.7.1IDE:sublime_text 3二. 解决方 ...
- Java学习笔记(八)面向对象---抽象类
当多个类中出现相同功能,但是功能主体不同时,我们可以向上抽取,只抽取功能定义,而不抽取功能主体. 抽象类的特点 抽象方法一定在抽象类中. 抽象方法和抽象类都必须被abstract关键字修饰. 抽象类不 ...
- 如何将mongo查询结果导出到文件中
1.新建一个js文件,将查询方法写进去,如dump.js,文件内容如下 var c = db.campaign.find({status:1}).limit(5) while(c.hasNext()) ...
- numpy (1.16.4) has the default value of allow_pickle as False.
My version of numpy (1.16.4) has the default value of allow_pickle as False. numpy版本是1.16.4,allow_pi ...
