自定义用户认证(继承django的)
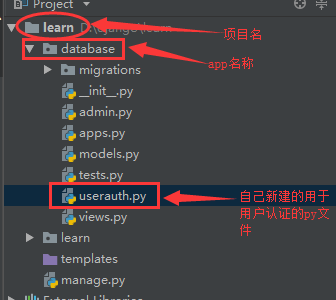
1、在app下创建一个自己用户认证文件,文件名随意,记得为.py文件

2、编辑该userauth.py文件
 #!/usr/bin/env python

 #coding:utf-8

 from django.db import models

 from django.contrib.auth.models import (

     BaseUserManager, AbstractBaseUser

 )

 import django

 class UserManager(BaseUserManager):

     def create_user(self, email, name, password=None):

         """

         Creates and saves a User with the given email, date of

         birth and password.

         """

         if not email:

             raise ValueError('Users must have an email address')

         user = self.model(

             email=self.normalize_email(email),

             name=name,

             #token=token,

             #department=department,

             #tel=tel,

             #memo=memo,

         )

         user.set_password(password)

         user.save(using=self._db)

         return user

     def create_superuser(self, email, name ,password):

         """

         Creates and saves a superuser with the given email, date of

         birth and password.

         """

         user = self.create_user(email,

             password=password,

             name=name,

             #token=token,

             #department=department,

             #tel=tel,

             #memo=memo,

         )

         user.is_admin = True

         user.save(using=self._db)

         return user

 class UserProfile(AbstractBaseUser):

     email = models.EmailField(

         verbose_name='email address',

         max_length=255,

         unique=True,

     )

     is_active = models.BooleanField(default=True)

     is_admin = models.BooleanField(default=False)

     name = models.CharField(u'名字', max_length=32)

     token = models.CharField(u'token', max_length=128,default=None,blank=True,null=True)

     department = models.CharField(u'部门', max_length=32,default=None,blank=True,null=True)

     mobile = models.CharField(u'手机', max_length=32,default=None,blank=True,null=True)

     memo = models.TextField(u'备注', blank=True,null=True,default=None)

     date_joined = models.DateTimeField(blank=True, auto_now_add=True)

     valid_begin_time = models.DateTimeField(default=django.utils.timezone.now)

     valid_end_time = models.DateTimeField(blank=True,null=True)

     USERNAME_FIELD = 'email'  #定义email为用户名

     #REQUIRED_FIELDS = ['name','token','department','tel','mobile','memo']

     REQUIRED_FIELDS = ['name']

     def get_full_name(self):

         # The user is identified by their email address

         return self.email

     def get_short_name(self):

         # The user is identified by their email address

         return self.email

     def __str__(self):              # __unicode__ on Python 2

         return self.email

     def has_perm(self, perm, obj=None):

         "Does the user have a specific permission?"

         # Simplest possible answer: Yes, always

         return True

     def has_perms(self, perm, obj=None):

         "Does the user have a specific permission?"

         # Simplest possible answer: Yes, always

         return True

     def has_module_perms(self, app_label):

         "Does the user have permissions to view the app `app_label`?"

         # Simplest possible answer: Yes, always

         return True

     @property

     def is_staff(self):

         "Is the user a member of staff?"

         # Simplest possible answer: All admins are staff

         return self.is_admin

     class Meta:

         verbose_name = u'用户信息'

         verbose_name_plural = u"用户信息"

     def __unicode__(self):

         return self.name

     objects = UserManager()
3、在models中导入该文件中的UserProfile类

4、admin中注册
编辑admin.py文件
 #_*_coding:utf8_*_

 from django.contrib import admin

 # Register your models here.

 from django import forms

 from django.contrib import admin

 from django.contrib.auth.models import Group

 from django.contrib.auth.admin import UserAdmin

 from django.contrib.auth.forms import ReadOnlyPasswordHashField

 import models

 from userauth import UserProfile

 from django.contrib.auth import  forms as auth_form

 class UserCreationForm(forms.ModelForm):

     """A form for creating new users. Includes all the required

     fields, plus a repeated password."""

     password1 = forms.CharField(label='Password', widget=forms.PasswordInput)

     password2 = forms.CharField(label='Password confirmation', widget=forms.PasswordInput)

     class Meta:

         model = UserProfile

         fields = ('email','token')

     def clean_password2(self):

         # Check that the two password entries match

         password1 = self.cleaned_data.get("password1")

         password2 = self.cleaned_data.get("password2")

         if password1 and password2 and password1 != password2:

             raise forms.ValidationError("Passwords don't match")

         return password2

     def save(self, commit=True):

         # Save the provided password in hashed format

         user = super(UserCreationForm, self).save(commit=False)

         user.set_password(self.cleaned_data["password1"])

         if commit:

             user.save()

         return user

 class UserChangeForm(forms.ModelForm):

     """A form for updating users. Includes all the fields on

     the user, but replaces the password field with admin's

     password hash display field.

     """

     password = ReadOnlyPasswordHashField(label="Password",

         help_text=("Raw passwords are not stored, so there is no way to see "

                     "this user's password, but you can change the password "

                     "using <a href=\"password/\">this form</a>."))

     class Meta:

         model = UserProfile

         fields = ('email', 'password','is_active', 'is_admin')

     def clean_password(self):

         # Regardless of what the user provides, return the initial value.

         # This is done here, rather than on the field, because the

         # field does not have access to the initial value

         return self.initial["password"]

 class UserProfileAdmin(UserAdmin):

     # The forms to add and change user instances

     form = UserChangeForm

     add_form = UserCreationForm

     # The fields to be used in displaying the User model.

     # These override the definitions on the base UserAdmin

     # that reference specific fields on auth.User.

     list_display = ('id','email','is_admin','is_active')

     list_filter = ('is_admin',)

     fieldsets = (

         (None, {'fields': ('email', 'password')}),

         ('Personal info', {'fields': ('department','name','mobile','memo')}),

         ('API TOKEN info', {'fields': ('token',)}),

         ('Permissions', {'fields': ('is_active','is_admin')}),

         ('账户有效期', {'fields': ('valid_begin_time','valid_end_time')}),

     )

     # add_fieldsets is not a standard ModelAdmin attribute. UserAdmin

     # overrides get_fieldsets to use this attribute when creating a user.

     add_fieldsets = (

         (None, {

             'classes': ('wide',),

             'fields': ('email',  'password1', 'password2','is_active','is_admin')}

         ),

     )

     search_fields = ('email',)

     ordering = ('email',)

     filter_horizontal = ()

 # Now register the new UserAdmin...

 admin.site.register(models.UserProfile,UserProfileAdmin)

 admin.site.unregister(Group)
 #这里需注意,第51行

"using <a href=\"password/\">this form</a>."))

#这是django1.8的写法,如果>1.8的话需要修改成

"using <a href=\"../password/\">this form</a>."))

否则在admin后台点击修改密码的话会提示404找不到页面
5、在settings告诉django使用我们自己定义的用户认证系统
修改settings,结尾添加
AUTH_USER_MODEL = 'database.UserProfile'
#database为app名称

#UserProfile为我们刚才在userauth.py中创建的类名称
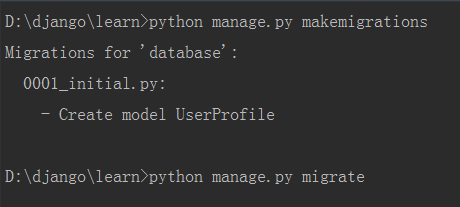
6、同步数据库

可以看到创建了UserProfile表,这样就可以直接使用django的用户认证功能
7、创建超级用户

可以看到提示已经跟django默认的不一样了,以email地址作为用户名
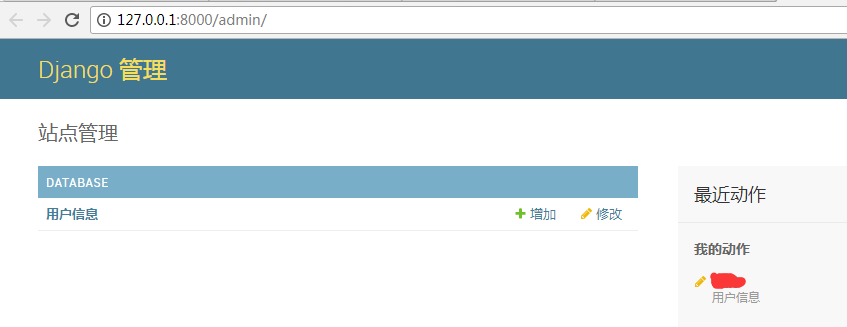
8、此时访问django admin

自定义用户认证(继承django的)的更多相关文章
- 使用django实现自定义用户认证
参考资料:https://docs.djangoproject.com/en/1.10/topics/auth/customizing/ 直接拉到最后看栗子啦 django自定义用户认证(使用自 ...
- Django自定义用户认证
自定义一个用户认证 详细参考官方文档: https://docs.djangoproject.com/en/1.9/topics/auth/customizing/#django.contrib.au ...
- Django自定义用户认证系统之自定义用户模型
参考文档:http://python.usyiyi.cn/django/topics/auth/customizing.html Django 自带的认证系统足够应付大多数情况,但你或许不打算使用现成 ...
- CMDB资产管理系统开发【day25】:Django 自定义用户认证
官方文档:https://docs.djangoproject.com/en/1.10/topics/auth/customizing/#substituting-a-custom-user-mode ...
- Django--分页器(paginator)、Django的用户认证、Django的FORM表单
分页器(paginator) >>> from django.core.paginator import Paginator >>> objects = ['joh ...
- 43)django-用户认证,授权,自定义用户认证
##用户认证 django自带用户认证系统,包括认证和授权.用户认证系统由用户,权限,用户组,密码,cookie和session给组成. ###用户认证系统设置 #settings.py INSTAL ...
- YII2中自定义用户认证模型,完成登陆和注册
有些时候我们需要自已定义用户类,操作自已建的用户表,来完成登陆和注册功能. 用户表结构如下,当然可以根据自已的需要添加或删除: CREATE TABLE `tb_user` ( `id` int(11 ...
- spring Security的自定义用户认证
首先我需要在xml文件中声明.我要进行自定义用户的认证类,也就是我要自己从数据库中进行查询 <http pattern="/*.html" security="no ...
- Django自定义用户认证系统Customizing authentication
扩展已有的用户模型Extending the existing User model 有两种方法来扩展默认的User Model而不用重写自己的模型.如果你不需要改变存储在数据库中的字段,而只是需要改 ...
随机推荐
- Android官方命令深入分析之Hierarchy Viewer
Hierarchy Viewer允许你调试和优化用户界面.它提供了一个层可视的方式来显示. 启动Hierarchy Viewer,如下: 在Android Studio中,选择Tools > A ...
- mysql进阶(二十二)MySQL错误之Incorrect string value: '\xE7\x81\xAB\xE7\x8B\x90...中文字符输入错误
MySQL错误之Incorrect string value: '\xE7\x81\xAB\xE7\x8B\x90...' for column 'tout' at row 1中文字符输入错误 在实验 ...
- ROS_Kinetic_02 ROS Kinetic 迁移指南及中文wiki指南(Migration guide)
ROS_Kinetic_02 ROS Kinetic 迁移指南(Migration guide) 对于ROS Kinetic Kame有些功能包已经更新改变,提供关于这些包的迁移注意或教程.主要针对于 ...
- OJ题:将一个字符串顺序翻转
题目描述 写出一个程序,接受一个字符串,然后输出该字符串反转后的字符串. 之前写过这样的一个程序,用位运算的方法去操作指针,但是那样的方法未免就有点复杂啦,不如用以下这种,简单明了. 程序如下: #i ...
- 解决log4cxx退出时的异常
解决log4cxx退出时的异常(金庆的专栏)如果使用log4cxx的FileWatchdog线程来监视日志配置文件进行动态配置,就可能碰到程序退出时产生的异常.程序退出时清理工作耗时很长时,该异常很容 ...
- (NO.00001)iOS游戏SpeedBoy Lite成形记(二十九):增加排行榜功能2
接下来回到Xcode中,首先在PopupLayer.m中添加justClose方法: -(void)justClose{ [self.gameScene removePopup]; } 然后在Game ...
- jpa一对多映射案例
订单和订单项就是一对多的关系.一个订单有多个订单项,一个订单项属于某个订单. 订单和订单项映射后的表结构如下: 订单表结构 订单项表结构 下面就以订单和订单项为例介绍多对多映射关系的实例开发 pers ...
- (二十四)监听键盘的通知和键盘弹出隐藏的View移动
让控制器监听键盘的通知,注意谁监听,谁的dealloc方法中就要remove,如果非ARC还要调用父类的dealloc方法. //监听键盘的操作: [[NSNotificationCenter def ...
- ROS_RGB-D SLAM学习笔记--室内环境测试
ROS_RGB-D SLAM学习笔记 RTAB-Map's ros-pkg. RTAB-Map is a RGB-D SLAM approach with real-time constraints. ...
- AngularJS进阶(四)ANGULAR.JS实现下拉菜单单选
ANGULAR.JS: NG-SELECT AND NG-OPTIONS PS:其实看英文文档比看中文文档更容易理解,前提是你的英语基础还可以.英文文档对于知识点讲述简明扼要,通俗易懂,而有些中文文档 ...
