asp.net core系列 55 IS4结合Identity密码保护API
一.概述
OAuth 2.资源所有者密码授权允许客户端(Client项目)向令牌服务(IdentityServer项目)发送用户名和密码,并获取代表该用户的访问令牌。本篇将IS4结合asp.net core Identity实现密码保护API的简单示例。关于asp.net core Identity的了解实现,请查看之前章节介绍或官方文档。
开源地址:Github,这里演示与官方示例有点区别,是结合了asp.net core Identity。
本篇示例,还是三个项目,与上篇三个项目差不多。分别是IdentityServer令牌项目、 API资源项目、 Client访问项目。其中IdentityServer令牌项目换成了含有asp.net core Identity的MVC项目中。API资源项目没有变动,Client访问项目使用了用户名和密码访问受保护的API。
二. IdentityServer项目
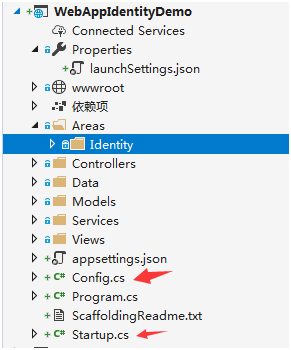
IdentityServer令牌项目是在基于asp.net core Identity功能下,添加了Config.cs类 和 在Startup.cs中加入了IdentityServer的配置。下面是含有asp.net core Identity的MVC项目目录结构:
(1) 添加用户
IdentityServer中自带TestUser类,该类代表测试用户及其声明。TestUser用于测试的内存(In-memory)用户对象。不打算为生产中的用户建模。通过在config.cs类中添加以下代码获取用户密码。
        /// <summary>

        /// 获取Identity的User表用户,条件是属于Administrator角色的用户,返回TestUser

        /// </summary>

        /// <param name="provider"></param>

        /// <returns></returns>

        public static List<TestUser> GetUsers(ServiceProvider provider)

        {

            var webAppIdentityDemoUser = provider.GetRequiredService<UserManager<WebAppIdentityDemoUser>>();

            IList<WebAppIdentityDemoUser> users = null;

            users = webAppIdentityDemoUser.GetUsersInRoleAsync("Administrator").Result;

            List<TestUser> testUserList = new List<TestUser>();

            foreach (WebAppIdentityDemoUser user in users)

            {

                testUserList.Add(new TestUser() { SubjectId = user.Id.ToString(), Username = user.UserName, Password = user.PasswordHash });

            }

            return testUserList;

        }
(2) 然后在Startup类的ConfigureServices方法中使用IdentityServer注入测试用户:
            ServiceProvider provider = services.BuildServiceProvider();

            var builder = services.AddIdentityServer()

                .AddInMemoryIdentityResources(Config.GetIdentityResources())

                .AddInMemoryApiResources(Config.GetApis())

                .AddInMemoryClients(Config.GetClients())

                .AddTestUsers(Config.GetUsers(provider));
(3) 定义客户端, 密码授予访问此API
在config.cs类中,定义客户端,通过修改AllowedGrantTypes枚举来简单地向现有客户端添加对授权类型的支持, 将以下代码添加到客户端配置中, 里面有二个Client实例,支持二种授权类型,分别是ClientCredentials使用凭证来访问令牌和ResourceOwnerPassword 使用密码来访问令牌。
      public static IEnumerable<Client> GetClients()

        {

            return new List<Client>

            {

                new Client

                {

                    ClientId = "client",

                    // no interactive user, use the clientid/secret for authentication

                    AllowedGrantTypes = GrantTypes.ClientCredentials,

                    // secret for authentication

                    ClientSecrets =

                    {

                        new Secret("secret".Sha256())

                    },

                    // scopes that client has access to

                    AllowedScopes = { "api1" }

                },

                // resource owner password grant client

                new Client

                {

                    ClientId = "ro.client",

                    AllowedGrantTypes = GrantTypes.ResourceOwnerPassword,

                    ClientSecrets =

                    {

                        new Secret("secret".Sha256())

                    },

                    AllowedScopes = { "api1" }

                }

            };

        }
三.Client项目
该Client项目类似于上篇介绍的Client项目,该项目名为ResourceOwnerClient, 该Client将收集用户名和密码,并在令牌请求期间将其发送到IdentityServer令牌服务(WebAppIdentityDemo项目)。
// request token
var tokenResponse = await client.RequestPasswordTokenAsync(new PasswordTokenRequest
{
Address = disco.TokenEndpoint,
ClientId = "ro.client",
ClientSecret = "secret", UserName = "924964690@qq.com",
Password = "AQAAAAEAACcQAAAAEH4Xhui5BByq6d8VS5Z+S2o2SnlkyrP5pN9CmMpgJ4QiIVrt7lBLzDlEWa6AdlpxpA==",
Scope = "api1"
}); if (tokenResponse.IsError)
{
Console.WriteLine(tokenResponse.Error);
return;
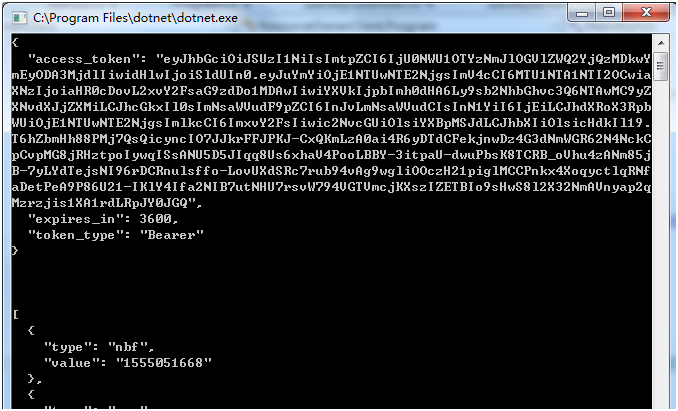
} Console.WriteLine(tokenResponse.Json);
Console.WriteLine("\n\n");
最后测试,先启动WebAppIdentityDemo项目程序,再启动API程序,最后启动Client客户端来访问API,通过下图可以了解到:(1)客户端请求使用 用户名和和密码 访问令牌(token)成功, (2) 客户端使用令牌(AccessToken)来访问受密码保护的API成功。
参考文献
asp.net core系列 55 IS4结合Identity密码保护API的更多相关文章
- asp.net core系列 55 IS4使用Identity密码保护API
一.概述 OAuth 2.0资源(web api)所有者密码授权,允许客户端(Client项目)向令牌服务(IdentityServer项目)发送用户名和密码,并获取代表该用户的访问令牌.在官方文档中 ...
- 【asp.net core 系列】15 自定义Identity
0. 前言 在之前的文章中简单介绍了一下asp.net core中的Identity,这篇文章将继续针对Identity进行进一步的展开. 1. 给Identity添加额外的信息 在<[asp. ...
- asp.net core系列 54 IS4用客户端凭据保护API
一. 概述 本篇开始进入IS4实战学习,从第一个示例开始,该示例是 “使用客户端凭据保护API”,这是使用IdentityServer保护api的最基本场景.该示例涉及到三个项目包括:Identity ...
- asp.net core系列 58 IS4 基于浏览器的JavaScript客户端应用程序
一. 概述 本篇探讨使用"基于浏览器的JavaScript客户端应用程序".与上篇实现功能一样,只不过这篇使用JavaScript作为客户端程序,而非core mvc的后台代码Ht ...
- asp.net core系列 57 IS4 使用混合流(OIDC+OAuth2.0)添加API访问
一.概述 在上篇中,探讨了交互式用户身份验证,使用的是OIDC协议. 在之前篇中对API访问使用的是OAuth2.0协议.这篇把这两个部分放在一起,OpenID Connect和OAuth 2.0组合 ...
- asp.net core系列 56 IS4使用OpenID Connect添加用户认证
一.概述 在前二篇中讲到了客户端授权的二种方式: GrantTypes.ClientCredentials凭据授权和GrantTypes.ResourceOwnerPassword密码授权,都是OAu ...
- 【目录】asp.net core系列篇
随笔分类 - asp.net core系列篇 asp.net core系列 68 Filter管道过滤器 摘要: 一.概述 本篇详细了解一下asp.net core filters,filter叫&q ...
- asp.net core系列 30 EF管理数据库架构--必备知识 迁移
一.管理数据库架构概述 EF Core 提供两种主要方法来保持 EF Core 模型和数据库架构同步.一是以 EF Core 模型为基准,二是以数据库为基准. (1)如果希望以 EF Core 模型为 ...
- WPF中的常用布局 栈的实现 一个关于素数的神奇性质 C# defualt关键字默认值用法 接口通俗理解 C# Json序列化和反序列化 ASP.NET CORE系列【五】webapi整理以及RESTful风格化
WPF中的常用布局 一 写在开头1.1 写在开头微软是一家伟大的公司.评价一门技术的好坏得看具体的需求,没有哪门技术是面面俱到地好,应该抛弃对微软和微软的技术的偏见. 1.2 本文内容本文主要内容 ...
随机推荐
- The Beam Model:Stream & Tables翻译(上)
本文由 网易云发布. 作者:周思华 本篇文章仅限内部分享,如需转载,请联系网易获取授权. 本文尝试描述Beam模型和Stream & Table理论间的关系(前者描述于数据流模型论文.the ...
- 44.1khz 16位比特双声道一分钟的音乐文件占多少硬盘空间?
2*2*44.1*1000*60=10584000字节=10M2个声道*(16比特/8比特)字节*采样率(每秒采样44.1*1000次)*一分钟有60秒16比特是精度,描述振幅的,16比特等于2个字节 ...
- 用Django做一个团队介绍
所用工具 Pycharm 社区版 Django 2.x Python 3.6.4 总目录 settings中的设置 总的路由设置 templates中的index.html文件 <!DOCTYP ...
- python的约束库constraint解决《2018刑侦科题目》
Github地址:https://github.com/ZJW9633/hello-word/blob/master/Xingzhenke 题目分析: 10道题互相关联,耦合性强,暴力求解需4^10种 ...
- jieba库分词
(1)团队简介的词频统计 import jieba import collections s="制作一个购票小程序,这个购票小程序可以根据客户曾经的购票历史" s+="和 ...
- FastDFS单机版安装
FastDFS 分布式文件系统 1 目标 了解项目中使用FastDFS的原因和意义. 掌握FastDFS的架构组成部分,能说出tracker和storage的作用. 了解FastDFS+nginx上传 ...
- juniper srx 配置
天涯海角- juniper为人所熟悉的一定是从netscreen开始的,作为一线防火墙品牌,还是有很高的地位.但是以前玩netscreen,都是用的网页版去配置,而且网页版做得很不错.但是现在nets ...
- 深入浅出 TCP/IP 协议
TCP/IP 协议栈是一系列网络协议的总和,是构成网络通信的核心骨架,它定义了电子设备如何连入因特网,以及数据如何在它们之间进行传输.TCP/IP 协议采用4层结构,分别是应用层.传输层.网络层和链路 ...
- 如何识别企业内的“千里马”?
很多企业主都在感叹无法找到合适的优秀管理人才,却忽视了一条获得管理人才的捷径:内部培养.在员工中挑选具有领导潜质的人才,加以培养,必成企业栋梁,而且这样选拔的人才与企业的契合度.忠诚度方面都相对较高. ...
- js创建数组
var a1 = new Array(); var a2 = new Array(7); var a3 = new Array(100,"0",true); var a4 = ...