react之——render prop
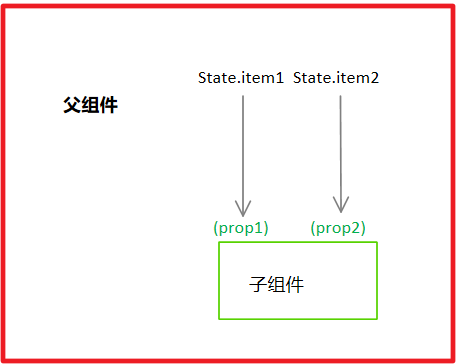
在react “从上至下的数据流原则” 背景下,常规的消息传递机制就是通过prop属性,把父级数据传递给子级,这样一种数据流通模式决定了——数据的接收方子组件要被”硬植入“进数据的数据的给予方父组件,模式如下:

图1 传统依赖props进行数据传递的组件“硬植入”模型
基于上述的“硬植入”模式,就形成了组件之间的强耦合,进而会在代码里写出很多这种基于“功能型”中间件——大组件里嵌特定小组件。
那如果大组件里的数据要被多个子组件共享怎么办?如果继续“硬植入”要继续写出“功能型组件1”,“功能型组件2”。。。这种方式很显然破坏了前端功能化,让维护和扩展都变的艰难。
render prop
render prop的出现,让“子组件注入”变成了可能,在注入阶段进行父子组件之间的传值,从而实现了父子组件的解耦,具体参看react官网示例代码,本地demo了一下,贴上来:
class Cat extends React.Component{

  render(){

    const mouse = this.props.mouse;

    return(

      <div>

        <img src={require("./cat.PNG")} style={{position:"absolute",left:mouse.x,top:mouse.y}} />

      </div>

    );

  }

}

//带有函数prop的Mouse组件———render prop的由来

class Mouse extends React.Component{

  constructor(){

    super();

    this.state = {

      x:,

      y:

    };

    this.handleMouseMove = this.handleMouseMove.bind( this );

  }

  handleMouseMove( e ){

    this.setState( {

      x: e.clientX,

      y: e.clientY

    } );

  }

  render(){//用render注入的方式,可以动态渲染注入对象

    return (<div style={{height:"900px",position:"relative"}} onMouseMove={this.handleMouseMove}>

      {this.props.render( this.state )}//调用render prop(函数引用),渲染注入的子组件

    </div>);

  }

}

class MouseTracker extends React.Component{

  render(){

    return (<div className="customized-wrapper">

      <h1>Move the mouse around!</h1>

      <Mouse

      render={ mouse => (//render接收一个箭头函数引用,render作为一个prop传入子级

        <Cat mouse={mouse}/>

        ) }

        />

    </div>);

  }

}
事实上,除了render prop之外,react组件也可以接收用户自定义的函数型属性作为注入依赖,当然也可以在父级调用该prop实现render或其他公用,用法于render类似,大家可在本地demo.
render prop实现了什么?
1. 为减少“硬植入”的功能型组件编写提供了解决方案,当然不能为了解耦而解耦,当某个父级只需要给一个子级传递数据时,大可不必进行这样的解耦操作
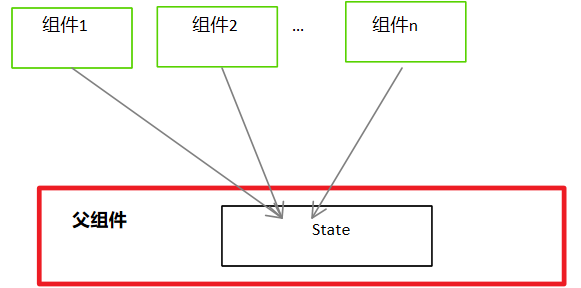
2. 提供了一种简单的“数据共享”机制,将数据使用方注入数据的提供方,实现了一种“按需供给”的机制,一份数据支持多方共享,很nice.
上述机制数据模型如下:

end
——May stars guide your way.
react之——render prop的更多相关文章
- [React] Integration test a React component that consumes a Render Prop
In this lesson, I use Enzyme and Jest's Snapshot functionality to write an integration test for a co ...
- [React] Unit test a React Render Prop component
In this lesson, I use Enzyme and Jest to unit test a Counter Render Prop component. Writing integrat ...
- React 之 render props 的理解
1.基本概念 在调用组件时,引入一个函数类型的 prop,这个 prop定义了组件的渲染方式. 2.回调渲染 回顾组件通信的几种方式 父-> 子 props 子-> 父 回调.消息通道 任 ...
- React中render Props模式
React组件复用 React组件复用的方式有两种: 1.render Props模式 2.高阶组件HOC 上面说的这两种方式并不是新的APi. 而是利用Raect自身的编码特点,演化而来的固定编码写 ...
- react解析: render的FiberRoot(三)
react解析: render的FiberRoot(三) 感谢 yck: 剖析 React 源码解析,本篇文章是在读完他的文章的基础上,将他的文章进行拆解和加工,加入我自己的一下理解和例子,便于大家理 ...
- React components render order All In One
React components render order All In One components render order / components lifecycle DOM tree ren ...
- REACT Missing “key” prop for element
https://stackoverflow.com/questions/48266018/missing-key-prop-for-element-reactjs-and-typescript Whe ...
- React在Render中使用bind可能导致的问题
因为bind在render的时候会重现生成,这样会导致props每次都不同, puremixin的插件也会失效. 所以需要将bind的结果缓存下来,或者直接在constructor里做这个事情 con ...
- [React Intl] Render Content Based on a Number using react-intl FormattedMessage (plural)
Using the react-intl FormattedMessage component, we’ll learn how to render content conditionally in ...
随机推荐
- bzoj 2238 Mst——树链剖分
题目:https://www.lydsy.com/JudgeOnline/problem.php?id=2238 一条非树边可以对一条链的树边产生影响.注意是边,所以把边下放到点上,只要跳 top 时 ...
- ubuntu下网络性能测试
iperf的主要功能 TCP 测量网络带宽 报告MSS/MTU值的大小和观测值 支持TCP窗口值通过套接字缓冲 当P线程或Win32线程可用时,支持多线程.客户端与服务端支持同时多重连接 UDP 客户 ...
- haproxy小结(一)基础概念篇
HAProxy是法国人Willy Tarreau个人开发的一个开源软件,目标是应对客户端10000以上的同时连接,为后端应用服务器.数据库服务器提供高性能的负载均衡服务.HAproxy可以实现基于TC ...
- JavaScript-Tool:jQuery
ylbtech-JavaScript-Tool:jQuery 1.返回顶部 1. jQuery是一个快速.简洁的JavaScript框架,是继Prototype之后又一个优秀的JavaScript代码 ...
- python zlib字符串压缩
在做网络程序时,可以对字符串进行压缩来节省带宽 项目中用到 {"compress": <压缩标记>, "result":[[设备类型.设备ID, 设 ...
- python之文件的读写(1)
真的崩溃,刚写完的笔记由于点错了,现在特么又要重新写了. 崩溃呀.......... 之前的废话就不再重复了,直接进入正题吧. 今天小R 学了一天的NP课程,但是python还是不能忘得,所以晚上又 ...
- CodeForces - 377A Maze BFS逆思维
Maze Pavel loves grid mazes. A grid maze is an n × m rectangle maze where each cell is either empty, ...
- WindApi2 , WindOriginalApiLibrary 突然不兼容问题
1. 在新的电脑上从tfs拉下代码后编译, windoriginalapilibrary 这个工程弹出对话框,要求转为vs2013编译,选择同意,编译成功 2.WindApi2 的Reference列 ...
- uoj#283. 直径拆除鸡(构造)
传送门 好神的构造题 vfk巨巨的题解 //minamoto #include<bits/stdc++.h> #define R register #define fp(i,a,b) fo ...
- IT兄弟连 JavaWeb教程 EL表达式获取对象的属性以及数组的元素
使用${对象名.属性名} EL表达式语言可以使用点号运算符"."来访问对象的属性,例如表达式${customer.name}表示customer对象的name属性. 使用${对象名 ...
