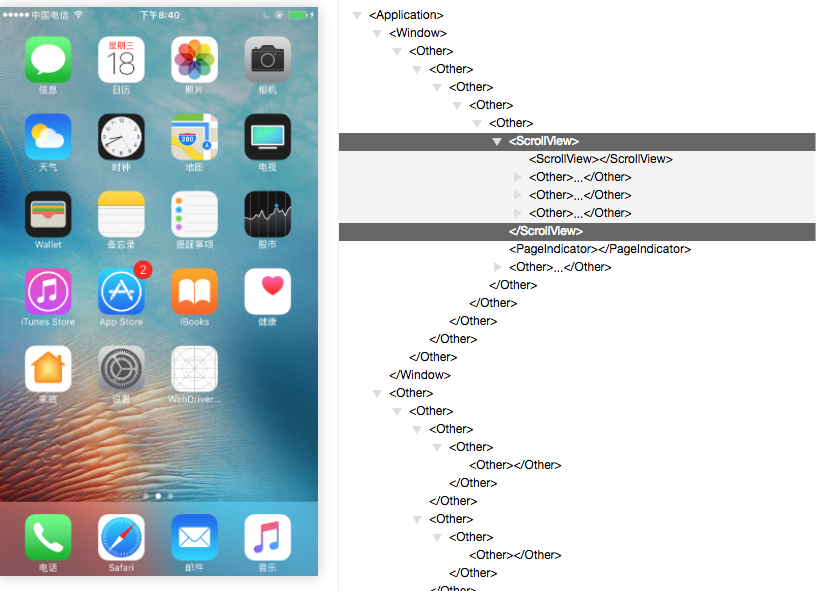
mac 系统使用macaca inspector 获取iphone真机应用元素
1、安装brew 软件包管理工具:/usr/bin/ruby -e "$(curl -fsSL https://raw.githubusercontent.com/Homebrew/install/master/install)"
2、安装nodejs :brew install node 安装完node 后需要设置通过npm安装的软件包放置位置设置为可以读写权限,chmod -R 777 /usr/local/lib/node_modules/ (注:在操作时时测试机器,赋给777权限没有问题,如果是其他机器,需要考虑是否给了不该给的权限) 其中 /usr/local/ 可以通过npm config get prefix 获得,这样会省去一些权限的问题。
3、安装macaca 参考官网:https://macacajs.github.io/environment-setup
4、安装macaca inspect :npm i app-inspector -g
安装完后进入目录:/usr/local/lib/node_modules/app-inspector/node_modules/webdriveragent/WebDriverAgent,
在这个目录下面新建一个文件夹并执行下命令
mkdir -p Resources/WebDriverAgent.bundle
sh ./Scripts/bootstrap.sh -d
用xcode 打开WebDriverAgent.xcodeproj文件,对项目文件进行重新编译,
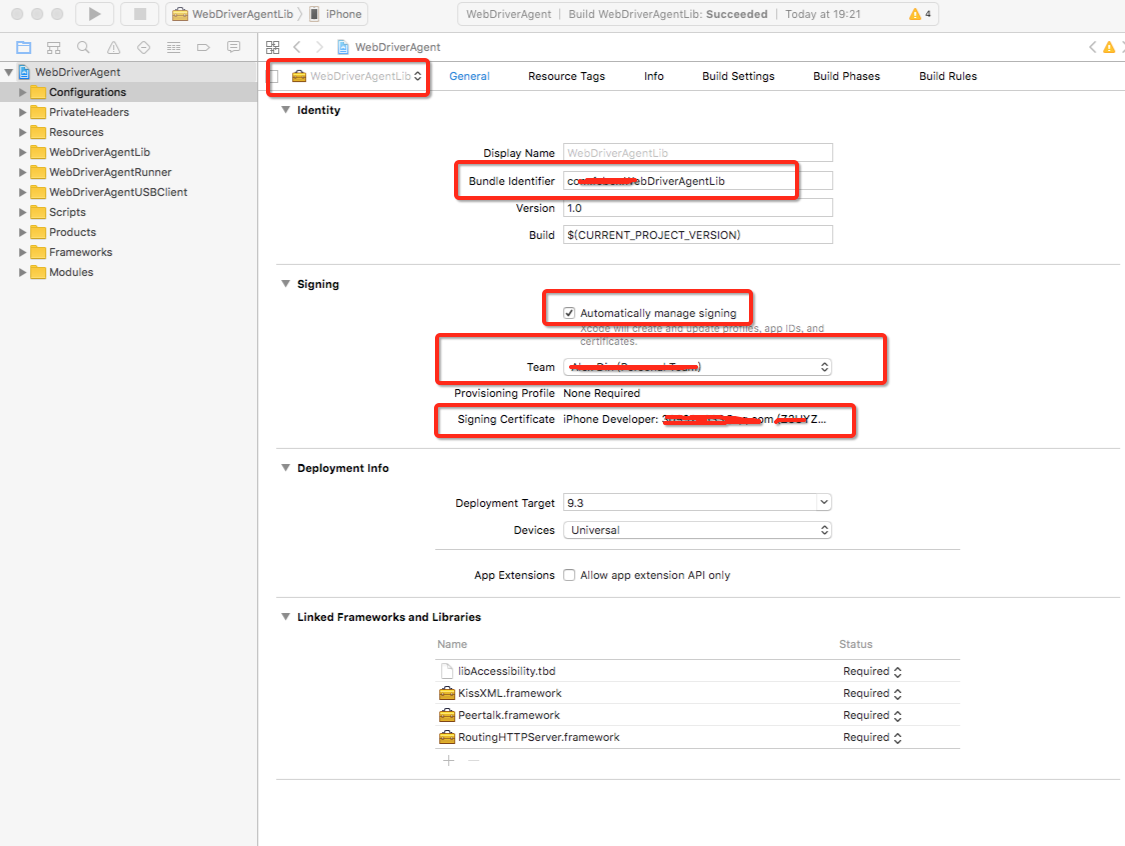
编译:WebDriverAgentLib编译选项
修改Bundle id,Team选为登录xcode的appid,

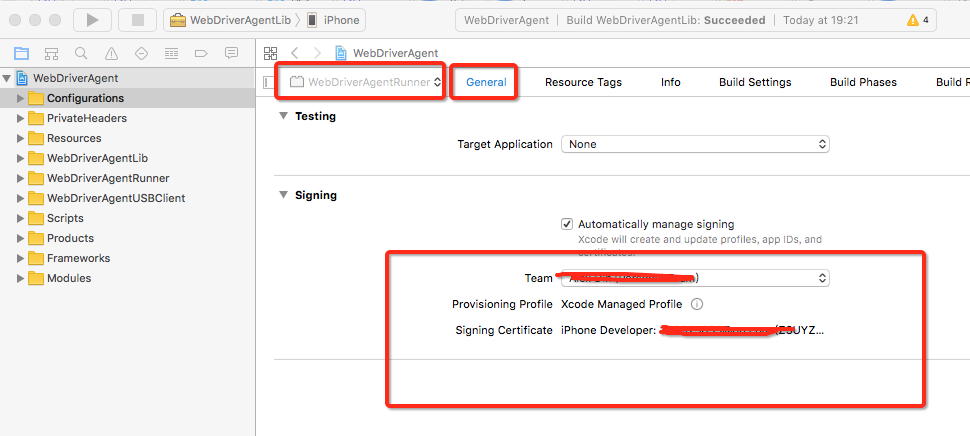
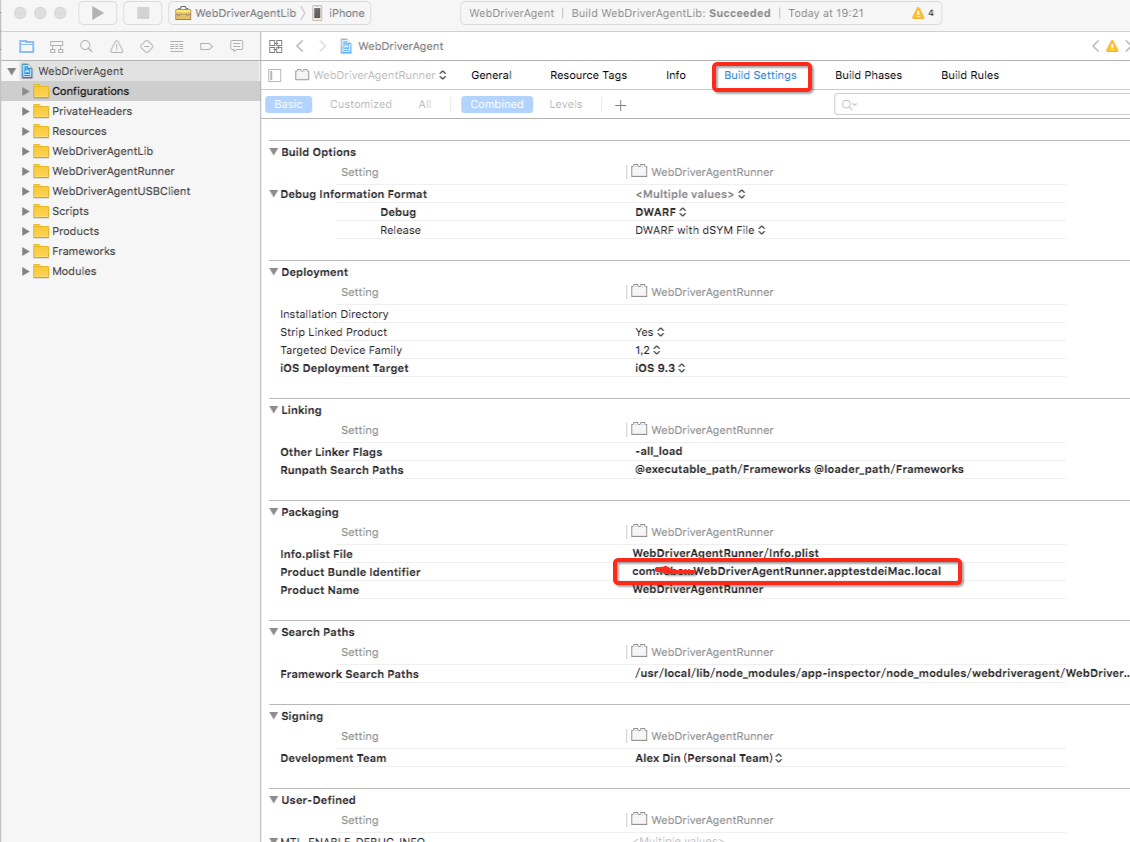
编译:WebDriverAgentRunner


每个编译一定要出现succeeded才行

编译完成,就可以启动macaca inspector 命令:app-inspector --port 56789 -u f9b87274e2a24b310399ddxxxxxx
启动后再浏览器中输入localhost:56789 访问,(实际端口以执行命令显示为准),手机会安装一个程序,需要手动点击这个名为:WebDriverAgentRunner的app, 会提示要在设置中信任改开发者开发的软件,进入手机>设置>通用>设备管理 >开发者应用 >信任WebDriverAgentRunner

再次安装执行命令:
app-inspector --port 56789 -u f9b87274e2a24b310399dd56dd80f8561d99fdac --verbose
提示出错误:xctest client exit with code: 65
>> xctest-client.js:181:14 [master] pid:33863 xctest client exit with code: 65, signal: null
>> xctest-client.js:145:16 [master] pid:33863 deviceconsole exit with code: null, signal: SIGKILL
>> xctest-client.js:255:14 [master] pid:33863 Fail to start xctest: undefined
>> app-inspector:66:44 [master] pid:33863 undefined
解决办法:在xcode 中编译下:WebDriverAgentUSBClient
再删除手机上的WDA,重复启动下
app-inspector --port 56789 -u f9b87274e2a24b310399dd56dd80f8561d99fdac --verbose
在再手机中信任开发者。就可以了,这个问题是签名问题
又由于macaca inspector 无法查看所有的元素,只有通过代码获取运行时xml页面元素布局 获取xml内容方法为:System.out.println(driver.getPageSource());
获取如下,有了这个xml文件内容,就能根据实际内容得到xpath name 登录内容,完美解决元素查找问题
<?xml version="1.0" encoding="UTF-8"?><AppiumAUT><XCUIElementTypeApplication type="XCUIElementTypeApplication" name="xxxx" label="xxxx" visible="true" enabled="true" x="0" y="0" width="414" height="736">

    <XCUIElementTypeWindow type="XCUIElementTypeWindow" visible="true" enabled="true" x="0" y="0" width="414" height="736">

        <XCUIElementTypeOther type="XCUIElementTypeOther" visible="true" enabled="true" x="0" y="0" width="414" height="736">

            <XCUIElementTypeOther type="XCUIElementTypeOther" visible="true" enabled="true" x="0" y="0" width="414" height="736">

                <XCUIElementTypeOther type="XCUIElementTypeOther" visible="true" enabled="true" x="0" y="0" width="414" height="736">

                    <XCUIElementTypeOther type="XCUIElementTypeOther" visible="true" enabled="true" x="0" y="0" width="414" height="736">

                        <XCUIElementTypeNavigationBar type="XCUIElementTypeNavigationBar" name="我的xxxx" visible="true" enabled="true" x="0" y="20" width="414" height="44">

                            <XCUIElementTypeButton type="XCUIElementTypeButton" visible="true" enabled="true" x="12" y="26" width="41" height="30"/>

                            <XCUIElementTypeButton type="XCUIElementTypeButton" name="返回" label="返回" visible="true" enabled="true" x="12" y="31" width="21" height="22"/>

                            <XCUIElementTypeStaticText type="XCUIElementTypeStaticText" value="我的xxxx" name="我的xxxx" label="我的xxxx" visible="true" enabled="true" x="170" y="28" width="74" height="27"/>

                            <XCUIElementTypeButton type="XCUIElementTypeButton" name="MyReceiveSearch" label="MyReceiveSearch" visible="true" enabled="true" x="367" y="29" width="27" height="25"/>

                        </XCUIElementTypeNavigationBar>

                        <XCUIElementTypeOther type="XCUIElementTypeOther" visible="true" enabled="true" x="0" y="0" width="414" height="736">

                            <XCUIElementTypeOther type="XCUIElementTypeOther" visible="true" enabled="true" x="0" y="0" width="414" height="736">

                                <XCUIElementTypeOther type="XCUIElementTypeOther" visible="true" enabled="true" x="0" y="64" width="414" height="672">

                                    <XCUIElementTypeOther type="XCUIElementTypeOther" visible="true" enabled="true" x="0" y="64" width="414" height="57">

                                        <XCUIElementTypeStaticText type="XCUIElementTypeStaticText" value="xxxx(0)" name="xxxx(0)" label="xxxx" visible="true" enabled="true" x="0" y="64" width="138" height="57"/>

                                        <XCUIElementTypeStaticText type="XCUIElementTypeStaticText" value="xxxx(14)" name="xxxx14)" label="xxxx" visible="true" enabled="true" x="138" y="64" width="138" height="57"/>

                                        <XCUIElementTypeStaticText type="XCUIElementTypeStaticText" value="xxxx(10)" name="xxxx(10)" label="xxxx" visible="true" enabled="true" x="276" y="64" width="138" height="57"/>

                                        <XCUIElementTypeOther type="XCUIElementTypeOther" visible="true" enabled="true" x="0" y="117" width="138" height="4"/>

                                        <XCUIElementTypeOther type="XCUIElementTypeOther" visible="true" enabled="true" x="0" y="120" width="414" height="1"/>

                                    </XCUIElementTypeOther>

                                    <XCUIElementTypeScrollView type="XCUIElementTypeScrollView" visible="true" enabled="true" x="0" y="120" width="414" height="616">

                                        <XCUIElementTypeTable type="XCUIElementTypeTable" name="无更多记录" label="无更多记录" visible="true" enabled="true" x="0" y="120" width="414" height="616"/>

                                    </XCUIElementTypeScrollView>

                                </XCUIElementTypeOther>

                            </XCUIElementTypeOther>

                        </XCUIElementTypeOther>

                    </XCUIElementTypeOther>

                </XCUIElementTypeOther>

            </XCUIElementTypeOther>

        </XCUIElementTypeOther>

    </XCUIElementTypeWindow>

    <XCUIElementTypeWindow type="XCUIElementTypeWindow" visible="false" enabled="true" x="0" y="0" width="414" height="736">

        <XCUIElementTypeOther type="XCUIElementTypeOther" visible="false" enabled="true" x="0" y="0" width="414" height="736"/>

    </XCUIElementTypeWindow>

    <XCUIElementTypeWindow type="XCUIElementTypeWindow" visible="true" enabled="true" x="0" y="0" width="414" height="736">

        <XCUIElementTypeStatusBar type="XCUIElementTypeStatusBar" visible="true" enabled="true" x="0" y="0" width="414" height="20">

            <XCUIElementTypeOther type="XCUIElementTypeOther" visible="false" enabled="true" x="0" y="0" width="414" height="20"/>

            <XCUIElementTypeOther type="XCUIElementTypeOther" visible="true" enabled="true" x="0" y="0" width="414" height="20">

                <XCUIElementTypeOther type="XCUIElementTypeOther" name="信号强度:5 格(共 5 格)" label="信号强度:5 格(共 5 格)" visible="true" enabled="true" x="6" y="0" width="34" height="20"/>

                <XCUIElementTypeOther type="XCUIElementTypeOther" name="中国电信 网络" label="中国电信 网络" visible="true" enabled="true" x="43" y="0" width="50" height="20"/>

                <XCUIElementTypeOther type="XCUIElementTypeOther" value="SSID" name="4G" label="4G" visible="true" enabled="true" x="102" y="0" width="17" height="20"/>

                <XCUIElementTypeOther type="XCUIElementTypeOther" name="下午6:13" label="下午6:13" visible="true" enabled="true" x="184" y="0" width="51" height="20"/>

                <XCUIElementTypeOther type="XCUIElementTypeOther" name="勿扰模式" label="勿扰模式" visible="true" enabled="true" x="343" y="0" width="9" height="20"/>

                <XCUIElementTypeOther type="XCUIElementTypeOther" name="方向已锁定" label="方向已锁定" visible="true" enabled="true" x="358" y="0" width="12" height="20"/>

                <XCUIElementTypeOther type="XCUIElementTypeOther" name="电池电量:100%, 使用交流电源" label="电池电量:100%, 使用交流电源" visible="true" enabled="true" x="376" y="0" width="33" height="20"/>

            </XCUIElementTypeOther>

        </XCUIElementTypeStatusBar>

    </XCUIElementTypeWindow>

</XCUIElementTypeApplication></AppiumAUT>
mac 系统使用macaca inspector 获取iphone真机应用元素的更多相关文章
- iPhone 真机调试应用程序
原文:http://blog.sina.com.cn/s/blog_68e753f70100r3w5.html 真机调试iphone应用程序 1.真机调试流程概述 1) 真机调试应用程序, ...
- Xcode证书破解 iphone真机部署
Xcode证书破解 iphone真机部署 证书伪造: 先按照该教程的步骤添加证书.注意,原教程选择的是"系统"证书,这里我们用"登录"证书,切记. Xcode破 ...
- XCode - vmware虚拟机安装XCode进行iPhone真机调试
1.vmware安装黑苹果,然后在appStore安装XCode http://blog.csdn.net/forgot2015/article/details/51104329 2.真机调试证书等申 ...
- XCode - 无法对iPhone真机调试的解决方法!
OSX:10.14 XCode:10.1 真机:iPhone 4S 错误很多啊,并非编译错误,编译已经成功了,但是无法安装到真机,我真不理解啊!!由于真的没有想到能够解决,有的错误没有截图,先看部分错 ...
- 苹果IPhone真机开发调试
需要 在苹果开发网站 加入真机的UDID, 并在Profile中勾选该手机
- Mac OSX下Appium驱动iPhone真机
1.安装Xcode.Command Line Tools和Appium. 2.安装brew:/usr/bin/ruby -e "$(curl -fsSL https://raw.github ...
- iPhone真机测试Crash信息分析
一.获取Crash Log的方式 在iOS开发过程,当应用已经打包,iPhone设备通过ipa的包安装应用后,在使用过程发现crash,那么如何获取crash日志呢,现提供如下四种获取crash日志的 ...
- iphone真机开发流程之--证书申请
一.申请 1.进入ios开发者中心 http://www.apple.com.cn/developer/ios/index.html 2.点击登录 输入用户名和密码(前提:已经有Apple ID,且花 ...
- iPhone真机调试流程
大致流程:绑定设置ID--绑定电脑---绑定appbundle ID mac----钥匙串----证书助理-----从证书机构请求颁发证书-----填写邮件----生成证书到桌面 数据线连接设备--- ...
随机推荐
- HDU 1159 && POJ 1458
最长公共子序列.状态转移方程见代码. #include <iostream> #include <cstdio> #include <cstring> using ...
- (转)h264中avc和flv数据的解析
计算 AVCDecoderConfigurationRecord 得到 CodecPrivateData 数据(只有第一帧需要): 计算 NALUs 得到帧数据. 计算 AVCDecoderConf ...
- pytest文档11-assert断言
前言 断言是写自动化测试基本最重要的一步,一个用例没有断言,就失去了自动化测试的意义了.什么是断言呢? 简单来讲就是实际结果和期望结果去对比,符合预期那就测试pass,不符合预期那就测试 failed ...
- Last-Modified和If-Modified-Since
Last-Modified 是由服务器往客户端发送的 HTTP 头 If-Modified-Since是由客户端往服务器发送的头 基础知识 1) 什么是”Last-Modified”? ...
- 命令方式启动安卓模拟器(M9)
H:\Android\M9SDK_windows_1.0\platforms\android-2.3.1>emulator.exe -sysdir H:\Android\M9SDK_window ...
- Shell学习:grep, sed, awk命令的练习题
http://www.cnblogs.com/chengmo/archive/2013/01/17/2865479.html 文件:datafileSteve Blenheim:238-923-736 ...
- DEDECMS网站管理系统Get Shell漏洞
漏洞版本: DEDECMS 5.3/5.6 漏洞描述: DedeCms 基于PHP+MySQL的技术开发,支持Windows.Linux.Unix等多种服务器平台,从2004年开始发布第一个版本开始, ...
- HTML中的attribute和property
一.概述 attribute和property是常常被弄混的两个概念. 简单来说,property则是JS代码里访问的: document.getElementByTagName('my-elemen ...
- libmysqld,嵌入式MySQLserver库
25.1.1. 嵌入式MySQLserver库概述 使用嵌入式MySQLserver库,可以在client应用程序中使用具备所有特性的MySQLserver. 主要长处在于.添加了速度.并使得嵌入式应 ...
- [ES6] 04. The let keyword -- 2 Fiald case
Fiald case 1: let can work in it's block { let a = 10; var b = 1; } a // ReferenceError: a is not de ...
