第三章 LinkedList源码解析
一、对于LinkedList需要掌握的八点内容
- LinkedList的创建:即构造器
- 往LinkedList中添加对象:即add(E)方法
- 获取LinkedList中的单个对象:即get(int index)方法
- 修改LinkedList中的指定索引的节点的数据set(int index, E element)
- 删除LinkedList中的对象:即remove(E),remove(int index)方法
- 遍历LinkedList中的对象:即iterator,在实际中更常用的是增强型的for循环去做遍历
- 判断对象是否存在于LinkedList中:contain(E)
- LinkedList中对象的排序:主要取决于所采取的排序算法(以后讲)
二、源码分析
2.1、LinkedList的创建
实现方式:
List<String> strList0 = new LinkedList<String>();
源代码:在读源代码之前,首先要知道什么是环形双向链表,参考《算法导论(第二版)》P207
    private transient Entry<E> header = new Entry<E>(null, null, null);//底层是双向链表,这时先初始化一个空的header节点

    private transient int size = 0;//链表中的所存储的元素个数

    /**

     * 构造环形双向链表

     */

    public LinkedList() {

        header.next = header.previous = header;//形成环形双向链表

    }
Entry是LinkedList的一个内部类:
    /**

     * 链表节点

     */

    private static class Entry<E> {

        E element;            //链表节点所存储的数据

        Entry<E> next;        //当前链表节点的下一节点

        Entry<E> previous;    //当前链表节点的前一个节点

        Entry(E element, Entry<E> next, Entry<E> previous) {

            this.element = element;

            this.next = next;

            this.previous = previous;

        }

    }
执行完上述的无参构造器后:形成的空环形双向链表如下:
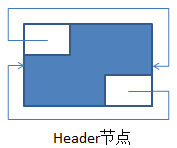
其中,左上角为previous,右下角为next
2.2、往LinkedList中添加对象(add(E e))
实现方式:
strList0.add("hello");
源代码:
    /**

     * 在链表尾部增加新节点,新节点封装的数据为e

     */

    public boolean add(E e) {

        addBefore(e, header);//在链表尾部增加新节点,新节点封装的数据为e

        return true;

    }
    /*

     * 在链表指定节点entry后增加新节点,新节点封装的数据为e

     */

    private Entry<E> addBefore(E e, Entry<E> entry) {

        Entry<E> newEntry = new Entry<E>(e, entry, entry.previous);

        newEntry.previous.next = newEntry;//新节点的前一个节点的下一节点为该新节点

        newEntry.next.previous = newEntry;//新节点的下一个节点的前一节点为该新节点

        size++;            //链表中元素个数+1

        modCount++;        //与ArrayList相同,用于在遍历时查看是否发生了add和remove操作

        return newEntry;

    }
在添加一个元素后的新环形双向链表如下:

在上述的基础上,再调用一次add(E)后,新的环形双向链表如下:
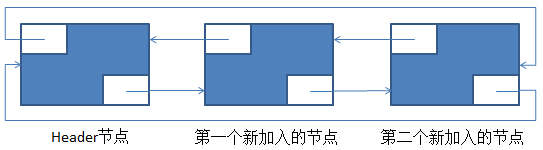
这里,结合着代码注释与图片去看add(E)的源代码就好。
注意:在添加元素方面LinkedList不需要考虑数组扩容和数组复制,只需要新建一个对象,但是需要修改前后两个对象的属性。
2.3、获取LinkedList中的单个对象(get(int index))
实现方式:
strList.get(0);//注意:下标从0开始
源代码:
    /**

     * 返回索引值为index节点的数据,index从0开始计算

     */

    public E get(int index) {

        return entry(index).element;

    }
    /**

     * 获取指定index索引位置的节点(需要遍历链表)

     */

    private Entry<E> entry(int index) {

        //index:0~size-1

        if (index < 0 || index >= size)

            throw new IndexOutOfBoundsException("Index:"+index+", Size:"+size);

        Entry<E> e = header;//头节点:既作为头节点也作为尾节点

        if (index < (size >> 1)) {//index<size/2,则说明index在前半个链表中,从前往后找

            for (int i = 0; i <= index; i++)

                e = e.next;

        } else {//index>=size/2,则说明index在后半个链表中,从后往前找

            for (int i = size; i > index; i--)

                e = e.previous;

        }

        return e;

    }
注意:
- 链表节点的按索引查找,需要遍历链表;而数组不需要。
- header节点既是头节点也是尾节点
- 双向链表的查找,先去判断索引值index是否小于size/2,若小于,从header节点开始,从前往后找;若大于等于,从header节点开始,从后往前找
- size>>1,右移一位等于除以2;左移一位等于乘以2
2.4、修改LinkedList中指定索引的节点的数据:set(int index, E element)
使用方式:
strList.set(0, "world");
源代码:
    /**

     * 修改指定索引位置index上的节点的数据为element

     */

    public E set(int index, E element) {

        Entry<E> e = entry(index);//查找index位置的节点

        E oldVal = e.element;//获取该节点的旧值

        e.element = element;//将新值赋给该节点的element属性

        return oldVal;//返回旧值

    }
注意:entry(int index)查看上边
2.5、删除LinkedList中的对象
2.5.1、remove(Object o)
使用方式:
strList.remove("world")
源代码:
    /**

     * 删除第一个出现的指定元数据为o的节点

     */

    public boolean remove(Object o) {

        if (o == null) {//从前往后删除第一个null

            //遍历链表

            for (Entry<E> e = header.next; e != header; e = e.next) {

                if (e.element == null) {

                    remove(e);

                    return true;

                }

            }

        } else {

            for (Entry<E> e = header.next; e != header; e = e.next) {

                if (o.equals(e.element)) {

                    remove(e);

                    return true;

                }

            }

        }

        return false;

    }
    /*

     * 删除节点e

     */

    private E remove(Entry<E> e) {

        //header节点不可删除

        if (e == header)

            throw new NoSuchElementException();

        E result = e.element;

        //调整要删除节点的前后节点的指针指向

        e.previous.next = e.next;

        e.next.previous = e.previous;

        //将要删除元素的三个属性置空

        e.next = e.previous = null;

        e.element = null;

        size--;//size-1

        modCount++;

        return result;

    }
注意:
- header节点不可删除
2.5.2、remove(int index)
使用方式:
strList.remove(0);
源代码:
    /**

     * 删除指定索引的节点

     */

    public E remove(int index) {

        return remove(entry(index));

    }
注意:
- remove(entry(index))见上边
- remove(Object o)需要遍历链表,remove(int index)也需要
2.6、判断对象是否存在于LinkedList中(contains(E))
源代码:
    /**

     * 链表中是否包含指定数据o的节点

     */

    public boolean contains(Object o) {

        return indexOf(o) != -1;

    }
    /**

     * 从header开始,查找第一个出现o的索引

     */

    public int indexOf(Object o) {

        int index = 0;

        if (o == null) {//从header开始,查找第一个出现null的索引

            for (Entry e = header.next; e != header; e = e.next) {

                if (e.element == null)

                    return index;

                index++;

            }

        } else {

            for (Entry e = header.next; e != header; e = e.next) {

                if (o.equals(e.element))

                    return index;

                index++;

            }

        }

        return -1;

    }
注意:
- indexOf(Object o)返回第一个出现的元素o的索引
2.7、遍历LinkedList中的对象(iterator())
使用方式:
        List<String> strList = new LinkedList<String>();

        strList.add("jigang");

        strList.add("nana");

        strList.add("nana2");

        Iterator<String> it = strList.iterator();

        while (it.hasNext()) {

            System.out.println(it.next());

        }
源代码:iterator()方法是在父类AbstractSequentialList中实现的,
    public Iterator<E> iterator() {

        return listIterator();

    }
listIterator()方法是在父类AbstractList中实现的,
    public ListIterator<E> listIterator() {

        return listIterator(0);

    }
listIterator(int index)方法是在父类AbstractList中实现的,
    public ListIterator<E> listIterator(final int index) {

        if (index < 0 || index > size())

            throw new IndexOutOfBoundsException("Index: " + index);

        return new ListItr(index);

    }
该方法返回AbstractList的一个内部类ListItr对象
ListItr:
    private class ListItr extends Itr implements ListIterator<E> {

        ListItr(int index) {

            cursor = index;

        }
上边这个类并不完整,它继承了内部类Itr,还扩展了一些其他方法(eg.向前查找方法hasPrevious()等),至于hasNext()/next()等方法还是来自于Itr的。
Itr:
    private class Itr implements Iterator<E> {

        int cursor = 0;//标记位:标记遍历到哪一个元素

        int expectedModCount = modCount;//标记位:用于判断是否在遍历的过程中,是否发生了add、remove操作

        //检测对象数组是否还有元素

        public boolean hasNext() {

            return cursor != size();//如果cursor==size,说明已经遍历完了,上一次遍历的是最后一个元素

        }

        //获取元素

        public E next() {

            checkForComodification();//检测在遍历的过程中,是否发生了add、remove操作

            try {

                E next = get(cursor++);

                return next;

            } catch (IndexOutOfBoundsException e) {//捕获get(cursor++)方法的IndexOutOfBoundsException

                checkForComodification();

                throw new NoSuchElementException();

            }

        }

        //检测在遍历的过程中,是否发生了add、remove等操作

        final void checkForComodification() {

            if (modCount != expectedModCount)//发生了add、remove操作,这个我们可以查看add等的源代码,发现会出现modCount++

                throw new ConcurrentModificationException();

        }

    }
注:
- 上述的Itr我去掉了一个此时用不到的方法和属性。
- 这里的get(int index)方法参照2.3所示。
三、总结
- LinkedList基于环形双向链表方式实现,无容量的限制
- 添加元素时不用扩容(直接创建新节点,调整插入节点的前后节点的指针属性的指向即可)
- 线程不安全
- get(int index):需要遍历链表
- remove(Object o)需要遍历链表
- remove(int index)需要遍历链表
- contains(E)需要遍历链表
第三章 LinkedList源码解析的更多相关文章
- 第三章 CopyOnWriteArrayList源码解析
注:在看这篇文章之前,如果对ArrayList底层不清楚的话,建议先去看看ArrayList源码解析. http://www.cnblogs.com/java-zhao/p/5102342.html ...
- LinkedList源码解析
LinkedList是基于链表结构的一种List,在分析LinkedList源码前有必要对链表结构进行说明.1.链表的概念链表是由一系列非连续的节点组成的存储结构,简单分下类的话,链表又分为单向链表和 ...
- Java集合:LinkedList源码解析
Java集合---LinkedList源码解析 一.源码解析1. LinkedList类定义2.LinkedList数据结构原理3.私有属性4.构造方法5.元素添加add()及原理6.删除数据re ...
- 第十四章 Executors源码解析
前边两章介绍了基础线程池ThreadPoolExecutor的使用方式.工作机理.参数详细介绍以及核心源码解析. 具体的介绍请参照: 第十二章 ThreadPoolExecutor使用与工作机理 第十 ...
- 第九章 LinkedBlockingQueue源码解析
1.对于LinkedBlockingQueue需要掌握以下几点 创建 入队(添加元素) 出队(删除元素) 2.创建 Node节点内部类与LinkedBlockingQueue的一些属性 static ...
- 第六章 ReentrantLock源码解析2--释放锁unlock()
最常用的方式: int a = 12; //注意:通常情况下,这个会设置成一个类变量,比如说Segement中的段锁与copyOnWriteArrayList中的全局锁 final Reentrant ...
- Java集合---LinkedList源码解析
一.源码解析1. LinkedList类定义2.LinkedList数据结构原理3.私有属性4.构造方法5.元素添加add()及原理6.删除数据remove()7.数据获取get()8.数据复制clo ...
- ava集合---LinkedList源码解析
一.源码解析 public class LinkedList<E> extends AbstractSequentialList<E> implements List<E ...
- 【vuejs深入三】vue源码解析之二 htmlParse解析器的实现
写在前面 一个好的架构需要经过血与火的历练,一个好的工程师需要经过无数项目的摧残. 昨天博主分析了一下在vue中,最为基础核心的api,parse函数,它的作用是将vue的模板字符串转换成ast,从而 ...
随机推荐
- 《Android源码设计模式》--工厂方法模式
No1: 对于一个应用程序来说,其真正的入口是在ActivityThread类中,ActivityThread中含有我们熟悉的main方法.ActivityThread是一个final类,不能被继承. ...
- synchronized锁优化
1.自旋锁和自适应自旋锁 sync在JDK1.6之前之所以被称为重量级锁,是因为对于互斥同步的性能来说,影响最大的就是阻塞的实现.挂起线程与恢复线程的操作都需要转入内核态中完成.从用户态转入内核态是比 ...
- Linux signal 编程(转载)
转载地址:http://blog.sina.com.cn/s/blog_4b226b92010119l5.html 当服务器close一个连接时,若client端接着发数据.根据TCP协议的规定,会收 ...
- Graphviz 在 Windows 10 下 的 安装 Bug 解决方案
报错: 解决方法: 参考:stackoverflow
- CSUOJ 1808 地铁
Description Bobo 居住在大城市 ICPCCamp. ICPCCamp 有 n 个地铁站,用 1,2,-,n 编号. m 段双向的地铁线路连接 n 个地铁站,其中第 i 段地铁属于 ci ...
- 深度学习基础系列(五)| 深入理解交叉熵函数及其在tensorflow和keras中的实现
在统计学中,损失函数是一种衡量损失和错误(这种损失与“错误地”估计有关,如费用或者设备的损失)程度的函数.假设某样本的实际输出为a,而预计的输出为y,则y与a之间存在偏差,深度学习的目的即是通过不断地 ...
- ARM Linux 驱动Input子系统之按键驱动测试
上一篇已经谈过,在现内核的中引入设备树之后对于内核驱动的编写,主要集中在硬件接口的配置上了即xxxx.dts文件的编写. 在自己的开发板上移植按键驱动: 1.根据开发板的原理图 确定按键的硬件接口为: ...
- [代码审计]某开源商城前台getshell
0x00 前言 这套系统搞了有点久了,漏洞是发现了,但一直卡在某个地方迟迟没拿下来. 下面就分享一下自己审这套系统的整个过程. 0x01 系统简介 略 0x02 审计入口 看到inc\functi ...
- [ 原创 ] git使用技巧
Git的使用--如何将本地项目上传到Github Git分支图介绍 https://www.cnblogs.com/cheneasternsun/p/5952830.html https://www. ...
- 【贪心】Google Code Jam Round 1A 2018 Waffle Choppers
题意:给你一个矩阵,有些点是黑的,让你横切h刀,纵切v刀,问你是否能让切出的所有子矩阵的黑点数量相等. 设黑点总数为sum,sum必须能整除(h+1),进而sum/(h+1)必须能整除(v+1). 先 ...