OpenGL ES 渲染立体图形
一、理解
顶点数据存储在申请的缓冲区中,其由数据总线传递给着色器(如果是片元着色器,还须将顶点转换成片元),再由着色器最终渲染到涂层上;
二、思路
1.设置涂层;
2.创建上下文;
3.清空缓存区;
4.创建渲染缓存区和帧缓存区;
5.开始绘制;
三、核心代码
//最终渲染
- (void)renderLayer

{

    //设置窗口背景颜色

    glClearColor(0.0, 0.0, 0.0, 1.0);

    //清空颜色缓存

    glClear(GL_COLOR_BUFFER_BIT);

    //设置视口大小

    CGFloat scale = [[UIScreen mainScreen] scale];

    glViewport(self.frame.origin.x*scale, self.frame.origin.y*scale, self.frame.size.width*scale, self.frame.size.height*scale);

    //读取顶点和片元着色器程序

    NSString *vertFile = [[NSBundle mainBundle] pathForResource:@"shaderv" ofType:@"glsl"];

    NSString *fragFile = [[NSBundle mainBundle] pathForResource:@"shaderf" ofType:@"glsl"];

    NSLog(@"vertFile:%@", vertFile);

    NSLog(@"fragFile:%@", fragFile);

    //判断myProgram是否存在,存在则清空

    if (self.myProgram) {

        glDeleteProgram(self.myProgram);

        self.myProgram = ;

    }

    //加载着色器到myProgram中

    self.myProgram = [self loadShader:vertFile frag:fragFile];

    //创建链接

    glLinkProgram(self.myProgram);

    GLint linkSuccess;

    //获取链接状态

    glGetProgramiv(self.myProgram, GL_LINK_STATUS, &linkSuccess);

    //判断链接是否成功

    if (linkSuccess == GL_FALSE) {

        //获取失败信息

        GLchar message[];

        glGetProgramInfoLog(self.myProgram, sizeof(message), , &message[]);

        //c字符串转换成oc字符串

        NSString *messageString = [NSString stringWithUTF8String:message];

        NSLog(@"error:%@", messageString);

        return;

    } else {

        //使用myProgram

        glUseProgram(self.myProgram);

    }

    //创建绘制索引数组

    GLuint indices[] = {

        , , ,

        , , ,

        , , ,

        , , ,

        , , ,

        , ,

    };

    //判断顶点缓存区是否为空,为空则申请一个缓存区标志符

    if (self.myVertices == ) {

        glGenBuffers(, &_myVertices);

    }

    //----------处理顶点坐标---------

    /*顶点数据

     1.前3个坐标值(x、y、z),后3个颜色值(RGB);

     2.有先后顺序,否则绘制形状完全不同

     */

    GLfloat attrArr[] =

    {

        -0.5f, 0.5f, 0.0f,      1.0f, 0.0f, 1.0f, //左上

        0.5f, 0.5f, 0.0f,       1.0f, 0.0f, 1.0f, //右上

        -0.5f, -0.5f, 0.0f,     1.0f, 1.0f, 1.0f, //左下

        0.5f, -0.5f, 0.0f,      1.0f, 1.0f, 1.0f, //右下

        0.0f, 0.0f, 1.0f,       0.0f, 1.0f, 0.0f, //顶点

    };

    //将_myVertices绑定到GL_ARRAY_BUFFER标志符上

    glBindBuffer(GL_ARRAY_BUFFER, _myVertices);

    //把顶点坐标数据从CPU复制到GPU上

    glBufferData(GL_ARRAY_BUFFER, sizeof(attrArr), attrArr, GL_DYNAMIC_DRAW);

    //将顶点坐标数据通过myProgram传递到顶点着色器程序的position

    //获取顶点属性入口

    GLuint position = glGetAttribLocation(self.myProgram, "position");

    /*传递数据

     1.一行6个数据,前3个为坐标,后3个为颜色;

     2.NULL开始位置:默认为0,指向数组首地址;

     */

    glVertexAttribPointer(position, , GL_FLOAT, GL_FALSE, sizeof(GLfloat)*, NULL);

    //设置合适的格式从缓存区中读取数据

    glEnableVertexAttribArray(position);

    //处理顶点颜色数据:传递到顶点着色器的positionColor

    GLuint positionColor = glGetAttribLocation(self.myProgram, "positionColor");

    glVertexAttribPointer(positionColor, , GL_FLOAT, GL_FALSE, sizeof(GLfloat)*, (float *)NULL +);

    glEnableVertexAttribArray(positionColor);

    //在myProgram中找到透视投影矩阵和模型视图矩阵

    GLuint projectionMatrixSlot = glGetUniformLocation(self.myProgram, "projectionMatrix");

    GLuint modelViewMatrixSlot = glGetUniformLocation(self.myProgram, "modelViewMatrix");

    //创建透视投影矩阵并初始化

    float width = self.frame.size.width;

    float height = self.frame.size.height;

    KSMatrix4 _projectionMatrix;

    ksMatrixLoadIdentity(&_projectionMatrix);

    float aspect = width/height;

    ksPerspective(&_projectionMatrix, 30.0, aspect, 5.0f, 20.0f);

    //设置glsl里面的投影矩阵

    glUniformMatrix4fv(projectionMatrixSlot, , GL_FALSE, (GLfloat *)&_projectionMatrix.m[][]);

    //开启剔除功能

    glEnable(GL_CULL_FACE);

    //创建平移矩阵:Z轴平移-10

    KSMatrix4 _modelViewMatrix;

    ksMatrixLoadIdentity(&_modelViewMatrix);

    ksTranslate(&_modelViewMatrix, 0.0, 0.0, -10.0);

    //创建旋转矩阵

    KSMatrix4 _rotationMatrix;

    ksMatrixLoadIdentity(&_rotationMatrix);

    ksRotate(&_rotationMatrix, xDegree, 1.0, 0.0, 0.0);

    ksRotate(&_rotationMatrix, yDegree, 0.0, 1.0, 0.0);

    ksRotate(&_rotationMatrix, zDegree, 0.0, 0.0, 1.0);

    //将平移矩阵和旋转矩阵相乘,结果放到模型视图矩阵中

    ksMatrixMultiply(&_modelViewMatrix, &_rotationMatrix, &_modelViewMatrix);

    //设置glsl里面的模型视图矩阵

    glUniformMatrix4fv(modelViewMatrixSlot, , GL_FALSE, (GLfloat *)&_modelViewMatrix.m[][]);

    //设置绘制参数:片元、个数、索引数组

    glDrawElements(GL_TRIANGLES, sizeof(indices)/sizeof(indices[]), GL_UNSIGNED_INT, indices);

    //由顶点着色器将缓存区中的数据渲染到显示涂层上

    [self.myContext presentRenderbuffer:GL_RENDERBUFFER];

}
四、效果
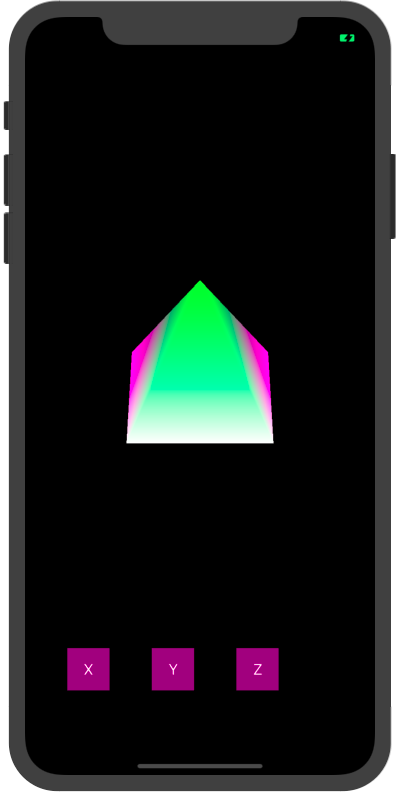

以上是采用GLSL自定义着色器绘制,下面是采用GLKit框架并添加纹理来绘制
//核心代码
- (void)renderLayer

{

    //顶点数据:前3个坐标(x、y、z),中间三个颜色(RGB),最后2个坐标(纹理)

    GLfloat attrArr [] = {

        -0.5, 0.5, 0.0,   0.0, 0.0, 0.5,   0.0, 1.0,

        0.5, 0.5, 0.0,    0.0, 0.5, 0.0,   1.0, 1.0,

        -0.5, -0.5, 0.0,  0.5, 0.0, 0.0,   0.0, 0.0,

        0.5, -0.5, 0.0,   0.0, 0.0, 0.5,   1.0, 0.0,

        0.0, 0.0, 1.0,     1.0, 1.0, 1.0,   0.5, 0.5

    };

    //绘图索引

    GLuint indices[] =

    {

        , , ,

        , , ,

        , , ,

        , , ,

        , , ,

        , , ,

    };

    //顶点个数

    self.count = sizeof(indices)/sizeof(GLuint);

    //顶点数据存入缓存区:CPU->GPU

    GLuint buffer;

    glGenBuffers(, &buffer);

    glBindBuffer(GL_ARRAY_BUFFER, buffer);

    glBufferData(GL_ARRAY_BUFFER, sizeof(attrArr), attrArr, GL_STATIC_DRAW);

    //索引数据存入缓存区:CPU->GPU

    GLuint index;

    glGenBuffers(, &index);

    glBindBuffer(GL_ELEMENT_ARRAY_BUFFER, index);

    glBufferData(GL_ELEMENT_ARRAY_BUFFER, sizeof(indices), indices, GL_STATIC_DRAW);

    //传递顶点数据到着色器指定位置

    glEnableVertexAttribArray(GLKVertexAttribPosition);

    glVertexAttribPointer(GLKVertexAttribPosition, , GL_FLOAT, GL_FALSE, sizeof(GLfloat)*, NULL);

    //顶点颜色数据

    glEnableVertexAttribArray(GLKVertexAttribColor);

    glVertexAttribPointer(GLKVertexAttribColor, , GL_FLOAT, GL_FALSE, sizeof(GLfloat)*, (GLfloat *)NULL + );

    //顶点纹理数据

    glEnableVertexAttribArray(GLKVertexAttribTexCoord0);

    glVertexAttribPointer(GLKVertexAttribTexCoord0, , GL_FLOAT, GL_FALSE, sizeof(GLfloat)*, (GLfloat *)NULL + );

    //加载纹理

    NSString *filePath = [[NSBundle mainBundle] pathForResource:@"cTest" ofType:@"jpg"];

    NSDictionary *options = [NSDictionary dictionaryWithObjectsAndKeys:@"", GLKTextureLoaderOriginBottomLeft, nil];

    GLKTextureInfo *textureInfo = [GLKTextureLoader textureWithContentsOfFile:filePath options:options error:nil];

    self.mEffect = [[GLKBaseEffect alloc] init];

    self.mEffect.texture2d0.enabled = GL_TRUE;

    self.mEffect.texture2d0.name = textureInfo.name;

    //创建透视投影矩阵

    CGSize size = self.view.bounds.size;

    float aspect = fabs(size.width/size.height);

    GLKMatrix4 projectionMatrix = GLKMatrix4MakePerspective(GLKMathDegreesToRadians(90.0), aspect, 0.1, 10.0);

    //设置等比缩放

    projectionMatrix = GLKMatrix4Scale(projectionMatrix, 1.0, 1.0, 1.0);

    self.mEffect.transform.projectionMatrix = projectionMatrix;

    //设置平移:Z轴负方向平移2.0

    GLKMatrix4 modelViewMatrix = GLKMatrix4Translate(GLKMatrix4Identity, 0.0, 0.0, -2.0);

    self.mEffect.transform.modelviewMatrix = modelViewMatrix;

    //设置定时器

    double seconds = 0.1;

    timer = dispatch_source_create(DISPATCH_SOURCE_TYPE_TIMER, , , dispatch_get_main_queue());

    dispatch_source_set_timer(timer, DISPATCH_TIME_NOW, seconds*NSEC_PER_SEC, );

    dispatch_source_set_event_handler(timer, ^{

        self.xDegree += 0.1*self.XB;

        self.yDegree += 0.1*self.YB;

        self.zDegree += 0.1*self.ZB;

    });

    dispatch_resume(timer);

}
效果:


OpenGL ES 渲染立体图形的更多相关文章
- 使用OpenGL ES绘制3D图形
如果应用定义的顶点不在同一个平面上,并且使用三角形把合适的顶点连接起来,就可以绘制出3D图形了. 使用OpenGL ES绘制3D图形的方法与绘制2D图形的步骤大致相同,只是绘制3D图形需要定义更多的 ...
- 基于Cocos2d-x学习OpenGL ES 2.0系列——OpenGL ES渲染之Shader准备(7)
Cocos2d-x底层图形绘制是使用OpenGL ES协议的.OpenGL ES是什么呢? OpenGL ES(OpenGl for Embedded System)是OpenGL三维图形API的子集 ...
- 基于Cocos2d-x学习OpenGL ES 2.0系列——OpenGL ES渲染之LayerColor(8)
在前面文章中讲述了Cocos2d-x引擎OpenGL渲染准备Shader方面,本文主要讲解使用LayerColor来讲述OpenGL的渲染过程. 1.LayerColor对象创建 添加LayerCol ...
- 一步步实现windows版ijkplayer系列文章之六——SDL2源码分析之OpenGL ES在windows上的渲染过程
一步步实现windows版ijkplayer系列文章之一--Windows10平台编译ffmpeg 4.0.2,生成ffplay 一步步实现windows版ijkplayer系列文章之二--Ijkpl ...
- Android 中建立一个OpenGL ES的开发环境
转自: http://wiki.eoe.cn/page/Building_an_OpenGL_ES_Environment.html 负责人:zhangql原文链接:http://docs.eoean ...
- 【Android Developers Training】 62. 搭建一个OpenGL ES环境
注:本文翻译自Google官方的Android Developers Training文档,译者技术一般,由于喜爱安卓而产生了翻译的念头,纯属个人兴趣爱好. 原文链接:http://developer ...
- Android OpenGL ES 开发(二): OpenGL ES 环境搭建
零:环境搭建目的 为了在Android应用程序中使用OpenGL ES绘制图形,必须要为他们创建一个视图容器.其中最直接或者最常用的方式就是实现一个GLSurfaceView和一个GLSurfaceV ...
- OpenGL ES: (3) EGL、EGL绘图的基本步骤、EGLSurface、ANativeWindow
1. EGL概述 EGL 是 OpenGL ES 渲染 API 和本地窗口系统(native platform window system)之间的一个中间接口层,它主要由系统制造商实现. EGL提供如 ...
- 在Android中使用OpenGL ES进行开发第(一)节:概念先行
一.前期基础是知识储备笔者计划写三篇文章来详细分析OpenGL ES基础的同时也是入门关键的三个点: ①OpenGL ES是什么?与OpenGL的关系是什么?——概念部分 ②使用OpenGL ES绘制 ...
随机推荐
- Keras vs. PyTorch in Transfer Learning
We perform image classification, one of the computer vision tasks deep learning shines at. As traini ...
- 产品相关 细说软件产品和业务 & 业务过程(流程) & 业务逻辑
细说软件产品和业务& 业务过程(流程) & 业务逻辑 by:授客 QQ:1033553122 作为一名测试人猿,需要懂产品,不懂产品的测试猿不是好测试猿猴.而业务逻辑是软件产品 ...
- Mouse For Winpad
Mouse For Winpad 用WIN10的平板模式玩游戏总会到一些兼容性问题,之前在推Re:LieF的时候就遇到了触屏不能像鼠标指针一样进行游戏,于是猜想一定是程序没进行标准化MFC的编程.于是 ...
- Django From组件 fields widgets
一.Form组件之字段 Field required=True, 是否允许为空 widget=None, HTML插件 label=None, 用于生成Label标签或显示内容 initial=Non ...
- leetCode题解之Reshape the Matrix
1.题目描述 2.分析 使用了一个队列. 3.代码 vector<vector<int>> matrixReshape(vector<vector<int>& ...
- Vue2学习笔记:过渡效果css
过渡效果 Vue 提供了 transition 的封装组件,在下列情形中,可以给任何元素和组件添加 entering/leaving 过渡 <!DOCTYPE html> <html ...
- extjs 可视化开发工具
不清楚Ext可视化的可以看一下http://www.screencast.com/users/JackSlocum这里的三个视频哈. 安装和汉化的步骤 第一步下载:Ext需要支持AIR的支持 下载并安 ...
- Linux装python3
记住下载的软件最好装在/opt下默认的 大家都这样做 linux装python3.7我们以安装最新的来做测试 先下载关联的包防止出错 安装python前的库环境,非常重要yum install gc ...
- [翻译] ZCSHoldProgress
ZCSHoldProgress 以下是使用效果: https://github.com/zshannon/ZCSHoldProgress "Your users be pressin' lo ...
- 《CDN 之我见》原理篇——CDN的由来与调度
CDN是将源站内容分发至全国所有的节点,从而缩短用户查看对象的延迟,提高用户访问网站的响应速度与网站的可用性的技术.它能够有效解决网络带宽小.用户访问量大.网点分布不均等问题. 为了让大家更全面的了解 ...