基于electron+vue+element构建项目模板之【自定义标题栏&右键菜单项篇】
1、概述
开发平台OS:windows
开发平台IDE:vs code
本篇章将介绍自定义标题栏和右键菜单项,基于electron现有版本安全性的建议,此次的改造中主进程和渲染进程彼此语境隔离,通过预加载(preload.js)和进程间通信(ipc)的方式来完成。
2、窗口最大化
一些应用在实际情况中,希望启动的时候就以窗口最大化的方式呈现,BrowserWindow对象提供了窗口最大化的方法:win.maximize(),具体如下所示:


  const win = new BrowserWindow({

    //窗体宽度(像素),默认800像素

    width: 800,

    //窗体高度(像素),默认600像素

    height: 600,

    //窗口标题,如果在加载的 HTML 文件中定义了 HTML 标签 `<title>`,则该属性将被忽略。

    title: `${process.env.VUE_APP_NAME}(${process.env.VUE_APP_VERSION})`,

    webPreferences: {

      // Use pluginOptions.nodeIntegration, leave this alone

      // See nklayman.github.io/vue-cli-plugin-electron-builder/guide/security.html#node-integration for more info

      nodeIntegration: process.env.ELECTRON_NODE_INTEGRATION,

      contextIsolation: !process.env.ELECTRON_NODE_INTEGRATION,

    },

  });

  //窗体最大化

  win.maximize();
点击查看代码
通过设置后,启动应用就会发现,最大化的过程中会出现黑底闪屏,这样会给用户造成困扰。
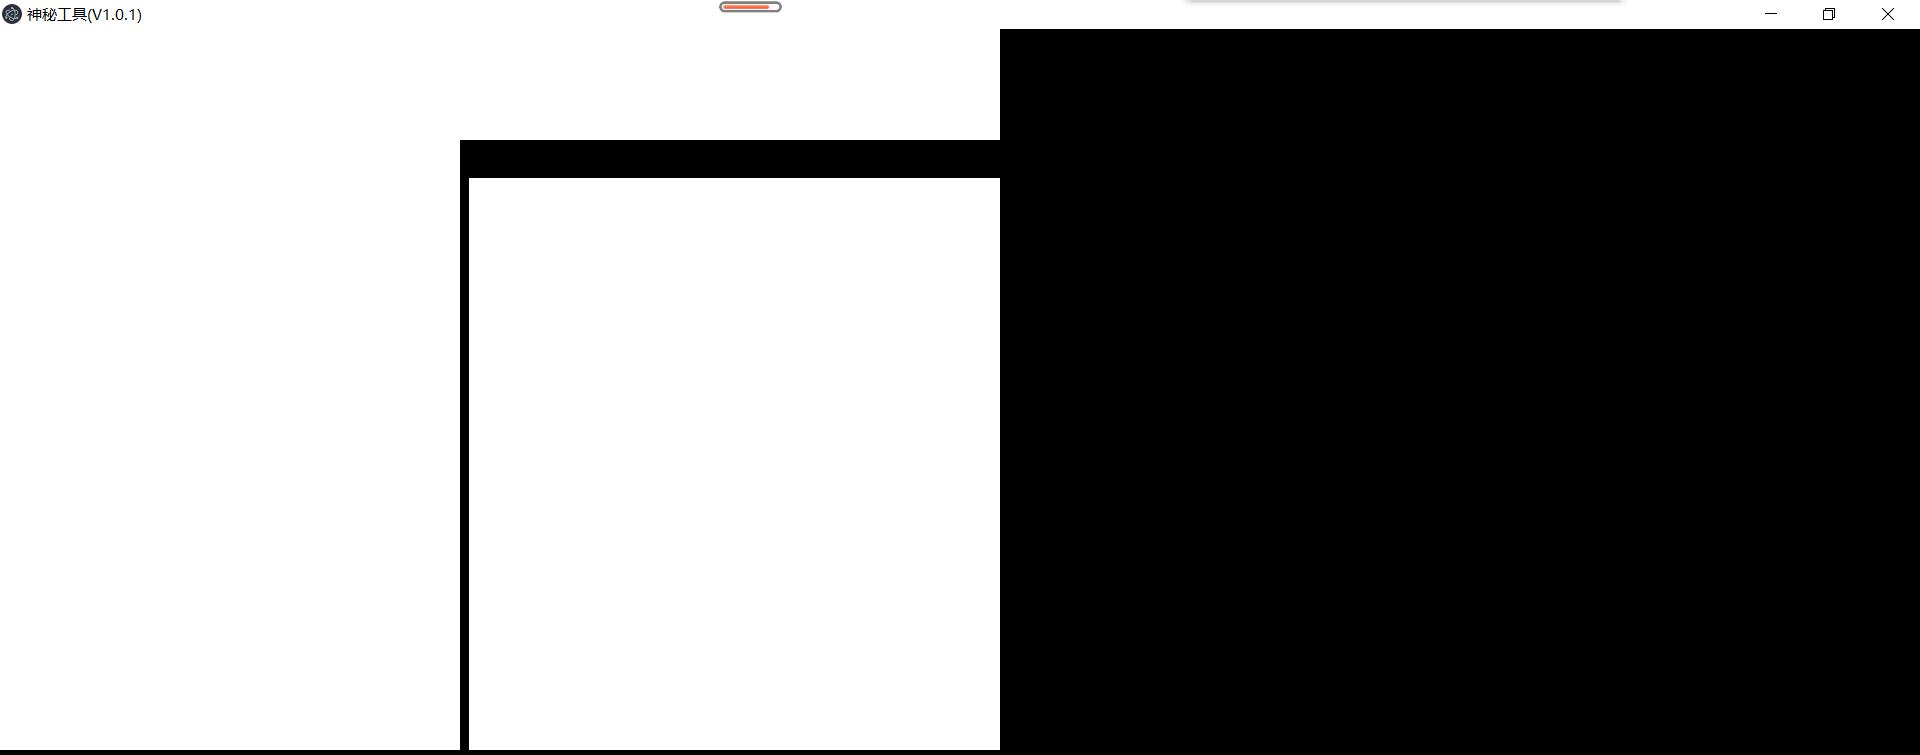
造成这个现象的原因是实例化窗体的时候,默认显示了窗口,然后再最大化,从默认窗口大小到最大化窗口大小的这个过程中窗体还没绘制好,就会出现黑色背景直至最大化完成后,现在稍加改造就可以解决这个问题:实例化的时候不显示窗体,最大化后再显示窗体。


  const win = new BrowserWindow({

    //窗体宽度(像素),默认800像素

    width: 800,

    //窗体高度(像素),默认600像素

    height: 600,

    //窗口标题,如果在加载的 HTML 文件中定义了 HTML 标签 `<title>`,则该属性将被忽略。

    title: `${process.env.VUE_APP_NAME}(${process.env.VUE_APP_VERSION})`,

    //不显示窗体

    show: false,

    webPreferences: {

      // Use pluginOptions.nodeIntegration, leave this alone

      // See nklayman.github.io/vue-cli-plugin-electron-builder/guide/security.html#node-integration for more info

      nodeIntegration: process.env.ELECTRON_NODE_INTEGRATION,

      contextIsolation: !process.env.ELECTRON_NODE_INTEGRATION,

    },

  });

  //窗体最大化

  win.maximize();

  //显示窗体

  win.show();
点击查看代码
3、自定义标题栏
为什么要自定义标题栏?electron应用自带的标题栏不能满足日益复杂的功能需求时,就只能自定义了。自定义标题除了实现基本的窗口功能外,它还能方便的快速的扩展其他功能需求。
自定义标题栏使用的是css3-flex+scss 来实现布局和样式的编写,其主体划分为两个区域:标题栏区域和功能区域,如下图所示:

为了使用scss语言来编写样式,我们需要安装 sass-loader 插件,在终端输入命令:npm install sass-loader@^10 sass --save-dev 指定版本尤为重要,高版本对于webpack版本也有要求
3.1、iconfront 图标添加
功能区域处的功能按钮需要图标,此块是在 iconfront 官网上找了合适的图标加入购物车后以下载代码的方式下载资源,然后通过下载的demo中第二种方式集成在项目中。
3.2、编写标题栏页面
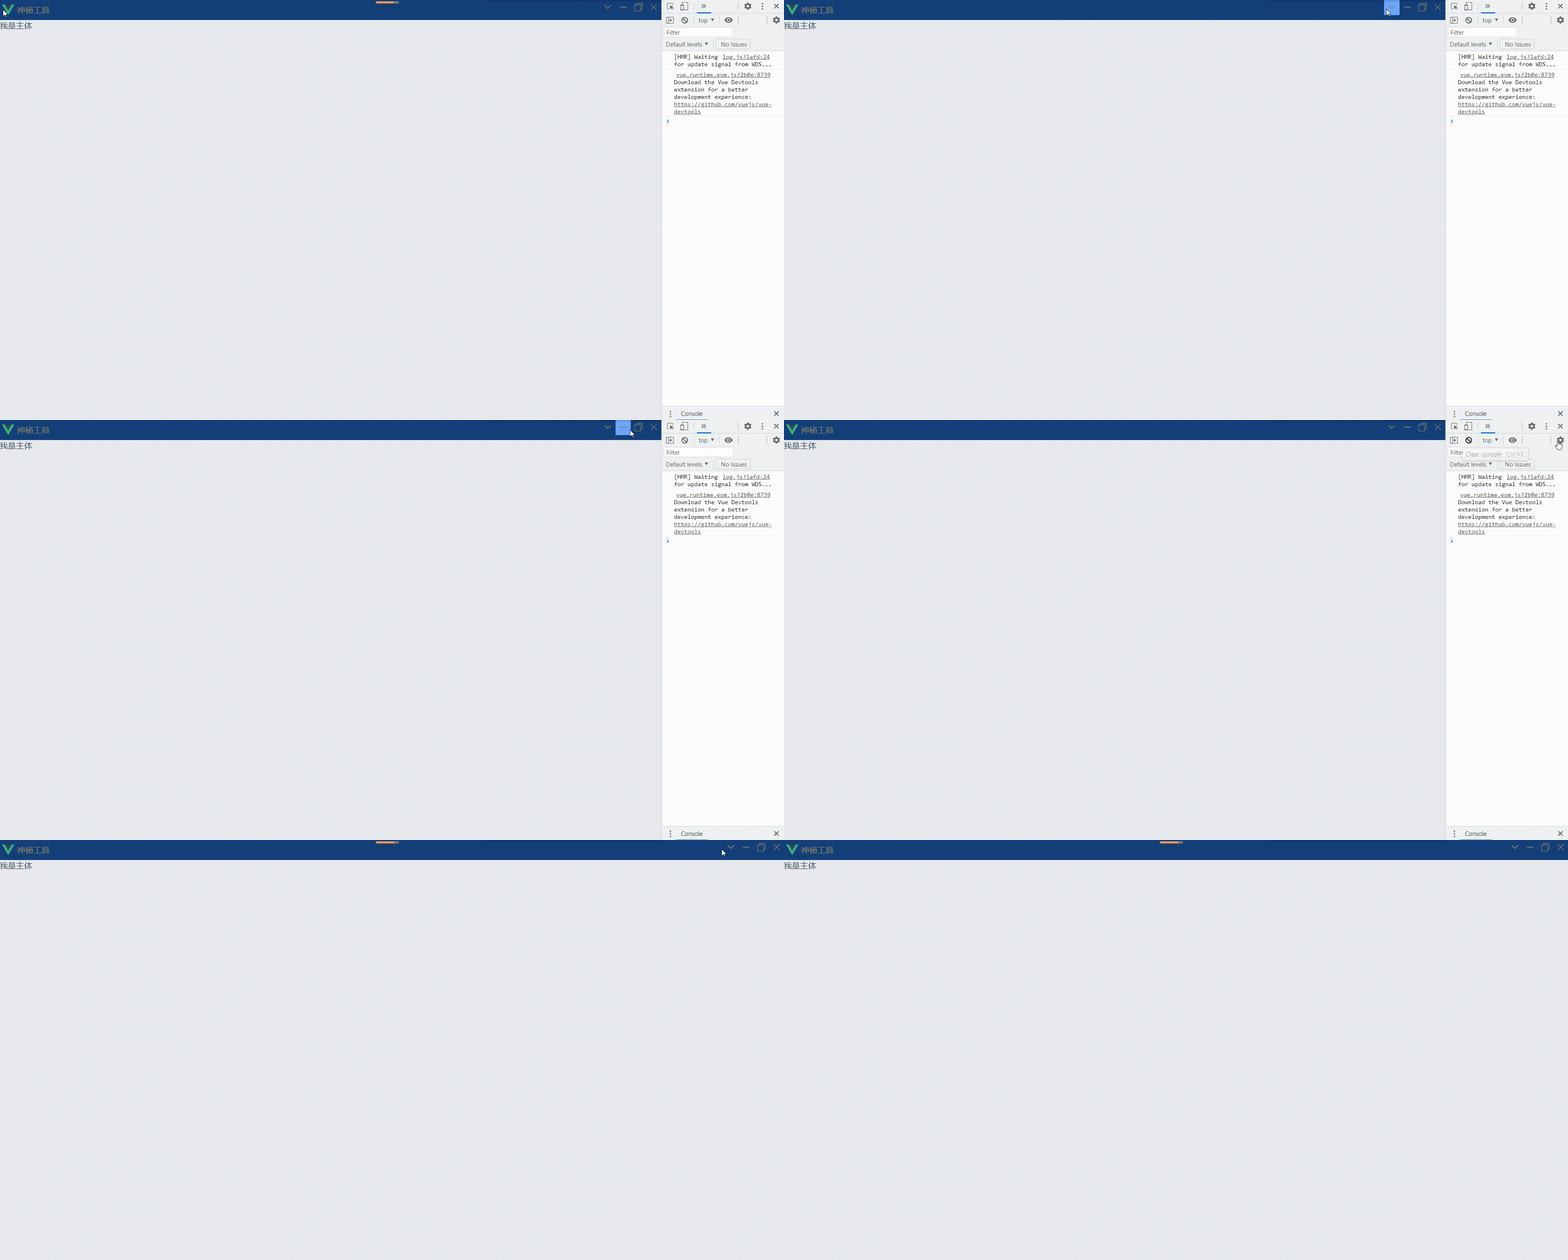
在src/renderer/App.vue 修改其内容以完成标题栏的改造,主要是通过css3-flex来完成的布局,包含了标题栏原有的基本功能,改造后效果(gif有失真效果)以及改造的代码如下所示:


<template>

  <div id="app">

    <header>

      <div class="titleArea">

        <img :src="winIcon" />

        <span>{{ winTitle }}</span>

      </div>

      <div class="featureArea">

        <div title="扩展">

          <span class="iconfont icon-xiakuozhanjiantou"></span>

        </div>

        <div title="最小化">

          <span class="iconfont icon-minimum"></span>

        </div>

        <div :title="maximizeTitle">

          <span

            :class="{

              iconfont: true,

              'icon-zuidahua': isMaximized,

              'icon-window-max_line': !isMaximized,

            }"

          ></span>

        </div>

        <div title="关闭">

          <span class="iconfont icon-guanbi"></span>

        </div>

      </div>

    </header>

    <main>我是主体</main>

  </div>

</template>

<script>

export default {

  data: () => ({

    winIcon: `${process.env.BASE_URL}favicon.ico`,

    winTitle: process.env.VUE_APP_NAME,

    isMaximized: true,

  }),

  computed: {

    maximizeTitle() {

      return this.isMaximized ? "向下还原" : "最大化";

    },

  },

};

</script>

<style lang="scss">

$titleHeight: 40px;

body {

  margin: 0px;

}

#app {

  font-family: "微软雅黑";

  color: #2c3e50;

  display: flex;

  flex-direction: column;

  header {

    background: #16407b;

    color: #8c8663;

    height: $titleHeight;

    width: 100%;

    display: flex;

    .titleArea {

      flex-grow: 10;

      padding-left: 5px;

      display: flex;

      align-items: center;

      img {

        width: 24px;

        height: 24px;

      }

      span {

        padding-left: 5px;

      }

    }

    .featureArea {

      flex-grow: 1;

      display: flex;

      justify-content: flex-end;

      div {

        width: 30px;

        height: 30px;

        line-height: 30px;

        text-align: center;

      }

      /* 最小化 最大化悬浮效果 */

      div:hover {

        background: #6fa8ff;

      }

      /* 关闭悬浮效果 */

      div:last-child:hover {

        background: red;

      }

    }

  }

  //   主体区域铺满剩余的整个宽、高度

  main {

    background: #e8eaed;

    width: 100%;

    height: calc(100vh - $titleHeight);

  }

}

</style>
点击查看代码
3.3、标题栏页面添加交互
从electron机制上来说,BrowserWindow是属于主进程模块,要想实现在页面中(渲染进程)调用主进程窗口的功能,这涉及到渲染进程与主进程的通信和安全性,在这通过预加载(preload.js)和 ipc 来实现该需求。
- src/main 目录下添加 preload.js 文件,具体内容如下所示:


import { contextBridge, ipcRenderer } from "electron";

//窗体操作api

contextBridge.exposeInMainWorld("windowApi", {

  //最小化

  minimize: () => {

    ipcRenderer.send("window-min");

  },

  //向下还原|最大化

  maximize: () => {

    ipcRenderer.send("window-max");

  },

  //关闭

  close: () => {

    ipcRenderer.send("window-close");

  },

  /**

   * 窗口重置大小

   * @param {重置大小后的回调函数} callback

   */

  resize: (callback) => {

    ipcRenderer.on("window-resize", callback);

  },

});
点击查看代码
- src/main/index.js 添加窗体最大化、最小化、关闭、重置大小监听、预先加载指定脚本等功能,具体内容如下所示:


"use strict";

import { app, protocol, BrowserWindow, ipcMain } from "electron";

import { createProtocol } from "vue-cli-plugin-electron-builder/lib";

import path from "path";

// 取消安装devtools后,则不需要用到此对象,可以注释掉

// import installExtension, { VUEJS_DEVTOOLS } from "electron-devtools-installer";

const isDevelopment = process.env.NODE_ENV !== "production";

// Scheme must be registered before the app is ready

protocol.registerSchemesAsPrivileged([

  { scheme: "app", privileges: { secure: true, standard: true } },

]);

//创建应用主窗口

const createWindow = async () => {

  const win = new BrowserWindow({

    //窗体宽度(像素),默认800像素

    width: 800,

    //窗体高度(像素),默认600像素

    height: 600,

    //窗口标题,如果在加载的 HTML 文件中定义了 HTML 标签 `<title>`,则该属性将被忽略。

    title: `${process.env.VUE_APP_NAME}(${process.env.VUE_APP_VERSION})`,

    //不显示窗体

    show: false,

    webPreferences: {

      // Use pluginOptions.nodeIntegration, leave this alone

      // See nklayman.github.io/vue-cli-plugin-electron-builder/guide/security.html#node-integration for more info

      // 是否开启node集成,默认false

      nodeIntegration: false,

      // 否在独立 JavaScript 环境中运行 Electron API和指定的preload 脚本. 默认为 true

      contextIsolation: true,

      //在页面运行其他脚本之前预先加载指定的脚本

      preload: path.join(__dirname, "preload.js"),

    },

    //fasle:无框窗体(没有标题栏、菜单栏)

    frame: false,

  });

  //窗体最大化

  win.maximize();

  //显示窗体

  win.show();

  if (process.env.WEBPACK_DEV_SERVER_URL) {

    // Load the url of the dev server if in development mode

    await win.loadURL(process.env.WEBPACK_DEV_SERVER_URL);

    if (!process.env.IS_TEST) win.webContents.openDevTools();

  } else {

    createProtocol("app");

    // Load the index.html when not in development

    await win.loadURL("app://./index.html");

  }

  //监听窗口重置大小后事件,若触发则给渲染进程发送消息

  win.on("resize", () => {

    win.webContents.send("window-resize", win.isMaximized());

  });

};

// Quit when all windows are closed.

app.on("window-all-closed", () => {

  // On macOS it is common for applications and their menu bar

  // to stay active until the user quits explicitly with Cmd + Q

  if (process.platform !== "darwin") {

    app.quit();

  }

});

app.on("activate", () => {

  // On macOS it's common to re-create a window in the app when the

  // dock icon is clicked and there are no other windows open.

  if (BrowserWindow.getAllWindows().length === 0) createWindow();

});

// 只有在 app 模组的 ready 事件能触发后才能创建 BrowserWindows 实例。 您可以借助 app.whenReady() API 来等待此事件

// 通常我们使用触发器的 .on 函数来监听 Node.js 事件。

// 但是 Electron 暴露了 app.whenReady() 方法,作为其 ready 事件的专用监听器,这样可以避免直接监听 .on 事件带来的一些问题。 参见 https://github.com/electron/electron/pull/21972。

app.whenReady().then(() => {

  createWindow();

  //窗口最小化

  ipcMain.on("window-min", function (event) {

    const win = BrowserWindow.fromId(event.sender.id);

    win.minimize();

  });

  //窗口向下还原|最大化

  ipcMain.on("window-max", function (event) {

    const win = BrowserWindow.fromId(event.sender.id);

    const isMaximized = win.isMaximized();

    if (isMaximized) {

      win.unmaximize();

    } else {

      win.maximize();

    }

  });

  //窗口关闭

  ipcMain.on("window-close", function (event) {

    const win = BrowserWindow.fromId(event.sender.id);

    win.destroy();

  });

});

// 注释了此种方式改用官方推荐的专用方法来实现事件的监听

// app.on("ready", async () => {

//   //启动慢的原因在此,注释掉它后能换来极致的快感

//   //   if (isDevelopment && !process.env.IS_TEST) {

//   //     // Install Vue Devtools

//   //     try {

//   //       await installExtension(VUEJS_DEVTOOLS);

//   //     } catch (e) {

//   //       console.error("Vue Devtools failed to install:", e.toString());

//   //     }

//   //   }

//   createWindow();

// });

// Exit cleanly on request from parent process in development mode.

if (isDevelopment) {

  if (process.platform === "win32") {

    process.on("message", (data) => {

      if (data === "graceful-exit") {

        app.quit();

      }

    });

  } else {

    process.on("SIGTERM", () => {

      app.quit();

    });

  }

}
点击查看代码
- 完成上述两个步骤后启用应用,控制面板中提示有错误消息,如下图所示:

解决办法:根目录下vue.config.js 文件 pluginOptions.electronBuilder 节点添加内容 preload: "src/main/preload.js",具体内容如下所示:


  pluginOptions: {

    electronBuilder: {

      mainProcessFile: "src/main/index.js", // 主进程入口文件

      mainProcessWatch: ["src/main"], // 检测主进程文件在更改时将重新编译主进程并重新启动

      preload: "src/main/preload.js", // 预加载js

    },

  },
点击查看代码
- src/renderer/App.vue 在功能区域为功能按钮绑定点击事件及处理,具体内容如下所示:


<template>

  <div id="app">

    <header>

      <div class="titleArea">

        <img :src="winIcon" />

        <span>{{ winTitle }}</span>

      </div>

      <div class="featureArea">

        <div title="扩展" @click="expand">

          <span class="iconfont icon-xiakuozhanjiantou"></span>

        </div>

        <div title="最小化" @click="minimize">

          <span class="iconfont icon-minimum"></span>

        </div>

        <div :title="maximizeTitle" @click="maximize">

          <span

            :class="{

              iconfont: true,

              'icon-zuidahua': isMaximized,

              'icon-window-max_line': !isMaximized,

            }"

          ></span>

        </div>

        <div title="关闭" @click="close">

          <span class="iconfont icon-guanbi"></span>

        </div>

      </div>

    </header>

    <main>我是主体</main>

  </div>

</template>

<script>

export default {

  data: () => ({

    winIcon: `${process.env.BASE_URL}favicon.ico`,

    winTitle: process.env.VUE_APP_NAME,

    isMaximized: true,

  }),

  mounted() {

    window.windowApi.resize(this.resize);

  },

  computed: {

    maximizeTitle() {

      return this.isMaximized ? "向下还原" : "最大化";

    },

  },

  methods: {

    //扩展

    expand() {

      this.$message({

        type: "success",

        message: "我点击了扩展",

      });

    },

    //最小化

    minimize() {

      window.windowApi.minimize();

    },

    //向下还原|最大化

    maximize() {

      window.windowApi.maximize();

    },

    // 窗口关闭

    close() {

      window.windowApi.close();

    },

    /**

     * 重置窗体大小后的回调函数

     * @param {事件源对象} event

     * @param {参数} args

     */

    resize(event, args) {

      this.isMaximized = args;

    },

  },

};

</script>

<style lang="scss">

$titleHeight: 40px;

$iconSize: 35px;

body {

  margin: 0px;

}

#app {

  font-family: "微软雅黑";

  color: #2c3e50;

  display: flex;

  flex-direction: column;

  header {

    background: #16407b;

    color: #8c8663;

    height: $titleHeight;

    width: 100%;

    display: flex;

    .titleArea {

      flex-grow: 10;

      padding-left: 5px;

      display: flex;

      align-items: center;

      img {

        width: 24px;

        height: 24px;

      }

      span {

        padding-left: 5px;

      }

    }

    .featureArea {

      flex-grow: 1;

      display: flex;

      justify-content: flex-end;

      color: white;

      div {

        width: $iconSize;

        height: $iconSize;

        line-height: $iconSize;

        text-align: center;

      }

      /* 最小化 最大化悬浮效果 */

      div:hover {

        background: #6fa8ff;

      }

      /* 关闭悬浮效果 */

      div:last-child:hover {

        background: red;

      }

    }

  }

  //   主体区域铺满剩余的整个宽、高度

  main {

    background: #e8eaed;

    width: 100%;

    height: calc(100vh - $titleHeight);

  }

}

</style>
点击查看代码
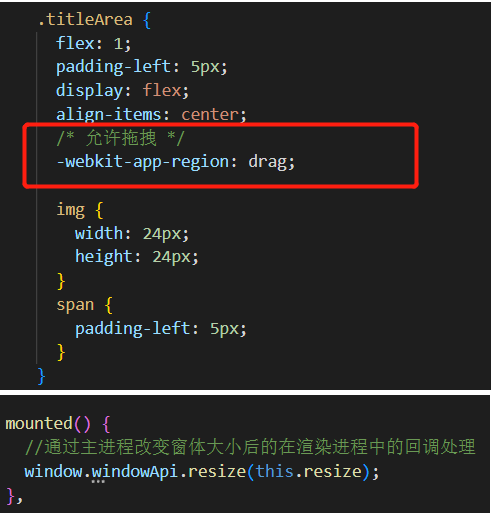
- 现在还差最后一步,在拖拽标题栏的时候,也需要能改变窗体位置和大小,具体内容如下所示:
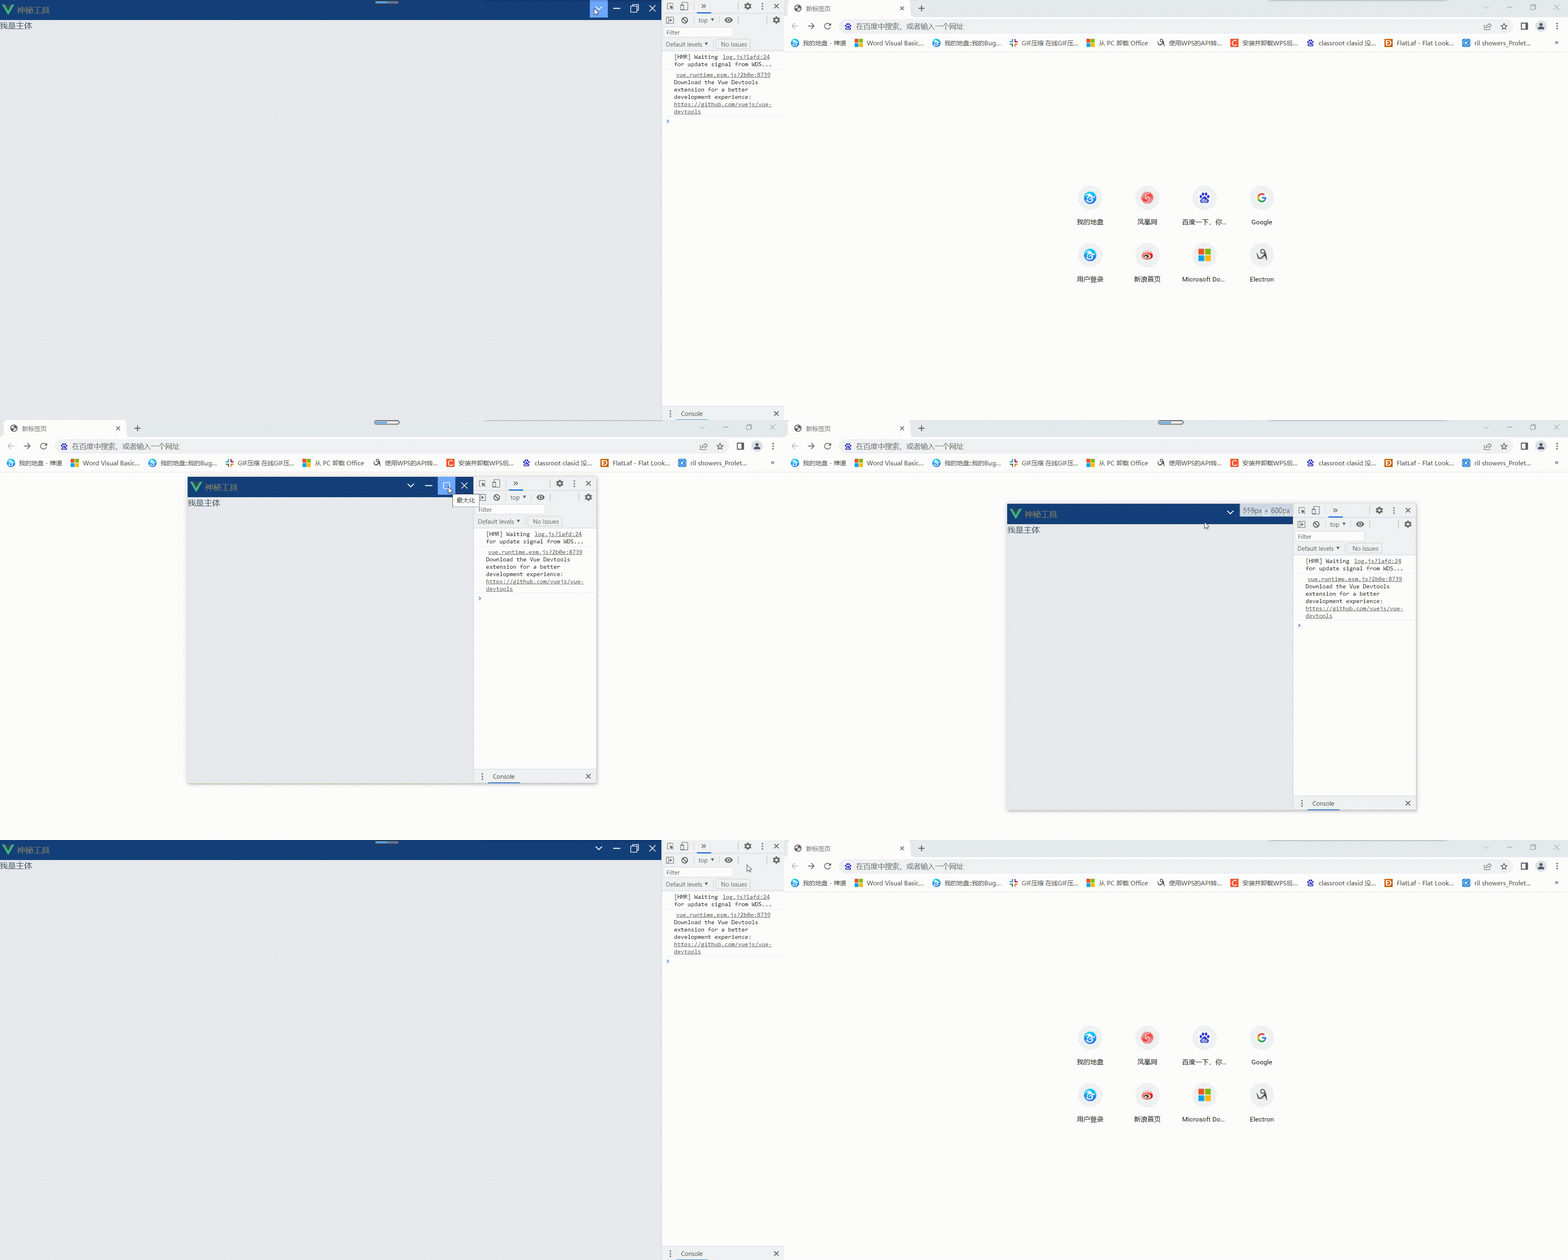
标题栏最终的交互效果,如下图所示:
4、自定义右键菜单项
当前在开发模式下启动应用后也会自启动调试工具(devtools)便于技术人员分析并定位问题,如果关闭调试工具后就没有渠道再次启用调试工具了。还有场景就是在非开发模式下默认是不启用调试工具的,应用出现问题后也需要启用调试工具来分析定位问题。这个时候呢,参考浏览器鼠标右键功能,给应用添加右键菜单项功能包含有:重新加载、调试工具等。右键菜单项在主进程中 src/main/index.js 管理,通过给 BrowserWindow 对象 webContents 属性绑定鼠标右键处理监听处理,具体内容如下所示:


"use strict";

import { app, protocol, BrowserWindow, ipcMain, Menu } from "electron";

import { createProtocol } from "vue-cli-plugin-electron-builder/lib";

import path from "path";

// 取消安装devtools后,则不需要用到此对象,可以注释掉

// import installExtension, { VUEJS_DEVTOOLS } from "electron-devtools-installer";

const isDevelopment = process.env.NODE_ENV !== "production";

// Scheme must be registered before the app is ready

protocol.registerSchemesAsPrivileged([

  { scheme: "app", privileges: { secure: true, standard: true } },

]);

//创建应用主窗口

const createWindow = async () => {

  const win = new BrowserWindow({

    //窗体宽度(像素),默认800像素

    width: 800,

    //窗体高度(像素),默认600像素

    height: 600,

    //窗口标题,如果在加载的 HTML 文件中定义了 HTML 标签 `<title>`,则该属性将被忽略。

    title: `${process.env.VUE_APP_NAME}(${process.env.VUE_APP_VERSION})`,

    //不显示窗体

    show: false,

    webPreferences: {

      // Use pluginOptions.nodeIntegration, leave this alone

      // See nklayman.github.io/vue-cli-plugin-electron-builder/guide/security.html#node-integration for more info

      // 是否开启node集成,默认false

      nodeIntegration: false,

      // 否在独立 JavaScript 环境中运行 Electron API和指定的preload 脚本. 默认为 true

      contextIsolation: true,

      //在页面运行其他脚本之前预先加载指定的脚本

      preload: path.join(__dirname, "preload.js"),

    },

    //fasle:无框窗体(没有标题栏、菜单栏)

    frame: false,

  });

  //窗体最大化

  win.maximize();

  //显示窗体

  win.show();

  if (process.env.WEBPACK_DEV_SERVER_URL) {

    // Load the url of the dev server if in development mode

    await win.loadURL(process.env.WEBPACK_DEV_SERVER_URL);

    if (!process.env.IS_TEST) win.webContents.openDevTools();

  } else {

    createProtocol("app");

    // Load the index.html when not in development

    await win.loadURL("app://./index.html");

  }

  //监听窗口重置大小后事件,若触发则给渲染进程发送消息

  win.on("resize", () => {

    win.webContents.send("window-resize", win.isMaximized());

  });

  //添加右键菜单项

  createContextMenu(win);

};

//给指定窗体创建右键菜单项

const createContextMenu = (win) => {

  //自定义右键菜单

  const template = [

    {

      label: "重新加载",

      accelerator: "ctrl+r", //快捷键

      click: function () {

        win.reload();

      },

    },

    {

      label: "调试工具",

      click: function () {

        const isDevToolsOpened = win.webContents.isDevToolsOpened();

        if (isDevToolsOpened) {

          win.webContents.closeDevTools();

        } else {

          win.webContents.openDevTools();

        }

      },

    },

  ];

  const contextMenu = Menu.buildFromTemplate(template);

  win.webContents.on("context-menu", () => {

    contextMenu.popup({ window: win });

  });

};

// Quit when all windows are closed.

app.on("window-all-closed", () => {

  // On macOS it is common for applications and their menu bar

  // to stay active until the user quits explicitly with Cmd + Q

  if (process.platform !== "darwin") {

    app.quit();

  }

});

app.on("activate", () => {

  // On macOS it's common to re-create a window in the app when the

  // dock icon is clicked and there are no other windows open.

  if (BrowserWindow.getAllWindows().length === 0) createWindow();

});

// 只有在 app 模组的 ready 事件能触发后才能创建 BrowserWindows 实例。 您可以借助 app.whenReady() API 来等待此事件

// 通常我们使用触发器的 .on 函数来监听 Node.js 事件。

// 但是 Electron 暴露了 app.whenReady() 方法,作为其 ready 事件的专用监听器,这样可以避免直接监听 .on 事件带来的一些问题。 参见 https://github.com/electron/electron/pull/21972。

app.whenReady().then(() => {

  createWindow();

  //窗口最小化

  ipcMain.on("window-min", function (event) {

    const win = BrowserWindow.fromId(event.sender.id);

    win.minimize();

  });

  //窗口向下还原|最大化

  ipcMain.on("window-max", function (event) {

    const win = BrowserWindow.fromId(event.sender.id);

    const isMaximized = win.isMaximized();

    if (isMaximized) {

      win.unmaximize();

    } else {

      win.maximize();

    }

  });

  //窗口关闭

  ipcMain.on("window-close", function (event) {

    const win = BrowserWindow.fromId(event.sender.id);

    win.destroy();

  });

});

// 注释了此种方式改用官方推荐的专用方法来实现事件的监听

// app.on("ready", async () => {

//   //启动慢的原因在此,注释掉它后能换来极致的快感

//   //   if (isDevelopment && !process.env.IS_TEST) {

//   //     // Install Vue Devtools

//   //     try {

//   //       await installExtension(VUEJS_DEVTOOLS);

//   //     } catch (e) {

//   //       console.error("Vue Devtools failed to install:", e.toString());

//   //     }

//   //   }

//   createWindow();

// });

// Exit cleanly on request from parent process in development mode.

if (isDevelopment) {

  if (process.platform === "win32") {

    process.on("message", (data) => {

      if (data === "graceful-exit") {

        app.quit();

      }

    });

  } else {

    process.on("SIGTERM", () => {

      app.quit();

    });

  }

}
点击查看代码
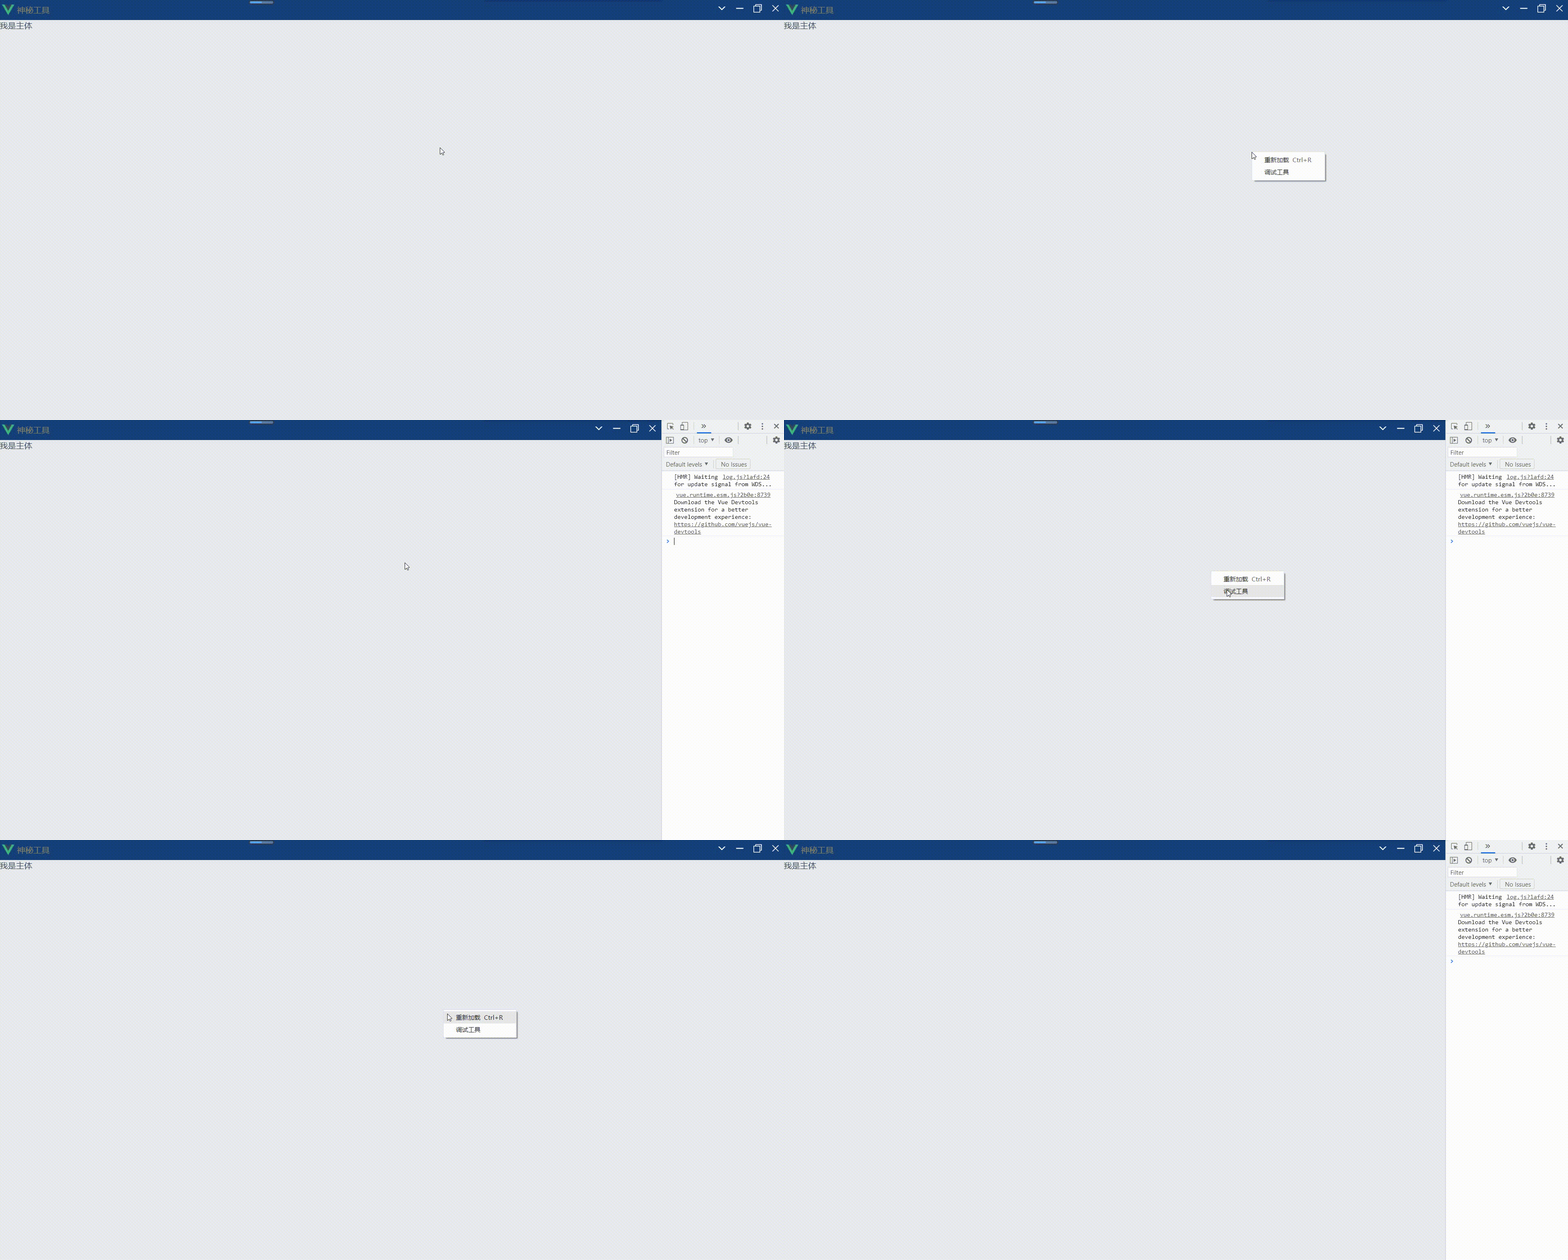
下一篇中将介绍项目打包等事宜
感谢您阅读本文,如果本文给了您帮助或者启发,还请三连支持一下,点赞、关注、收藏,作者会持续与大家分享更多干货~
源码地址:https://gitee.com/libaitianya/electron-vue-element-template
基于electron+vue+element构建项目模板之【自定义标题栏&右键菜单项篇】的更多相关文章
- 基于electron+vue+element构建项目模板之【创建项目篇】
1.概述 electron:使用javascript.css.html构建跨平台的桌面应用程序 vue:数据驱动视图中的一款渐进式的javascript框架 element:基于vue的桌面端UI组件 ...
- 基于electron+vue+element构建项目模板之【改造项目篇】
1.概述 开发平台OS:windows 开发平台IDE:vs code 上一篇中已完成了electron-vue项目的创建,本篇章中则介绍在此项目基础上进行取消devtools的安装.项目结构的改造. ...
- 基于electron+vue+element构建项目模板之【打包篇】
1.概述 开发平台OS:windows 开发平台IDE:vs code 本项目使用了一款Vue-CLI插件(vue-cli-plugin-electron-builder) 来构建 electron ...
- 在Vue&Element前端项目中,使用FastReport + pdf.js生成并展示自定义报表
在我的<FastReport报表随笔>介绍过各种FastReport的报表设计和使用,FastReport报表可以弹性的独立设计格式,并可以在Asp.net网站上.Winform端上使用, ...
- 在Vue&Element前端项目中,对于字典列表的显示处理
在很多项目开发中,我们为了使用方便,一般都会封装一些自定义组件来简化界面的显示处理,例如参照字典的下拉列表显示,是我们项目中经常用到的功能之一,本篇随笔介绍在Vue&Element前端项目中如 ...
- 用Vue-cli生成vue+webpack的项目模板怎么设置为vue1.0版本?
用Vue-cli生成vue+webpack的项目模板 $ npm install -g vue-cli $ vue init webpack my-project $ cd my-project $ ...
- AIR32F103(三) Linux环境基于标准外设库的项目模板
目录 AIR32F103(一) 合宙AIR32F103CBT6开发板上手报告 AIR32F103(二) Linux环境和LibOpenCM3项目模板 AIR32F103(三) Linux环境基于标准外 ...
- vue+element 构建的后台管理系统项目(1)新建项目
1.运行 vue init webpack demo 这里的demo是你项目的名字 2.npm run dev 查看项目启动效果 3.安装Element cd 项目 cmd 运行 npm i e ...
- 如何使用 vue-cli 3 的 preset 打造基于 git repo 的前端项目模板
vue-cli 之 Preset vue-cli 插件开发指南 TLDR 背景介绍 vue-cli 3 完全推翻了 vue-cli 2 的整体架构设计,所以当你需要给组里定制一份基于 vue-cli ...
随机推荐
- NC16618 [NOIP2008]排座椅
NC16618 [NOIP2008]排座椅 题目 题目描述 上课的时候总有一些同学和前后左右的人交头接耳,这是令小学班主任十分头疼的一件事情.不过,班主任小雪发现了一些有趣的现象,当同学们的座次确定下 ...
- Tapdata 实时数据融合平台解决方案(一):现代企业数据架构及痛点
作者介绍:TJ,唐建法,Tapdata 钛铂数据 CTO,MongoDB中文社区主席,原MongoDB大中华区首席架构师,极客时间MongoDB视频课程讲师. "怎样可以来搭建一个数据中台? ...
- 选择结构-单if语句和标准if else语句
判断语句1--if if语句第一种格式: if if(关系表达式){ 语句体; } 执行流程 首先判断关系表达式看其结果是true还是false 如果是true就执行语句体 如果是false就不执行语 ...
- 【docker专栏6】详解docker容器状态转换管理命令
docker容器有三种状态运行.停止.暂停,镜像可以创建.运行容器,镜像和容器也可以转换成tar压缩包进行存储.本文为大家介绍容器的状态转换命令及镜像创建运行容器.tar包导入导出相关的命令及使用场景 ...
- VMware 无法为处于开启或挂起状态的去你及或快照创建克隆
VMware 要克隆的时候出现 无法为处于开启或挂起状态的去你及或快照创建克隆 因为属于挂起或者运行中的不能克隆,因为会发生数据的变化
- grafana监控配置
一.配置开启smtp服务 1.编辑grafana配置文件grafana.ini [smtp] enabled = true host = smtp.163.com:25 user = 157xxxx3 ...
- 技术分享 | 为什么MGR一致性模式不推荐AFTER
GreatSQL社区原创内容未经授权不得随意使用,转载请联系小编并注明来源. 1.引子 2.AFTER 的写一致性 3.AFTER 的读一致性 4.AFTER 执行流程 5.BEFORE 执行流程 6 ...
- 分享俩个js数组比较少用的方法join与from
1:array.join 用于将数组中的所有元素转化为字符串 例: var arr = ["one", "two", "four"]; va ...
- HDU3085 Nightmare Ⅱ (双向BFS)
联赛前该练什么?DP,树型,状压当然是爆搜啦 双向BFS就是两个普通BFS通过一拼接函数联系,多多判断啦 #include <iostream> #include <cstdio&g ...
- Luogu3090 [USACO13NOV]空荡荡的摊位Empty Stalls (动态规划)
#include <iostream> #include <cstdio> #include <cstring> #include <algorithm> ...
