高清地图转换(xord转apollo的bin文件)
目标
将carla中的OpenDrive地图(carla\Unreal\CarlaUE4\Content\Carla\Maps\OpenDrive)转换为Apollo中可识别的地图格式(bin与txt文件)
用到的软件
python的imap_box包、apollov5、unity、 SVL SIMULATOR
安装
Unity
- Download and Install Unity Hub(需要代理)
- Ubuntu: You may need to allow the downloaded AppImage to be run as an executable
- Right-click the AppImage
- Select Properties
- Go to the Permissions tab
- Check Allow executing file as program
- Alternatively, in the terminal run sudo chmod +x UnityHub.AppImage
- Ubuntu: You may need to allow the downloaded AppImage to be run as an executable
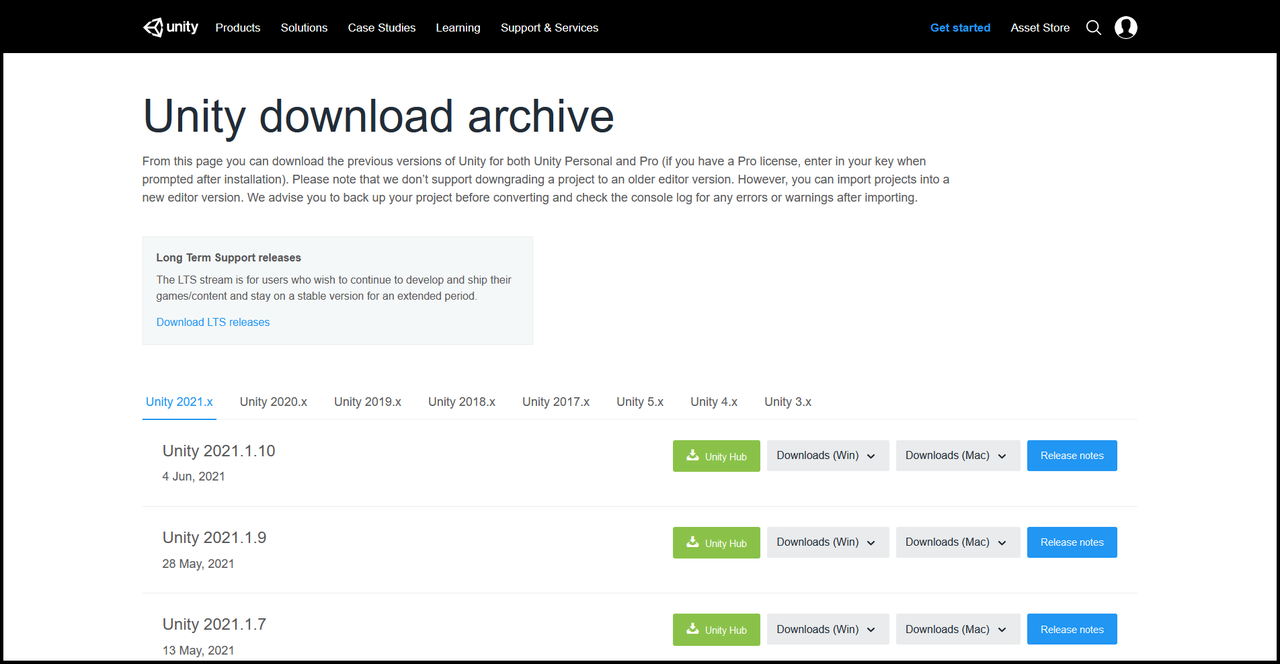
- Download and Install Unity 2020.3.3f1 from the Unity Download Archive: (需要代理)
SVL SIMULATOR
安装文档地址:https://www.svlsimulator.com/docs/installation-guide/build-instructions/
- Installing Git LFS top
Make sure you have git-lfs installed before cloning the Simulator repository.- Instructions for installation are here
- Verify installation
- In a terminal enter git lfs install
- Git LFS initialized. should print out
- Building a standalone executable
Clone simulator project from GitHub (open-source) release branch.
- Open a terminal and navigate to where you want the Simulator to be downloaded to
- If you want the Simulator in your Documents folder, use cd in the terminal so that the input for the terminal is similar to /Documents$
- Open-source user: git clone https://github.com/lgsvl/simulator.git
- Verify download
- Above clone will create a Simulator folder
- Open a File Explorer and navigate to where the Simulator folder is
- Navigate to Simulator/Assets/Materials/EnvironmentMaterials/
- There should be a EnvironmentDamageAlbedo.png in this folder
- Open the image, it should look like the image below
- If the image cannot be opened, Git LFS was not installed before cloning the repository
- Install Git LFS following step 4
- In a terminal, navigate to the Simulator folder so that the terminal is similar to /Simulator$
- git lfs pull
- Check the image again
- Open a terminal and navigate to where you want the Simulator to be downloaded to
Note: Please checkout the "release-*" branches or release tags for stable (ready features) and "master" branch for unstable (preview of work in progress).
Run Unity Hub
In the Projects tab, click Add and select the Simulator folder that was created by git clone in Step 5
In the Projects tab, verify that the Simulator is using Unity Version 2020.3.3f1 from the dropdown
Double-click the name of the project to launch Unity Editor
Note: On Ubuntu 18.04, create an empty sample project before adding an existing project as mentioned in step 1.
Open the Simulator menu from the top toolbar and select Build... to open the build window (shown below with a red outline)
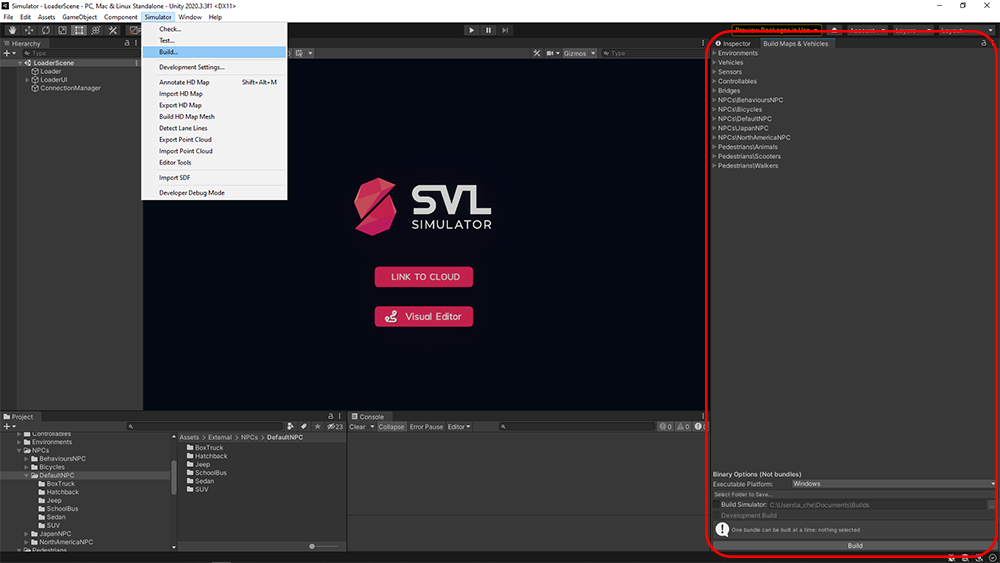
Select the target OS for the build using the Executable Platform dropdown menu
Verify Build Simulator is checked for the Simulator to be built
Select a folder that the simulator will be built in
(Optional) Check Development Build to create a Development Build that includes debug symbols and enables the Profiler
Click Build
Once the build process is complete a simulator executable will be available at the specified location.
imap_box
imap_box包用于读取转换出来的bin文件,导出txt文件,git地址:https://github.com/daohu527/imap
pip install -i https://pypi.tuna.tsinghua.edu.cn/simple imap_box
在windows中安装时要使用powershell命令行安装,否则会报错
使用
将carla地图导出apollo的bin文件
- 点击上方simulator-> Import HD Map,在弹出的HD Map Import中Import 选择carla地图路径,导入地图(这里以carla\Unreal\CarlaUE4\Content\Carla\Maps\OpenDrive\Town01.xodr为例)
[图片]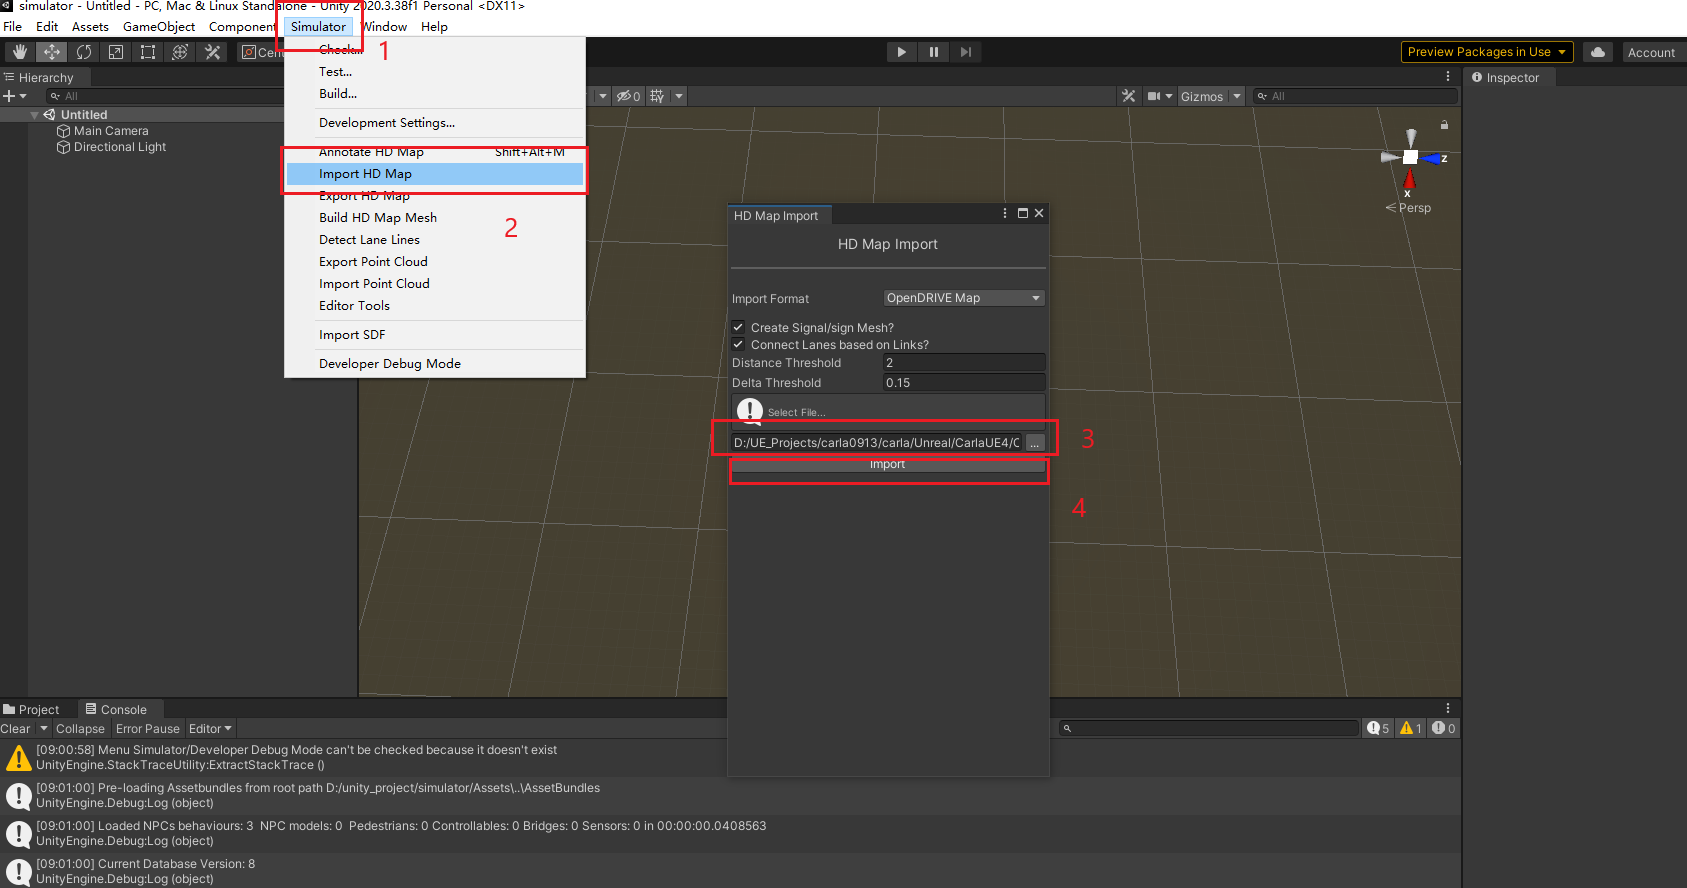
- 单击左边界面中新出现的MapOrigin,在右边出现的设置中,将Origin Easting设置为0,Origin Northing设置为0
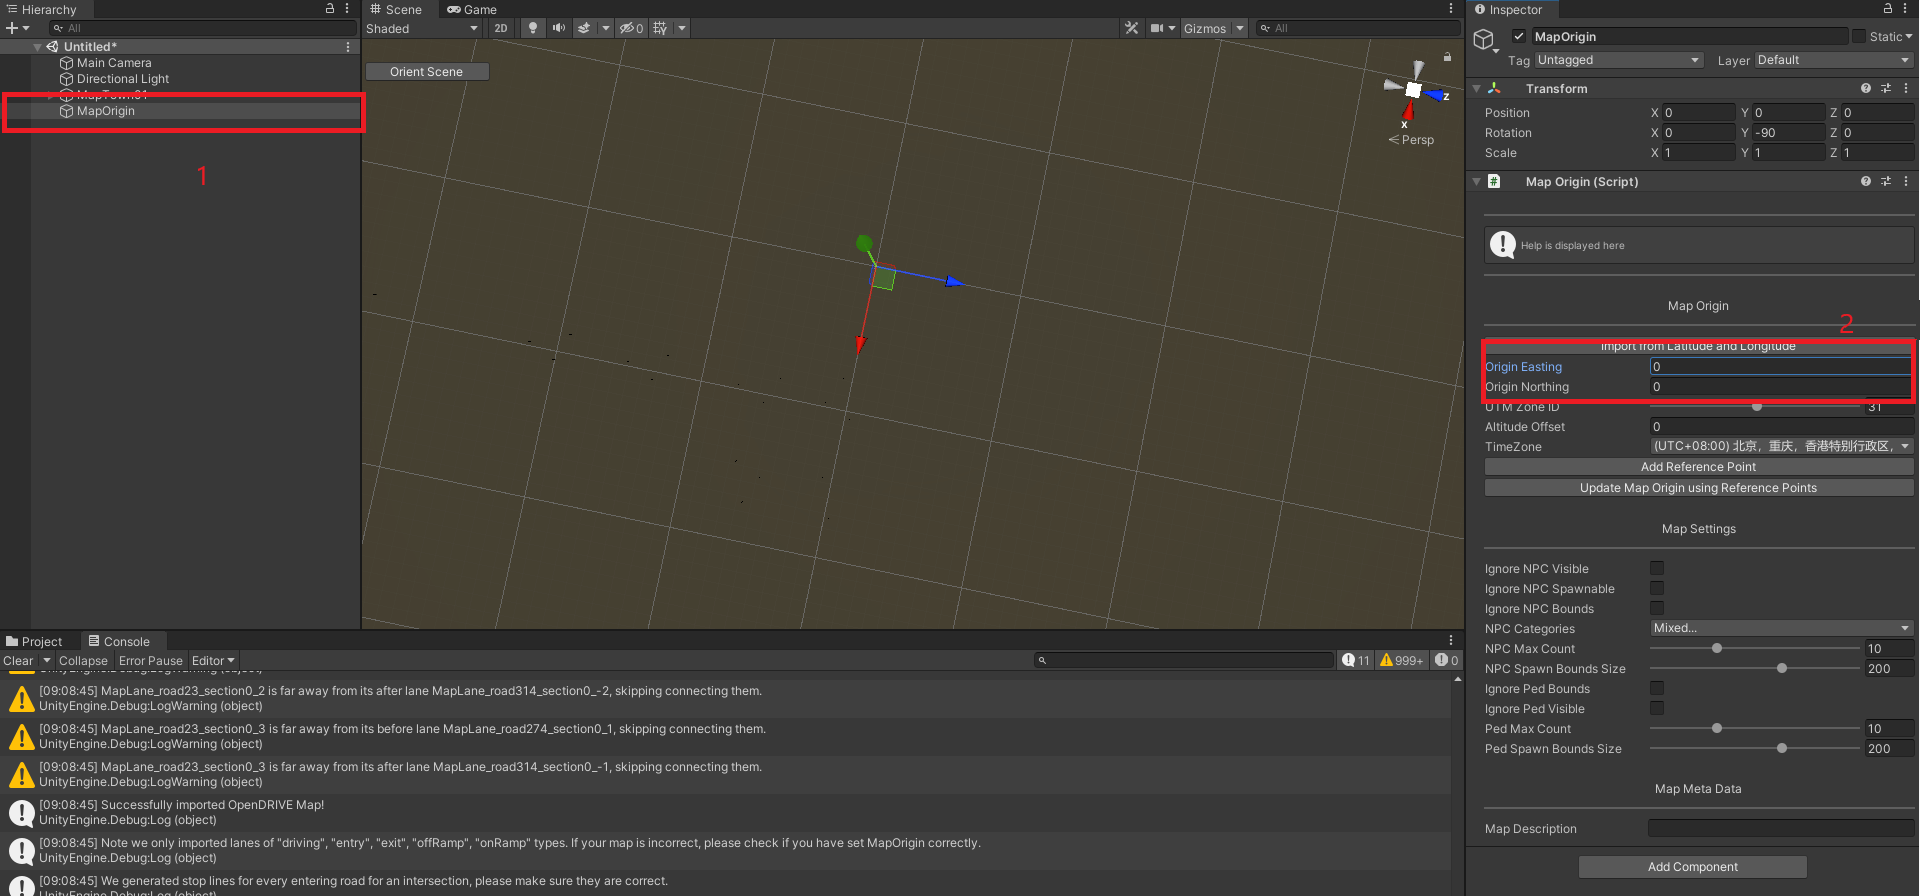
- 鼠标左键按住MapTown01,将其拖拽到MapOrigin上,成为其子节点。拖拽后点击MapTown01,将右边属性中的Rotation->Y设置为0
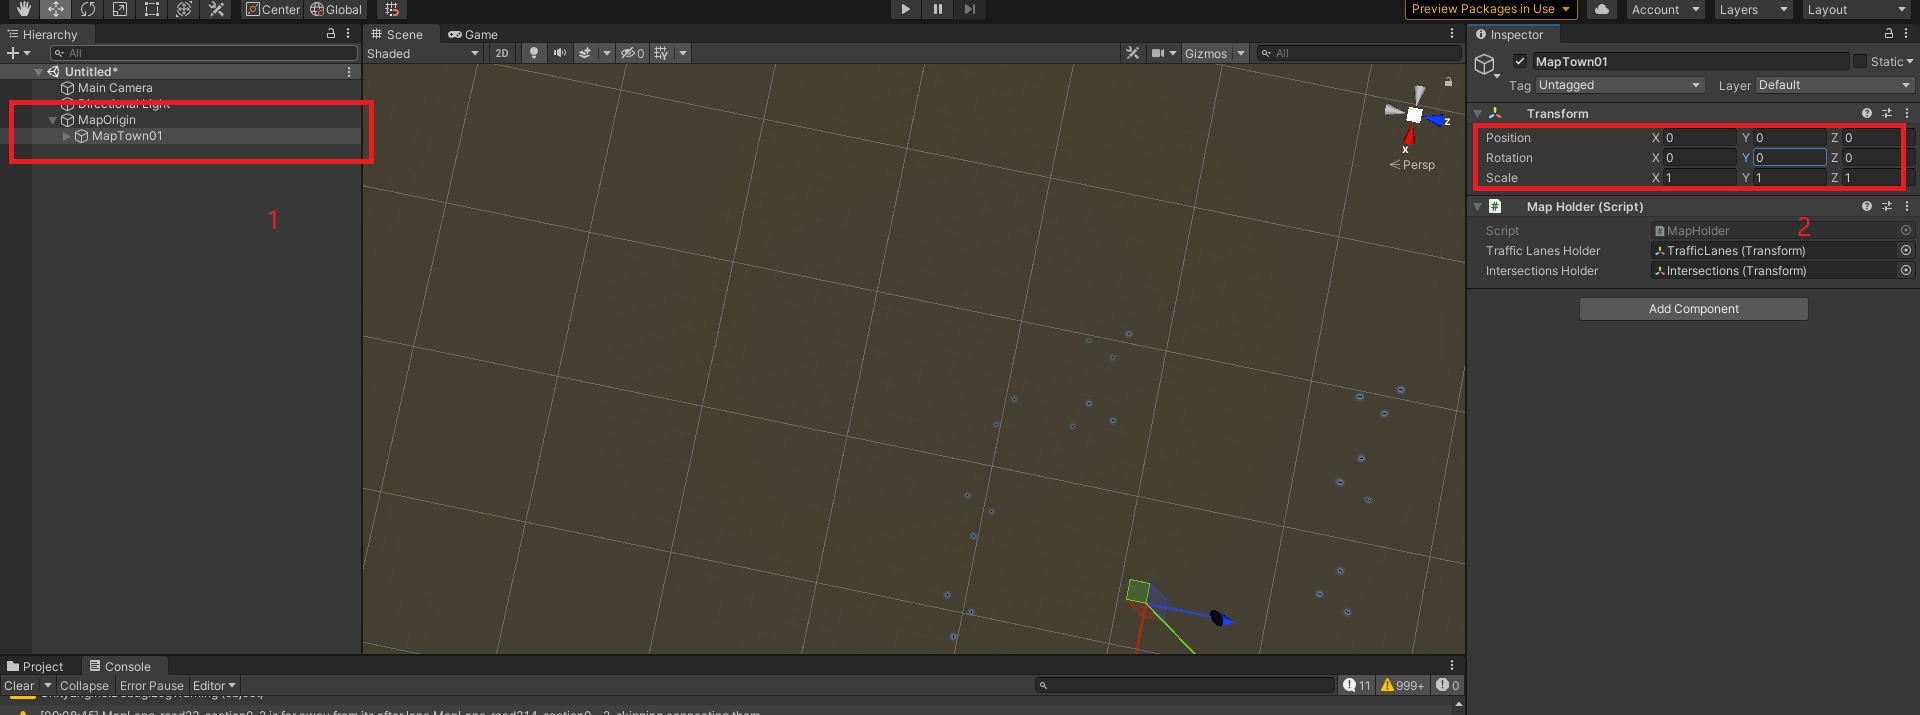
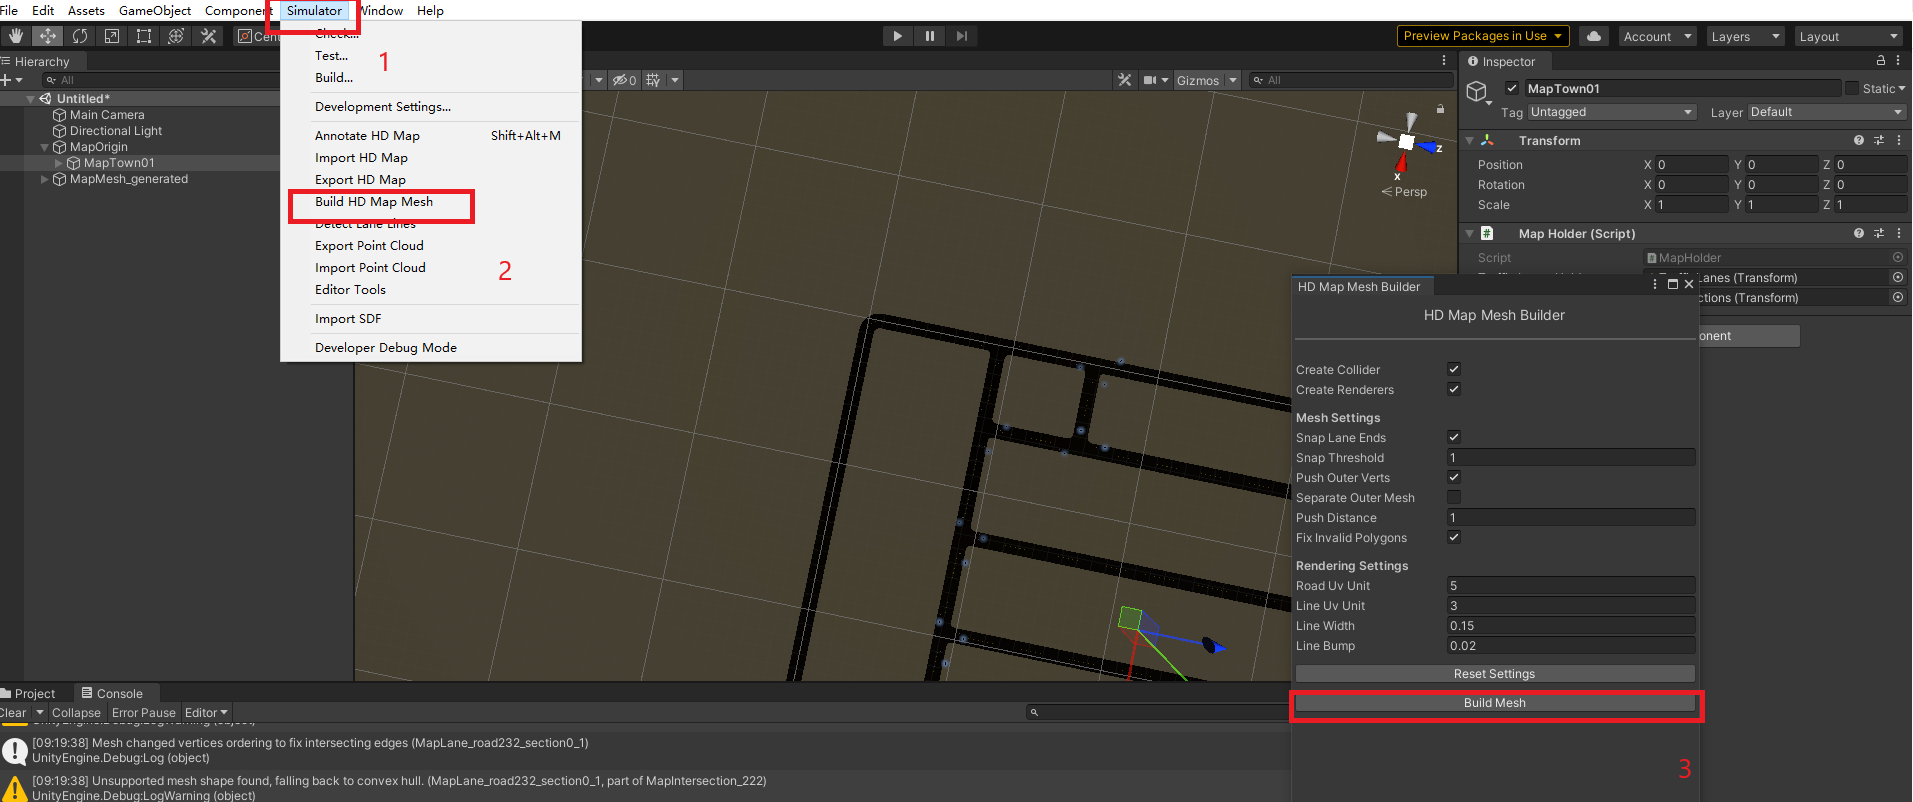
- 选择simulator->Build HD Map Mesh, 在弹出的HD Map Mesh Builder中点击Build Mesh
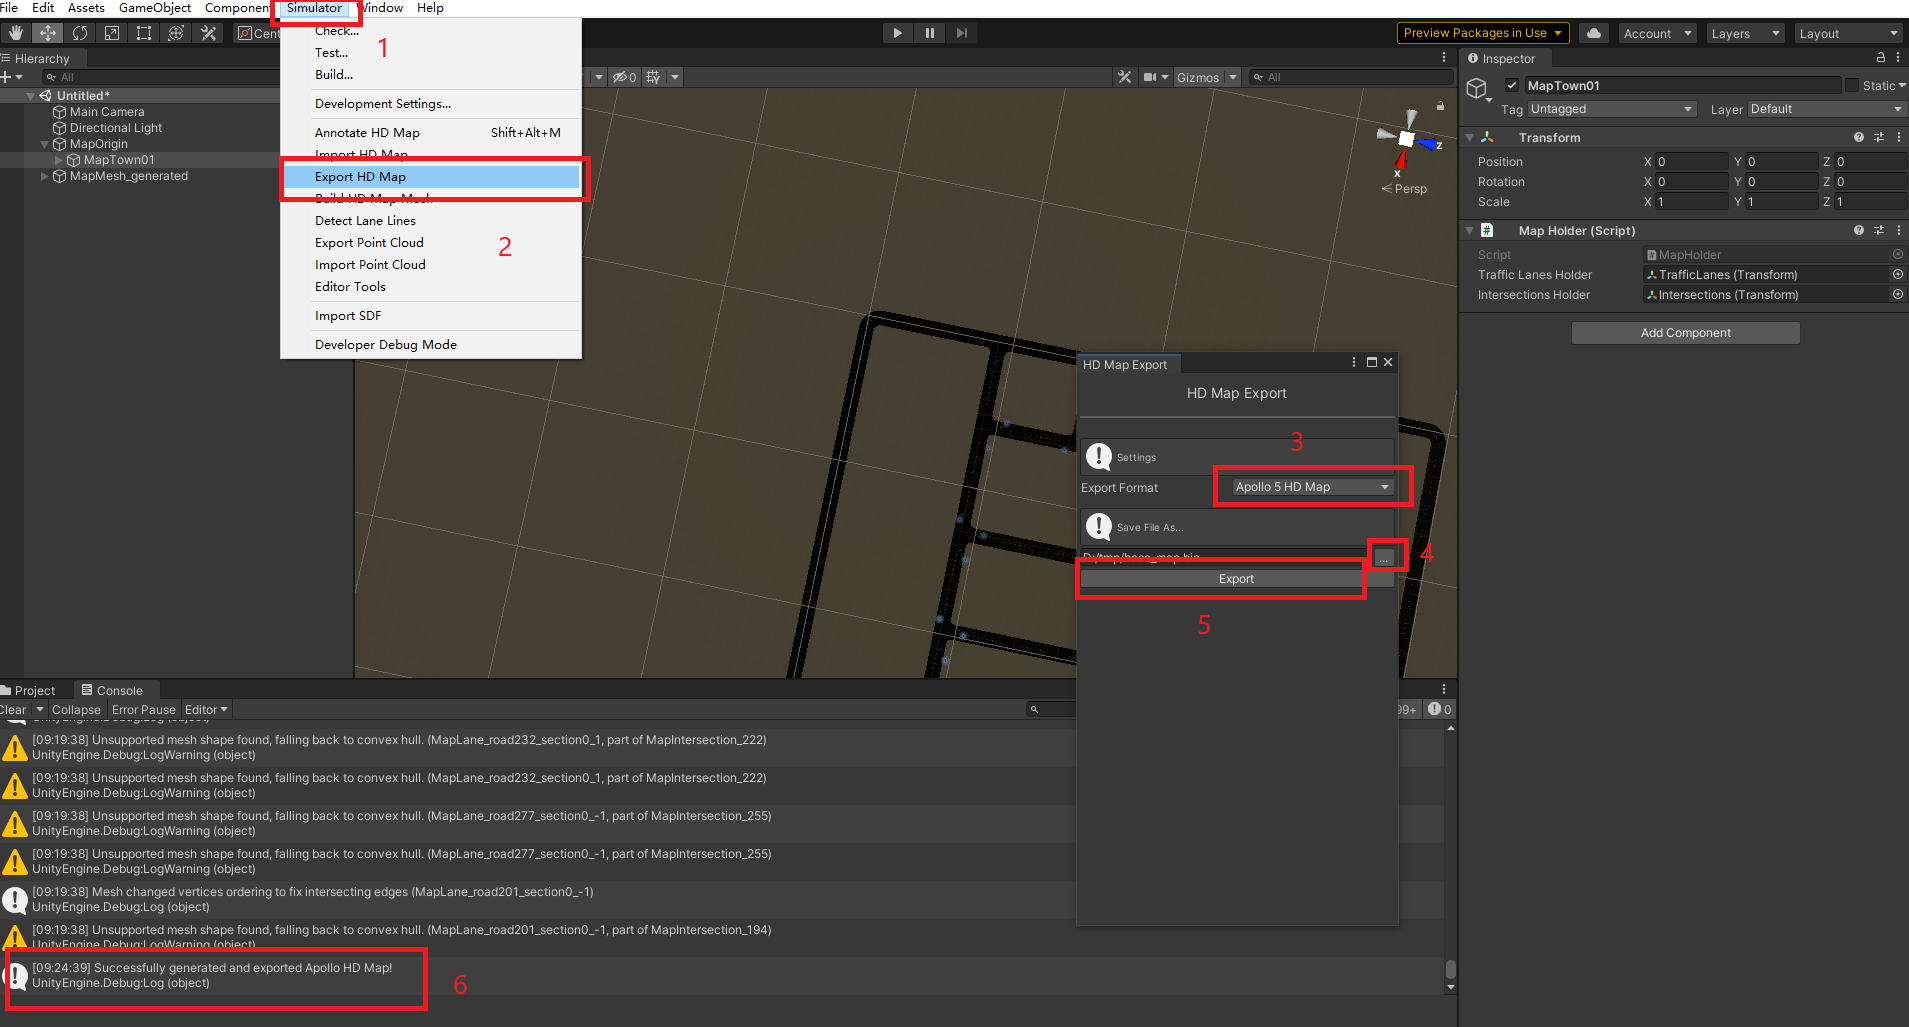
- 选择simulator->Export HD Map, 在弹出的HD Map Export中选择Apollo 5 HD Map格式,选择路径后点击Export,成功时可以看到左下界面提示(Carla地图1-10中,只有Town03没有导出成功)
使用imap_box包从bin文件导出txt文件
- 创建新的工程,python环境选择的是python3.9.12(理论上3.6以上都可以).
- 创建文件convert_bin_to_txt.py文件,内容为
from modules.map.proto import map_pb2

from imap.lib.proto_utils import get_pb_from_bin_file

from imap.lib.proto_utils import write_pb_to_text_file

def convert_bin_to_txt(input_file: str):

    map = map_pb2.Map()

    pb = get_pb_from_bin_file(filename=input_file, pb_value=map)

    write_pb_to_text_file(pb, input_file.split('.')[0])

if __name__ == '__main__':

    convert_bin_to_txt(r"D:\tmp\base_map.bin")
- 执行convert_bin_to_txt.py, 查看到D:\tmp下会出现base_map.txt。里面有可读的地图信息
生成sim_map与routing_map
将base_map.bin拷贝到安装了apollov5的容器内,在 /apollo/modules/map/data内创建新的文件夹,并将base_map.bin移动到新创建的文件夹中;然后运行脚本生成文件
# 将文件拷贝到docker容器的/apollo目录下

docker cp base_map.bin apollo_dev_ubuntu:/apollo

# 进入docker容器

/apollo/docker/scripts/dev_into.sh

# 创建文件夹

mkdir /apollo/modules/map/data/town01_example

# 移动文件

mv /apollo/base_map.bin /apollo/modules/map/data/town01_example/

# 执行脚本生成文件

/apollo/scripts/generate_maps.sh /apollo/modules/map/data/town01_example/
最后一步时执行会有两处报错,那是通过xml生成bin和txt的脚本命令,不影响直接用bin生成sim_map与routing_map
ubuntu@in_dev_docker:/apollo$ /apollo/scripts/generate_maps.sh /apollo/modules/map/data/town01_example/

I0906 10:10:26.932503 2935423 topo_creator.cc:32] [routing] Conf file: /apollo/modules/routing/conf/routing_config.pb.txt is loaded.

I0906 10:10:26.941069 2935423 graph_creator.cc:78] [routing] Number of lanes: 124

I0906 10:10:26.942127 2935423 graph_creator.cc:111] [routing] Current lane id: lane_0

.....

.....

I0906 10:10:26.983175 2935423 graph_creator.cc:158] [routing] Txt file is dumped successfully. Path: /apollo/modules/map/data/town01_example//routing_map.txt

I0906 10:10:26.984313 2935423 graph_creator.cc:163] [routing] Bin file is dumped successfully. Path: /apollo/modules/map/data/town01_example//routing_map.bin

I0906 10:10:26.984656 2935423 topo_creator.cc:40] [routing] Create routing topo successfully from /apollo/modules/map/data/town01_example//base_map.bin to /apollo/modules/map/data/town01_example//routing_map.bin

I0906 10:10:27.100512 2935439 sim_map_generator.cc:86] [] Downsampling lane lane_0

I0906 10:10:27.100884 2935439 sim_map_generator.cc:74] [] Lane curve downsampled from 8 points to 2 points

I0906 10:10:27.100904 2935439 sim_map_generator.cc:74] [] Lane curve downsampled from 8 points to 2 points

I0906 10:10:27.100915 2935439 sim_map_generator.cc:74] [] Lane curve downsampled from 8 points to 2 points

.....

.....

I0906 10:10:27.112815 2935439 sim_map_generator.cc:74] [] Lane curve downsampled from 5 points to 2 points.

I0906 10:10:27.164212 2935439 sim_map_generator.cc:122] [] sim_map generated at:/apollo/modules/map/data/town01_example/

# 下面的报错并不影响

E0906 10:10:27.247184 2935455 opendrive_adapter.cc:33] [] fail to load file /apollo/modules/map/data/town01_example//base_map.xml

F0906 10:10:27.247690 2935455 proto_map_generator.cc:39] Check failed: apollo::hdmap::adapter::OpendriveAdapter::LoadData(map_filename, &pb_map) fail to load data from : /apollo/modules/map/data/town01_example//base_map.xml

*** Check failure stack trace: ***

    @     0x7fb3a918aec0  google::LogMessage::Fail()

    @     0x7fb3a918ae07  google::LogMessage::SendToLog()

    @     0x7fb3a918a7de  google::LogMessage::Flush()

    @     0x7fb3a918d83b  google::LogMessageFatal::~LogMessageFatal()

    @           0x45d1a9  main

    @     0x7fb3a6b09f45  __libc_start_main

    @           0x45cf89  (unknown)

/apollo/scripts/generate_maps.sh: line 8: 2935455 Aborted                 (core dumped) bazel-bin/modules/map/tools/proto_map_generator --map_dir=$1 --output_dir=$1

E0906 10:10:28.046296 2935471 file.cc:73] [] Failed to open file /apollo/modules/map/data/town01_example//base_map.txt in text mode.

E0906 10:10:28.051890 2935471 file.cc:99] [] Failed to open file /apollo/modules/map/data/town01_example//base_map.txt in binary mode.

F0906 10:10:28.051970 2935471 bin_map_generator.cc:38] Check failed: apollo::cyber::common::GetProtoFromFile(map_filename, &pb_map) fail to load data from : /apollo/modules/map/data/town01_example//base_map.txt

*** Check failure stack trace: ***

    @     0x7f1fed03fec0  google::LogMessage::Fail()

    @     0x7f1fed03fe07  google::LogMessage::SendToLog()

    @     0x7f1fed03f7de  google::LogMessage::Flush()

    @     0x7f1fed04283b  google::LogMessageFatal::~LogMessageFatal()

    @           0x45bd29  main

    @     0x7f1fea9bef45  __libc_start_main

    @           0x45bb09  (unknown)

/apollo/scripts/generate_maps.sh: line 9: 2935471 Aborted                 (core dumped) bazel-bin/modules/map/tools/bin_map_generator --map_dir=$1 --output_dir=$1
查看生成的文件
ubuntu@in_dev_docker:/apollo$ ls /apollo/modules/map/data/town01_example/

base_map.bin  routing_map.bin  routing_map.txt  sim_map.bin  sim_map.txt
其他
使用SVL SIMULATOR而放弃RoadRunner的原因
在使用SVL SIMULATOR前首先调研的是使用RoadRunner导出地图。使用过程中遇到的主要问题有:
- 地图中心点的设置问题
在设置SVL SIMULATOR与RoadRunner中都有MapOrigin设置的能力,但是RoadRunner中将MapOrigin设置为0后,导出的文件坐标依然不是以地图中心为原点的坐标系,这样就需要将MapOrigin中的参数设置为负数来抵消坐标系带来的影响,这需要反复试验 - 红绿灯和停止线的问题
在生成的场景中,能够看到场景中的红绿灯高度不足,停止线缺失的现象,需要手动进行调整 - 红绿灯id不对应问题
生成的txt文件中可以看出,生成的信号灯的id并不能与carla中的灯的id对应上,这样就无法用carla进行模拟
结论:
RoadRunner可以在自定义场景时使用,如果想将已经完成的地图转换成apollo地图,考虑SVL SIMULATOR更合适一些
高清地图转换(xord转apollo的bin文件)的更多相关文章
- python爬虫王者荣耀高清皮肤大图背景故事通用爬虫
wzry-spider python通用爬虫-通用爬虫爬取静态网页,面向小白 基本上纯python语法切片索引,少用到第三方爬虫网络库 这是一只小巧方便,强大的爬虫,由python编写 主要实现了: ...
- Cocos2D瓦块地图高清屏(retina)显示比例问题的解决
大熊猫猪·侯佩原创或翻译作品.欢迎转载,转载请注明出处. 如果觉得写的不好请多提意见,如果觉得不错请多多支持点赞.谢谢! hopy ;) 在Cocos2D的游戏编程里,常用到瓦块地图.而cocos2D ...
- 广州高清卫星地图 用百度卫星地图server下载 含标签、道路数据叠加 可商用
广州高清卫星地图的地图展示图片各自是15级别.17级别.19级别的地图.一般来说17级别的地图图片就行用于商用.地图包包括一整张高级别的图片,如要全图浏览请用专业图片处理软件PS等打开. 一般来说互联 ...
- java 库 pdfbox 将 pdf 文件转换成高清图片方法
近期需要将 pdf 文件转成高清图片,使用库是 pdfbox.fontbox.可以使用 renderImageWithDPI 方法指定转换的清晰度,当然清晰度越高,转换需要的时间越长,转换出来的图片越 ...
- 【Apollo自动驾驶源码解读】车道线的感知和高精地图融合
模式选择 在modules/map/relative_map/conf/relative_map_config.pb.txt文件中对模式进行修改: lane_source: OFFLINE_GENER ...
- 移动端H5页面高清多屏适配方案
背景 开发移动端H5页面 面对不同分辨率的手机 面对不同屏幕尺寸的手机 视觉稿 在前端开发之前,视觉MM会给我们一个psd文件,称之为视觉稿. 对于移动端开发而言,为了做到页面高清的效果,视觉稿的规范 ...
- Hawk: 无编程抓取淘女郎的所有高清照片
1.这是什么鬼? 哦?美女? 最近看了这一篇文章:http://cuiqingcai.com/1001.html 大概说的是用Python和Pyspider(这货好像是我的一位师兄写的,吓尿),抓取淘 ...
- Android 高清加载巨图方案 拒绝压缩图片
Android 高清加载巨图方案 拒绝压缩图片 转载请标明出处: http://blog.csdn.net/lmj623565791/article/details/49300989: 本文出自:[张 ...
- webapp:移动端高清、多屏适配方案(zz)
来源: http://sentsin.com/web/1212.html 移动端高清.多屏适配方案 背景 开发移动端H5页面 面对不同分辨率的手机 面对不同屏幕尺寸的手机 视觉稿 在前端开发之前,视觉 ...
随机推荐
- SAP Web Dynpro-使用服务调用
创建服务调用后,功能模块可用于组件. 现在可以选择一个视图,以便在浏览器中显示数据库表的元素. 如果全局控制器不是组件控制器,则必须为所选视图的控制器输入全局控制器的使用页面. 之后,应该有该节点的映 ...
- Java Web servlet 详解
执行原理 当服务器接收到客户端浏览器的访问时,会解析请求的URL路径,获取访问的Servlet的资源路径 查找web.xml文件,看是否有对应的<url-pattern>标签体内容 如果有 ...
- ansible-playbook批量修改密码
1. 将服务器ip写到ansible hosts文件中 2. 实现免密登录服务器 将ansible服务器公钥拷贝到目标服务器用户目录下的.ssh/authorized_keys 手动连接一次或者自己写 ...
- Bitbucket 使用 SSH 拉取仓库失败的问题
问题 在 Bitbucket 使用 Linux 机器上 ssh-keygen 工具生成的公钥作为 API KEY,然后在 Jenkins 里面存储对应的 SSH 私钥,最后执行 Job 的时候,Win ...
- 配置Apollo阿波罗.net core 3.1 c#
直接上代码: public static IHostBuilder CreateHostBuilder(string[] args) => Host.CreateDefaultBuilder(a ...
- 没有Kubernetes怎么玩Dapr?
Dapr 被设计成一个面向开发者的企业级微服务编程平台,它独立于具体的技术平台,可以运行在"任何地方".Dapr本身并不提供"基础设施(infrastructure)&q ...
- 使用 NSProxy 实现消息转发
一.简介 在 iOS 应用开发中,自定义一个类一般需要继承自 NSObject 类或者 NSObject 子类,但是,NSProxy 类不是继承自 NSObject 类或者 NSObject 子类 ...
- Django【查询】 基础回顾与深入应用
官方Django3.2 文档:https://docs.djangoproject.com/en/3.2/topics/db/queries/ 本文大部分内容参考官方3.2版本文档撰写,仅供学习使用 ...
- 自定义nginx的日志格式存储到Filebeat和Logstash
vim /etc/nginx/nginx.conf log_format main '$remote_addr - $remote_user [$time_local] ' '"$reque ...
- postgresql自增id
drop index Ix_product_define_id; drop index Ix_user_umid; drop table invims_product_attention; /*=== ...
