Spring Cloud 核心组件之Spring Cloud Hystrix:服务容错保护
Spring Cloud Hystrix:服务容错保护
- SpringCloud学习教程
- SpringCloud
Spring Cloud Hystrix 是Spring Cloud Netflix 子项目的核心组件之一,具有服务容错及线程隔离等一系列服务保护功能,本文将对其用法进行详细介绍。
#Hystrix 简介
在微服务架构中,服务与服务之间通过远程调用的方式进行通信,一旦某个被调用的服务发生了故障,其依赖服务也会发生故障,此时就会发生故障的蔓延,最终导致系统瘫痪。Hystrix实现了断路器模式,当某个服务发生故障时,通过断路器的监控,给调用方返回一个错误响应,而不是长时间的等待,这样就不会使得调用方由于长时间得不到响应而占用线程,从而防止故障的蔓延。Hystrix具备服务降级、服务熔断、线程隔离、请求缓存、请求合并及服务监控等强大功能。
#创建一个hystrix-service模块
这里我们创建一个hystrix-service模块来演示hystrix的常用功能。
#在pom.xml中添加相关依赖
<dependency>

    <groupId>org.springframework.cloud</groupId>

    <artifactId>spring-cloud-starter-netflix-eureka-client</artifactId>

</dependency>

<dependency>

    <groupId>org.springframework.cloud</groupId>

    <artifactId>spring-cloud-starter-netflix-hystrix</artifactId>

</dependency>

<dependency>

    <groupId>org.springframework.boot</groupId>

    <artifactId>spring-boot-starter-web</artifactId>

</dependency>
#在application.yml进行配置
主要是配置了端口、注册中心地址及user-service的调用路径。
server:

  port: 8401

spring:

  application:

    name: hystrix-service

eureka:

  client:

    register-with-eureka: true

    fetch-registry: true

    service-url:

      defaultZone: http://localhost:8001/eureka/

service-url:

  user-service: http://user-service
#在启动类上添加@EnableCircuitBreaker来开启Hystrix的断路器功能
@EnableCircuitBreaker

@EnableDiscoveryClient

@SpringBootApplication

public class HystrixServiceApplication {

    public static void main(String[] args) {

        SpringApplication.run(HystrixServiceApplication.class, args);

    }
#创建UserHystrixController接口用于调用user-service服务
#服务降级演示
- 在UserHystrixController中添加用于测试服务降级的接口:
@GetMapping("/testFallback/{id}")

public CommonResult testFallback(@PathVariable Long id) {

    return userService.getUser(id);

}
- 在UserService中添加调用方法与服务降级方法,方法上需要添加@HystrixCommand注解:
@HystrixCommand(fallbackMethod = "getDefaultUser")

public CommonResult getUser(Long id) {

    return restTemplate.getForObject(userServiceUrl + "/user/{1}", CommonResult.class, id);

}

public CommonResult getDefaultUser(@PathVariable Long id) {

    User defaultUser = new User(-1L, "defaultUser", "123456");

    return new CommonResult<>(defaultUser);

}
- 启动eureka-server、user-service、hystrix-service服务;


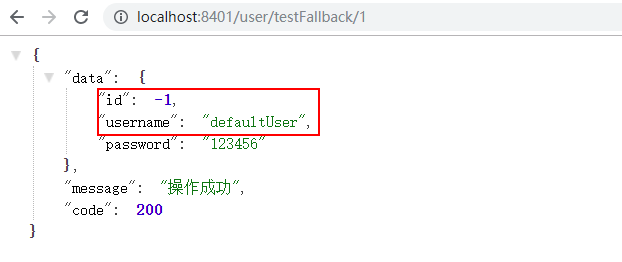
- 关闭user-service服务重新测试该接口,发现已经发生了服务降级:
#@HystrixCommand详解
#@HystrixCommand中的常用参数
- fallbackMethod:指定服务降级处理方法;
- ignoreExceptions:忽略某些异常,不发生服务降级;
- commandKey:命令名称,用于区分不同的命令;
- groupKey:分组名称,Hystrix会根据不同的分组来统计命令的告警及仪表盘信息;
- threadPoolKey:线程池名称,用于划分线程池。
#设置命令、分组及线程池名称
- 在UserHystrixController中添加测试接口:
@GetMapping("/testCommand/{id}")

public CommonResult testCommand(@PathVariable Long id) {

    return userService.getUserCommand(id);

}
- 在UserService中添加方式实现功能:
 @HystrixCommand(fallbackMethod = "getDefaultUser",

    commandKey = "getUserCommand",

    groupKey = "getUserGroup",

    threadPoolKey = "getUserThreadPool")

public CommonResult getUserCommand(@PathVariable Long id) {

    return restTemplate.getForObject(userServiceUrl + "/user/{1}", CommonResult.class, id);

 }
#使用ignoreExceptions忽略某些异常降级
- 在UserHystrixController中添加测试接口:
@GetMapping("/testException/{id}")

public CommonResult testException(@PathVariable Long id) {

    return userService.getUserException(id);

}
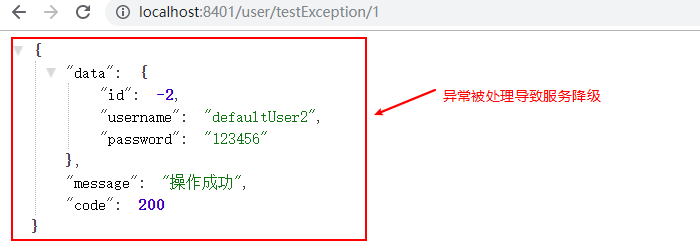
- 在UserService中添加实现方法,这里忽略了NullPointerException,当id为1时抛出IndexOutOfBoundsException,id为2时抛出NullPointerException:
@HystrixCommand(fallbackMethod = "getDefaultUser2", ignoreExceptions = {NullPointerException.class})

public CommonResult getUserException(Long id) {

    if (id == 1) {

        throw new IndexOutOfBoundsException();

    } else if (id == 2) {

        throw new NullPointerException();

    }

    return restTemplate.getForObject(userServiceUrl + "/user/{1}", CommonResult.class, id);

}

public CommonResult getDefaultUser2(@PathVariable Long id, Throwable e) {

    LOGGER.error("getDefaultUser2 id:{},throwable class:{}", id, e.getClass());

    User defaultUser = new User(-2L, "defaultUser2", "123456");

    return new CommonResult<>(defaultUser);

}

#Hystrix的请求缓存
当系统并发量越来越大时,我们需要使用缓存来优化系统,达到减轻并发请求线程数,提供响应速度的效果。
#相关注解
- @CacheResult:开启缓存,默认所有参数作为缓存的key,cacheKeyMethod可以通过返回String类型的方法指定key;
- @CacheKey:指定缓存的key,可以指定参数或指定参数中的属性值为缓存key,cacheKeyMethod还可以通过返回String类型的方法指定;
- @CacheRemove:移除缓存,需要指定commandKey。
#测试使用缓存
- 在UserHystrixController中添加使用缓存的测试接口,直接调用三次getUserCache方法:
@GetMapping("/testCache/{id}")

public CommonResult testCache(@PathVariable Long id) {

    userService.getUserCache(id);

    userService.getUserCache(id);

    userService.getUserCache(id);

    return new CommonResult("操作成功", 200);

}
- 在UserService中添加具有缓存功能的getUserCache方法:
@CacheResult(cacheKeyMethod = "getCacheKey")

@HystrixCommand(fallbackMethod = "getDefaultUser", commandKey = "getUserCache")

    public CommonResult getUserCache(Long id) {

    LOGGER.info("getUserCache id:{}", id);

    return restTemplate.getForObject(userServiceUrl + "/user/{1}", CommonResult.class, id);

}

/**

 * 为缓存生成key的方法

 */

public String getCacheKey(Long id) {

    return String.valueOf(id);

}
- 调用接口测试http://localhost:8401/user/testCache/1open in new window,这个接口中调用了三次getUserCache方法,但是只打印了一次日志,说明有两次走的是缓存:

#测试移除缓存
- 在UserHystrixController中添加移除缓存的测试接口,调用一次removeCache方法:
@GetMapping("/testRemoveCache/{id}")

public CommonResult testRemoveCache(@PathVariable Long id) {

    userService.getUserCache(id);

    userService.removeCache(id);

    userService.getUserCache(id);

    return new CommonResult("操作成功", 200);

}
- 在UserService中添加具有移除缓存功能的removeCache方法:
@CacheRemove(commandKey = "getUserCache", cacheKeyMethod = "getCacheKey")

@HystrixCommand

public CommonResult removeCache(Long id) {

    LOGGER.info("removeCache id:{}", id);

    return restTemplate.postForObject(userServiceUrl + "/user/delete/{1}", null, CommonResult.class, id);

}
- 调用接口测试http://localhost:8401/user/testRemoveCache/1open in new window,可以发现有两次查询都走的是接口:

#缓存使用过程中的问题
- 在缓存使用过程中,我们需要在每次使用缓存的请求前后对HystrixRequestContext进行初始化和关闭,否则会出现如下异常:
java.lang.IllegalStateException: Request caching is not available. Maybe you need to initialize the HystrixRequestContext?

	at com.netflix.hystrix.HystrixRequestCache.get(HystrixRequestCache.java:104) ~[hystrix-core-1.5.18.jar:1.5.18]

	at com.netflix.hystrix.AbstractCommand$7.call(AbstractCommand.java:478) ~[hystrix-core-1.5.18.jar:1.5.18]

	at com.netflix.hystrix.AbstractCommand$7.call(AbstractCommand.java:454) ~[hystrix-core-1.5.18.jar:1.5.18]
- 这里我们通过使用过滤器,在每个请求前后初始化和关闭HystrixRequestContext来解决该问题:
/**

 * Created by macro on 2019/9/4.

 */

@Component

@WebFilter(urlPatterns = "/*",asyncSupported = true)

public class HystrixRequestContextFilter implements Filter {

    @Override

    public void doFilter(ServletRequest servletRequest, ServletResponse servletResponse, FilterChain filterChain) throws IOException, ServletException {

        HystrixRequestContext context = HystrixRequestContext.initializeContext();

        try {

            filterChain.doFilter(servletRequest, servletResponse);

        } finally {

            context.close();

        }

    }

}
#请求合并
微服务系统中的服务间通信,需要通过远程调用来实现,随着调用次数越来越多,占用线程资源也会越来越多。Hystrix中提供了@HystrixCollapser用于合并请求,从而达到减少通信消耗及线程数量的效果。
#@HystrixCollapser的常用属性
- batchMethod:用于设置请求合并的方法;
- collapserProperties:请求合并属性,用于控制实例属性,有很多;
- timerDelayInMilliseconds:collapserProperties中的属性,用于控制每隔多少时间合并一次请求;
#功能演示
- 在UserHystrixController中添加testCollapser方法,这里我们先进行两次服务调用,再间隔200ms以后进行第三次服务调用:
@GetMapping("/testCollapser")

public CommonResult testCollapser() throws ExecutionException, InterruptedException {

    Future<User> future1 = userService.getUserFuture(1L);

    Future<User> future2 = userService.getUserFuture(2L);

    future1.get();

    future2.get();

    ThreadUtil.safeSleep(200);

    Future<User> future3 = userService.getUserFuture(3L);

    future3.get();

    return new CommonResult("操作成功", 200);

}
- 使用@HystrixCollapser实现请求合并,所有对getUserFuture的的多次调用都会转化为对getUserByIds的单次调用:
@HystrixCollapser(batchMethod = "getUserByIds",collapserProperties = {

    @HystrixProperty(name = "timerDelayInMilliseconds", value = "100")

})

public Future<User> getUserFuture(Long id) {

    return new AsyncResult<User>(){

    @Override

    public User invoke() {

        CommonResult commonResult = restTemplate.getForObject(userServiceUrl + "/user/{1}", CommonResult.class, id);

        Map data = (Map) commonResult.getData();

        User user = BeanUtil.mapToBean(data,User.class,true);

        LOGGER.info("getUserById username:{}", user.getUsername());

        return user;

        }

    };

}

@HystrixCommand

public List<User> getUserByIds(List<Long> ids) {

    LOGGER.info("getUserByIds:{}", ids);

    CommonResult commonResult = restTemplate.getForObject(userServiceUrl + "/user/getUserByIds?ids={1}", CommonResult.class, CollUtil.join(ids,","));

    return (List<User>) commonResult.getData();

}
- 访问接口测试http://localhost:8401/user/testCollapseropen in new window,由于我们设置了100毫秒进行一次请求合并,前两次被合并,最后一次自己单独合并了。

#Hystrix的常用配置
#全局配置
hystrix:

  command: #用于控制HystrixCommand的行为

    default:

      execution:

        isolation:

          strategy: THREAD #控制HystrixCommand的隔离策略,THREAD->线程池隔离策略(默认),SEMAPHORE->信号量隔离策略

          thread:

            timeoutInMilliseconds: 1000 #配置HystrixCommand执行的超时时间,执行超过该时间会进行服务降级处理

            interruptOnTimeout: true #配置HystrixCommand执行超时的时候是否要中断

            interruptOnCancel: true #配置HystrixCommand执行被取消的时候是否要中断

          timeout:

            enabled: true #配置HystrixCommand的执行是否启用超时时间

          semaphore:

            maxConcurrentRequests: 10 #当使用信号量隔离策略时,用来控制并发量的大小,超过该并发量的请求会被拒绝

      fallback:

        enabled: true #用于控制是否启用服务降级

      circuitBreaker: #用于控制HystrixCircuitBreaker的行为

        enabled: true #用于控制断路器是否跟踪健康状况以及熔断请求

        requestVolumeThreshold: 20 #超过该请求数的请求会被拒绝

        forceOpen: false #强制打开断路器,拒绝所有请求

        forceClosed: false #强制关闭断路器,接收所有请求

      requestCache:

        enabled: true #用于控制是否开启请求缓存

  collapser: #用于控制HystrixCollapser的执行行为

    default:

      maxRequestsInBatch: 100 #控制一次合并请求合并的最大请求数

      timerDelayinMilliseconds: 10 #控制多少毫秒内的请求会被合并成一个

      requestCache:

        enabled: true #控制合并请求是否开启缓存

  threadpool: #用于控制HystrixCommand执行所在线程池的行为

    default:

      coreSize: 10 #线程池的核心线程数

      maximumSize: 10 #线程池的最大线程数,超过该线程数的请求会被拒绝

      maxQueueSize: -1 #用于设置线程池的最大队列大小,-1采用SynchronousQueue,其他正数采用LinkedBlockingQueue

      queueSizeRejectionThreshold: 5 #用于设置线程池队列的拒绝阀值,由于LinkedBlockingQueue不能动态改版大小,使用时需要用该参数来控制线程数
#实例配置
实例配置只需要将全局配置中的default换成与之对应的key即可。
hystrix:

  command:

    HystrixComandKey: #将default换成HystrixComrnandKey

      execution:

        isolation:

          strategy: THREAD

  collapser:

    HystrixCollapserKey: #将default换成HystrixCollapserKey

      maxRequestsInBatch: 100

  threadpool:

    HystrixThreadPoolKey: #将default换成HystrixThreadPoolKey

      coreSize: 10
#配置文件中相关key的说明
- HystrixComandKey对应@HystrixCommand中的commandKey属性;
- HystrixCollapserKey对应@HystrixCollapser注解中的collapserKey属性;
- HystrixThreadPoolKey对应@HystrixCommand中的threadPoolKey属性。
#使用到的模块
springcloud-learning

├── eureka-server -- eureka注册中心

├── user-service -- 提供User对象CRUD接口的服务

└── hystrix-service -- hystrix服务调用测试服务
简介
Hystrix提供了Hystrix Dashboard来实时监控HystrixCommand方法的执行情况。 Hystrix Dashboard可以有效地反映出每个Hystrix实例的运行情况,帮助我们快速发现系统中的问题,从而采取对应措施。
#Hystrix 单个实例监控
我们先通过使用Hystrix Dashboard监控单个Hystrix实例来了解下它的使用方法。
#创建一个hystrix-dashboard模块
用来监控hystrix实例的执行情况。
- 在pom.xml中添加相关依赖:
<dependency>

    <groupId>org.springframework.cloud</groupId>

    <artifactId>spring-cloud-starter-netflix-eureka-client</artifactId>

</dependency>

<dependency>

    <groupId>org.springframework.cloud</groupId>

    <artifactId>spring-cloud-starter-netflix-hystrix-dashboard</artifactId>

</dependency>

<dependency>

    <groupId>org.springframework.boot</groupId>

    <artifactId>spring-boot-starter-actuator</artifactId>

</dependency>
- 在application.yml进行配置:
server:

  port: 8501

spring:

  application:

    name: hystrix-dashboard

eureka:

  client:

    register-with-eureka: true

    fetch-registry: true

    service-url:

      defaultZone: http://localhost:8001/eureka/
- 在启动类上添加@EnableHystrixDashboard来启用监控功能:
@EnableHystrixDashboard

@EnableDiscoveryClient

@SpringBootApplication

public class HystrixDashboardApplication {

    public static void main(String[] args) {

        SpringApplication.run(HystrixDashboardApplication.class, args);

    }

}
#启动相关服务
这次我们需要启动如下服务:eureka-server、user-service、hystrix-service、hystrix-dashboard,启动后注册中心显示如下。

#Hystrix实例监控演示
- 访问Hystrix Dashboard:http://localhost:8501/hystrixopen in new window
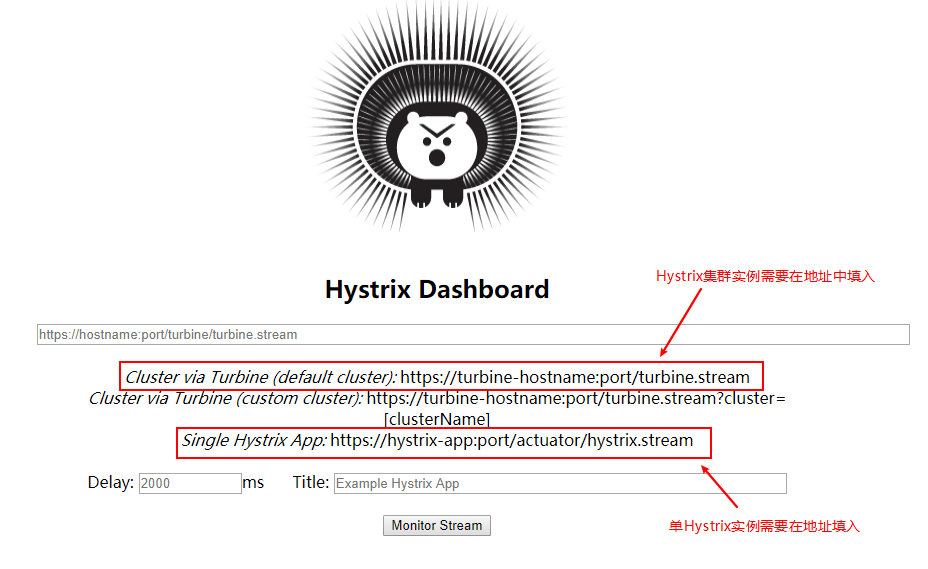
- 填写好信息后点击监控按钮,这里我们需要注意的是,由于我们本地不支持https,所以我们的地址需要填入的是http,否则会无法获取监控信息;
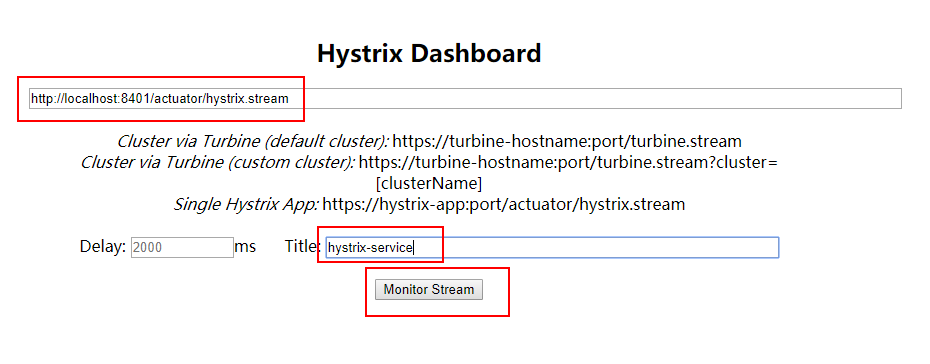
- 还有一点值得注意的是,被监控的hystrix-service服务需要开启Actuator的hystrix.stream端点,配置信息如下:
management:

  endpoints:

    web:

      exposure:

        include: 'hystrix.stream' #暴露hystrix监控端点
- 调用几次hystrix-service的接口:http://localhost:8401/user/testCommand/1open in new window
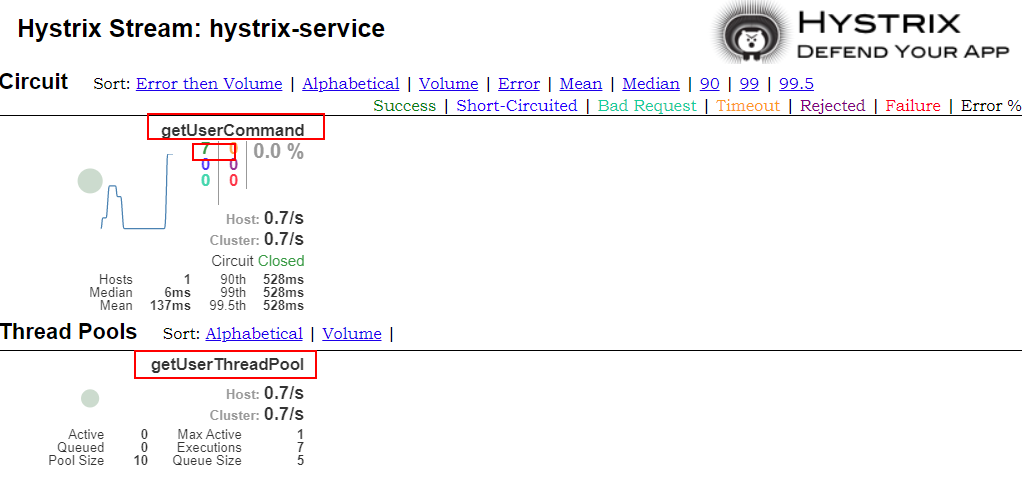
- 可以发现曾经我们在@HystrixCommand中添加的commandKey和threadPoolKey属性都显示在上面了,并且有7次调用都成功了。
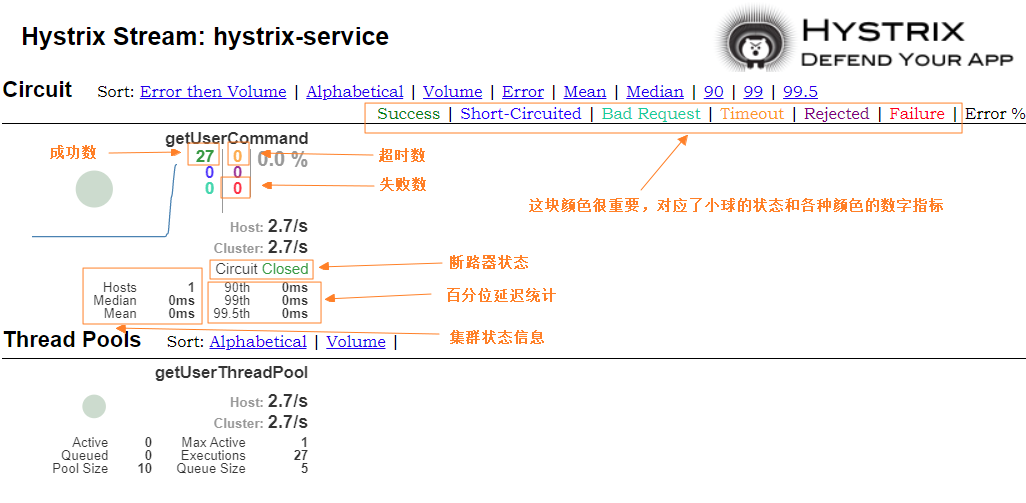
#Hystrix Dashboard 图表解读
图表解读如下,需要注意的是,小球代表该实例健康状态及流量情况,颜色越显眼,表示实例越不健康,小球越大,表示实例流量越大。曲线表示Hystrix实例的实时流量变化。
#Hystrix 集群实例监控
这里我们使用Turbine来聚合hystrix-service服务的监控信息,然后我们的hystrix-dashboard服务就可以从Turbine获取聚合好的监控信息展示给我们了。
#创建一个turbine-service模块
用来聚合hystrix-service的监控信息。
- 在pom.xml中添加相关依赖:
<dependency>

    <groupId>org.springframework.cloud</groupId>

    <artifactId>spring-cloud-starter-netflix-eureka-client</artifactId>

</dependency>

<dependency>

    <groupId>org.springframework.cloud</groupId>

    <artifactId>spring-cloud-starter-netflix-turbine</artifactId>

</dependency>

<dependency>

    <groupId>org.springframework.boot</groupId>

    <artifactId>spring-boot-starter-actuator</artifactId>

</dependency>
- 在application.yml进行配置,主要是添加了Turbine相关配置:
server:

  port: 8601

spring:

  application:

    name: turbine-service

eureka:

  client:

    register-with-eureka: true

    fetch-registry: true

    service-url:

      defaultZone: http://localhost:8001/eureka/

turbine:

  app-config: hystrix-service #指定需要收集信息的服务名称

  cluster-name-expression: new String('default') #指定服务所属集群

  combine-host-port: true #以主机名和端口号来区分服务
- 在启动类上添加@EnableTurbine来启用Turbine相关功能:
@EnableTurbine

@EnableDiscoveryClient

@SpringBootApplication

public class TurbineServiceApplication {

    public static void main(String[] args) {

        SpringApplication.run(TurbineServiceApplication.class, args);

    }

}
#启动相关服务
使用application-replica1.yml配置再启动一个hystrix-service服务,启动turbine-service服务,此时注册中心显示如下。

#Hystrix集群监控演示
访问Hystrix Dashboard:http://localhost:8501/hystrixopen in new window
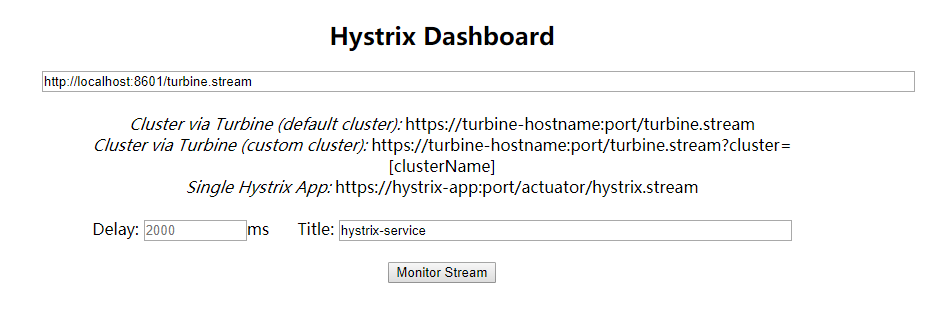
添加集群监控地址,需要注意的是我们需要添加的是turbine-service的监控端点地址:
- 调用几次hystrix-service的接口:http://localhost:8401/user/testCommand/1open in new window以及http://localhost:8402/user/testCommand/1open in new window
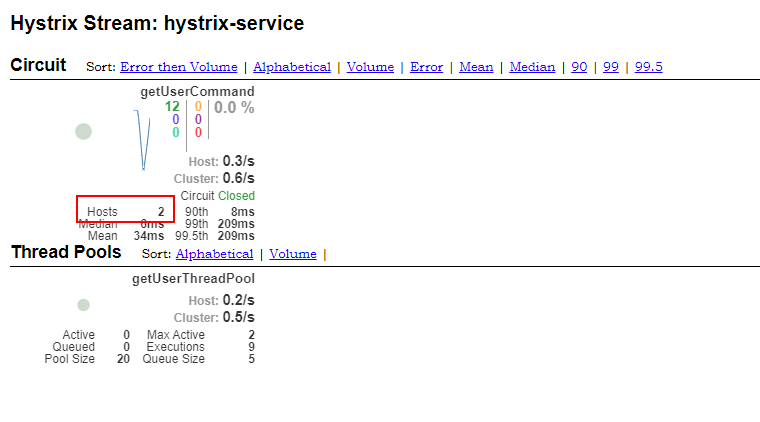
- 可以看到我们的Hystrix实例数量变成了两个。
#使用到的模块
springcloud-learning

├── eureka-server -- eureka注册中心

├── user-service -- 提供User对象CRUD接口的服务

├── hystrix-service -- hystrix服务调用测试服务

├── turbine-service -- 聚合收集hystrix实例监控信息的服务

└── hystrix-dashboard -- 展示hystrix实例监控信息的仪表盘
Spring Cloud 核心组件之Spring Cloud Hystrix:服务容错保护的更多相关文章
- 笔记:Spring Cloud Hystrix 服务容错保护
由于每个单元都在不同的进程中运行,依赖通过远程调用的方式执行,这样就有可能因为网络原因或是依赖服务自身问题出现调用故障或延迟,而这些问题会直接导致调用方的对外服务也出现延迟,若此时调用方的请求不断增加 ...
- Spring Cloud Hystrix 服务容错保护 5.1
Spring Cloud Hystrix介绍 在微服务架构中,通常会存在多个服务层调用的情况,如果基础服务出现故障可能会发生级联传递,导致整个服务链上的服务不可用为了解决服务级联失败这种问题,在分布式 ...
- Spring Cloud Hystrix 服务容错保护
目录 一.Hystrix 是什么 二.Hystrix断路器搭建 三.断路器优化 一.Hystrix 是什么 在微服务架构中,我们将系统拆分成了若干弱小的单元,单元与单元之间通过HTTP或者TCP等 ...
- Hystrix服务容错保护
一.什么是灾难性雪崩效应? 造成灾难性雪崩效应的原因,可以简单归结为下述三种: 服务提供者不可用.如:硬件故障.程序BUG.缓存击穿.并发请求量过大等. 重试加大流量.如:用户重试.代码重试逻辑等. ...
- spring cloud 入门系列四:使用Hystrix 实现断路器进行服务容错保护
在微服务中,我们将系统拆分为很多个服务单元,各单元之间通过服务注册和订阅消费的方式进行相互依赖.但是如果有一些服务出现问题了会怎么样? 比如说有三个服务(ABC),A调用B,B调用C.由于网络延迟或C ...
- Spring Cloud(四):服务容错保护 Hystrix【Finchley 版】
Spring Cloud(四):服务容错保护 Hystrix[Finchley 版] 发表于 2018-04-15 | 更新于 2018-05-07 | 分布式系统中经常会出现某个基础服务不可用 ...
- Spring Cloud (8) 服务容错保护-Hystrix依赖隔离
依赖隔离 docker使用舱壁模式来实现进程的隔离,使容器与容器之间不会互相影响.而Hystrix则使用该模式实现线程池的隔离,它会为每一个Hystrix命令创建一个独立的线程池,这样就算在某个Hys ...
- 白话SpringCloud | 第五章:服务容错保护(Hystrix)
前言 前一章节,我们知道了如何利用RestTemplate+Ribbon和Feign的方式进行服务的调用.在微服务架构中,一个服务可能会调用很多的其他微服务应用,虽然做了多集群部署,但可能还会存在诸如 ...
- SpringCloud+Hystrix服务容错
Netflix Hystrix — 应对复杂分布式系统中的延时和故障容错 +应用场景 分布式系统中经常会出现某个基础服务不可用造成整个系统不可用的情况, 这种现象被称为服务雪崩效应. 为了应对服务雪崩 ...
- SpringCould-------使用Hystrix 实现断路器进行服务容错保护
消费: <project xmlns="http://maven.apache.org/POM/4.0.0" xmlns:xsi="http://www.w3.or ...
随机推荐
- Nginx-web系列
nginx 系列 目录 nginx 系列 一 简述 1.1 为什么要使用? 1.2 主要用于哪里? 二. Nginx 搭建环境 2.1 版本选择 2.2 环境准备 2.2 yum 直装 2.3 ngi ...
- Zabbix6.0使用教程 (二)—zabbix6.0常用术语
上一次我们已经详细介绍了zabbix6.0的新增功能,本篇我们来说说zabbix6.0常用的一些术语,这个对小伙伴日常使用zabbix的时候还是非常有用,建议大家收藏起来,话不多说,附上干货. 概览 ...
- ymal & properties 赋值特性 JSR303数据校验
基本语法 1.空格不能省略 2.以缩进来控制层级关系,只要是左边对齐的一列数据都是同一个层级的. 3.属性和值的大小写都是十分敏感的. key:空格value 字面量直接写在后面就可以 , 字符串默认 ...
- vue-router tomcat 下报404 WEB-INF 放入 web.xml 即可
vue-router tomcat 下报404 WEB-INF 放入 web.xml 即可 <?xml version="1.0" encoding="UTF-8& ...
- vue中setTimeout之前 一定要 clearTimeout 否则将失效
window.clearTimeout(this.singleClick) // 这句很重要,否则不起作用 this.singleClick = window.setTimeout(() => ...
- Nginx 同时支持 http 和 https SSL 为了能有权限调取摄像头
Nginx 同时支持 http 和 https 当然起项目的会后也分成俩 "dev": "vue-cli-service serve --port=8080", ...
- WPF之控件布局
目录 控件概述 WPF的内容模型 各类内容模型详解 ContentControl族 HeaderedContentControl族 ItemsControl族 ListBox:在XAML中添加数据 L ...
- 可穿戴智能手环解决方案之BLE的ADV广播协议解读
一 概念 直接上英文原文,怕自己的翻译误导大家. When a BLE device is advertising, it periodically transmits packets, which ...
- Android打造万能自定义阴影控件
目录介绍 01.阴影效果有哪些实现方式 02.实现阴影效果Api 03.设置阴影需要注意哪些 04.常见Shape实现阴影效果 05.自定义阴影效果控件 06.如何使用该阴影控件 07.在recycl ...
- 三维模型3DTile格式轻量化顶点压缩主要技术方法分析
三维模型3DTile格式轻量化顶点压缩主要技术方法分析 三维模型顶点压缩是3DTile格式轻量化压缩的重要组成部分,能有效减小数据大小,提高数据处理效率.下面将详细分析几种主要的顶点压缩技术方法: 预 ...
