Maven 之 profile 与Spring boot 的 profile
一、概述
不同的环境(测试环境、开发环境)有不同的配置,目前希望在打包的时候,就直接打出针对不同环境的包(内含有某个环境的配置)。Maven本身在 pom.xml 中就提供了 profile 标签进行配置;
spring boot 开发的软件,其也有不同的配置,在结合 maven 打出对应的包的时候,也需要 指定 spring.profiles.active 表示使用的是哪份配置;
二、知识点
1、maven 不同环境配置
(1) profile 的定义位置
我们可以有多个地方定义profile。定义的地方不同,它的作用范围也不同。
- 针对于特定项目的profile配置我们可以定义在该项目的pom.xml中。
- 针对于特定用户的profile配置,我们可以在用户的settings.xml文件中定义profile。该文件在用户家目录下的“.m2”目录下。
- 全局的profile配置。全局的profile是定义在Maven安装目录下的“conf/settings.xml”文件中的。
(2) profile 中能定义的信息
profile中能够定义的配置信息跟profile所处的位置是相关的。以下就分两种情况来讨论,一种是定义在settings.xml中,另一种是定义在pom.xml中。
a) 定义在Setting.xml
当profile定义在settings.xml中时意味着该profile是全局的,它会对所有项目(文件在 Maven 安装目录下)或者某一用户(文件在 用户目录下)的所有项目都产生作用。
此时 Setting.xml 中 profile 下可定义的标签主要有:
- repositories
- pluginRepositories
- properties:定义在<properties>里面的键值对可以在pom.xml中使用
b) 定义在pom.xml中(文件在项目里面)
此时 pom.xml 中标签主要有:
- repositories
- pluginReponsitories
- dependencies
- plugins
- properties
- dependencyManagement
- distributionManagement
(3) profile 的激活方式
a) settings.xml 中 使用 activeProfiles ,指定激活的 profile。
<profiles>

    <profile>

        <id>profileTest1</id>

        <properties>

            <hello>world</hello>

        </properties>

    </profile>

    <profile>

        <id>profileTest2</id>

        <properties>

            <hello>andy</hello>

        </properties>

    </profile>

</profiles>

<activeProfiles>
    <activeProfile>profileTest2</activeProfile>

    <activeProfile>profileTest1</activeProfile>
</activeProfiles>
一般情况下,activeProfiles 就定义一个 activeProfile ,但会出现如上定义了两个,此时生效两个 profile,pom.xml 在使用 hello 这个 property的时候,是按照 profile 定义的先后顺序来进行覆盖取值的,然后后面定义的会覆盖前面定义的。
而在上面的这个例子中,pom.xml 中 若使用了 ${hello},表示使用 hello 的值,那么此时会使用 andy。
默认激活的 profile 在任何项目打包中都会被激活,它是全局的。
b) pom.xml 中激活方式
- activeByDefault
<profiles>

    <profile>

        <id>profileTest1</id>

        <properties>

            <hello>world</hello>

        </properties>

        <activation>

            <activeByDefault>true</activeByDefault>

        </activation>

    </profile>

</profiles>
当执行maven 命令进行打包时,未指定 -P profile,则表示使用 activeByDefault 声明的 profile,若使用了 吗,mvn clean package -pl artificaId -PanotherProfile,此时就是执行指定的profile,但是settings.xml 中的 默认激活的 profile会默认一致执行,而且是先执行,后执行 pom.xml 中的 profile。
若不想默认执行settings,xml 中激活的 profile,可以使用 mvn -P !profile 命令即可。
- 根据环境来激活 profile
- 根据当前环境中的 jdk 来激活 profile
<profiles>

    <profile>

        <id>profileTest1</id>

        <jdk>1.5</jdk>    //JDK版本的前缀匹配,当JDK的版本号以"1.5"开头时, 该配置将被触发

    </profile>

<profiles>
<profiles>

    <profile>

        <id>profileTest1</id>

        <jdk>[1.3,1.6)</jdk>    //JDK版本的前缀匹配,当JDK的版本号以"1.3\1.4\1.5"开头时, 该配置将被触发

    </profile>

<profiles>
- 根据操作系统来激活profile
<profiles>

   <profile>

       <activation>

            <os>

                 <name>Windows XP</name>

                  <family>Windows</family>

                  <arch>x86</arch>

                  <version>5.1.2600</version>

            </os>

       </activation>

   </profile>

</profiles>
- 基于环境变量(用户\系统变量)
<profiles>

   <profile>

       <activation>

            <property>

                 <name>debug</name>    //系统属性 debug,无论为何值,都会触发生效该配置

            </property>

       </activation>

   </profile>

</profiles>
<profiles>

   <profile>

       <activation>

            <property>

                 <name>environment</name>

                  <value>test</value>    //系统属性 environment,值为test 时,会触发生效该配置,可以使用  mvn groupId:artifactId:goal -Denvironment=test  触发

            </property>

       </activation>

   </profile>

</profiles>
- 现在\缺失 文件
<profiles>

   <profile>

       <activation>

            <file>

                 <missing>target/config.xml</missing>

            </file>

       </activation>

   </profile>

</profiles>
- 显示使用命令激活
mvn groupId:artifactId:goal -P profile-1,profile-2
(4) 当settings.xml 和 pom.xml (本工程、从 父pom.xml 继承下来的profile)混合用的时候生效的结果
设定场景:
- settings.xml 中 有 profile 为 test1、test2
- 父pom.xml 中有 profile 为 test1、test2、test3
- 本工程 pom.xml 中有 profile 为test1、test2、test3
- 以下表格是 maven 打包时 查找需要执行 profile 的列表,打包时 查找文件顺序为:settings.xml -> 本工程pom.xml -> 父pom.xml
| settings.xml | 本工程pom.xml | 父 pom.xml | mvn 打包时是否指定profile |
实际生效profile (顺序 : settings.xml -> 本工程pom.xml -> 父pom.xml) |
|||
| 默认profile | 非默认profile | 默认profile | 非默认profile | 默认profile | 非默认profile | ||
| test1 | test2 | test2 |
test1、 test3、 test4 |
test3 |
test1、 test2、 teset5 |
未指定 | test1、test3、test2 |
| 指定 test2 | test2、test2、test2 | ||||||
| 指定 test3 | test1、test3、test3 | ||||||
| 指定 test4 | test1、test4、test3 | ||||||
| 指定 test5 | test1、test2、test5 | ||||||
profile 生效规则如下
- 针对每份文件(settings.xml \ 本工程 pom.xml \ 父工程 pom.xml),打包时指定了 profile,若文件 中有指定的 profile 直接激活 指定的 profile,没有则使用默认激活的 profile;
- 针对每份文件(settings.xml \ 本工程 pom.xml \ 父工程 pom.xml),打包时未指定 profile,若文件 中有默认激活的 profile 则使用默认激活的 profile,若没有则不使用该文件中的任何 profile;
- 不同文件激活的多个 profile,出现 property 相同 key时,生效的是第一个激活profile 中的 property;
- pom.xml 中的 activeByDefault 的 profile 若定义了 dependencies ,则依赖的包在任何打包形式下都会被依赖进来;
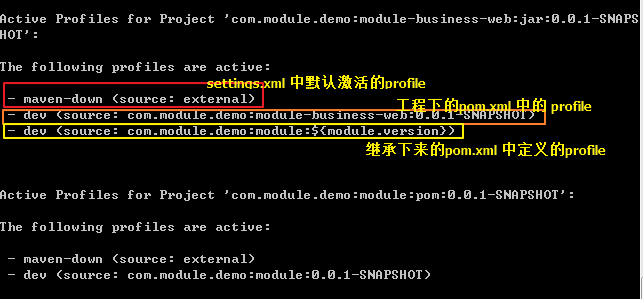
(5)查看当前处于激活状态的 profile
使用 mvn help:active-profiles
2、spring boot 不同环境配置
(1) 在工程中配置不同环境配置文件
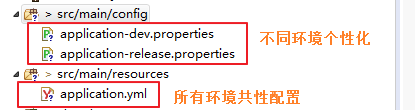
其中:application.yml 内容如下
spring:

  application:

    name: web

  profiles:

    active: "@package.env@"

server:

  port: 8090
(2) pom.xml 配置如下:
 <resources>

            <resource>

                <directory>src/main/resources</directory>

                <filtering>true</filtering>

                <includes>

                    <include>**/*.yml</include>

                    <include>**/*.yaml</include>

                    <include>**/*.properties</include>

                    <include>**/*.xml</include>

                </includes>

            </resource>

            <resource>

                <directory>src/main/resources</directory>

                <filtering>false</filtering>

                <excludes>

                    <exclude>**/*.yml</exclude>

                    <exclude>**/*.yaml</exclude>

                    <exclude>**/*.properties</exclude>

                    <exclude>**/*.xml</exclude>

                </excludes>

            </resource>

            <resource>

                <directory>src/main/config</directory>

                <filtering>true</filtering>

                <includes>

                    <include>**/*.yml</include>

                    <include>**/*.yaml</include>

                    <include>**/*.properties</include>

                    <include>**/*.xml</include>

                </includes>

            </resource>

            <resource>

                <directory>src/main/config</directory>

                <filtering>false</filtering>

                <excludes>

                    <exclude>**/*.yml</exclude>

                    <exclude>**/*.yaml</exclude>

                    <exclude>**/*.properties</exclude>

                    <exclude>**/*.xml</exclude>

                </excludes>

            </resource>

        </resources>

<plugin>

     <groupId>org.springframework.boot</groupId>

     <artifactId>spring-boot-maven-plugin</artifactId>

     <configuration>

           <executable>true</executable>

     </configuration>

</plugin>
可以把 src/main/config 及 src/main/resources 下的配置文件 打包过程中打入。
(3) 激活
在运行的时候,传入参数:-Dspring.profiles.active=dev,表示使用dev 环境配置;
3、不同环境配置 spring boot 与 maven结合
- application.yml 要配置成上图所示的,spring.profiles.active=占位符属性,占位符属性值 在 pom.xml 中的 profile 指定
- pom.xml 中定义 profile ,如下,在本工程中定义内容:
<!-- 多环境的不同配置,在运行时需指明使用哪个环境配置 -->

    <profiles>

        <profile>

            <id>dev</id>

            <activation>

                <activeByDefault>true</activeByDefault>   <!-- 运行时未指明 profile,则使用默认的,该配置表示 dev为默认配置 -->

            </activation>

            <properties>

                <package.env>dev</package.env>

            </properties>

        </profile>

        <profile>

            <id>release</id>

            <properties>

                <package.env>release</package.env>

            </properties>

        </profile>

    </profiles>
- pom.xml 中的 resource 标签若没有上面的示例配置复杂,也一定要有以下内容,才能让 maven 将其 property 写入到指定的配置文件中。
 <resource>

       <directory>src/main/resources</directory>     // 需要将 maven 的 property 写入 src/main/resources 下所有的配置文件中(只要该配置文件中使用了propetry对应的占位符,如上面 application.yml 配置的那样

        <filtering>true</filtering>

</resource>
- 激活
此时,执行命令:mvn groupId:artifactId:goal -P dev 时,maven 的 dev profile 生效,其中定义的 package.env 属性值为dev,此时打开 target 下的 application.yml,其内容已变成,如下:
spring:

  application:

    name: web

  profiles:

    active: "dev"

server:

  port: 8090
问题:
在做上述例子的时候,发现按照如上配置之后,执行mvn命令,打开 target 下的 application.yml @package.dev@ 还是没有替换成对应值,该原因为:
- maven 默认可识别的配置文件占位符 符号为 ${};
- 若 pom.xml 有通过 parent 标签继承别的 pom.xml ,此时需打开父pom.xml 查看,如,本实例继承了 spring boot 的pom.
<parent>

    <groupId>org.springframework.boot</groupId>

    <artifactId>spring-boot-starter-parent</artifactId>

    <version>2.1.7.RELEASE</version>

</parent>

因此 spring boot 继承过来的这种形式,配置文件中要使用 @ 作为占位符,但是若是使用 dependency 这种方式继承 spring boot 的话,直接使用 ${},作为占位符即可。
PS: 以上参考内容:
https://www.cnblogs.com/wxgblogs/p/6696229.html
https://www.cnblogs.com/lddbupt/p/5531885.html
https://www.jianshu.com/p/929b9aa70dc8
Maven 之 profile 与Spring boot 的 profile的更多相关文章
- [Spring Boot 系列] 集成maven和Spring boot的profile功能
由于项目的需要, 今天给spirng boot项目添加了profile功能.再网上搜索了一圈,也没有找到满意的参考资料,其实配置并不难,就是没有一个one stop(一站式)讲解的地方,所以有了写这篇 ...
- 集成maven和Spring boot的profile 专题
maven中配置profile节点: <project> .... <profiles> <profile> <!-- 生产环境 --> <id& ...
- 004-集成maven和Spring boot的profile功能打包
参考地址:https://blog.csdn.net/lihe2008125/article/details/50443491 一.主要目标 1.通过mvn在命令行中打包时,可以指定相应的profil ...
- [Spring Boot 系列] 集成maven和Spring boot的profile 专题
maven中配置profile节点: <project> .... <profiles> <profile> <!-- 生产环境 --> <id& ...
- 集成maven和Spring boot的profile
如果在配置中勾选了多套配置,则以pom.xml文件中 profiles中 配置 最后一个配置为准. maven中配置profile节点: <project> .... <profi ...
- Spring boot 的profile功能如何实现多环境配置自动切换
通常服务端应用开发需要经过以下几个流程: 开发 -> 测试 -> RC验证 -> 上线 这就涉及到四个不同的环境,开发环境.测试环境.RC环境以及生产环境,为了避免不同环境之间相互干 ...
- Spring Boot 之 Profile --快速搞定多环境使用与切换
Spring Profile是Spring3引入的概念,主要用在项目多环境运行的情况下,通过激活方式实现多环境切换,省去多环境切换时配置参数和文件的修改,并且Spring profile提供了多种激活 ...
- maven 聚合工程 用spring boot 搭建 spring cloud 微服务 模块式开发项目
项目的简单介绍: 项目采用maven聚合工程 用spring boot 搭建 spring cloud的微服务 模块式开发 项目的截图: 搭建开始: 能上图 我少打字 1.首先搭建maven的聚合工程 ...
- 集成maven和Spring boot的profile功能
思路:maven支持profile功能,当使用maven profile打包时,可以打包指定目录和指定文件,且可以修改文件中的变量.spring boot也支持profile功能,只要在applica ...
随机推荐
- redis服务及其配置与应用(window 环境下)
一.redis简介:Redis是一个开源的使用ANSI C语言编写.支持网络.可基于内存亦可持久化的日志型.Key-Value数据库,并提供多种语言的API(源自百度百科),个人更喜欢下面的解释:我们 ...
- KERNEL_SECURITY_CHECK_FAILURE
出现错误提示重装系统可以解决问题,但不需要重装系统.win8错误提示:KERNEL_SECURITY_CHECK_FAILURE提示对应错误代码:0x00000139 (0x00000003, 0x8 ...
- Qt 串口通信 高速发送出错的解决方法总结
使用网上的qextserialport-1.2类,自行开发多线程串口通信.开发的过程中,出现两个问题: 问题1:我用信号槽跨线程调用串口类MyCom 发送和接收数据,中间运行的时候,会内存错误,Q ...
- 数据库 | Redis 缓存雪崩解决方案
Redis 雪崩 缓存层承载着大量的请求,有效保护了存储层.但是如果由于缓存大量失效或者缓存整体不能提供服务,导致大量的请求到达存储层,会使存储层负载增加,这就是缓存雪崩的场景. 解决缓存雪崩,可以从 ...
- 宝塔安装Nextcloud,挂载在阿里云oss上,打造个人/企业高效私有云盘
如下未完整整理,看懂看不懂随缘.... 准备条件: 1.阿里云oss 2.阿里云ecs 3.环境:centos7.x 步骤: 1.centos中安装宝塔面板 2.下载NextCloud安装包,上传到宝 ...
- Tomcat多实例集群架构 安全优化和性能优化
Tomcat多实例 复制tomcat目录 /usr/local/tomcat1 /usr/local/tomcat2 修改多实例配置文件 #创建多实例的网页根目录 mkdir -p /data/www ...
- vuex中的babel编译mapGetters/mapActions报错解决方法
vex使用...mapActions报错解决办法 vuex2增加了mapGetters和mapActions的方法,借助stage2的Object Rest Operator 所在通过 methods ...
- js 操作select和option常见用法
1.获取选中select的value和text,html <select id="mySelect"> <option value="1"&g ...
- MySQL主从双向同步
最近部署测试环境,涉及到MySQL数据库主从双向同步的部署,记录一下部署过程,正常读写都发生在主库,从库作为备选数据库(热备份),当主库发生异常,数据库自动切换到从库,这里面是怎么监控数据库异常并触发 ...
- Oracle CDC (Change Data Capture)更新数据捕获——Asynchronous HotLog Mode(附带简单的kettle任务实现数据同步)
Performing Asynchronous HotLog Publishing Step 1 Source Database DBA: Set the database initializat ...