1、linux基础优化
1、添加一个用户
[root@oldboy ~]# useradd oldboy

[root@oldboy ~]# id oldboy

uid=500(oldboy) gid=500 (oldboy) groups=500(oldboy)

[root@oldboy ~]# echo 123456lpasswd --stdin oldboy

Changing password for user oldboy.

passwd: all authentication tokens updated successfully.
2、加到sudo管理, oldboy就相当于管理员
[root@oldboy ~]# visudo

[root@oldboy ~]# grep -w oldboy /etc/sudoers

oldboy  ALL=(ALL)  NOPASSWD: ALL

远程连接直接用oldboy

弃用root登录,改用oidboy用户登录。

[oldboy@oldboy ~]$ whoami

oldboy

[oldboy@oldboy ~]$ sudo su -

[root@oldboy ~]# whoami

root
3、关闭防火墙
centos6

临时关闭: /etc/init.d/iptables   stop

永久关闭: chkconfig iptables off

关闭后检查: /etc/init.d/iptables   status

chkconfig --list  iptables

centos7

临时关闭:systemctl stop firewalld.service

永久关闭: systemctl disable firewalld.service

关闭后检查: systemctl is-active firewalld.service
4、优化SSH远程连接
 备份/etc/ssh/ssh_config

cp /etc/ssh/ssh_config{,.bak}

vim /etc/ssh/ssh_config

###by xly#2018-11-24##

Port 52113				#设置10000以上的端口

PermitRootLogin no			#禁止root远程登录

PermitEmptyPasswords no	#禁止空密码登录

UseDNS no				#不使用DNS解析

GSSAPIAuthentication no	#Xshell连接慢的解决配置

###by xly#2018-11-24##

 把监听网段改掉,即0.0.0.0改为内网网段,例如10.0.0.0

grep -i listen  /etc/ssh/ssh_config

5、关闭SELinux
①永久生效,需要重启计算机

更改配置文件/etc/selinux/config

vim  /etc/selinux/config把SELINUX=enforcing改成SELINUX=disable或者

sed -i 's#SELINUX=enforcing#SELINUX=disable#g' /etc/selinux/config

②临时生效

设置:setenforce  0

查看:getenforce  结果为Permissive
6、设定运行级别为3
设置运行级别:grep 3:initdefault  /etc/inittab

查看运行级别:runlevel
7、 精简开机系统自启动
linux系统要开启的开机自启动服务:sshd、rsyslog、network、crond、sysstat

chkconfig  --list|grep "3:on"   首先查看有哪些服务开机自启动

思路:

关掉不需要的

chkconfig  --list|grep "3:on"|egrep  -v "sshd|rsyslog|network|cron|sysstat"|awk '{print  "chkconfig",$1,"off"}'|bash

优化:

chkconfig  --list|grep "3:on"|grep  -vE "sshd|rsyslog|network|cron|sysstat"|awk '{print  "chkconfig",$1,"off"}'|bash

关闭所有,开启需要的

全关:chkconfig  --list|grep "3:on"|awk '{print  "chkconfig",$1,"off"}'|bash

开需要的:chkconfig --list|egrep  "sshd|rsyslog|network|cron|sysstat"|awk '{print  "chkconfig",$1,"on"}'|bash
8、修改linux服务器字符集
centos6

修改/etc/sysconfig/i18n

vim /etc/sysconfig/i18n把LANG="zh_CN.UTF-8"放进去

查看结果:cat /etc/sysconfig/i18n

使之生效:source /etc/sysconfig/i18n或者. /etc/sysconfig/i18n

centos7

修改  /etc/locale.conf

vim /etc/locale.conf 把 LANG="zh_CN.UTF-8"放进去

查看结果:cat /etc/locale.conf

使之生效:source /etc/locale.conf或者. /etc/locale.conf
9、设置Linux服务器时间同步
①验证时间同步服务器是否可用

/usr/sbin/ntpdate  ntp2.aliyun.com

②设置定时任务

echo 'time sync by liyang at 2019-3-30'  >>/var/spool/cron/root

echo '*/5 * * * * /usr/sbin/ntpdate ntp2.aliyun.com >/dev/null 2>&1' >>/var/spool/cron/root

centos7

/usr/bin/timedatectl

# 安装

yum install chrony

# 启用

systemctl start chronyd

systemctl enable chronyd

# 设置亚洲时区

timedatectl set-timezone Asia/Shanghai

# 启用NTP同步

timedatectl set-ntp yes
10、命令行安全
echo 'export TIMEOUT=300'  >>/etc/profile

echo 'export HISTSIZE=5'  >>/etc/profile

echo 'export HISTFILESIZE=5'  >>/etc/profile

tail -3 /etc/profile

source /etc/profile 使配置文件生效
11、锁定关键系统文件
加锁

chattr +i /etc/passwd /etc/shadow /etc/group /etc/inittab /etc/fstab /etc/sudoers

查看加锁的文件

lsattr

还可以把chattr命令移走:mv /usr/bin/chattr  /opt/oldboy

想用的时候移回来:mv  /opt/oldboy  /usr/bin/chattr
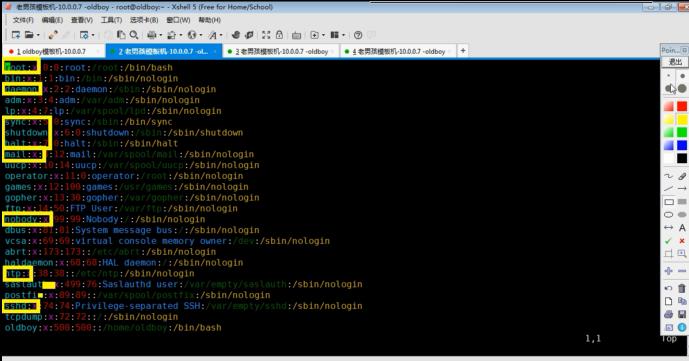
12、清除多余的系统账号
可以选择不优化,加框的是有用的

13、为grup菜单加密码
[root@oldboy ~]# /sbin/grub-md5-crypt

Password:

Retype password:

$1s.Fv.q/$eCasAokskqxvw0ow37hJr1

vi /etc/grub.conf

password --md5 $1s.Fv.q/$eCasAokskqxvw0ow37hJr1

注意:password要加在aplashimage和title之间,否则可能无法生效
14、隐藏版本信息
查看文件信息:cat  /etc/issue

清除文件信息:>/etc/issue.net	>/etc/issue
15、禁止 Linux系统被ping
[rootooldboy ~]# echo "net.ipv4.icmp_echo_ignore_all=1"  >> /etc/sysctl.conf

[rootooldboy ~]#sysctl -p

自己也没办法调试了,Iptables指定内网可以Ping,外网不能ping.
16、调整linux系统文件描述符数量
①文件永久生效

echo ‘*		-	nofile		65535’ >>/etc/security/limits.conf

tail  -1 /etc/security/limits.conf

②临时生效

ulimit  -SHn 65535

可以追加到/etc/rc.local每次开机自启动

echo >>/etc/rc.local<<EOF

#-S user the 'soft' resource limit

#-H user the 'hard' resource limit

#-n the maximum number of open file derscriptors

ulimit -SHn 65535

#-s the maximum stack size

ulimit -s 65535

EOF
17、linux服务器内核参数优化
vim /etc/sysctl.conf添加如下内容:

net.ipv4.tcp_fin_timeout = 2

net.ipv4.tcp_tw_reuse = 1

net.ipv4.tcp_tw_recycle = 1

net.ipv4.tcp_syncookies = 1

net.ipv4.tcp_keepalive_time = 600

net.ipv4.ip_local_port_range = 4000  65000

net.ipv4.tcp_max_syn backlog = 16384

net.ipv4.tcp_ max_ tw_buckets = 36000

net.ipv4.route.gc_timeout = 100

net.ipv4.tcp_syn_retries = 1

net.ipv4.tcp_synack_retries = 1

net.core.somaxconn = 16384

net.core.netdev_max_backlog = 16384

net.ipv4.tcp_max_orphans = 16384

#以下参数是对iptables防火墙的优化,防火墙不开会提示,可以忽略不理.

net.nf_conntrack_max = 25000000

net.netfilter.nf_conntrack_max = 259909  I

net.netfilter.nf_conntrack_tcp_timeout_established = 180

net.netfilter.nf_conntrack_tcp_timeout_time_wait = 120

net.netfilter.nf_conntrack_tcp_timeout_close_wait = 60

net.netfilter.nf_conntrack_tco_timeout_fin_wait = 120

执行svsctl-p生效
18、升级具有典型漏洞的软件版本
首先查看先关软件版本号:

rpm -qa openssl openssh bash

升级已知漏洞的软件版本到最新

yum install openssl openssh bash -y

yum update
19、定时清理邮件服务临时目录垃圾文件
①手动清理的方法如下:

find /var/spool/postfix/maildrop/ -type f|xargs rm -f

②定时清理的方法:做定时任务

写个脚本:

echo "find /var/spool/postfix/maildrop/ -type f|xargs rm -f" >/server/scripts/del_file.sh

做定时任务

echo "00 00 * * * /bin/sh /server/scripts/del_file.sh >/dev/null 2>&1" >>/var/spoll/cron/root

查看做好的定时任务

corntab -l
20、hosts解析
都是内网IP

21.配置yum仓库
rm -f /etc/yum.repos.d/*

curl -o /etc/yum.repos.d/CentOS-Base.repo http://mirrors.aliyun.com/repo/Centos-7.repo

curl -o /etc/yum.repos.d/epel.repo http://mirrors.aliyun.com/repo/epel-7.repo
22.安装基础软件包
yum install net-tools vim tree htop iftop \

iotop lrzsz sl wget unzip telnet nmap nc psmisc \

dos2unix bash-completion bash-completion-extra sysstat \

rsync nfs-utils httpd-tools -y
1、linux基础优化的更多相关文章
- Linux基础优化和安全重点小结
Linux基础优化和安全重点小结 1.不用root管理,以普通用户的名义通过sudo管理授权(/etc/sudoers) 2.更改默认的ssh服务端口,禁止root用户远程连接,甚至监听 ...
- Linux基础优化(二)
Linux基础优化(二) 一操作系统字符优化 避免出现中文乱码,UTF-8支持中文GBK-Xx支持中文 (一)查看默认编码 [root@centos7 ~]# echo $LANG en_US.UTF ...
- Linux 基础优化
1.操作的最小化原则 1)安装系统最小化 一般情况下安装OS时,软件安装包组(Package Group)的选择: base--------------------------基本环境 editors ...
- Linux基础优化与安全归纳总结
一名运维工程师在运维岗位上时间久了,就会发现Linux优化的重要性,同时会给运维工作带来很多的便利性.本人逐渐认识到了这一点,所以特意在工作闲暇之余,通过阅读Linux相关书籍及向同事.同行高手咨询, ...
- 18.linux基础优化
1.linux系统的基础优化 (1)关闭selinux sed -i 's#SELINUX=enforcing#SELINUX=disabled#g' /etc/selinux/config 临时关闭 ...
- linux运维、架构之路-linux基础优化
1.查看linux版本 cat /etc/redhat-release #CentOS release 6.9 (Final) ————>查看版本号 uname -m #x86_64 ————& ...
- linux基础优化
[root@moban oldboy]# for oldboy in `chkconfig --list |grep "3:on" |awk '{print $1}' |grep ...
- Centos6.5 64linux系统基础优化(二)
1 操作的最小化原则 1)安装系统最小化 2)开启程序服务最小化原则 3)操作最小化原则 4)登陆最小化原则;平时没有需求不用root登陆,要用普通登陆. 2 更改ssh服务默认端口及常规配置 # ...
- Linux实战教学笔记06:Linux系统基础优化
第六节 Linux系统基础优化 标签(空格分隔):Linux实战教学笔记-陈思齐 第1章 基础环境 第2章 使用网易163镜像做yum源 默认国外的yum源速度很慢,所以换成国内的. 第一步:先备份 ...
随机推荐
- jq 点击除了某元素以外的其他所有元素
$('body').click(function(e){ if(($(e.target).attr('class')!='header-top-nav-ipt')){ alert('除了class=h ...
- go 基础 结构体 接口 访问权限
package School type SchoolModel struct { Name string Address string StudentCount int Is985 bool } ty ...
- lab 颜色模式的生理原因 黄色, 洋红色 刺眼。 绿色,蓝色,不刺眼。
hsb 颜色模式理解了. lab 颜色模式,都说是生理原因.没说是啥生理原因. 猜测:黄色, 洋红色 刺眼. 绿色,蓝色,不刺眼. https://blog.csdn.net/self_mind/ ...
- 2019.05.30 S4 BUPT BP 客户增强说明
- 看了一圈,发现网上BUPT增强的很少,有的也是做一个字段的页签的增强,我自己花时间研究了一下,在BP增加新的interface 界面按钮. BP页签增强部分就不写了,大家看链接吧 加上如何做出新的 ...
- IDEA "Library source does not match the bytecode for class"问题
问题描述 Jar包更新后,报错信息:"Library source does not match the bytecode for class" 经检查,发现Jar内容还是旧版本的 ...
- Python爬虫学习==>第四章:MySQL的安装
学习目的: 掌握MySQL数据库的安装 正式步骤 Step1:安装数据库 百度MySQL,下载软件 端口设置 设置密码,我的密码123456 下一步 下一步 查看MySQL服务器是否启动 PS:未申明 ...
- 【HANA系列】【第六篇】SAP HANA XS使用JavaScript(JS)调用存储过程(Procedures)
公众号:SAP Technical 本文作者:matinal 原文出处:http://www.cnblogs.com/SAPmatinal/ 原文链接:[HANA系列][第六篇]SAP HANA XS ...
- 解决anaconda安装cvxpy失败的方法
在Windows下安装凸优化包CVXPY 直接在anaconda prompt中输入pip install cvxpy经常会出现安装失败的情况,使用以下方法,亲测成功! 1. 下载所需的whl文件,请 ...
- 配置传统vlan间路由
S1#SH RUN spanning-tree mode pvst ! interface FastEthernet0/1 switchport access vlan 10 switchport m ...
- webdriervAPI(WebElement接口常用方法)
from selenium import webdriver driver = webdriver.Chorme() driver.get("http://www.baidu.co ...
