http服务详解(3)
https
https:http over ssl
SSL会话的简化过程
(1) 客户端发送可供选择的加密方式,并向服务器请求证书

(2) 服务器端发送证书以及选定的加密方式给客户端

(3) 客户端取得证书并进行证书验证
如果信任给其发证书的CA
(a) 验证证书来源的合法性;用CA的公钥解密证书上数字签名

(b) 验证证书的内容的合法性:完整性验证

(c) 检查证书的有效期限

(d) 检查证书是否被吊销

(e) 证书中拥有者的名字,与访问的目标主机要一致
(4) 客户端生成临时会话密钥(对称密钥),并使用服务器端的公钥加密此数据发送给服务器,完成密钥交换
(5) 服务用此密钥加密用户请求的资源,响应给客户端
注意:SSL是基于IP地址实现,单IP的主机仅可以使用一个https虚拟主机
https实现
(1) 为服务器申请数字证书
测试:通过私建CA发证书
(a) 创建私有CA

(b) 在服务器创建证书签署请求

(c) CA签证
(2) 配置httpd支持使用ssl,及使用的证书
yum -y install mod_ssl
配置文件:/etc/httpd/conf.d/ssl.conf
DocumentRoot

ServerName

SSLCertificateFile

SSLCertificateKeyFile
(3) 测试基于https访问相应的主机
openssl s_client [-connect host:port] [-cert filename] [-CApath directory] [-CAfile filename]
实现HTTP网站加密
第一种申请证书方式(自签名证书)
A主机:192.168.34.100 提供加密的网站
B主机:192.168.34.101 客户端
(1)在A主机安装mod_ssl模块
[root@centos7 ~]# yum install mod_ssl -y
(2)可以查看到安装mod_ssl模块时,执行了以下哎脚本就已经自动生成了公私钥文件,不需要我们再进行自签名证书
[root@centos7 ~]# rpm -q --scripts mod_ssl

postinstall scriptlet (using /bin/sh):

umask 077

if [ -f /etc/pki/tls/private/localhost.key -o -f /etc/pki/tls/certs/localhost.crt ]; then

   exit 0

fi

/usr/bin/openssl genrsa -rand /proc/apm:/proc/cpuinfo:/proc/dma:/proc/filesystems:/proc/interrupts:/proc/ioports:/proc/pci:/proc/rtc:/proc/uptime 2048 > /etc/pki/tls/private/localhost.key 2> /dev/null

FQDN=`hostname`

if [ "x${FQDN}" = "x" -o ${#FQDN} -gt 59 ]; then

   FQDN=localhost.localdomain

fi

cat << EOF | /usr/bin/openssl req -new -key /etc/pki/tls/private/localhost.key \

         -x509 -sha256 -days 365 -set_serial $RANDOM -extensions v3_req \

         -out /etc/pki/tls/certs/localhost.crt 2>/dev/null

--

SomeState

SomeCity

SomeOrganization

SomeOrganizationalUnit

${FQDN}

root@${FQDN}

EOF
证书存放路径:
[root@centos7 asite]# cd /etc/pki/tls/certs/

[root@centos7 certs]# ll

total 16

lrwxrwxrwx. 1 root root   49 Jan  4 16:32 ca-bundle.crt -> /etc/pki/ca-trust/extracted/pem/tls-ca-bundle.pem

lrwxrwxrwx. 1 root root   55 Jan  4 16:32 ca-bundle.trust.crt -> /etc/pki/ca-trust/extracted/openssl/ca-bundle.trust.crt

-rw-------  1 root root 1391 Mar 31 10:43 localhost.crt  # 自签名颁发的证书

-rwxr-xr-x. 1 root root  610 Aug  9  2019 make-dummy-cert

-rw-r--r--. 1 root root 2516 Aug  9  2019 Makefile

-rwxr-xr-x. 1 root root  829 Aug  9  2019 renew-dummy-cert
(3)此时我们的/etc/httpd/conf.d/目录下就会生产一个ssl.conf加密文件,加密的关键信息,就是监听了443端口,并指定了https类型,不指定会默认为http,且加密默认访问的住配置文件的网站在/var/www/html目录下
vim /etc/httpd/conf.d/ssl.conf 生成的ssl.conf配置文件不需要修改,这里只是展示重要信息而已。
Listen 443 https

SSLCertificateFile /etc/pki/tls/certs/localhost.crt   # 证书存放路径

SSLCertificateKeyFile /etc/pki/tls/private/localhost.key  # 私钥存放路径
(4)注释掉httpd主配置文件的documenroot "/var/www/html"路径,并自定义访问路径。
1、注释掉httpd主配置文件的路径
[root@centos7 www]# vim /etc/httpd/conf/httpd.conf

#DocumentRoot "/var/www/html"  # 注释掉此行即可。
2、指定自定义的/data/www目录下访问网站
[root@centos7 www]# cat  /etc/httpd/conf.d/test.conf

documentroot "/data/www"  # 指定访问的网站路径

<directory "/data/www">

 require all granted  # 授权所有人都可以访问

</directory>
3、定义访问页面:
[root@centos7 www]# echo welcome to shanghai > /data/www/index.html
访问网站
1、在B主机客户端访问效果
[root@centos7 ~]# curl -k https://192.168.7.100   # -k是跳过检查

welcome to shanghai
2、此时就会提示不安全的网站:

第二种方法:搭建私有CA,实现HTTPS加密
(1)在A主机的/etc/pki/CA目录下生成私钥
[root@centos7html]#cd /etc/pki/CA

[root@centos7CA]#tree

.

├── certs

├── crl

├── newcerts

└── private

4 directories, 0 files

[root@centos7CA]#(umask 066;openssl genrsa  -out private/cakey.pem 2048)  生成私钥证书

Generating RSA private key, 2048 bit long modulus

..........................................................................................................+++

.......................................+++

e is 65537 (0x10001)
(2)在A主机上申请自签名证书:
[root@centos7CA]#openssl req -new -x509 -key  private/cakey.pem  -out cacert.pem

You are about to be asked to enter information that will be incorporated

into your certificate request.

What you are about to enter is what is called a Distinguished Name or a DN.

There are quite a few fields but you can leave some blank

For some fields there will be a default value,

If you enter '.', the field will be left blank.

-----

Country Name (2 letter code) [XX]:CN

State or Province Name (full name) []:beijing

Locality Name (eg, city) [Default City]:beijing

Organization Name (eg, company) [Default Company Ltd]:magedu

Organizational Unit Name (eg, section) []:devops

Common Name (eg, your name or your server's hostname) []:ca.magedu.com

Email Address []:
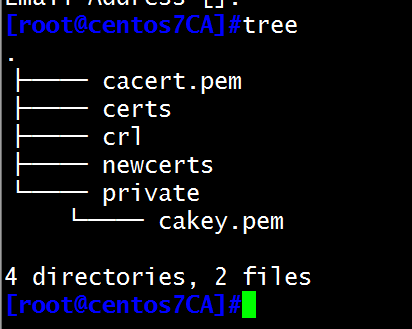
查看当前创建文件的tree结构

(3)在A主机上新建两个文件
[root@centos7CA]#touch index.txt

[root@centos7CA]#echo 01 > serial

(4)在A主机向服务端申请证书
1、先生成私钥
[root@centos7CA]#cd /etc/httpd/conf.d

[root@centos7conf.d]#ls

autoindex.conf  httpdgroup  httpdpass  manual.conf  README  ssl.conf  test.conf  userdir.conf  welcome.conf

[root@centos7conf.d]#mkdir ssl  新建一个ssl目录

[root@centos7conf.d]#cd ssl

[root@centos7ssl]#pwd

/etc/httpd/conf.d/ssl

[root@centos7ssl]#(umask 077;openssl genrsa -out httpd.key 1024)  生成私钥

Generating RSA private key, 1024 bit long modulus

..........++++++

.......++++++

e is 65537 (0x10001)
2、生成证书申请文件
[root@centos7ssl]#openssl req -new -key  httpd.key -out  httpd.csr

You are about to be asked to enter information that will be incorporated

into your certificate request.

What you are about to enter is what is called a Distinguished Name or a DN.

There are quite a few fields but you can leave some blank

For some fields there will be a default value,

If you enter '.', the field will be left blank.

-----

Country Name (2 letter code) [XX]:CN   国家一致

State or Province Name (full name) []:beijing  省份一致

Locality Name (eg, city) [Default City]:beijing

Organization Name (eg, company) [Default Company Ltd]:magedu  公司一致

Organizational Unit Name (eg, section) []:beiguobu

Common Name (eg, your name or your server's hostname) []:*.magedu.com

Email Address []:

Please enter the following 'extra' attributes

to be sent with your certificate request

A challenge password []:

An optional company name []:
(5)在A主机开始颁发证书
[root@centos7CA]#cd /etc/pki/CA    切换到CA目录下

[root@centos7CA]#openssl ca -in /etc/httpd/conf.d/ssl/httpd.csr  -out  certs/httpd.crt  -days 100  颁发证书

Using configuration from /etc/pki/tls/openssl.cnf

Check that the request matches the signature

Signature ok

Certificate Details:

        Serial Number: 1 (0x1)

        Validity

            Not Before: Nov 28 14:09:59 2019 GMT

            Not After : Mar  7 14:09:59 2020 GMT

        Subject:

            countryName               = CN

            stateOrProvinceName       = beijing

            organizationName          = magedu

            organizationalUnitName    = beiguobu

            commonName                = *.magedu.com

        X509v3 extensions:

            X509v3 Basic Constraints:

                CA:FALSE

            Netscape Comment:

                OpenSSL Generated Certificate

            X509v3 Subject Key Identifier:

                E3:03:AB:A2:28:41:EB:41:A8:2F:35:DD:A1:D3:FA:F4:9B:2E:49:EB

            X509v3 Authority Key Identifier:

                keyid:E5:B6:6E:DC:62:18:90:3C:6E:BD:08:CF:4A:9A:1B:E5:2E:3A:15:F0

Certificate is to be certified until Mar  7 14:09:59 2020 GMT (100 days)

Sign the certificate? [y/n]:y

1 out of 1 certificate requests certified, commit? [y/n]y

Write out database with 1 new entries

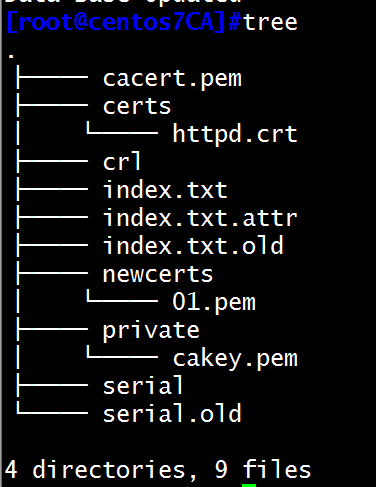
Data Base Updated

(6)将certs目录下的文件以及cacert.pem文件都复制到ssl目录下
[root@centos7CA]#cp certs/httpd.crt   /etc/httpd/conf.d/ssl/  复制httpd.crt文件到ssl目录下

[root@centos7CA]#cd /etc/httpd/conf.d/ssl

[root@centos7ssl]#ls

httpd.crt  httpd.csr  httpd.key

[root@centos7CA]#cp cacert.pem /etc/httpd/conf.d/ssl  复制cacert.pem文件到ssl目录下

[root@centos7CA]#ls /etc/httpd/conf.d/ssl

cacert.pem httpd.crt httpd.csr httpd.key
(7)修改mod_ssl配置文件信息
vim /etc/httpd/conf.d/ssl.conf
SSLCertificateFile /etc/httpd/conf.d/ssl/httpd.crt  证书文件路径

SSLCertificateKeyFile /etc/httpd/conf.d/ssl/httpd.key 私钥文件路径

SSLCACertificateFile /etc/httpd/conf.d/ssl/cacert.pem  CA证书文件路径

重启httpd服务:systemctl restart httpd
在网页上查看结果:将证书安装后,就会信任此证书,就不会再提示危险网址

http重定向https
(1)将http请求转发至https的URL
(2)重定向
Redirect [status] URL-path URL
(3)status状态:
Permanent: 返回永久重定向状态码 301
Temp:返回临时重定向状态码302. 此为默认值
示例:
Redirect temp / https://www.magedu.com/
HSTS
HSTS:HTTP Strict Transport Security (常用此功能)
服务器端配置支持HSTS后,会在给浏览器返回的HTTP首部中携带HSTS字段。浏览器获取到该信息后,会将所有HTTP访问请求在内部做307跳转到HTTPS。而无需任何网络过程
HSTS preload list
是Chrome浏览器中的HSTS预载入列表,在该列表中的网站,使用Chrome浏览器访问时,会自动转换成HTTPS。Firefox、Safari、Edge浏览器也会采用这个列表
实现HSTS示例:
vim /etc/httpd/conf/httpd.conf

Header always set Strict-Transport-Security "max-age=31536000"  总是加密,但定义跳转时间有效期,以数s为单位,实际是1年

RewriteEngine on

RewriteRule ^(/.*)$ https://%{HTTP_HOST}$1 [redirect=302]
演示:网页跳转
修改httpd配置文件
vim /etc/httpd/conf/httpd.conf
RewriteEngine on

RewriteRule ^(/.*)$ https://%{HTTP_HOST}$1 [redirect=302]

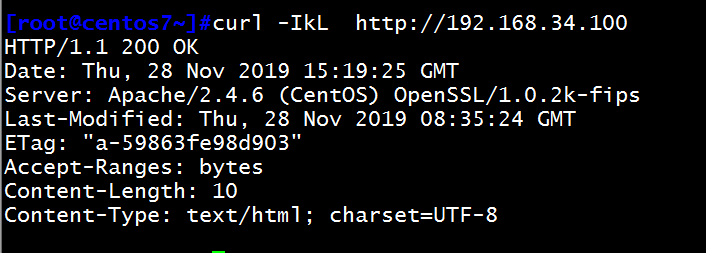
在另一台主机上检测此时的主机跳转结果:

如果想定义一个跳转的有效期,就在/etc/httpd/conf/httpd.conf配置文件中加入一条代码,并实现HSTS功能,如下:
Header always set Strict-Transport-Security "max-age=31536000" 总是加密,定义跳转时间有效期,以数s为单位,算下来就是一年
vim /etc/httpd/conf/httpd.conf 在最底部写入此配置文件内容即可

http服务详解(3)的更多相关文章
- winxp计算机管理中服务详解
winxp计算机管理中服务详解01 http://blog.sina.com.cn/s/blog_60f923b50100efy9.html http://blog.sina.com.cn/s/blo ...
- Android中Service(服务)详解
http://blog.csdn.net/ryantang03/article/details/7770939 Android中Service(服务)详解 标签: serviceandroidappl ...
- WCF中队列服务详解
WCF中队列服务详解 一.引言 在前面的WCF服务中,它都要求服务与客户端两端都必须启动并且运行,从而实现彼此间的交互.然而,还有相当多的情况希望一个面向服务的应用中拥有离线交互的能力.WCF通过服务 ...
- 【转】SSH服务详解
[转]SSH服务详解 第1章 SSH服务 1.1 SSH服务协议说明 SSH 是 Secure Shell Protocol 的简写,由 IETF 网络工作小组(Network Working Gro ...
- (转)SSH服务详解
SSH服务详解 原文:http://www.cnblogs.com/clsn/p/7711494.html 第1章 SSH服务1.1 SSH服务协议说明SSH 是 Secure Shell Proto ...
- HTTPD之二————HTTPD服务详解————httpd的配置文件常见设置
HTTPD之二----HTTPD服务详解----httpd的配置文件常见设置 HTTP服务器应用 http服务器程序 httpd apache nginx lighttpd 应用程序服务器 IIS,a ...
- angular-ngSanitize模块-$sanitize服务详解
本篇主要讲解angular中的$sanitize这个服务.此服务依赖于ngSanitize模块. 要学习这个服务,先要了解另一个指令: ng-bing-html. 顾名思义,ng-bind-html和 ...
- Java从入门到精通——数据库篇Oracle 11g服务详解
装上Oracle之后大家都会感觉到我们的电脑慢了下来,如何提高计算机的速度呢?我们应该打开必要的服务,关闭没有用的服务.下面是Oracle服务的详解: Oracle ORCL VSS Writer S ...
- windows 7 系统进程服务详解
windows 7已经发布有段时间了,相信很多网友都已经换上了传说中非常完美的win7系统.win7不仅继承而且还超越了vista的美观界面,性能优化方面也下足了功力.还拥有强大的win xp兼容性, ...
- Oracle 11g服务详解
装上Oracle之后大家都会感觉到我们的电脑慢了下来,如何提高计算机的速度呢?我们应该打开必要的服务,关闭没有用的服务.下面是Oracle服务的详解: Oracle ORCL VSS Writer S ...
随机推荐
- [warn] the "user" directive makes sense only if the master process runs with super-user privileges, ignored in /usr/local/nginx/conf/nginx.conf:1
带有sudo 权限执行就可以了
- Python之汉诺塔递归运算
汉诺塔问题是一个经典的问题.汉诺塔(Hanoi Tower),又称河内塔,源于印度一个古老传说.大梵天创造世界的时候做了三根金刚石柱子,在一根柱子上从下往上按照大小顺序摞着64片黄金圆盘.大梵天命令婆 ...
- Python netaddr CIDR转换
功能 http://netaddr.readthedocs.io/en/latest/tutorial_03.html 将CIDR地址与IP范围相互转化 Convert CIDR to IP rang ...
- 学习docker笔记1
docker是一个能够把开发应用程序自动部署到容器的开源引擎 docker通过namespace实现了资源隔离,通过cgroups实现了资源限制,通过写时复制机制(copy-on-write)实现了高 ...
- 【长期更新】Python使用随想笔记
Q1:python函数传参是传值还是传引用? A:Python参数传递采用的肯定是"传对象引用"的方式.这种方式相当于传值和传引用的一种综合.python不允许程序员选择采用传值还 ...
- leetcode903 Valid Permutations for DI Sequence
思路: dp[i][j]表示到第i + 1个位置为止,并且以剩下的所有数字中第j + 1小的数字为结尾所有的合法序列数. 实现: class Solution { public: int numPer ...
- markdown转移字符表
本片转的ASCII码,主要针对$,另外我为了不让"&#xxx;"被转移成字符,我在分号";"前加了个空格,复制的时候注意一下 字符 转义 0 空格 @ ...
- win10系统不能ping通vmware虚假机解决办法
在使用vmware安装虚拟机后,在虚拟机里面可以上网,但就是不能在宿主机通过远程连接工具连接 同时也不能ping通虚拟机 检查网络配置 查看网关 在宿主机打开 ip地址填写刚刚查看的网关,同时把子网掩 ...
- [转帖]nginx location配置详细解释
nginx location配置详细解释 http://outofmemory.cn/code-snippet/742/nginx-location-configuration-xiangxi-exp ...
- [转帖]从光刻机的发展,看懂ASML为何是不可取替
从光刻机的发展,看懂ASML为何是不可取替 http://mini.eastday.com/mobile/171230223351249.html# 2017-12-30 22:33 来源:半导 ...
