python3+pyshark读取wireshark数据包并追踪telnet数据流
一、程序说明
本程序有两个要点,第一个要点是读取wireshark数据包(当然也可以从网卡直接捕获改个函数就行),这个使用pyshark实现。pyshark是tshark的一个python封装,至于tshark可以认为是命令行版的wireshark,随wireshark一起安装。
第二个要点是追踪流,追踪流在wireshark中是“tcp.stream eq 70”之类的形式,但是70这类值暂是不知道具体怎么计算出来的,但从网上资料看,是依据[IP address A, TCP port A, IP address B, TCP port B]四元组计算出来的,只要这四个值一样那么计算出来的tcp.stream也就一样,就认为是同一个流。那么,反过来也就是说“tcp.stream eq 70”这种形式,其实等价于"ip.addr == ip_a and tcp.port == port_a and ip.addr == ip_b and tcp.port == port_b"的形式,我们这里就是用这种形式来追踪telnet流。
至于为什么一再强调是追踪telnet流而不是追踪流,是因为感觉各应用层协议没有统一获取应用层协议内容的方法,比如这里通过tmp_packet[highest_layer_name].get_field('data')形式读取telnet数据的,但http则得用tmp_packet['http'].file_data读取,ftp等其他协议又要通过其他不同属性来获取。
另外还要说明的一点是,数据包的每次过滤主要是借助写display_filter重新读取数据包文件,而不是将所有数据包读入后自己写代码进行过滤(就实际来看这种方法比借助写display_filter重新读取数据包文件要复杂且运行速度要慢)或者写display_filter进行二次过滤(tshark本身就不支持二次过滤,就观察来看wireshark自己也没有二次过滤这种东西在执行过滤器表达式时都是重新读取数据包文件)
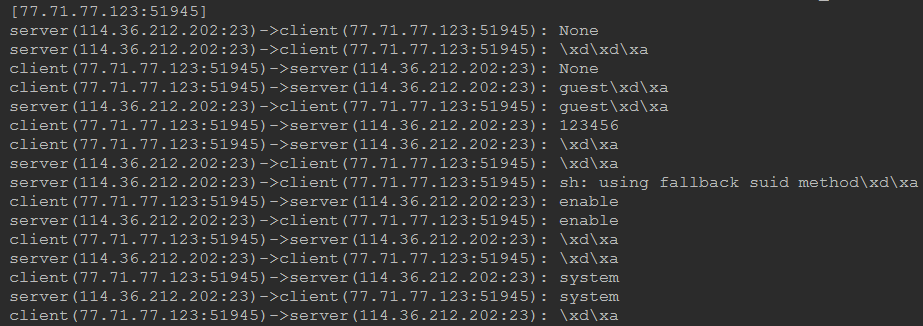
运行效果如下:
二、程序源代码
import pyshark

class wireshark_analysis_script():

    # 此函数的作用是封装一下pyshark.FileCapture

    def read_packets_from_file(self,packets_file_path,tshark_path,display_filter):

        packets_file_obj = pyshark.FileCapture(input_file=packets_file_path,tshark_path=tshark_path,display_filter=display_filter)

        return packets_file_obj

    # 此函数的作用是从传送过来的所有数据包中,抽取并返回{ip_server,ip_client,port_server,port_client}四元组

    def get_target_client_ip_port(self,packets_file_obj):

        for tmp_packet in packets_file_obj:

            ip_server = tmp_packet.ip.src

            port_server = tmp_packet.tcp.srcport

            ip_client = tmp_packet.ip.dst

            port_client = tmp_packet.tcp.dstport

            yield {"ip_server":ip_server,"port_server":port_server,"ip_client":ip_client, "port_client":port_client}

    # 此函数的作用是读取传过来的所有数据包应用层的数据,并打印

    def follow_tcp_stream(self,packets_file_obj,ip,port):

        for tmp_packet in packets_file_obj:

            highest_layer_name = tmp_packet.highest_layer

            if ((tmp_packet.ip.dst == ip) and (tmp_packet.tcp.dstport == port)):

                print("server(%s:%s)->client(%s:%s): %s" % (tmp_packet.ip.src, tmp_packet.tcp.srcport, tmp_packet.ip.dst, tmp_packet.tcp.dstport, tmp_packet[highest_layer_name].get_field('data')))

            elif ((tmp_packet.ip.src == ip) and (tmp_packet.tcp.srcport == port)):

                print("client(%s:%s)->server(%s:%s): %s" % (tmp_packet.ip.src, tmp_packet.tcp.srcport, tmp_packet.ip.dst, tmp_packet.tcp.dstport, tmp_packet[highest_layer_name].get_field('data')))

if __name__ == '__main__':

    # 要读取的wireshark数据包的所在的路径

    packets_file_path = 'F:\\PycharmProjects\\telnet\\pyshark_pack'

    # tshark程序所在的路径,tshark随wireshark安装

    tshark_path = 'D:\\tools\\Wireshark\\tshark.exe'

    # 过滤器表达式,与在wireshark中使用时的写法完全相同

    first_step_filter = 'telnet contains "HiLinux"'

    # 用于存放要追踪流的ip和端口

    target_client_ip_port = []

    # 实例化类

    wireshark_analysis_script_instance = wireshark_analysis_script()

    # 使用first_step_filter过滤器表达式,过滤出要追踪流的数据包

    first_step_obj = wireshark_analysis_script_instance.read_packets_from_file(packets_file_path, tshark_path, first_step_filter)

    # 从要追踪流的数据包中抽取出ip和端口

    target_client_ip_port = wireshark_analysis_script_instance.get_target_client_ip_port(first_step_obj)

    first_step_obj.close()

    # 遍历要追踪流的ip+端口组合

    for target_client_ip_port_temp in target_client_ip_port:

        ip_server = target_client_ip_port_temp['ip_server']

        port_server = target_client_ip_port_temp['port_server']

        ip_client = target_client_ip_port_temp['ip_client']

        port_client = target_client_ip_port_temp['port_client']

        # 这里是追踪流的关键,所有数据包中如果数据包中{ip_server,ip_client,port_server,port_client}四元组相同,那么就认为是同一个流

        # 当然追踪流一般都是追踪应用层的数据流,所以加上应用层协议运行过滤去掉三次握手四次挥手等没有应用层数据的数据包;我这里要追踪telnet数据流,所以除四元组外还加了telnet做过滤

        second_step_filter = 'telnet and ip.addr == %s and ip.addr == %s  and tcp.port == %s and tcp.port == %s' % (ip_server,ip_client,port_server,port_client)

        second_step_obj = wireshark_analysis_script_instance.read_packets_from_file(packets_file_path, tshark_path, second_step_filter)

        print("[%s:%s]" % (ip_client, port_client))

        # 调用follow_tcp_stream将认为是同一个流的所有数据包的应用层数据打印

        wireshark_analysis_script_instance.follow_tcp_stream(second_step_obj, ip_client, port_client)

        second_step_obj.close()
三、使用与wireshark一致的形式【20180929更新】
在前边的解决方案中,我们使用"ip.addr == ip_a and tcp.port == port_a and ip.addr == ip_b and tcp.port == port_b"等价代替wireshark中“tcp.stream eq 70”的形式来实现追踪流,当时的想法是不知道某个流的70这种值如何计算。
现在发现这种值pyshark在tcp.stream属性直接给出了,所以我们完全可以使用和wireshark的“tcp.stream eq 70”一致的形式来追踪流。第二大节程序可等介修改如下。
(当然因为是等价形式所以输出结果还是一样的,都是要重新解析数据包文件所以效率也就差不多,主要是为了说追流可以使用和wireshark一样的形式)
import pyshark

class wireshark_analysis_script():

    # 此函数的作用是封装一下pyshark.FileCapture

    def read_packets_from_file(self, packets_file_path, tshark_path, display_filter):

        packets_file_obj = pyshark.FileCapture(input_file=packets_file_path, tshark_path=tshark_path, display_filter=display_filter)

        return packets_file_obj

    # 此函数的作用是从传送过来的所有数据包中,抽取并返回{ip_server,ip_client,port_server,port_client}四元组

    def get_target_client_ip_port(self, packets_file_obj):

        for tmp_packet in packets_file_obj:

            ip_server = tmp_packet.ip.src

            port_server = tmp_packet.tcp.srcport

            ip_client = tmp_packet.ip.dst

            port_client = tmp_packet.tcp.dstport

            stream_value = tmp_packet.tcp.stream

            yield {"ip_server": ip_server, "port_server": port_server, "ip_client": ip_client, "port_client": port_client,"stream_value":stream_value}

    # 此函数的作用是读取传过来的所有数据包应用层的数据,并打印

    def follow_tcp_stream(self, packets_file_obj, ip, port):

        for tmp_packet in packets_file_obj:

            highest_layer_name = tmp_packet.highest_layer

            #追踪流时会有握手挥手tcp将其排除

            if highest_layer_name != "TCP":

                if ((tmp_packet.ip.dst == ip) and (tmp_packet.tcp.dstport == port)):

                    print("server(%s:%s)->client(%s:%s): %s" % (tmp_packet.ip.src, tmp_packet.tcp.srcport, tmp_packet.ip.dst, tmp_packet.tcp.dstport, tmp_packet[highest_layer_name].get_field('data')))

                elif ((tmp_packet.ip.src == ip) and (tmp_packet.tcp.srcport == port)):

                    print("client(%s:%s)->server(%s:%s): %s" % (tmp_packet.ip.src, tmp_packet.tcp.srcport, tmp_packet.ip.dst, tmp_packet.tcp.dstport, tmp_packet[highest_layer_name].get_field('data')))

if __name__ == '__main__':

    # 要读取的wireshark数据包的所在的路径

    packets_file_path = 'F:\\PycharmProjects\\telnet\\pyshark_pack'

    # tshark程序所在的路径,tshark随wireshark安装

    tshark_path = 'D:\\tools\\Wireshark\\tshark.exe'

    # 过滤器表达式,与在wireshark中使用时的写法完全相同

    first_step_filter = 'telnet contains "HiLinux"'

    # 用于存放要追踪流的ip和端口

    target_client_ip_port = []

    # 实例化类

    wireshark_analysis_script_instance = wireshark_analysis_script()

    # 使用first_step_filter过滤器表达式,过滤出要追踪流的数据包

    first_step_obj = wireshark_analysis_script_instance.read_packets_from_file(packets_file_path, tshark_path, first_step_filter)

    # 从要追踪流的数据包中抽取出ip和端口

    target_client_ip_port = wireshark_analysis_script_instance.get_target_client_ip_port(first_step_obj)

    first_step_obj.close()

    # 遍历要追踪流的ip+端口组合

    for target_client_ip_port_temp in target_client_ip_port:

        # stream的值

        stream_value = target_client_ip_port_temp['stream_value']

        ip_client = target_client_ip_port_temp['ip_client']

        port_client = target_client_ip_port_temp['port_client']

        # tcp.stream eq 70形式。为了排除tcp其实可以再直接加上and telnet

        second_step_filter = 'tcp.stream eq %s' % (stream_value)

        second_step_obj = wireshark_analysis_script_instance.read_packets_from_file(packets_file_path, tshark_path, second_step_filter)

        print("[%s:%s]" % (ip_client, port_client))

        # 调用follow_tcp_stream将认为是同一个流的所有数据包的应用层数据打印

        wireshark_analysis_script_instance.follow_tcp_stream(second_step_obj, ip_client, port_client)

        second_step_obj.close()
参考:
http://kiminewt.github.io/pyshark/
https://www.wireshark.org/docs/wsug_html_chunked/
https://medium.com/@asfandyar.khalil/tcp-stream-in-pcap-file-using-python-6991a8e7b524
python3+pyshark读取wireshark数据包并追踪telnet数据流的更多相关文章
- 《Wireshark数据包分析实战》 - http背后,tcp/ip抓包分析
作为网络开发人员,使用fiddler无疑是最好的选择,方便易用功能强. 但是什么作为爱学习的同学,是不应该止步于http协议的,学习wireshark则可以满足这方面的需求.wireshark作为抓取 ...
- WireShark数据包分析数据封装
WireShark数据包分析数据封装 数据封装(Data Encapsulation)是指将协议数据单元(PDU)封装在一组协议头和尾中的过程.在OSI七层参考模型中,每层主要负责与其它机器上的对等层 ...
- Wireshark数据包分析入门
Wireshark数据包分析(一)——使用入门 Wireshark简介: Wireshark是一款最流行和强大的开源数据包抓包与分析工具,没有之一.在SecTools安全社区里颇受欢迎,曾一度超越 ...
- wireshark数据包分析
最近有不少同事开始学习Wireshark,他们遇到的第一个困难就是理解不了主界面上的提示信息,于是跑来问我.问的人多了,我也总结成一篇文章,希望对大家有所帮助.Wireshark的提示可是其最有价值之 ...
- Wireshark数据包分析(一)——使用入门
Wireshark简介: Wireshark是一款最流行和强大的开源数据包抓包与分析工具,没有之一.在SecTools安全社区里颇受欢迎,曾一度超越Metasploit.Nessus.Aircrack ...
- wireshark数据包分析实战 第三、四章
1,wireshark支持的协议上千种,开源的. 2,wireshark需要winpcap驱动支持.winpcap驱动的作用通过操作系统捕捉原始数据包.应用过滤器.将网卡切换为混杂模式. 3,捕获文件 ...
- wireshark数据包分析实战 第一章
1,数据包分析工具:tcpdump.wireshark.前者是命令行的,后者是图形界面的. 分析过程:收集数据.转换数据(二进制数据转换为可读形式).分析数据.tcpdump不提供分析数据,只将最原始 ...
- WireShark数据包分析一:认识WireShark
一.认识WireShark WireShark是一款抓包软件,官方网址:WireShark.org 官网如下图: 选择Download,在官网下载安装WireShark即可. WireShark可用来 ...
- wireshark数据包分析实战 第二章
1,监听网络线路:即嗅探器的位置确定. 2,混杂模式:将网卡设置成混杂模式,网卡可以接受经过网卡的所有数据报,包括目的地址不是本网卡的数据报.这些数据都会发送给cpu处理,这样,wireshark就能 ...
随机推荐
- JS绘制拓扑图示例 (JTopo)
目前在做的项目是渔政的监控,需要用到的设备包括雷达,光电,站点信息等,想要更直观的展现设备之间的连接关系和状态信息,这时候需要画一张拓扑图 在做拓扑图之前,首先要学习一下,html里面另一个比较常用的 ...
- 三: vue组件开发及自动化工具vue-cli
一: 组件化开发 1 组件 1: 组件(Component)是自定义封装的功能.在前端开发过程中,经常出现多个网页的功能是重复的,而且很多不同的网站之间,也存在同样的功能. 2: 什么是组件 而在网页 ...
- ABP捕捉异常错误代码
在服务层或者CORE层 随便哪里都可以 创建一个捕捉异常的文件夹 里面写一个LonsidException类 继承后面的接口 然后重写继承的方法 这样在ABP项目运行阶段 无论在哪里出现异 ...
- anusplina 4.36版本使用提示 说明
1),必须要注意的是,你生成的dat文件中,第一列必须是气象站点编号:第二列必须是经度数值,而且是投影坐标下,以 米 为单位:第三列必须是纬度了:第四列必须是海拔了:之后就是你自己的数据,比如平均温度 ...
- vue中使用vw适配移动端
推荐看看大漠老师的文章,非常的有收获 如何在Vue项目中使用vw实现移动端适配 1.首先在项目中安装依赖 npm i postcss-aspect-ratio-mini postcss-px-to-v ...
- VMware vSphere client 中英文语言界面设置
安装的时候可以选择简体中文,然后安装后,对vsphere client的执行程序制作快捷方式 以win7 x64环境默认路径为例 英文启动如下: "C:Program Files (x86) ...
- ROS的安装和卸载
Robot Operating System (ROS) 是一个得到广泛应用机器人系统的软件框架,它包含了一系列的软件库和工具用于构建机器人应用.从驱动到最先进的算法,以及强大的开发者工具,ROS 包 ...
- Java 发送SOAP请求调用WebService,解析SOAP报文
https://blog.csdn.net/Peng_Hong_fu/article/details/80113196 记录测试代码 SoapUI调用路径 http://localhost:8082/ ...
- 雷林鹏分享:XML 编辑器
XML 编辑器 如果您希望极认真地学习和使用 XML,那么您一定会从一款专业的 XML 编辑器的使用上受益. XML 是基于文本的 XML 是基于文本的标记语言. 关于 XML 的一件很重要的事情是, ...
- mismatch详解
mismatch到底只是一个碱基替换,还是也包括了插入缺失? If two sequences in an alignment share a common ancestor, mismatches ...