Springbooot +Mybaties 配置数据库多数据源
前言
在实际项目中,我们可能会碰到在一个项目中会访问多个数据库的情况。针对这种情况,我们就需要配置动态的数据源了。一般按照以下步骤即可
一、在启动类上添加注解

二、在application.properties文件中
#默认数据源
spring.datasource.driver-class-name= com.mysql.jdbc.Driver
spring.datasource.url = jdbc:mysql://127.0.0.1:3306/tianxi_mall?useUnicode=true&characterEncoding=UTF8&serverTimezone=GMT%2B8&allowMultiQueries=true
spring.datasource.username = root
spring.datasource.password =
#其他数据源.sqlserver
custom.datasource.names = ds1
custom.datasource.ds1.driver-class-name = com.mysql.jdbc.Driver
custom.datasource.ds1.url = jdbc:mysql://192.168.2.2:3306/wechat?useUnicode=true&characterEncoding=UTF8&serverTimezone=GMT%2B8&allowMultiQueries=true
custom.datasource.ds1.username = root
custom.datasource.ds1.password =
注:假如其他的数据源不是mysql,请自行百度其他数据的连接驱动
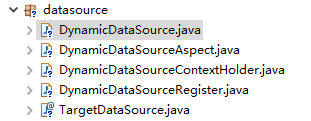
三、配置

import org.springframework.jdbc.datasource.lookup.AbstractRoutingDataSource;
/**
* AbstractRoutingDataSource获取数据源之前会先调用determineCurrentLookupKey方法查找当前的lookupKey,这个lookupKey就是数据源标识。
因此通过重写这个查找数据源标识的方法就可以让spring切换到指定的数据源了
* @author mayn
*
*/
public class DynamicDataSource extends AbstractRoutingDataSource{
protected Object determineCurrentLookupKey() {
//从自定义位置获取数据源标识
return DynamicDataSourceContextHolder.getDataSourceType();
}
}
import org.aspectj.lang.JoinPoint;
import org.aspectj.lang.annotation.After;
import org.aspectj.lang.annotation.Aspect;
import org.aspectj.lang.annotation.Before;
import org.slf4j.Logger;
import org.slf4j.LoggerFactory;
import org.springframework.core.annotation.Order;
import org.springframework.stereotype.Component;
/**
* // 保证该AOP在@Transactional之前执行
* @author mayn
*
*/
@Component
@Aspect
@Order(-1)
public class DynamicDataSourceAspect {
private static final Logger logger = LoggerFactory.getLogger(DynamicDataSourceAspect.class);
@Before("@annotation(ds)")
public void changeDataSource(JoinPoint point, TargetDataSource ds) throws Throwable {
String dsId = ds.name();
if (!DynamicDataSourceContextHolder.containsDataSource(dsId)) {
logger.error("数据源[{}]不存在,使用默认数据源 > {}", ds.name(), point.getSignature());
} else {
logger.debug("Use DataSource : {} > {}", ds.name(), point.getSignature());
DynamicDataSourceContextHolder.setDataSourceType(ds.name());
}
}
@After("@annotation(ds)")
public void restoreDataSource(JoinPoint point, TargetDataSource ds) {
logger.debug("Revert DataSource : {} > {}", ds.name(), point.getSignature());
DynamicDataSourceContextHolder.clearDataSourceType();
}
}
import java.util.ArrayList;
import java.util.List;
/**
* 用于持有当前线程中使用的数据源标识
* @author mayn
*
*/
public class DynamicDataSourceContextHolder {
private static final ThreadLocal<String> contextHolder = new ThreadLocal<String>();
public static List<String> dataSourceIds = new ArrayList<>();
public static void setDataSourceType(String dataSourceType) {
contextHolder.set(dataSourceType);
}
public static String getDataSourceType() {
return contextHolder.get();
}
public static void clearDataSourceType() {
contextHolder.remove();
}
/** * 判断指定DataSrouce当前是否存在 * */
public static boolean containsDataSource(String dataSourceId){
return dataSourceIds.contains(dataSourceId);
}
}
import java.util.HashMap;
import java.util.Map;
import javax.sql.DataSource;
import org.slf4j.Logger;
import org.slf4j.LoggerFactory;
import org.springframework.beans.MutablePropertyValues;
import org.springframework.beans.PropertyValues;
import org.springframework.beans.factory.support.BeanDefinitionRegistry;
import org.springframework.beans.factory.support.GenericBeanDefinition;
import org.springframework.boot.autoconfigure.jdbc.DataSourceBuilder;
import org.springframework.boot.bind.RelaxedDataBinder;
import org.springframework.boot.bind.RelaxedPropertyResolver;
import org.springframework.context.EnvironmentAware;
import org.springframework.context.annotation.ImportBeanDefinitionRegistrar;
import org.springframework.core.convert.ConversionService;
import org.springframework.core.convert.support.DefaultConversionService;
import org.springframework.core.env.Environment;
import org.springframework.core.type.AnnotationMetadata;
public class DynamicDataSourceRegister implements ImportBeanDefinitionRegistrar, EnvironmentAware {
private static final Logger logger = LoggerFactory.getLogger(DynamicDataSourceRegister.class);
private ConversionService conversionService = new DefaultConversionService();
private PropertyValues dataSourcePropertyValues;
// 如配置文件中未指定数据源类型,使用该默认值
private static final Object DATASOURCE_TYPE_DEFAULT = "org.apache.tomcat.jdbc.pool.DataSource";
// private static final Object DATASOURCE_TYPE_DEFAULT =
// "com.zaxxer.hikari.HikariDataSource";
// 数据源
private DataSource defaultDataSource;
private Map<String, DataSource> customDataSources = new HashMap<>();
@Override
public void registerBeanDefinitions(AnnotationMetadata importingClassMetadata, BeanDefinitionRegistry registry) {
Map<Object, Object> targetDataSources = new HashMap<Object, Object>();
// 将主数据源添加到更多数据源中
targetDataSources.put("dataSource", defaultDataSource);
DynamicDataSourceContextHolder.dataSourceIds.add("dataSource");
// 添加更多数据源
targetDataSources.putAll(customDataSources);
for (String key : customDataSources.keySet()) {
DynamicDataSourceContextHolder.dataSourceIds.add(key);
}
// 创建DynamicDataSource
GenericBeanDefinition beanDefinition = new GenericBeanDefinition();
beanDefinition.setBeanClass(DynamicDataSource.class);
beanDefinition.setSynthetic(true);
MutablePropertyValues mpv = beanDefinition.getPropertyValues();
mpv.addPropertyValue("defaultTargetDataSource", defaultDataSource);
mpv.addPropertyValue("targetDataSources", targetDataSources);
registry.registerBeanDefinition("dataSource", beanDefinition);
logger.info("Dynamic DataSource Registry");
}
/** * 创建DataSource * * @param type * @param driverClassName * @param url * @param username * @param password * @return * @author SHANHY * @create 2016年1月24日 */
@SuppressWarnings("unchecked")
public DataSource buildDataSource(Map<String, Object> dsMap) {
try {
Object type = dsMap.get("type");
if (type == null)
type = DATASOURCE_TYPE_DEFAULT;// 默认DataSource
Class<? extends DataSource> dataSourceType;
dataSourceType = (Class<? extends DataSource>) Class.forName((String) type);
String driverClassName = dsMap.get("driver-class-name").toString();
String url = dsMap.get("url").toString();
String username = dsMap.get("username").toString();
String password = dsMap.get("password").toString();
DataSourceBuilder factory = DataSourceBuilder.create().driverClassName(driverClassName).url(url)
.username(username).password(password).type(dataSourceType);
return factory.build();
} catch (ClassNotFoundException e) {
e.printStackTrace();
}
return null;
}
/** * 加载多数据源配置 */
public void setEnvironment(Environment env) {
initDefaultDataSource(env);
initCustomDataSources(env);
}
/** * 初始化主数据源 * * @author SHANHY * @create 2016年1月24日 */
private void initDefaultDataSource(Environment env) {
// 读取主数据源
RelaxedPropertyResolver propertyResolver = new RelaxedPropertyResolver(env, "spring.datasource.");
Map<String, Object> dsMap = new HashMap<>();
dsMap.put("type", propertyResolver.getProperty("type"));
dsMap.put("driver-class-name", propertyResolver.getProperty("driver-class-name"));
dsMap.put("url", propertyResolver.getProperty("url"));
dsMap.put("username", propertyResolver.getProperty("username"));
dsMap.put("password", propertyResolver.getProperty("password"));
defaultDataSource = buildDataSource(dsMap);
dataBinder(defaultDataSource, env);
}
/** * 为DataSource绑定更多数据 * * @param dataSource * @param env * @author SHANHY * @create 2016年1月25日 */
private void dataBinder(DataSource dataSource, Environment env){
RelaxedDataBinder dataBinder = new RelaxedDataBinder(dataSource);
//dataBinder.setValidator(new LocalValidatorFactory().run(this.applicationContext));
dataBinder.setConversionService(conversionService);
dataBinder.setIgnoreNestedProperties(false);//false
dataBinder.setIgnoreInvalidFields(false);//false
dataBinder.setIgnoreUnknownFields(true);//true
if(dataSourcePropertyValues == null){
Map<String, Object> rpr = new RelaxedPropertyResolver(env, "spring.datasource").getSubProperties(".");
Map<String, Object> values = new HashMap<>(rpr);
// 排除已经设置的属性
values.remove("type");
values.remove("driver-class-name");
values.remove("url");
values.remove("username");
values.remove("password");
dataSourcePropertyValues = new MutablePropertyValues(values);
}
dataBinder.bind(dataSourcePropertyValues);
}
/** * 初始化更多数据源 * * @author SHANHY * @create 2016年1月24日 */
private void initCustomDataSources(Environment env) {
// 读取配置文件获取更多数据源,也可以通过defaultDataSource读取数据库获取更多数据源
RelaxedPropertyResolver propertyResolver = new RelaxedPropertyResolver(env, "custom.datasource.");
String dsPrefixs = propertyResolver.getProperty("names");
for (String dsPrefix : dsPrefixs.split(",")) {// 多个数据源
Map<String, Object> dsMap = propertyResolver.getSubProperties(dsPrefix + ".");
DataSource ds = buildDataSource(dsMap);
customDataSources.put(dsPrefix, ds);
dataBinder(ds, env);
}
}
}
import java.lang.annotation.Documented;
import java.lang.annotation.ElementType;
import java.lang.annotation.Retention;
import java.lang.annotation.RetentionPolicy;
import java.lang.annotation.Target;
/**
* 自定义注解
* @author mayn
*
*/
@Target({ElementType.METHOD, ElementType.TYPE })
@Retention(RetentionPolicy.RUNTIME)
@Documented
public @interface TargetDataSource {
String name();
}
四、配置完成后,只需在要切换数据源的映射接口上添加注解@TargetDataSource(name="ds1") 即可。注意,ds1是自定义的,对应了配置application.properties中的ds1,如下
/**
* 切换数据源查询
*/
@TargetDataSource(name="ds1")
public List<CardInfoResponse> cardInfo(String card_id) {
return cardMapper.cardInfo(card_id);
}
五、至此,完成,亲测有效。假如需要拓展更多的数据源,则相应继续往下配置即可。
Springbooot +Mybaties 配置数据库多数据源的更多相关文章
- 如何配置数据库ODBC数据源
在<调整计算机的设置>中,点击<系统和安全>. 点击<管理工具>. 点击<数据源(ODBC)>. 点击<系统用户>,然后,点击按 ...
- Spring主从数据库的配置和动态数据源切换原理
原文:https://www.liaoxuefeng.com/article/00151054582348974482c20f7d8431ead5bc32b30354705000 在大型应用程序中,配 ...
- 配置ODBC DSN数据源,导出数据库数据到Excel过程记录
一.前言 工作中我们可能遇到这样的需要:查询数据库中的信息,并将结果导出到Excel文件.这本来没什么,但数据量比较大时,用PLSQL.toad导出Excel会出现内存不足等情况,使用odbc+Mic ...
- Spring配置多个数据源
Spring 配置多数据源实现数据库读写分离 博客分类: Spring 数据库 现在大型的电子商务系统,在数据库层面大都采用读写分离技术,就是一个Master数据库,多个Slave数据库.Mast ...
- tomcat配置JNDI获取数据源
各个web工程可以通过工程内的xml文件配置访问数据库的数据源,这样的配置是各个工程私有的.基于JNDI为tomcat配置数据源,则可以做成全局的,各工程只需要通过便签引用数据源即可. 1.需要将数据 ...
- SpringMVC+Mybatis 如何配置多个数据源并切换?
最近公司一个项目需要连接两个数据库(A和B)操作,有的模块查询A库,有的模块查询B库,因此需要改造下,项目后台用的是SpringMVC+Mybatis+MySQL架构,折腾了两天后终于搞定了,在这里记 ...
- SpringBoot入门之基于Druid配置Mybatis多数据源
上一篇了解了Druid进行配置连接池的监控和慢sql处理,这篇了解下使用基于基于Druid配置Mybatis多数据源.SpringBoot默认配置数据库连接信息时只需设置url等属性信息就可以了,Sp ...
- 20. Spring Boot 默认、自定义数据源 、配置多个数据源 jdbcTemplate操作DB
Spring-Boot-2.0.0-M1版本将默认的数据库连接池从tomcat jdbc pool改为了hikari,这里主要研究下hikari的默认配置 0. 创建Spring Boot项目,选中 ...
- 配置多个数据源,spring profile 多环境配置管理
针对生产环境,测试环境,以及本地调试开发有时会配置多套数据库,在一个数据配置文件进行修改,往往有时发布到生成环境会忘记修改,或者本地调试时还是生产环境的库,会导致生产环境数据被污染. ps--刚开始配 ...
随机推荐
- [xdoj] 1301&1302 数字计数 数字计数的复仇
1.首先需要掌握二进制数的一种特性,00=0,01=1,10=2,11=3.每一个二进制的值代表他前面的二进数的个数,比如11=3,他的前面就有三个二进制的数字,不过在本题中,题目数据是1-n,故把0 ...
- ida6.8 android so调试
献给还不会的同学. 我的设备 1.魅族手机,自带root功能 2.ida6.8 1.上传ida 目录下dbgsrv/android_server 到 手机上,这个目录自己可以修改,网上都用的adb p ...
- Hibernate基础增删改查语法
1.创建好Hibernate项目,创建好实体类和测试类,如果不会创建Hibernate项目的同学,点此处:http://www.cnblogs.com/zhaojinyan/p/9336174.htm ...
- es6Math对象新增的方法
Math.trunc() Math.trunc方法用于去除一个数的小数部分,返回整数部分. 对于没有部署这个方法的环境,可以用下面的代码模拟. Math.trunc = Math.trunc || f ...
- idea上将项目上传到github
1.下载并安装好git,然后配置git的path路径.再配置git的全局用户名和邮箱. 2.注册github账号,如果已经有github账号,则此步骤可以省略. 3.在idea中配置git,配置如下: ...
- python多线程,多进程编程。
进程,是目前计算机中为应用程序分配资源的最小单位: 线程,是目前计算机中运行应用程序的最小单位: 在实际系统中,其实进程都是被分为线程来实现的,所以参与时间片轮转的是线程: 但是管理应用程序的资源的单 ...
- python爬虫 ----文章爬虫(合理处理字符串中的\n\t\r........)
import urllib.request import re import time num=input("输入日期(20150101000):") def openpage(u ...
- 擠出機步進馬達的 Steps per Unit 該如何計算?
擠出機步進馬達的 Steps per Unit 該如何計算? 這邊 Steps per Unit 指的是塑料往前推進1mm,步進馬達須要走幾步.依此定義,可知計算方式可以用 步進馬達轉一圈需要的步 ...
- HDU1530 最大流问题
第一次写Dinic 然后贴一下 最基础的网络流问题 嘎嘎: #include <iostream> #include<cstdio> #include<string.h& ...
- Azure Event Hub 技术研究系列1-Event Hub入门篇
前两个系列研究了Azure IoT Hub和Azure Messaging.最近准备继续研究Azure Event Hub,即Azure的事件中心.首先, Azure Event Hub的官方介绍: ...
