react_app 项目开发 (3)_单页面设计_react-router4
(web) 利用 react-router4 实现 单页面 开发
SPA 应用 ---- (Single Page Web Application)
整个应用只有 一个完整的页面
单击链接不会刷新页面,本身不向服务器发请求
点击路由链接,指挥更新局部页面
数据都需要通过 ajax 请求获取,并在前台异步展现
- 路由:
指定了 不同请求 (路由地址 key ) 对应的 处理方式 value
一个路由就是一个映射关系 (key: value ---- 路由路径: 处理函数/component)
- 前台路由: value 就是一个 component 组件 -------- 不会发送 http 请求,但是界面会更新显示对应的组件
<Route path="/about" component={About}>
- 后台路由: value 就是一个处理函数 -------- 进行 http 请求/响应 的过程
router.post("/login", (req, res)=>{});
- 下载: npm install react-router-dom --save // 添加到 生产依赖
如果是开发跨平台应用: npm install react-router-dom --save // 添加到 生产依赖
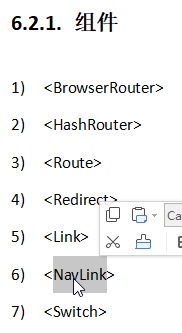

单页面 react 应用
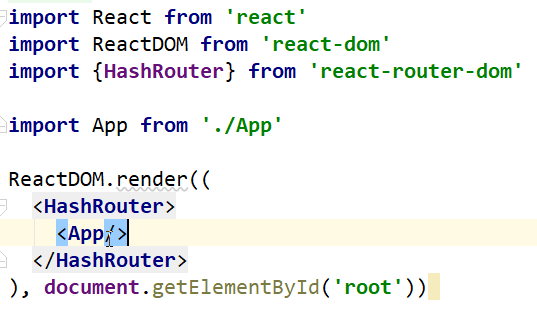
HashRouter
- index.js
import {BrowserRouter, HashRouter, Switch} from "react-router-dom";
// 用 HashRouter 会有 #/home ---- 哈希值
// 明文 经过 hash md5 转换成 32 位的 密文 ---- 同一明文 得到的 密文 始终一致
// 之所以有 # ,是因为利用了 锚点 不会发请求, history 的旧属性 hash 值
App.jsx
// 1. 定义路由链接
<NavLink className="xxx" to="/about">About</NavLink>
<NavLink className="xxx" to="/about">Home</NavLink>
// 2. 定义路由显示
<Switch>
<Route path="/about" component={About}/>
<Route path="/home" component={Home}/>
<Redirect to="/Home"> // 3. 默认定向到 Home 页面
// 4. 重新指定 active 为 activeClass
// <Route path="/home" component={Home} activeClassName="activeClass"/>
<Switch>
---------------- 包装已有组件生成自定义风格的组件 ------------------------------
- 利用了 ...扩展运算符,无论 父组件传什么,都接收了,然后传递给子组件

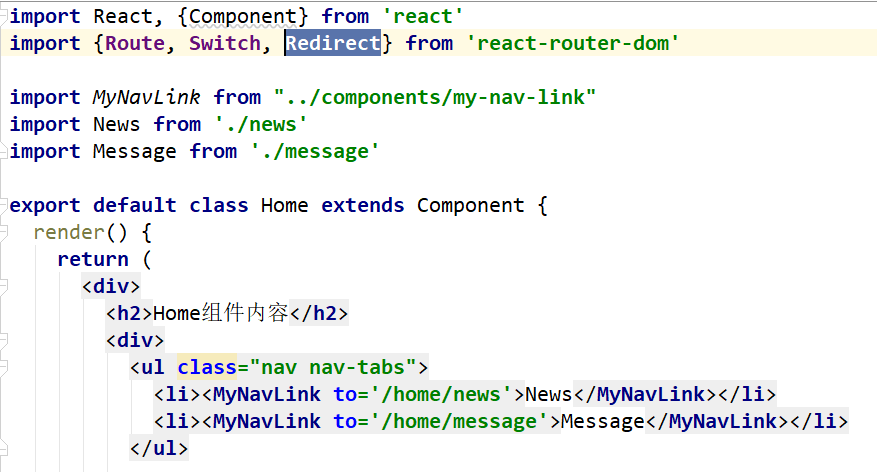
- 嵌套路由
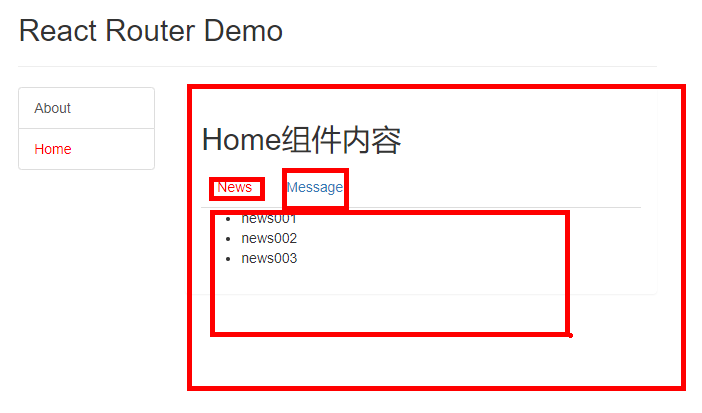
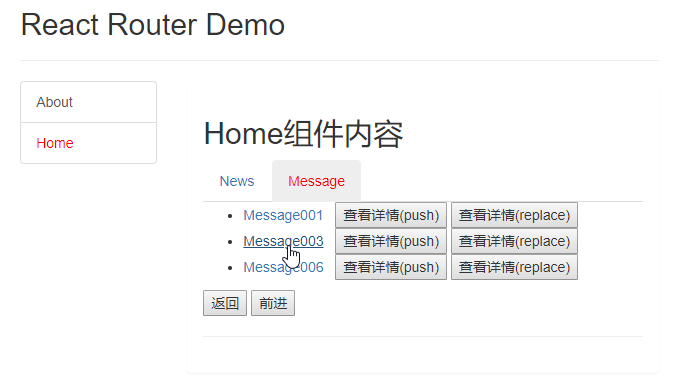
/home/news

BrowserRouter
路由路径没有 #
利用 HTML5 新语法实现
- 以 前端路由实现 为例
<!DOCTYPE html>
<html>
<head>
<meta charset="UTF-8"/>
<title>HashHistory - Browseristory</title> <meta http-equiv="X-UA-Compatible" content="ie=edge"/>
<meta name="viewport"
content="user-scalable=no,
width=device-width,
initial-scale=1.0,
minimum-scale=1.0,
maximum-scale=1.0"/> <style rel="stylesheet" type="text/css">
.unSelectedAble {
/* 内容不可以被选中 */
-webkit-user-select: none;
-moz-user-select: none;
-ms-user-select: none;
user-select: none;
} * {
padding: 0;
margin: 0;
} a {
text-decoration: none;
} ul,
ol {
list-style: none;
} input {
outline: none;
} img {
display: block;
} html,
body {
height: 100%;
/* overflow: hidden; */
} /**** Start ****/
html {
/* touch-action: none; */
} #wrap {
width: 100%;
min-height: 100%; background-color: #b3ccaf;
} #content {
box-shadow: inset 0 0 200px #6d5b2a;
width: 100%;
padding-bottom: 50px;
padding-top: 50px;
padding-left: 50px;
-webkit-box-sizing: border-box;
-moz-box-sizing: border-box;
box-sizing: border-box; font-size: 14px;
color: #4b1f4a;
background-color: #f0f0eb;
} #footer {
box-shadow: 0 0 88px #6d5b2a;
width: 100%;
height: 50px;
margin-top: -50px; color: #f0f0eb;
background-color: #998d68;
text-align: center;
line-height: 50px;
} button {
height: 36px;
margin: 20px;
padding: 4px; color: #000;
font-size: 18px;
background-color: #94b5b2;
border: 0 none;
border-radius: 6px;
} button:hover {
transform: scale(1.2);
box-shadow: 0 0 88px #6d5b2a;
} button:active {
transform: scale(1);
box-shadow: 0 0 40px #6d5b2a;
} input {
padding: 6px;
font-size: 18px;
margin: 0 2px;
background-color: #b76f59;
border: 0 none;
}
</style>
</head> <body class="unSelectedAble"> <!-- 模拟屏幕区域 -->
<div id="wrap"> <!-- 内容区域 -->
<div id="content">
<p><label>
<input type="text">
</label></p>
<a href="/index" onclick="return push('/index')">js push 跳转到 index</a><br><br>
<button onClick="push('/test2')">push 跳转到 test2</button>
<button onClick="replace('/test3')">replace 跳转到 test3</button><br><br>
<button onClick="back()">回退</button>
<button onClick="forword()">前进</button><br><br>
</div>
</div> <!-- 底部区域 -->
<div id="footer">
Copyright ©2019 耶梦加德
</div> <script type="text/javascript" src="https://cdn.bootcss.com/history/4.7.2/history.js"></script>
<script type="text/javascript">
let history = History.createBrowserHistory(); // 方式一
// history = History.createHashHistory() // 方式二
// console.log(history) function push (to) {
history.push(to);
return false
} function back() {
history.goBack()
} function forword() {
history.goForward()
} function replace (to) {
history.replace(to)
} history.listen((location) => {
console.log('请求路由路径变化了', location)
})
</script>
</body>
</html>
组件间的 params 参数传递 ---- 三级路由
定义路由路径时


所以 MessageDetail 返回的 li 应该是
<li>{this.props.match.params.id}</li>
路由跳转
- 路由链接 - 声明式路由导航
页面调转交给组件去完成
- js 之 编程式路由导航 this.porps.history
push 和 replace 的区别在于 goBack() / goForward() 时返回不同的页面
react_app 项目开发 (3)_单页面设计_react-router4的更多相关文章
- react_app 项目开发 (5)_前后端分离_后台管理系统_开始
项目描述 技术选型 react API 接口 接口文档,url,请求方式,参数类型, 根据文档描述的方法,进行 postman 测试,看是否能够得到理想的结果 collections - 创建文件取项 ...
- com.panie 项目开发随笔_功能任务设计(2016.12.28)
(一) 第一个菜单 做什么好呢? 1)上次 在研究的功能 是 爬虫,需要将定时爬虫的任务加进来 2)博客的页面,也需要重新布局出来 3)需要做一个,添加博客的页面 (二) 那就先做博客管理吧! 先添加 ...
- react_app 项目开发 (4)_ React UI 组件库 ant-design 的基本使用
最流行的开源 React UI 组件库 material-ui 国外流行(安卓手机的界面效果)文档 ant-design 国内流行 (蚂蚁金服 设计,一套 PC.一套移动端的____下拉菜单.分页.. ...
- react_app 项目开发 (7)_难点集合
/src/App/Admin/Header 布局 import {Row, Col} from "antd" <div className="header_box& ...
- react_app 项目开发 (8)_角色管理_用户管理----权限管理 ---- shouldComponentUpdate
角色管理 性能优化(前端面试) 需求:只要执行 setState(), 就会调用 render 重新渲染.由于有时调用了 setState,但是并没有发生状态的改变,以致于不必要的刷新 解决: 重写 ...
- react_app 项目开发 (6)_后台服务器端-node
后台服务器端 负责处理前台应用提交的请求,并向前台返回 json 数据 前台应用 负责 展现数据与用户交互 发 ajax 请求与后台应用交互 yarn add axios /src/api/ajax. ...
- react_app 项目开发 (9)_数据可视化 ECharts
数据可视化 ECharts yarn add echarts echarts-for-react
- react_app 项目开发
react_app 项目开发 npm install -g create-react-app npm root -g // 查看安装包位置 创建项目 create-react-app m ...
- com.panie 项目开发随笔_数据字典(2017.2.24)
(一) 做一个网站,第一步需要考虑的是从哪个地方开始下手.首先,每一个功能肯定有最基本的增删改查功能,而此功能一般都分为两个页面. 1) 列表显示页面.用列表来展示数据库中的数据,多用于分页显示.该页 ...
随机推荐
- css长度单位学习(em,rem,px,vw,vh)
绝对长度单位 绝对长度单位代表一个物理测量 [像素px(pixels)] 像素,为影像显示的基本单位,译自英文"pixel",pix是英语单词picture的常用简写,加上英语单词 ...
- China-global view
Good morning everyone. Everyone here would know this year Xia’Men held the BRICS business forum.In a ...
- 高并发秒杀系统--Service接口设计与实现
[DAO编写之后的总结] DAO层 --> 接口设计 + SQL编写 DAO拼接等逻辑 --> 统一在Service层完成 [Service层的接口设计] 1.接口 ...
- jQuery.rotate.js(控制图片转动)
jQuery.rotate.js笔记 1. jQuery.rotate.js是什么 一个开源的兼容多浏览器的jQuery插件用来对元素进行任意角度的旋转动画. 这个库开发的目的是为了旋转img的, ...
- Wndows下Apache+php+Mysql环境的搭建及其涉及的知识(转)
一.安装Apache 1. 在网上搜索以下3个文件,以及找一个地方新建一个文件夹 好吧,这里有下载链接:http://pan.baidu.com/s/1hr9IdSS 文件夹内有:apache,mys ...
- js打印WEB页面内容代码大全
第一种方法:指定不打印区域 使用CSS,定义一个.noprint的class,将不打印的内容放入这个class内. 详细如下: <style media=print type="tex ...
- Stm32 GPIO复习
地点:中图四楼. 1.七个寄存器 配置寄存器:GPIOx_CPL.GPIOx_CPH; 数据寄存器:GPIOx_IDR.GPIOx_ODR: 置位/复位寄存器:GPIOx_BSRR 复位寄存器:GPI ...
- 【Java编程思想笔记】注解--元注解
参考文章:(小白的小小白的白 )https://blog.csdn.net/weixin_42315600/article/details/80630669 https://www.cnblogs.c ...
- mybatis源码笔记
mybatis设计总览 目录结构: 通过配置文件,获取SqlSessionFactory XMLConfigBuilder 解析配置文件,获取SqlSessionFactory private sta ...
- C++入门篇二
c++是c语言的增强版,但是和c语言之间有何区别呢? c和c++的区别: 1.全局变量检测增强int a;int a=10; 2.函数检测增强,参数类型增强,返回值检测增强,函数调用参数检测增强(参数 ...
