用量子计算模拟器ProjectQ生成随机数,并用pytest进行单元测试与覆盖率测试
技术背景
本文中主要包含有三个领域的知识点:随机数的应用、量子计算模拟产生随机数与基于pytest框架的单元测试与覆盖率测试,这里先简单分别介绍一下背景知识。
随机数的应用
在上一篇介绍量子态模拟采样的算法中,我们就使用到了随机数,随机数在各种蒙特卡洛方法与数值计算中,扮演着非常重要的角色。在金融领域,随机数则是在加密算法中扮演重要角色,其风险在于,如果随机数可被预测,那么恶意用户就可以利用这一特点,破解对称加密甚至是非对称加密的算法(非对称加密如RSA算法的私钥的挑选其实也有可能使用到随机数)。在python代码中,可以通过调用random库或者numpy.random库进行随机数的生成,仅需要通过如下的代码即可实现:
import random

random_number = random.random() # 产生[0,1)之间的均匀随机数

import numpy as np

random_array = random.randn(10) # 产生10个随机数并存储到np格式的一维数组中
这些库所产生的随机数,往往被认为是不安全的随机数,其主要特点是通过随机数生成算法,结合硬件的一些独有编号来产生一系列数串。但是随机数生成算法一般都是已知的,因此还是有一定的潜在风险。有一个python库函数叫secrets可以产生"安全随机数",其特点在于不仅利用了一些硬件系统独有信息,如ip和MAC等,主要还利用了系统熵源来生成随机数,增强了所产生随机数的不可预测性。关于secrets的使用方法, 可以参考其官方文档。但是,即使是这里所谓的安全随机数,也并不是真随机数,真随机数的产生不依赖于算法。
量子计算与随机数
前面写过一篇博客介绍两比特量子系统的模拟,读者可以从中了解到量子计算的一些基本原理与模拟实现。而另一篇关于量子线路模拟的博客,则介绍了关于开源量子计算框架ProjectQ的一些基本使用方法,在这篇文章中我们也会使用到。通过量子硬件,我们可以直接读取一系列的随机串,由于这些随机串是由硬件直接给出来的结果,不是通过算法来生成的,因此是完成不可预测的,被称为"真随机数"。
基于pytest的python单元测试框架
在使用python编程实现算法时,需要对算法函数或者类进行功能验证,这就需要写测试用例。python第三方库pytest提供了非常好的自动化测试的功能,配合html插件和覆盖率测试插件,还可以进行更多的测试以及更好的展示测试的结果。
量子计算产生随机数
量子计算是基于量子叠加与量子纠缠两种特性进行计算的方案,其结合量子算法的复杂性优势,在量子处理器上可以实现经典计算机无法在有效时间内完成的任务,一般称之为量子优越性。量子叠加是对量子比特重要特性的一个总结,如下图所示(图片来自于参考链接1),区分于经典比特,量子比特不仅可以表示0和1,还可以表示处于0和1之间的状态,比如0.5,0.2243等等。这些状态我们不能直接读取,在硬件上我们只能够读取到0或者1两种状态,这跟经典比特是一样的。区别在于,即使我们不改变量子比特的状态,不同的测试却会给出不同的结果,而0.5等中间状态,则表示的是出现0或者1状态分别的概率。

由于量子测量会导致量子态的坍缩,也就是说,每一次测量之后,都需要重新制备量子态。而制备一个产生随机数的量子态,我们可以用如下所示的\(H\)量子门操作来实现。其具体的矩阵表述可以参考这篇博客,量子计算本质上就是用特殊的硬件方法,快速的实现大规模的矩阵运算,这也是其展现量子优势的来源。

这里我们直接使用开源量子计算框架ProjectQ来实现这个门操作,就省去了自己去模拟实习的繁琐操作:
# random_number.py

from projectq import MainEngine

from projectq.ops import H, Measure

def random_number_generator():

    eng = MainEngine()

    qubit = eng.allocate_qubit()

    H | qubit

    eng.flush()

    Measure | qubit

    random_number = int(qubit)

    eng.flush(deallocate_qubits=True)

    return random_number

if __name__ == '__main__':

    random_number = random_number_generator()

    print ('Random number generated by quantum simulator is: {}'.format(random_number))
这里顺带的介绍下ProjectQ的一些操作实现的方法,在ProjectQ中将众多的量子比特作为寄存器来进行调用,这些寄存器都在给定的engine下赋予了各种操作,如量子门操作、打印线路、编译优化等。编程框架与实际的量子比特并不在架构上的同一个层次,每次传送指令都是通过eng.flush()打包进行编译优化之后,再传送到后端去逐一执行。因此如果要测量量子比特(在ProjectQ模拟器中必须只能全部执行测量操作,不能只测量其中的某一个部分),或者是读取某一个量子态的概率时,都需要先执行eng.flush()才行。接下来简单看下上述代码的执行效果:
[dechin@dechin-manjaro pytest]$ python3 random_number.py

Random number generated by quantum simulator is: 1

[dechin@dechin-manjaro pytest]$ python3 random_number.py

Random number generated by quantum simulator is: 1

[dechin@dechin-manjaro pytest]$ python3 random_number.py

Random number generated by quantum simulator is: 0

[dechin@dechin-manjaro pytest]$ python3 random_number.py

Random number generated by quantum simulator is: 0

[dechin@dechin-manjaro pytest]$ python3 random_number.py

Random number generated by quantum simulator is: 1
在这个案例中,每一次都会产生一个新的随机数0或者1,并且在量子比特使用结束之后,通过eng.flush(deallocate_qubits=True)可以初始化该寄存器,所有的振幅和测量结果都会被丢弃。
注意!!!
需要注意的是,由于这里我们是使用了模拟器来模拟量子计算机的行为,因此得到的随机数结果还是伪随机数。只有当这一串代码执行在量子处理器上时,我们才能得到真随机数。
pytest测试
安装pytest库
首先我们可以通过pip来更新安装pytest:
[dechin@dechin-manjaro pytest]$ python3 -m pip install -U pytest

Collecting pytest

  Downloading pytest-6.2.2-py3-none-any.whl (280 kB)

     |████████████████████████████████| 280 kB 464 kB/s

Requirement already satisfied, skipping upgrade: iniconfig in /home/dechin/anaconda3/lib/python3.8/site-packages (from pytest) (1.1.1)

Requirement already satisfied, skipping upgrade: pluggy<1.0.0a1,>=0.12 in /home/dechin/anaconda3/lib/python3.8/site-packages (from pytest) (0.13.1)

Requirement already satisfied, skipping upgrade: attrs>=19.2.0 in /home/dechin/anaconda3/lib/python3.8/site-packages (from pytest) (20.3.0)

Requirement already satisfied, skipping upgrade: toml in /home/dechin/anaconda3/lib/python3.8/site-packages (from pytest) (0.10.1)

Requirement already satisfied, skipping upgrade: packaging in /home/dechin/anaconda3/lib/python3.8/site-packages (from pytest) (20.4)

Requirement already satisfied, skipping upgrade: py>=1.8.2 in /home/dechin/anaconda3/lib/python3.8/site-packages (from pytest) (1.9.0)

Requirement already satisfied, skipping upgrade: pyparsing>=2.0.2 in /home/dechin/anaconda3/lib/python3.8/site-packages (from packaging->pytest) (2.4.7)

Requirement already satisfied, skipping upgrade: six in /home/dechin/anaconda3/lib/python3.8/site-packages (from packaging->pytest) (1.15.0)

Installing collected packages: pytest

  Attempting uninstall: pytest

    Found existing installation: pytest 6.2.1

    Uninstalling pytest-6.2.1:

      Successfully uninstalled pytest-6.2.1

Successfully installed pytest-6.2.2
安装完成后,可以通过如下指令来查看安装的pytest版本:
[dechin@dechin-manjaro pytest]$ pytest --version

pytest 6.2.2
pytest单元测试用例撰写
根据前面一个章节中的random_number.py文件,我们可以对照的写一个简单测试用例:
# test_random_number.py

import pytest

from random_number import random_number_generator as rng

def test_random_number_generator():

    for i in range(10):

        random_number = rng()

        assert random_number == 0 or random_number == 1
该测试用例的含义为:导入rng函数之后,测试10次该函数的返回值,所返回的值必须是0或者1的随机数,如果输出了这两个数字以外的返回结果,那么说明这个随机数产生器功能上存在问题。基于pytest的测试代码可以通过如下的指令来运行:
[dechin@dechin-20n2s01200 pytest]$ py.test

=========================================== test session starts ============================================

platform linux -- Python 3.8.5, pytest-6.2.2, py-1.9.0, pluggy-0.13.1

rootdir: /home/dechin/projects/2021-python/pytest

plugins: cov-2.11.1, metadata-1.11.0, html-3.1.1

collected 1 item

test_random_number.py .                                                                              [100%]

============================================= warnings summary =============================================

../../../anaconda3/lib/python3.8/site-packages/projectq/ops/_gates.py:118

  /home/dechin/anaconda3/lib/python3.8/site-packages/projectq/ops/_gates.py:118: PendingDeprecationWarning: the matrix subclass is not the recommended way to represent matrices or deal with linear algebra (see https://docs.scipy.org/doc/numpy/user/numpy-for-matlab-users.html). Please adjust your code to use regular ndarray.

    return np.matrix([[1, 0], [0, 1j]])

../../../anaconda3/lib/python3.8/site-packages/projectq/ops/_gates.py:133

  /home/dechin/anaconda3/lib/python3.8/site-packages/projectq/ops/_gates.py:133: PendingDeprecationWarning: the matrix subclass is not the recommended way to represent matrices or deal with linear algebra (see https://docs.scipy.org/doc/numpy/user/numpy-for-matlab-users.html). Please adjust your code to use regular ndarray.

    return np.matrix([[1, 0], [0, cmath.exp(1j * cmath.pi / 4)]])

test_random_number.py: 40 warnings

  /home/dechin/anaconda3/lib/python3.8/site-packages/projectq/ops/_gates.py:69: PendingDeprecationWarning: the matrix subclass is not the recommended way to represent matrices or deal with linear algebra (see https://docs.scipy.org/doc/numpy/user/numpy-for-matlab-users.html). Please adjust your code to use regular ndarray.

    return 1. / cmath.sqrt(2.) * np.matrix([[1, 1], [1, -1]])

-- Docs: https://docs.pytest.org/en/stable/warnings.html

====================================== 1 passed, 42 warnings in 0.50s ======================================
从返回的结果来看,出现了1 passed而没有failed,说明所有的测试用例都已经执行成功了,但是这里存在不少的告警warnings信息。
pytest初始化配置文件
在上一节的测试结果中,我们发现有非常多的测试告警。假如我们确认这些告警信息可以忽略,那么我们可以通过在指令中配置忽略告警信息,或者直接使用这里介绍的pytest.ini来忽略相应的告警信息:
# pytest.ini

[pytest]

filterwarnings =

        ignore::PendingDeprecationWarning
在当前目录下的ini配置文件中,我们添加了PendingDeprecationWarning作为忽略项,然后我们再回头看一下上述用例的测试结果:
[dechin@dechin-20n2s01200 pytest]$ py.test

=========================================== test session starts ============================================

platform linux -- Python 3.8.5, pytest-6.2.2, py-1.9.0, pluggy-0.13.1

rootdir: /home/dechin/projects/2021-python/pytest, configfile: pytest.ini

plugins: cov-2.11.1, metadata-1.11.0, html-3.1.1

collected 1 item

test_random_number.py .                                                                              [100%]

============================================ 1 passed in 0.50s =============================================
这里返回的结果中就没有告警信息了。
pytest生成html格式报告
为了更好的展现测试的结果,这里我们需要先安装一个组件pytest-html:
[dechin@dechin-manjaro pytest]$ python3 -m pip install pytest-html

Collecting pytest-html

  Downloading pytest_html-3.1.1-py3-none-any.whl (14 kB)

Collecting pytest-metadata

  Downloading pytest_metadata-1.11.0-py2.py3-none-any.whl (10 kB)

Requirement already satisfied: pytest!=6.0.0,>=5.0 in /home/dechin/anaconda3/lib/python3.8/site-packages (from pytest-html) (6.2.1)

Requirement already satisfied: attrs>=19.2.0 in /home/dechin/anaconda3/lib/python3.8/site-packages (from pytest!=6.0.0,>=5.0->pytest-html) (20.3.0)

Requirement already satisfied: py>=1.8.2 in /home/dechin/anaconda3/lib/python3.8/site-packages (from pytest!=6.0.0,>=5.0->pytest-html) (1.9.0)

Requirement already satisfied: toml in /home/dechin/anaconda3/lib/python3.8/site-packages (from pytest!=6.0.0,>=5.0->pytest-html) (0.10.1)

Requirement already satisfied: packaging in /home/dechin/anaconda3/lib/python3.8/site-packages (from pytest!=6.0.0,>=5.0->pytest-html) (20.4)

Requirement already satisfied: pluggy<1.0.0a1,>=0.12 in /home/dechin/anaconda3/lib/python3.8/site-packages (from pytest!=6.0.0,>=5.0->pytest-html) (0.13.1)

Requirement already satisfied: iniconfig in /home/dechin/anaconda3/lib/python3.8/site-packages (from pytest!=6.0.0,>=5.0->pytest-html) (1.1.1)

Requirement already satisfied: six in /home/dechin/anaconda3/lib/python3.8/site-packages (from packaging->pytest!=6.0.0,>=5.0->pytest-html) (1.15.0)

Requirement already satisfied: pyparsing>=2.0.2 in /home/dechin/anaconda3/lib/python3.8/site-packages (from packaging->pytest!=6.0.0,>=5.0->pytest-html) (2.4.7)

Installing collected packages: pytest-metadata, pytest-html

Successfully installed pytest-html-3.1.1 pytest-metadata-1.11.0
安装成功后,执行如下指令,可以在当前目录下生成一个指定文件名的html文件,如下图所示,就比较全面且美观的展示了测试中的信息:
[dechin@dechin-manjaro pytest]$ py.test --html=pytest_report.html

=========================================== test session starts ============================================

platform linux -- Python 3.8.5, pytest-6.2.2, py-1.9.0, pluggy-0.13.1

rootdir: /home/dechin/projects/2021-python/pytest, configfile: pytest.ini

plugins: cov-2.11.1, metadata-1.11.0, html-3.1.1

collected 1 item

test_random_number.py .                                                                              [100%]

--------- generated html file: file:///home/dechin/projects/2021-python/pytest/pytest_report.html ----------

============================================ 1 passed in 0.51s =============================================

不过在问题数量并不是很多的情况下,直接看命令行输出也是比较方便的。
pytest覆盖率测试
在一个python仓库中我们有可能有非常多的函数、类和文件等,为了保障结果的准确性,我们需要能够给出一个可信的覆盖率测试的结论,只有当覆盖率达到100%时,我们才能认为测试工作已经比较全面的考虑。当然,覆盖率100%的测试,其实并不能保障100%的不出问题,这就是另外的话题了。首先我们又需要补充安装一个组件pytest-cov:
[dechin@dechin-manjaro pytest]$ python3 -m pip install pytest-cov

Collecting pytest-cov

  Downloading pytest_cov-2.11.1-py2.py3-none-any.whl (20 kB)

Collecting coverage>=5.2.1

  Downloading coverage-5.4-cp38-cp38-manylinux2010_x86_64.whl (245 kB)

     |████████████████████████████████| 245 kB 15 kB/s

Requirement already satisfied: pytest>=4.6 in /home/dechin/anaconda3/lib/python3.8/site-packages (from pytest-cov) (6.2.1)

Requirement already satisfied: attrs>=19.2.0 in /home/dechin/anaconda3/lib/python3.8/site-packages (from pytest>=4.6->pytest-cov) (20.3.0)

Requirement already satisfied: packaging in /home/dechin/anaconda3/lib/python3.8/site-packages (from pytest>=4.6->pytest-cov) (20.4)

Requirement already satisfied: iniconfig in /home/dechin/anaconda3/lib/python3.8/site-packages (from pytest>=4.6->pytest-cov) (1.1.1)

Requirement already satisfied: toml in /home/dechin/anaconda3/lib/python3.8/site-packages (from pytest>=4.6->pytest-cov) (0.10.1)

Requirement already satisfied: py>=1.8.2 in /home/dechin/anaconda3/lib/python3.8/site-packages (from pytest>=4.6->pytest-cov) (1.9.0)

Requirement already satisfied: pluggy<1.0.0a1,>=0.12 in /home/dechin/anaconda3/lib/python3.8/site-packages (from pytest>=4.6->pytest-cov) (0.13.1)

Requirement already satisfied: six in /home/dechin/anaconda3/lib/python3.8/site-packages (from packaging->pytest>=4.6->pytest-cov) (1.15.0)

Requirement already satisfied: pyparsing>=2.0.2 in /home/dechin/anaconda3/lib/python3.8/site-packages (from packaging->pytest>=4.6->pytest-cov) (2.4.7)

Installing collected packages: coverage, pytest-cov

Successfully installed coverage-5.4 pytest-cov-2.11.1
然后在当前目录下执行以下指令:
[dechin@dechin-manjaro pytest]$ py.test --cov=random_number ./ --cov-report=html

=========================================== test session starts ============================================

platform linux -- Python 3.8.5, pytest-6.2.1, py-1.9.0, pluggy-0.13.1

rootdir: /home/dechin/projects/2021-python/pytest, configfile: pytest.ini

plugins: cov-2.11.1, metadata-1.11.0, html-3.1.1

collected 1 item

test_random_number.py .                                                                              [100%]

----------- coverage: platform linux, python 3.8.5-final-0 -----------

Coverage HTML written to dir htmlcov

============================================ 1 passed in 0.76s =============================================
这里会提示我们去htmlcov目录下找测试报告,我们打开相应的index.html文件,效果如下:

这里我们看到random_number.py文件的测试覆盖率为86%,我们可以点开链接查看剩下未覆盖的测试是什么内容:

原来是main函数中的几行指令没有被测试到,一般我们在正式仓库中,是需要去掉main函数的,如果不是测试文件的话。
使用flake8进行python编码规范检查
首先我们还是使用pip来直接安装flake8组件,其集成了PEP8的python编码规范:
[dechin@dechin-manjaro pytest]$ python3 -m pip install -U flake8

Requirement already up-to-date: flake8 in /home/dechin/anaconda3/lib/python3.8/site-packages (3.8.4)

Requirement already satisfied, skipping upgrade: mccabe<0.7.0,>=0.6.0 in /home/dechin/anaconda3/lib/python3.8/site-packages (from flake8) (0.6.1)

Requirement already satisfied, skipping upgrade: pyflakes<2.3.0,>=2.2.0 in /home/dechin/anaconda3/lib/python3.8/site-packages (from flake8) (2.2.0)

Requirement already satisfied, skipping upgrade: pycodestyle<2.7.0,>=2.6.0a1 in /home/dechin/anaconda3/lib/python3.8/site-packages (from flake8) (2.6.0)
查看安装的flake8版本号:
[dechin@dechin-manjaro pytest]$ flake8 --version

3.8.4 (mccabe: 0.6.1, pycodestyle: 2.6.0, pyflakes: 2.2.0) CPython 3.8.5 on Linux
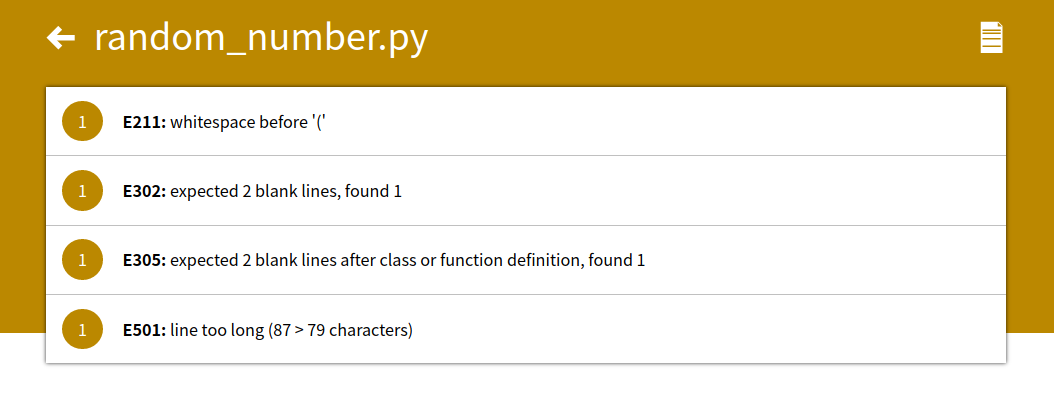
使用方式较为简单,在当前目录下直接执行flake8即可,检查项会以当前路径为rootdir,递归的进行检索:
[dechin@dechin-manjaro pytest]$ flake8

./test_random_number.py:2:1: F401 'pytest' imported but unused

./test_random_number.py:5:1: E302 expected 2 blank lines, found 1

./random_number.py:5:1: E302 expected 2 blank lines, found 1

./random_number.py:15:1: E305 expected 2 blank lines after class or function definition, found 1

./random_number.py:17:10: E211 whitespace before '('

./random_number.py:17:80: E501 line too long (87 > 79 characters)
假如我们不想包含测试用例的风格检查,我们可以在命令行中屏蔽相关文件,或者创建配置文件,在配置文件中屏蔽相关文件,这里介绍后者的使用方法:
# .flake8

[flake8]

exclude = ./test*
这个配置的意义在于,将当前目录下,所有以test开头的文件,都将会忽略python编码规范的检查,配置文件支持通配符的表达形式。接下来看下最新的执行结果:
[dechin@dechin-manjaro pytest]$ flake8

./random_number.py:5:1: E302 expected 2 blank lines, found 1

./random_number.py:15:1: E305 expected 2 blank lines after class or function definition, found 1

./random_number.py:17:10: E211 whitespace before '('

./random_number.py:17:80: E501 line too long (87 > 79 characters)
我们发现前面出现的关于测试用例中的编码规范,已经不在这个列表的范围了。这个列表中的问题我们一般最好是处理下,但是如果遇到一些判断不需要处理的规范,则同样可以在配置文件中添加相应的规范ID,这里仅作示例使用,前面显示的编码规范问题后面都会改。如下所示就是两个忽略:
# .flake8

[flake8]

exclude = ./test*

ignore = E302, E305
对应的执行结果如下所示:
[dechin@dechin-manjaro pytest]$ flake8

./random_number.py:17:10: E211 whitespace before '('

./random_number.py:17:80: E501 line too long (87 > 79 characters)
我们发现被忽略的问题已经没有显示了。flake8还有一个特点,是可以配置max-complexity,其采用的基本复杂性计算方法为McCabe度量法,可以参考这篇博客中的介绍内容,这里就不过多的赘述。为了更加美观简明的看到输出的结果,我们可以补充安装一个组件flake8-html:
[dechin@dechin-manjaro pytest]$ python3 -m pip install flake8-html

Collecting flake8-html

  Downloading flake8_html-0.4.1-py2.py3-none-any.whl (13 kB)

Requirement already satisfied: pygments>=2.2.0 in /home/dechin/anaconda3/lib/python3.8/site-packages (from flake8-html) (2.7.2)

Requirement already satisfied: flake8>=3.3.0 in /home/dechin/anaconda3/lib/python3.8/site-packages (from flake8-html) (3.8.4)

Requirement already satisfied: jinja2>=2.9.0 in /home/dechin/anaconda3/lib/python3.8/site-packages (from flake8-html) (2.11.2)

Requirement already satisfied: importlib-metadata in /home/dechin/anaconda3/lib/python3.8/site-packages (from flake8-html) (2.0.0)

Requirement already satisfied: pycodestyle<2.7.0,>=2.6.0a1 in /home/dechin/anaconda3/lib/python3.8/site-packages (from flake8>=3.3.0->flake8-html) (2.6.0)

Requirement already satisfied: mccabe<0.7.0,>=0.6.0 in /home/dechin/anaconda3/lib/python3.8/site-packages (from flake8>=3.3.0->flake8-html) (0.6.1)

Requirement already satisfied: pyflakes<2.3.0,>=2.2.0 in /home/dechin/anaconda3/lib/python3.8/site-packages (from flake8>=3.3.0->flake8-html) (2.2.0)

Requirement already satisfied: MarkupSafe>=0.23 in /home/dechin/anaconda3/lib/python3.8/site-packages (from jinja2>=2.9.0->flake8-html) (1.1.1)

Requirement already satisfied: zipp>=0.5 in /home/dechin/anaconda3/lib/python3.8/site-packages (from importlib-metadata->flake8-html) (3.4.0)

Installing collected packages: flake8-html

Successfully installed flake8-html-0.4.1
使用方法如下:
[dechin@dechin-20n2s01200 pytest]$ flake8 --format=html --htmldir=flake-report

./random_number.py has issues: medium: 4
在当前目录执行后,相关的规范的issue就不会在命令行里面逐一显示,都在flake-report目录下的index.html中可以查看:

我们可以点击进入相应文件的issue清单中去查看:
可以点击每一个issue,展开内容中包含了issue所对应行的代码内容:

经过一番修改之后,我们得到的flake8配置文件和源代码文件如下:
# .flake8

[flake8]

exclude = ./test*

ignore = W391
# random_number.py

from projectq import MainEngine

from projectq.ops import H, Measure

def random_number_generator():

    eng = MainEngine()

    qubit = eng.allocate_qubit()

    H | qubit

    eng.flush()

    Measure | qubit

    random_number = int(qubit)

    eng.flush(deallocate_qubits=True)

    return random_number

if __name__ == '__main__':

    random_number = random_number_generator()

    print('Random number generated by quantum simulator is:\

            {}'.format(random_number))
最终我们的目的是使得flake8执行的issue清零:
[dechin@dechin-manjaro pytest]$ flake8 --format=html --htmldir=flake-report

[dechin@dechin-manjaro pytest]$
总结概要
本文通过引入一个随机数生成器的案例,介绍了在量子计算中产生真随机数的方案,同时给出了量子计算模拟实现。借此机会也同时介绍了python的单元测试库pytest的一些常规和扩展使用方法,以及python的编码规范测试库flake8的基本使用方法,希望能够对大家有所启发以及帮助。
版权声明
本文首发链接为:https://www.cnblogs.com/dechinphy/p/random_number_test.html
作者ID:DechinPhy
更多原著文章请参考:https://www.cnblogs.com/dechinphy/
参考链接
用量子计算模拟器ProjectQ生成随机数,并用pytest进行单元测试与覆盖率测试的更多相关文章
- 用 150 行 Python 代码写的量子计算模拟器
简评:让你更轻松地明白,量子计算机如何遵循线性代数计算的. 这是个 GItHub 项目,可以简单了解一下. qusim.py 是一个多量子位的量子计算机模拟器(玩具?),用 150 行的 python ...
- 使用开源量子编程框架ProjectQ打印编译后的量子线路与绘制线路图
技术背景 在量子计算领域,基于量子芯片的算法设计(或简称为量子算法)是基于量子线路来设计的,类似于传统计算中使用的与门和非门之类的逻辑门.因此研究一个量子线路输入后的编译(可以简化为数量更少的量子门组 ...
- (摘)C#生成随机数的三种方法
随机数的定义为:产生的所有数字毫无关系. 在实际应用中很多地方会用到随机数,比如需要生成唯一的订单号. 在C#中获取随机数有三种方法: 一.Random 类 Random类默认的无参构造函数可以根据当 ...
- C#生成随机数的三种方法
随机数的定义为:产生的所有数字毫无关系. 在实际应用中很多地方会用到随机数,比如需要生成唯一的订单号. 在C#中获取随机数有三种方法: 一.Random 类 Random类默认的无参构造函数可以根据当 ...
- kbmMW基于硬件生成随机数
按作者的说法,Delphi提供的生成随机数不是真正随机的,因为他是根据种子计算的,即种子+算法生成的随机数,如果被人知道原始种子值和算法的调用次数,则可以重现随机数,因此在安全领域,这是不安全的.同时 ...
- C# Random循环生成随机数重复问题解决方案
C# Random循环生成随机数重复问题解决方案1.当我们通过Random生成随机数时,习惯的写法如下: int a=new Random().Next(0,100); 然后生成一个数据数没有任何问题 ...
- centos 阶段复习 2015-4-6 dd命令 hosts.allow和hosts.deny 啊铭的myssh脚本 清空history命令历史 /dev/zero 零发生器 /dev/null 黑洞 /dev/random 生成随机数 第十一节课
centos 阶段复习 2015-4-6 dd命令 hosts.allow和hosts.deny 啊铭的myssh脚本 清空history命令历史 /dev/zero 零发生器 /dev/nul ...
- QuantLib 金融计算——数学工具之随机数发生器
目录 QuantLib 金融计算--数学工具之随机数发生器 概述 伪随机数 正态分布(伪)随机数 拟随机数 HaltonRsg SobolRsg 两类随机数的收敛性比较 如果未做特别说明,文中的程序都 ...
- numpy生成随机数
如果你想说,我不想知道里面的逻辑和实现方法,只想要python生成随机数的代码,请移步本文末尾,最简单的demo帮你快速获取实现方法. 先开始背景故事说明: 在数据分析中,数据的获取是第一步,nump ...
随机推荐
- Hive调优相关
前言 Hive是由Facebook 开源用于解决海量结构化日志的数据统计,是基于Hadoop 的一个数据仓库工具,可以将结构化的数据文件映射为一张表,并提供类 SQL查询功能. 在资源有限的情况下,提 ...
- HDU-6881 Tree Cutting (HDU多校D10T5 点分治)
HDU-6881 Tree Cutting 题意 \(n\) 个点的一棵树,要求删除尽量少的点,使得删点之后还是一棵树,并且直径不超过 \(k\),求删除点的数量 分析 补题之前的一些错误想法: 尝试 ...
- Codeforces Round #651 (Div. 2) E. Binary Subsequence Rotation(dp)
题目链接:https://codeforces.com/contest/1370/problem/E 题意 给出两个长为 $n$ 的 $01$ 串 $s$ 和 $t$,每次可以选择 $s$ 的一些下标 ...
- 2019HDU多校 Round10
Solved:3 Rank:214 08 Coin 题意:n组硬币 每组有两个 分别有自己的价值 每组的第一个被拿了之后才能拿第二个 问拿1,2....2n个硬币的最大价值 题解:之前贪心带反悔的做法 ...
- 【poj 1984】&【bzoj 3362】Navigation Nightmare(图论--带权并查集)
题意:平面上给出N个点,知道M个关于点X在点Y的正东/西/南/北方向的距离.问在刚给出一定关系之后其中2点的曼哈顿距离((x1,y1)与(x2,y2):l x1-x2 l+l y1-y2 l),未知则 ...
- 【POJ 2411】【Mondriaans Dream】 状压dp+dfs枚举状态
题意: 给你一个高为h,宽为w的矩阵,你需要用1*2或者2*1的矩阵填充它 问你能有多少种填充方式 题解: 如果一个1*2的矩形横着放,那么两个位置都用二进制1来表示,如果是竖着放,那么会对下一层造成 ...
- Educational Codeforces Round 94 (Rated for Div. 2) String Similarity、RPG Protagonist、Binary String Reconstruction、Zigzags 思维
题目链接:String Similarity 题意: 首先题目定义了两个串的相似(串的构成是0.1),如果两个串存在对于一个下标k,它们的值一样,那么这两个串就相似 然后题目给你一个长度为2n-1的串 ...
- Python 是什么语言
Python 是 解释型语言,强类型定义语言,动态类型定义语言 编译型语言 & 解释型语言 编译型语言:代码在执行前,需要编译(成机器语言文件,如 .exe 文件):以后再运行时,直接使用编译 ...
- 鸟哥的linux私房菜——第七章学习(Linux 磁盘与文件系统管理)
1.1).文件系统特征 我们称呼一个可被挂载的数据为一个文件系统而不是一个分区! 文件系统通常会将这两部份的数据分别存放在不同的区块,权限与属性放置到 inode 中,至于实际数据则放置到 data ...
- Java之一个整数的二进制中1的个数
这是今年某公司的面试题: 一般思路是:把整数n转换成二进制字符数组,然后一个一个数: private static int helper1(int i) { char[] chs = Integer. ...