IdentityServer4 (4) 静默刷新(Implicit)
写在前面
1、源码(.Net Core 2.2)
git地址:https://github.com/yizhaoxian/CoreIdentityServer4Demo.git
2、相关章节
2.1、《IdentityServer4 (1) 客户端授权模式(Client Credentials)》
2.2、《IdentityServer4 (2) 密码授权(Resource Owner Password)》
2.3、《IdentityServer4 (3) 授权码模式(Authorization Code)》
2.4、《IdentityServer4 (4) 静默刷新(Implicit)》
2.5、《IdentityServer4 (5) 混合模式(Hybrid)》
3、参考资料
IdentityServer4 中文文档 http://www.identityserver.com.cn/
IdentityServer4 英文文档 https://identityserver4.readthedocs.io/en/latest/
OpenID Connect 官网 https://openid.net/connect/
OpenID Connect 中文 https://www.cnblogs.com/linianhui/p/openid-connect-core.html
OpenID Connect和OAuth 2.0对比:https://www.jianshu.com/p/d453076e6433
Oauth 2.0 官网:https://oauth.net/2/
Oauth 2.0 授权框架:https://tools.ietf.org/html/rfc6749#section-4.2.1
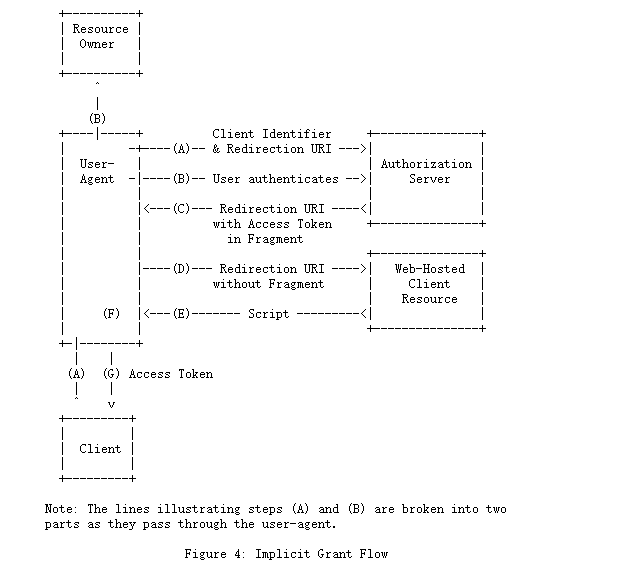
4、流程图

1、客户端准备一个包含所需请求参数的身份验证请求。
2、客户端将请求发送到授权服务器(填写账号密码)。
3、授权服务器对最终用户进行身份验证(验证账号密码和客户端)。
4、授权服务器获得最终用户同意/授权。
5、授权服务器使用IdToken和AccessToken(如果要求)将最终用户发送回客户端。
一、服务端
1、添加客户端
   new Client{

       ClientId="mvc client implicit", //客户端Id

       ClientName="测试客户端 Implicit", //客户端名称 随便写

       //Implicit 模式 因为token 是通过浏览器发送给客户端的,这里必须启用

      AllowAccessTokensViaBrowser=true,

       AllowedGrantTypes=GrantTypes.Implicit,//验证模式

       RedirectUris = {

           "http://localhost:5003/callback.html",

            // AccessToken 有效期比较短,刷新 AccessToken 的页面

           "http://localhost:5003/silentref.html",

       },

       //是否需要用户点击同意,这里需要设置为 false,不然客户端静默刷新不可用

       RequireConsent=false,

       AllowedCorsOrigins={ "http://localhost:5003" },

       //注销重定向的url

       PostLogoutRedirectUris = { "http://localhost:5003" },

       AccessTokenLifetime=,

       //客户端访问权限

       AllowedScopes =

       {

           "api1",

           IdentityServerConstants.StandardScopes.OpenId,

           IdentityServerConstants.StandardScopes.Email,

           IdentityServerConstants.StandardScopes.Address,

           IdentityServerConstants.StandardScopes.Phone,

           IdentityServerConstants.StandardScopes.Profile

       }

   },
二、客户端
1、下载 oidc-client 库
git地址:https://github.com/IdentityModel/oidc-client-js
2、添加测试页面
我直接使用的/home/index 在里面添加请求授权代码
<style>

    .box {

        height: 200px;

        overflow: auto;

        border: 1px solid #ccc

    }

    .btn-box {

        margin-top: 10px;

    }

        .btn-box button {

            margin-right: 10px;

        }

</style>

<div class="row btn-box">

    <button class="btn btn-primary" onclick="login()">登陆 Implicit</button>

    <button class="btn btn-primary" onclick="getuser()">获取 User Implicit</button>

    <button class="btn btn-primary" onclick="getapi()">测试 API Implicit</button>

    <button class="btn btn-primary" onclick="removeUser()">清除 User Implicit</button>

    <button class="btn btn-primary" onclick="iframeSignin()">刷新 User Implicit</button>

</div>

<hr />

<div class="row">

    <h3>User:</h3>

    <div id="userinfo" class="col-md-12 box">

    </div>

</div>

<div class="row">

    <h3>API:</h3>

    <div id="apiresult" class="col-md-12 box">

    </div>

</div>

@section Scripts{

    <script src="~/lib/oidc/oidc-client.min.js"></script>

    <script type="text/javascript">

        Oidc.Log.logger = window.console;

        Oidc.Log.level = Oidc.Log.DEBUG;

        var log = function (msg) { console.log(msg); }

        var testconfig = {

            authority: "http://localhost:5002",

            client_id: "mvc client implicit",

            redirect_uri: "http://localhost:5003/callback.html",

            response_type: "id_token token",

            scope: "api1 openid email phone address profile",

            clockSkew: ,

            //启用静默刷新token

            silent_redirect_uri: "http://localhost:5003/silentref.html",

            automaticSilentRenew: true,

        };

        var mgr = new Oidc.UserManager(testconfig);

        mgr.events.addUserLoaded(function (user) {

            console.log("user loaded", user);

            mgr.getUser().then(function () {

                console.log("getUser loaded user after userLoaded event fired");

            });

        });

        mgr.events.addUserUnloaded(function () {

            console.log("user unloaded");

        });

        mgr.events.addAccessTokenExpiring(function () {

            log("Access token expiring..." + new Date());

        });

        mgr.events.addSilentRenewError(function (err) {

            log("Silent renew error: " + err.message);

        });

        mgr.events.addUserSignedOut(function () {

            log("User signed out of OP");

            mgr.removeUser();

        });

        var login = function () {

            mgr.signinRedirect();

        };

        var getuser = function () {

            mgr.getUser().then(function (user) {

                log("got user");

                $('#userinfo').html(JSON.stringify(user));

            }).catch(function (err) {

                log(err);

            });

        };

        var removeUser = function () {

            mgr.removeUser().then(function () {

                log("user removed");

            }).catch(function (err) {

                log(err);

            });

        }

        var iframeSignin = function () {

            mgr.signinSilent().then(function (user) {

                log("signed in", user);

            }).catch(function (err) {

                log(err);

            });

        }

        var getapi = function (token) {

            mgr.getUser().then(function (user) {

                log("get user success");

                document.getElementById('userinfo').innerHTML = JSON.stringify(user);

                var settings = {

                    url: 'http://localhost:5001/api/suibian',

                    beforeSend: function (xhr) {

                        xhr.setRequestHeader('Authorization', 'Bearer ' + user.access_token)

                        console.log("beforeSend", xhr)

                    },

                    success: function (res) {

                        console.log("api result success:", res);

                        $('#apiresult').html(JSON.stringify(res));

                    }, error: function (res) {

                        console.log("api result error:", res);

                        $('#apiresult').html(res.responseText);

                    }

                }

                $.ajax(settings);

            }).catch(function (err) {

                log(err);

            });

        };

    </script>

}
3、登陆回调页面
<!DOCTYPE html>

<html>

<head>

    <meta charset="utf-8" />

    <title>Oidc-Client</title>

    <script src="lib/oidc/oidc-client.min.js"></script>

</head>

<body>

    登陆中...

</body>

</html>

<script>

    new Oidc.UserManager().signinRedirectCallback().then(function (user) {

        //console.log("signin response success");

        //console.log(user)

        //document.getElementById("message").innerText = JSON.stringify(user);

        location.href = "/home";

    }).catch(function (err) {

        console.log(err);

    });

</script>
4、自动刷新页面
<!DOCTYPE html>

<html>

<head>

    <meta charset="utf-8" />

    <title>Oidc-Client</title>

</head>

<body>

    <h1>Silent.html</h1>

</body>

</html>

<script src="lib/oidc/oidc-client.min.js"></script>

<script>

    new Oidc.UserManager().signinSilentCallback()

        .catch((err) => {

            console.log("refresh", err);

        });

</script>
5、页面结构目录

三、API资源
1、修改StartUp.cs
ConfigureServices()
   services.AddCors(options =>

   {

       options.AddPolicy("client1", policy =>

       {

           //客户端地址

           policy.WithOrigins("http://localhost:5003");

           policy.AllowAnyHeader();

           policy.AllowAnyMethod();

       });

   });

   JwtSecurityTokenHandler.DefaultInboundClaimTypeMap.Clear();

   services.AddAuthentication(JwtBearerDefaults.AuthenticationScheme)

   .AddJwtBearer(JwtBearerDefaults.AuthenticationScheme, options =>

   {

       // IdentityServer 地址

       options.Authority = "http://localhost:5002";

       //不需要https

       options.RequireHttpsMetadata = false;

       //这里要和 IdentityServer 定义的 api1 保持一致

       options.Audience = "api1";

       //token 默认容忍5分钟过期时间偏移,这里设置为0,

       //这里就是为什么定义客户端设置了过期时间为5秒,过期后仍可以访问数据

       options.TokenValidationParameters.ClockSkew = TimeSpan.Zero;

       options.Events = new JwtBearerEvents

       {

           //AccessToken 验证失败

           OnChallenge = op =>

           {

               //跳过所有默认操作

               op.HandleResponse();

               //下面是自定义返回消息

               //op.Response.Headers.Add("token", "401");

               op.Response.ContentType = "application/json";

               op.Response.StatusCode = StatusCodes.Status401Unauthorized;

               op.Response.WriteAsync(JsonConvert.SerializeObject(new

               {

                   status = StatusCodes.Status401Unauthorized,

                   msg = "token无效",

                   error = op.Error

               }));

               return Task.CompletedTask;

           }

       };

   });
Configure()
   app.UseStaticFiles();

   //这里注意 一定要在 UseMvc前面,顺序不可改变

   app.UseAuthentication();

   app.UseCors("client1");
三、测试
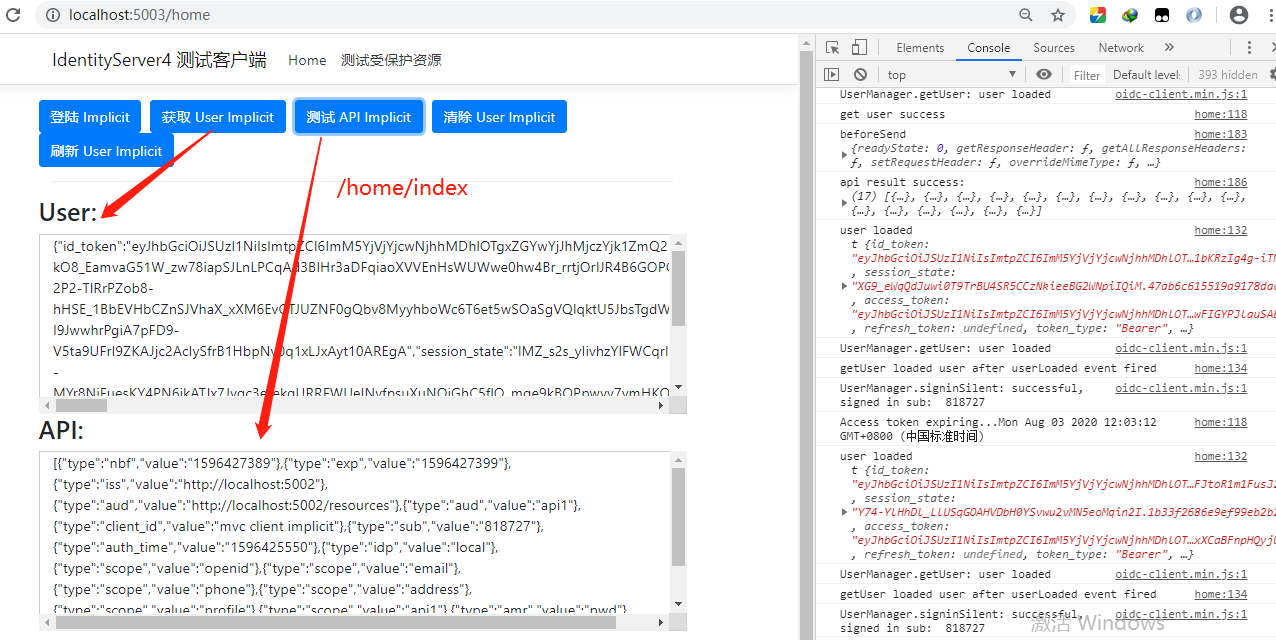
可以看到右侧console 再自动刷新

IdentityServer4 (4) 静默刷新(Implicit)的更多相关文章
- IdentityServer4 (1) 客户端授权模式(Client Credentials)
写在前面 1.源码(.Net Core 2.2) git地址:https://github.com/yizhaoxian/CoreIdentityServer4Demo.git 2.相关章节 2.1. ...
- IdentityServer4 (2) 密码授权(Resource Owner Password)
写在前面 1.源码(.Net Core 2.2) git地址:https://github.com/yizhaoxian/CoreIdentityServer4Demo.git 2.相关章节 2.1. ...
- IdentityServer4 (3) 授权码模式(Authorization Code)
写在前面 1.源码(.Net Core 2.2) git地址:https://github.com/yizhaoxian/CoreIdentityServer4Demo.git 2.相关章节 2.1. ...
- IdentityServer4笔记整理(更新中)
1 OAuth 2.0 1.1 OAuth 2.0协议流程图 1.2 授权码模式 1.3 简化模式 1.4 资源所有者密码模式 1.5 客户端凭证模式 2 OpenID Connect(OIDC) 2 ...
- Chrome80调整SameSite策略对IdentityServer4的影响以及处理方案(翻译)
首先,好消息是Goole将于2020年2月份发布Chrome 80版本.本次发布将推进Google的"渐进改良Cookie"策略,打造一个更为安全和保障用户隐私的网络环境. 坏消息 ...
- 从零搭建一个IdentityServer——单页应用身份验证
上一篇文章我们介绍了Asp.net core中身份验证的相关内容,并通过下图描述了身份验证及授权的流程: 注:改流程图进行过修改,第三方用户名密码登陆后并不是直接获得code/id_token/acc ...
- bootstraptable 必备知识点
1.如何动态刷新表中数据? (1).无参刷新: $("#table").bootstrapTable('refresh'); (2).带参刷新: var opt = { url: ...
- 理解ASP.NET Core - 基于JwtBearer的身份认证(Authentication)
注:本文隶属于<理解ASP.NET Core>系列文章,请查看置顶博客或点击此处查看全文目录 在开始之前,如果你还不了解基于Cookie的身份认证,那么建议你先阅读<基于Cookie ...
- IdentityServer4之Implicit和纯前端好像很配哦
前言 上一篇Resource Owner Password Credentials模式虽然有用户参与,但对于非信任的第三方的来说,使用这种模式是有风险的,所以相对用的不多:这里接着说说implicit ...
随机推荐
- java IO流 (六) 其它的流的使用
1. 标准的输入输出流:System.in:标准的输入流,默认从键盘输入System.out:标准的输出流,默认从控制台输出 修改默认的输入和输出行为:System类的setIn(InputStrea ...
- Django 【基础篇】
前戏 python Web程序 众所周知,对于所有的Web应用,本质上其实就是一个socket服务端,用户的浏览器其实就是一个socket客户端. #!/usr/bin/env python #cod ...
- Nslookup命令的使用 - [详细]
用法一.查询IP地址 nslookup最简单的用法就是查询域名对应的IP地址,包括A记录和CNAME记录,如果查到的是CNAME记录还会返回别名记录的设置情况.其用法是: nslookup 域名 # ...
- Spring AOP里的静态代理和动态代理,你真的了解嘛?
什么是代理? 为某一个对象创建一个代理对象,程序不直接用原本的对象,而是由创建的代理对象来控制原对象,通过代理类这中间一层,能有效控制对委托类对象的直接访问,也可以很好地隐藏和保护委托类对象,同时也为 ...
- oop的三种设计模式(单例、工厂、策略)
参考网站 单例模式: 废话不多说,我们直接上代码: <?php /** 三私一公 *私有的静态属性:保存类的单例 *私有的__construct():阻止在类的外部实例化 *私有的__clone ...
- 手写简易SpringMVC
手写简易SpringMVC 手写系列框架代码基于普通Maven构建,因此在手写SpringMVC的过程中,需要手动的集成Tomcat容器 必备知识: Servlet相关理解和使用,Maven,Java ...
- T2 监考老师 题解
第二题,他并不是多难的算法.甚至连搜索都不用,他的题目要求和数据断定了他第二题的地位. 在一个大试场里,有 n 行 m 列的考生,小王和众多同学正在考试,这时,有一部分考生 作弊,当然,监考老师能发现 ...
- 时间序列知识图谱-《利用Python进行数据分析》
所有内容整理自<利用Python进行数据分析>,使用MindMaster Pro 7.3制作,emmx格式,源文件已经上传Github,需要的同学转左上角自行下载或者右击保存图片. 其他章 ...
- UVa 548 Tree(中序遍历+后序遍历)
给一棵点带权(权值各不相同,都是小于10000的正整数)的二叉树的中序和后序遍历,找一个叶子使得它到根的路径上的权和最小.如果有多解,该叶子本身的权应尽量小.输入中每两行表示一棵树,其中第一行为中序遍 ...
- STL源码剖析:配接器
启 配接器就是适配器 STL中的适配器一共三种: 迭代器适配器 是一种观念上的改变,如将赋值操作变成插入,前进变成后退,等 函数适配器 STL中最广泛的配接器群体 可以实现连续配接 配接操作:bind ...
